IIS 5: Setting up SSL - Appendix C: Processing a Certificate Request

When you manage a certificate server, you will periodically need to issue certificates to requestors. To to so, use the following steps:

  1. Open the "Certificate Authority" administrative tool:

  2. Click on "Pending Requests":

  3. Right-click the pending request and choose "All Tasks", then click "Issue":

  4. The certificate will now show up under "Issued Certificates":

IIS 5: Setting up SSL - Appendix B: Obtaining a Root Certificate

Obtaining a root certificate is one of the most important steps for servers or clients that will use certificates that you issue. While this step is not necessary on the server where you installed Certificate Services, it is absolutely essential on your other servers or clients because it allows those computers to trust you as a Certificate Authority. Without that trust in place, you will either receive error messages or SSL simply won't work.

This process is broken into two steps:


Downloading the Root Certificate

  1. Browse to your certificate server's address, (e.g. http://<server-name>/certsrv/), and choose to retrieve the CA certificate:

  2. Click the link to download the CA certificate:

  3. Choose to save the certificate file to disk:

  4. Save the file to your desktop:


Installing the Root Certificate

Before using any certificates that you issue on a computer, you need to install the Root Certificate. (This includes web servers and clients.)

  1. Double-click the file on your desktop:

  2. Click the "Install Certificate" button:

  3. Click "Next" to start the Certificate Import Wizard:

  4. Choose to automatically choose the store:

  5. Click the "Finish" button:

  6. Click "Yes" when asked if you want to add the certificate:

    NOTE: This step is very important. If you do not see this dialog, something went wrong.
  7. Click "OK" when informed that the import was successful.

IIS 5: Setting up SSL - Appendix A: Installing Certificate Services

In this blog post I'll discuss installing Certificate Services for Windows 2000 in order to test SSL in your environment. To install Certificate Services, use the following steps:

  1. Run the "Windows Component Wizard" in "Add/Remove Programs", choose "Certificate Services", and click "Next":

  2. Choose "Stand-alone root CA", then click "Next":

  3. Enter all requested information, then click "Next":

  4. Accept the defaults for the data locations and click "Next":

  5. The wizard will step through installing the services:

  6. When the wizard has completed, click "Finish" to exit the wizard:

IIS 5: Setting up SSL - Part 3: Installing a Certificate

Installing Your Certificate

  1. Bring up the properties for a web site:

  2. Switch to the "Directory Security" tab and click "Server Certificate:"

  3. Click "Next" to bypass the first page:

  4. Choose to process the request and click "Next":

  5. Browse to the location of your certificate and click "Next":

  6. Review the information to make sure it is correct and click "Next":

  7. Click "Finish" to close the wizard:

  8. Notice that you now have all the buttons available for SSL.


Verifying Your Certificate

  1. Bring up the properties for a web site:

  2. Switch to the "Directory Security" tab and click "View Certificate":
  3. On the "General" tab, if the certificate is good you will see a normal certificate icon. (If not, you will see a warning or error icon.)

  4. On the "Certification Path" tab you will see your certificate hierarchy:

IIS 5: Setting up SSL - Part 2: Obtaining a Certificate

Typically you would submit your certificate request to any one of several Certificate Authorities (CA). There are several that are available, but here are just a few:

The steps to obtain a certificate differ for each CA, and it would be way outside the scope of my limited blogspace to include the steps for every CA on the Internet. So for my blog series I'm going to show how to use Certificate Services on Windows 2000 to obtain a certificate. This process is broken into three steps:

  1. Submit the Certificate Request
  2. Certificate Processing
  3. Obtain the Certificate

Step 1 - Submit the Certificate Request

  1. Browse to the "Certificate Services" web site, choose to "Request a Certificate", then click "Next":

  2. Choose "Advanced request", then click "Next":

  3. Choose the option to submit a request using a base64 encoded file, then click "Next":

  4. Copy the text from your certificate request file and paste it into the "Base64 Encoded Certificate Request" text box, then click "Submit":

  5. By default, Certificate Services will return a message stating that your certificate is pending. You will need to notify your Certificate Services administrator that your certificate needs to be approved.


Step 2 - Certificate Processing

At this point the Certificate Authority (CA) will consider your request. (See processing a Certificate Request for details on issuing your own requests.)


Step 3 - Obtain the Certificate

  1. Browse to the "Certificate Services" web site, choose to "Check on a Pending Certificate", then click "Next":

  2. Highlight your approved request, then click "Next":

  3. Click the link to "Download CA certificate":

  4. When prompted, choose to save the file to disk, then click "OK":

  5. Save the file to somewhere convenient, like your desktop:

  6. When you have saved the file to your computer, Windows Explorer will display the file with an icon that indicates that it contains a certificate:

IIS 5: Setting up SSL - Part 1: Making a Request

  1. Bring up the properties for a web site:

  2. Switch to the "Directory Security" tab and click "Server Certificate:"

  3. Click "Next" to bypass the first page:

  4. Choose to "Create a new certificate" and click "Next":

  5. Choose to "Prepare the request now, but send later" and click "Next":

  6. Enter a friendly "Name" for the request, and your desired "Bit length". (SGC certificates are only necessary for overseas customers.) Click "Next":

  7. Enter your "Organization" and "Organization unit", then click "Next":

  8. Enter the "Common name" for your site then click "Next":

    Note: This must be the actual web address that users will browse to when they hit your site.

  9. Enter your "Country", "State", and "City", then click "Next":

  10. Enter the "File name" for your request, then click Next:

  11. Review the information for your request, then click Next:

  12. Click "Finish" to exit the wizard.

FYI: If you were to open your request file in Notepad, it will look something like the following:

IIS 5: Setting up SSL - Overview

I wrote a series of instructions for my coworkers some time ago in order to show how to set up and enable Secure Sockets Layer (SSL) communications in IIS. I've had to troubleshoot a bunch of SSL issues over the years, so I thought that it would be a good idea to turn my notes into a blog series.

By way of explanation, setting up SSL on IIS is pretty simple. SSL is a Public Key/Private Key technology, and setting up SSL is essentially obtaining a Public Key from a trusted organization. The basic process for working with SSL is reduced to the following actions:

  1. Creating a Certificate Request
  2. Obtaining a Certificate from a Certificate Authority
  3. Installing the Certificate

While not necessary, installing certificate services on your computer is helpful when troubleshooting SSL issues, and I'll discuss that later in this blog series.

Creating a Certificate Request

This is a series of steps that need to be performed on the web server, and they differ widely depending on the server and version. A web administrator is required to enter information about their organization, their locality, etc. This information will be used to validate the requester.

Obtaining a Certificate from a Certificate Authority

This is when a web administrator submits their request for a certificate to a Certificate Authority (CA), which is a trusted organization like VeriSign or Thawte. For a list of trusted organizations, see the following section in Internet Explorer.
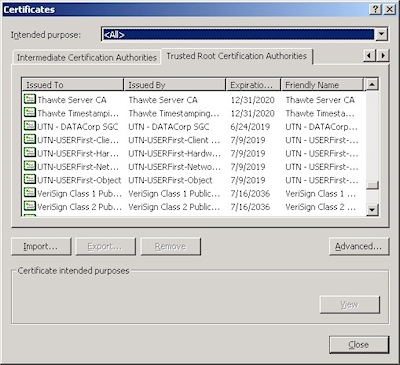
You can choose to trust a new CA by obtaining the Root Certificate from the CA. (I'll post an Obtaining a Root Certificate blog with more information later.)

Installing the Certificate

After a request has been processed by a CA, the web administrator needs to install the certificate on the web server. Once again, this series of steps needs to be performed on the web server, and the steps differ depending on the web server and version.

For the Future...

In future blogs I'll go through the steps for creating certificate requests, obtaining certificates from a CA, and installing certificates. Following that, I'll discuss setting up a CA for testing SSL in your environment.