FTP Clients - Part 16: NetDrive
30 November 2014 • by Bob • FTP, SSL
For the next installments in my series about FTP clients, I will be taking a look at two FTP redirectors at the same time. In this specific blog post, I will focus on NetDrive (from Bdrive Inc.), whereas my previous post looked at WebDrive (from South River Technologies).
At the time of this blog's writing, NetDrive is a for-retail FTP client and redirector which is available from the following URL:
For this blog post I will be using NetDrive version 2.3.2.
NetDrive 2.3 Overview
NetDrive is different from many of the other FTP clients that I have reviewed because it is an Internet protocol redirector, meaning that it allows you to map drive letters to a variety of Internet repositories. When you install and open NetDrive, you are presented with the list of supported Internet protocols and repositories which you can use for mapping drives:
As you can see from the illustration above, NetDrive's list of support technologies is quite extensive: DropBox, Box.net, Google Drive, OneDrive, Amazon S3, Openstack Swift, FTP, SFTP, and WebDAV.
When you add a drive or configure the settings for one of the default drives, you are presented with a dialog box where you can enter the settings for the drive connection; note that there are very few settings for FTP connections:
As you add drives, the NetDrive user interface will display the drives and their current connection status:
As an added touch, NetDrive customizes its drive icons in Windows Explorer, so you can easily see the type of mapped drive for each connection:
I would love to take an in-depth look at all of the supported protocols in this review, but this series is about FTP clients, so I'll move on to the FTP-specific features that I normally review.
Using NetDrive 2.3 with FTP over SSL (FTPS)
NetDrive 2.3 has built-in support for FTP over SSL (FTPS), although it only appears to support Explicit FTPS - and it does so in a confusing way. When you are editing the settings for an FTP drive connection, you need to check the box for SSL/TLS in order to enable FTPS. Unfortunately, when you do so, the dialog box will change the port to 990, which is the port number for Implicit FTPS; however, in my testing I could not get Implicit FTPS to work:
With the above information in mind, I needed to manually change the port number back to 21 in order to use Explicit FTPS with NetDrive:
Using NetDrive 2.3 with True FTP Hosts
True FTP hosts are not supported natively by NetDrive 2.3, and there are no settings which allow you to customize the login environment in order to work around this situation.
Using NetDrive 2.3 with Virtual FTP Hosts
NetDrive 2.3's login settings allow you to specify the virtual host name as part of the user credentials by using syntax like "ftp.example.com|username" or "ftp.example.com\username", so you can use virtual FTP hosts with NetDrive 2.3.
Scorecard for NetDrive 2.3
This concludes my quick look at a few of the FTP features that are available with NetDrive 2.3, and here are the scorecard results:
| Client Name | Directory Browsing | Explicit FTPS | Implicit FTPS | Virtual Hosts | True HOSTs | Site Manager | Extensibility |
|---|---|---|---|---|---|---|---|
| NetDrive 2.3.2 | N/A | Y | N1 | Y | N2 | Y | N/A |
Notes:
|
|||||||
That wraps things up for today's review of NetDrive 2.3. Your key take-aways should be: NetDrive has some nice features, and it supports a wide variety of protocols with a similar user experience; that being said, NetDrive has very few settings for drive connections, so its capabilities are somewhat limited.
Note: This blog was originally posted at http://blogs.msdn.com/robert_mcmurray/
FTP Clients - Part 15: WebDrive
30 November 2014 • by Bob • FTP, SSL
For the next installments in my series about FTP clients, I will be taking a look at two FTP redirectors at the same time. In this specific blog post, I will focus on WebDrive (from South River Technologies), whereas my next post will look at NetDrive (from Bdrive Inc.).
At the time of this blog's writing, WebDrive is a for-retail FTP client and redirector which is available from the following URL:
For this blog post I will be using WebDrive version 12.10.4082.
WebDrive 12 Overview
Before I continue, I would like to begin with some background information: because of my ongoing blog series about FTP clients, one question that I have often been asked is, "Which FTP client do you use?" Usually I have to answer, "That depends." I know that my answer sounds non-committal, but to be honest - I have yet to find an FTP client that does everything that I want, although a few FTP clients have had enough features for me to use them quite often. And with that in mind, I need to point out that I purchased my first license for WebDrive over 12 years ago, and over the years I have periodically renewed my license for later versions. So to partially answer my earlier question - WebDrive is one of the FTP clients that I have used a lot.
That being said, WebDrive is different from many of the other FTP clients that I have reviewed because it is an Internet protocol redirector, meaning that it allows you to map drive letters to a variety of Internet-based repositories. (I'll discuss those various protocols and repositories shortly.)
When you install and open WebDrive, you are presented with a fairly empty user interface:
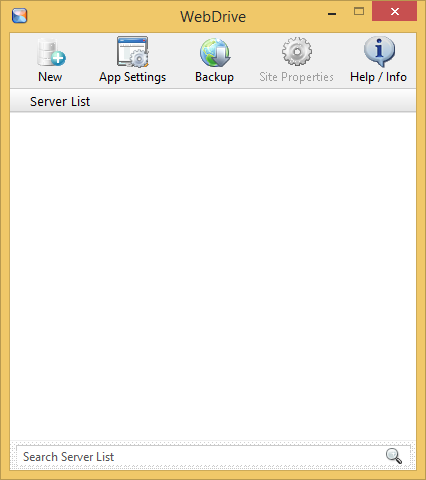
If you click the App Settings icon, you will be presented with a dialog box that offers dozens of customizable options:
When you click the New icon, you will be presented with a Site Wizard which lists the supported Internet protocols and repositories which you can use for mapping drives:
As you can see from the illustration above, WebDrive's list of support technologies is quite extensive: WebDAV, Secure WebDAV, FTP, Secure FTP, Google Drive, Amazon S3, SFTP, Dropbox, and FrontPage Server Extensions.
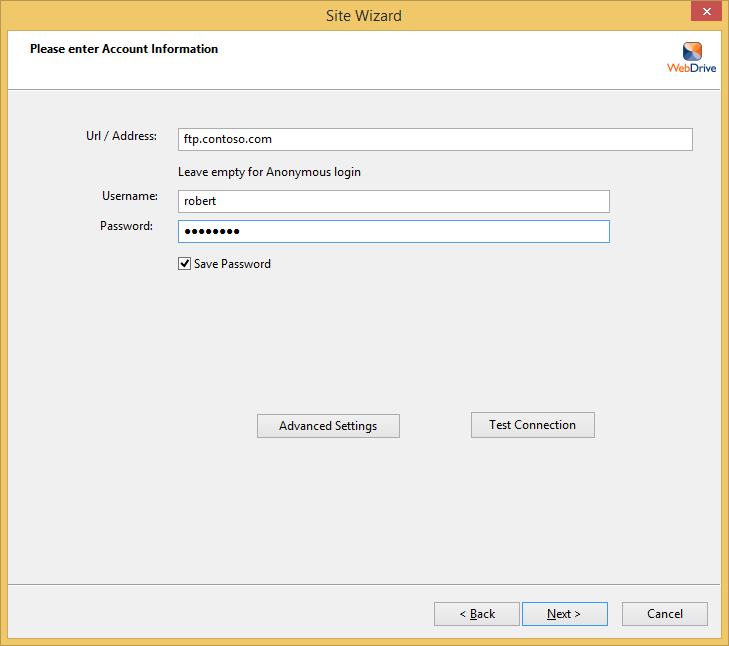
When you choose to create an FTP connection, WebDrive launches its Site Wizard, and the initial dialog box is pretty self-explanatory:
However, when you click the Advanced Settings button, you are presented once again with dozens of customizable settings for this specific connection:
As you continue to add sites with WebDrive, their connection types and current statuses are displayed in the user interface:
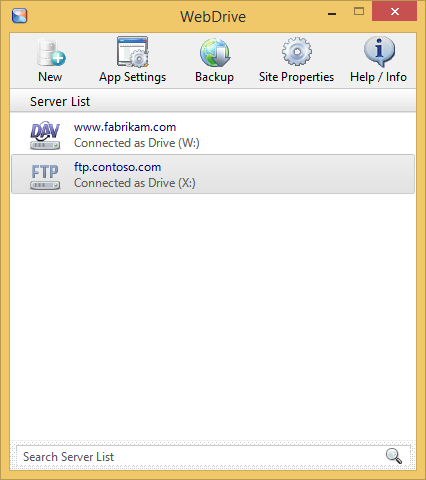
However, when you view your drives in Windows Explorer, even though network drives which are mapped through WebDrive are displayed with a different icon, you cannot tell the protocol type for mapped drives; this is one of the few times where NetDrive supported a feature that I really missed in WebDrive. (See my next blog entry for more information.)
WebDrive 12 supports command-line scripting, so if you find the features of the built-in Windows FTP client are somewhat limited, you can investigate scripting WebDrive:
WebDrive Command Line Parameters
I would love to take an in-depth look at all of the supported protocols in this review, but this series is about FTP clients, so I'll move on to the FTP-specific features that I normally review.
Using WebDrive 12 with FTP over SSL (FTPS)
WebDrive 12 has built-in support for FTP over SSL (FTPS), and it supports both Explicit and Implicit FTPS. To specify which type of encryption to use for FTPS, you need to choose the appropriate option from the Security Type drop-down menu in the FTP Settings for a site:
Using WebDrive 12 with True FTP Hosts
True FTP hosts are not supported natively by WebDrive 12, and there are no settings that I could find which would allow me to customize the login environment in order to work around this situation.
Using WebDrive 12 with Virtual FTP Hosts
WebDrive 12's login settings allow you to specify the virtual host name as part of the user credentials by using syntax like "ftp.example.com|username" or "ftp.example.com\username", so you can use virtual FTP hosts with WebDrive 12.
Scorecard for WebDrive 12
This concludes my quick look at a few of the FTP features that are available with WebDrive 12, and here are the scorecard results:
| Client Name | Directory Browsing | Explicit FTPS | Implicit FTPS | Virtual Hosts | True HOSTs | Site Manager | Extensibility |
|---|---|---|---|---|---|---|---|
| WebDrive 12.10.4082 | N/A | Y | Y | Y | N1 | Y | N/A |
Notes:
|
|||||||
That wraps things up for today's review of WebDrive 12. Your key take-aways should be: WebDrive is a powerful redirector with support for a wide variety of protocols. What's more, the WebDrive application and each individual connection contain dozens of options which allow you to customize the environment in hundreds of ways. As is the case with many of my reviews, I have barely presented a fraction of the capabilities that are available in WebDrive 12; you might want to try it out and experiment with all of its possibilities.
Note: This blog was originally posted at http://blogs.msdn.com/robert_mcmurray/
FTP Clients - Part 14: CuteFTP
16 July 2014 • by Bob • FTP, SSL
For this next installment in my series about FTP clients, I want to take a look at Globalscape's CuteFTP, which is available from the following URL:
CuteFTP is a for-retail product that used to be available in several editions - Lite, Home, and Pro - but at the time of this blog CuteFTP was only available in a single edition which combined all of the features. With that in mind, for this blog post I used CuteFTP 9.0.5.
CuteFTP 9.0 Overview
I should start off with a quick side note: it's kind of embarrassing that it has taken me so long to review CuteFTP, because CuteFTP has been my primary FTP client at one time or other over the past 15 years or so. That being said, it has been a few years since I had last used CuteFTP, so I was curious to see what had changed.
 |
| Fig. 1 - The Help/About dialog in CuteFTP 9.0. |
To start things off, when you first install CuteFTP 9.0, it opens a traditional explorer-style view with the Site Manager displayed.
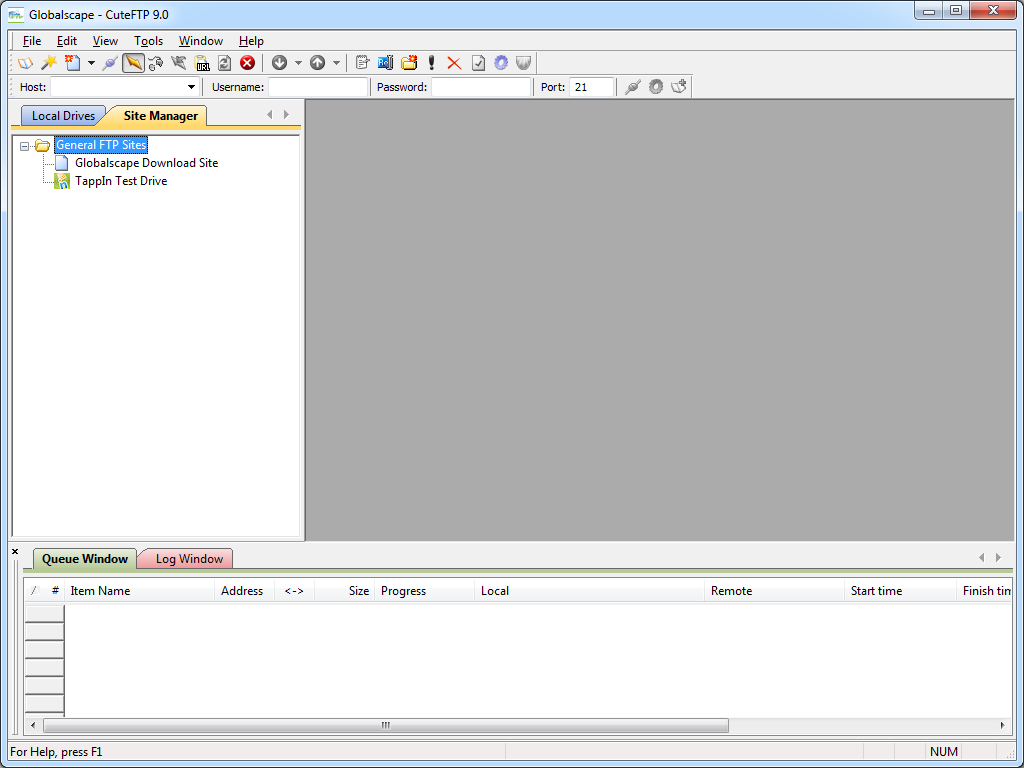 |
| Fig. 2 - CuteFTP 9.0's Site Manager. |
When you click File -> New, you are presented with a variety of connection options: FTP, FTPS, SFTP, HTTP, etc.
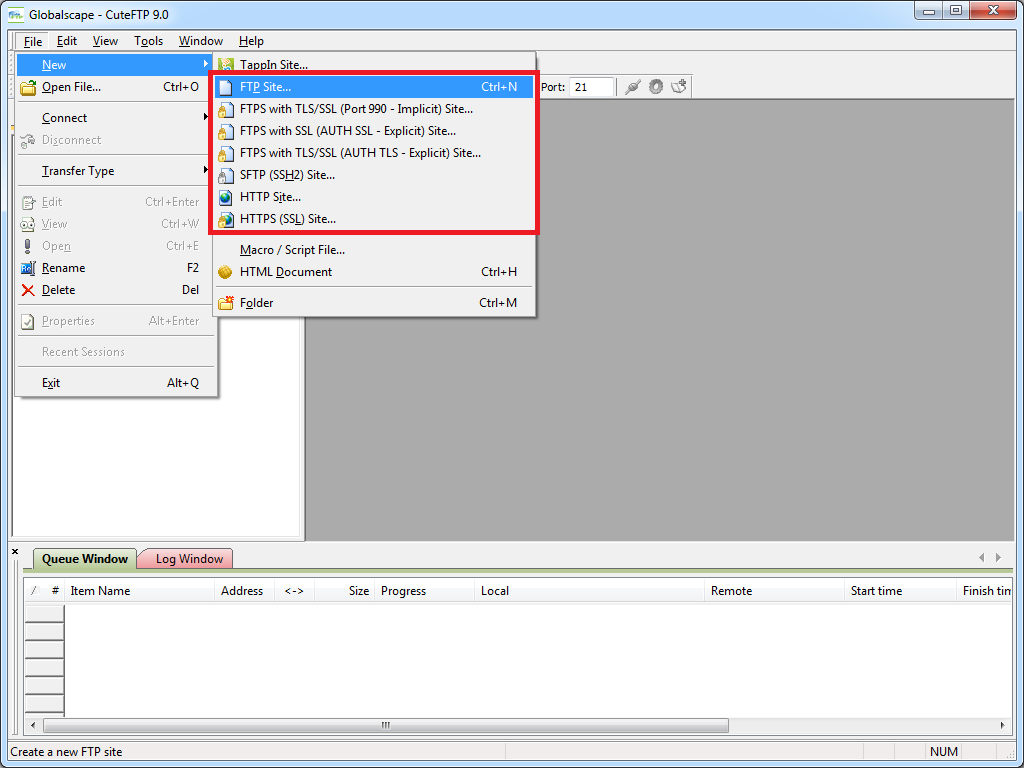 |
| Fig. 3 - Creating a new connection. |
When the Site Properties dialog is displayed during the creation of a new site connection, you have many of the options that you would expect, including the ability to change the FTP connection type after-the-fact; e.g. FTP, FTPS, SFTP, etc.
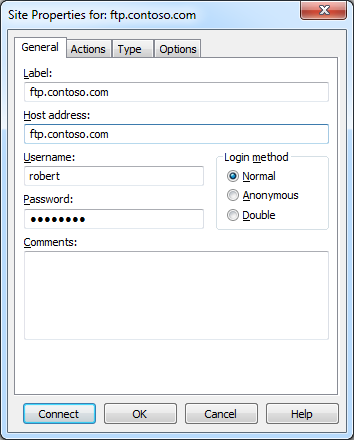 |
| Fig. 4 - Site connection properties. |
Once an FTP connection has been established, the CuteFTP connection display is pretty much what you would expect in any graphical FTP client.
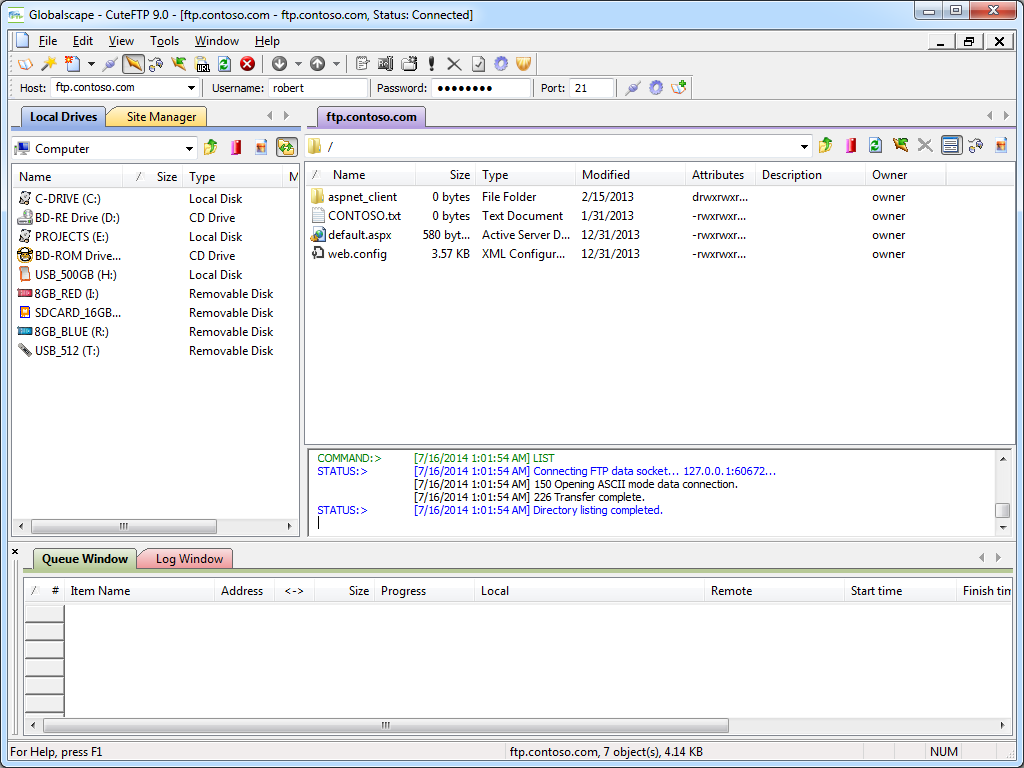 |
| Fig. 5 - FTP connection established. |
A cool feature for me is that CuteFTP 9.0 supports a COM interface, (which is called the Transfer Engine), so you can automate CuteFTP commands through .NET or a scripting language. What was specifically cool about CuteFTP's scripting interface was the inclusion of several practical samples in the help file that is installed with the application.
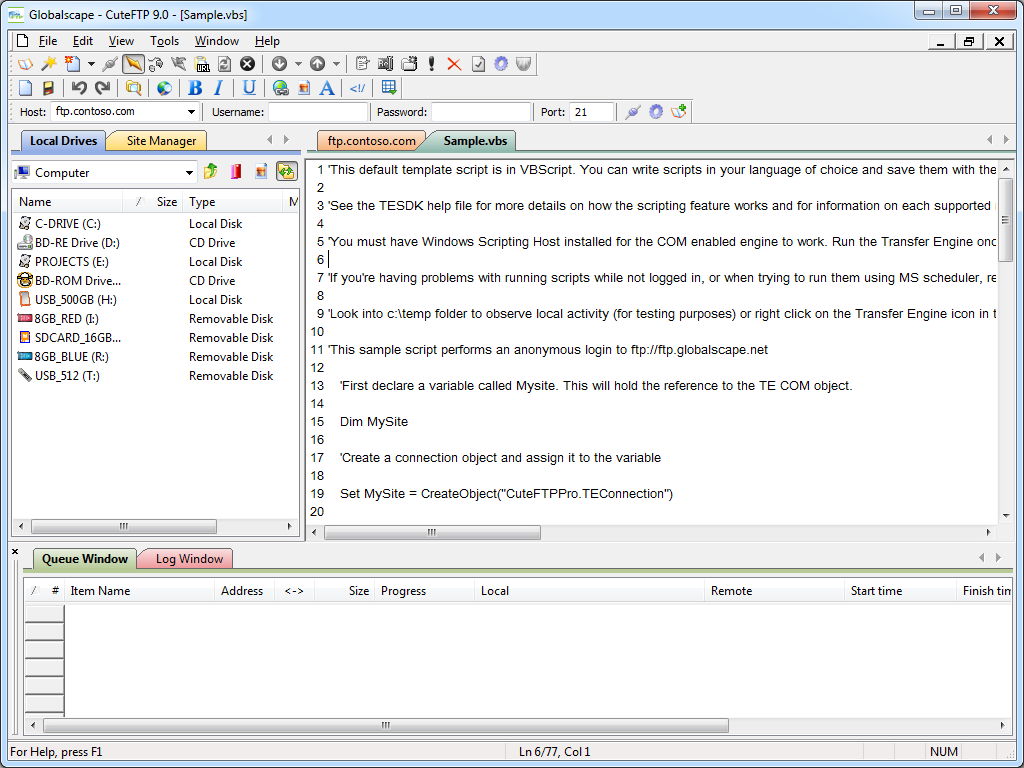 |
| Fig. 6 - Scripting CuteFTP. |
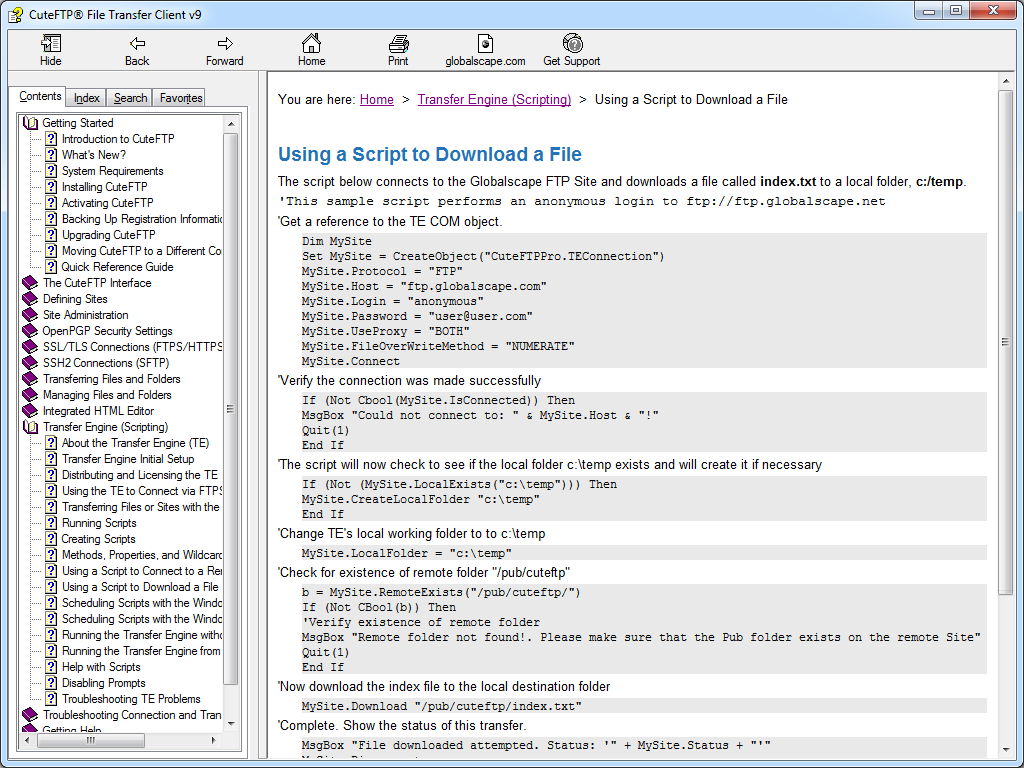 |
| Fig. 7 - Scripting samples in the CuteFTP help file. |
Anyone who has read my blogs in the past knows that I am also a big fan of WebDAV, and an interesting feature of CuteFTP is built-in WebDAV integration. Of course, this functionality is a little redundant if you are using any version of Windows starting from Windows XP and later since WebDAV integration is built-in to the operating system via the WebDAV redirector, (which lets you map drive letters to WebDAV-enabled websites). But still - it's cool that CuteFTP is trying to be an all-encompassing transfer client.
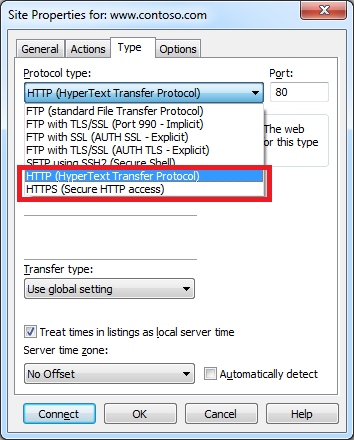 |
| Fig. 8 - Creating a WebDAV connection. |
One last cool feature that I should call out in the overview is the integrated HTML editor, which is pretty handy. I could see where this might be useful on a system where you use FTP and you don't want to bother installing a separate editor.
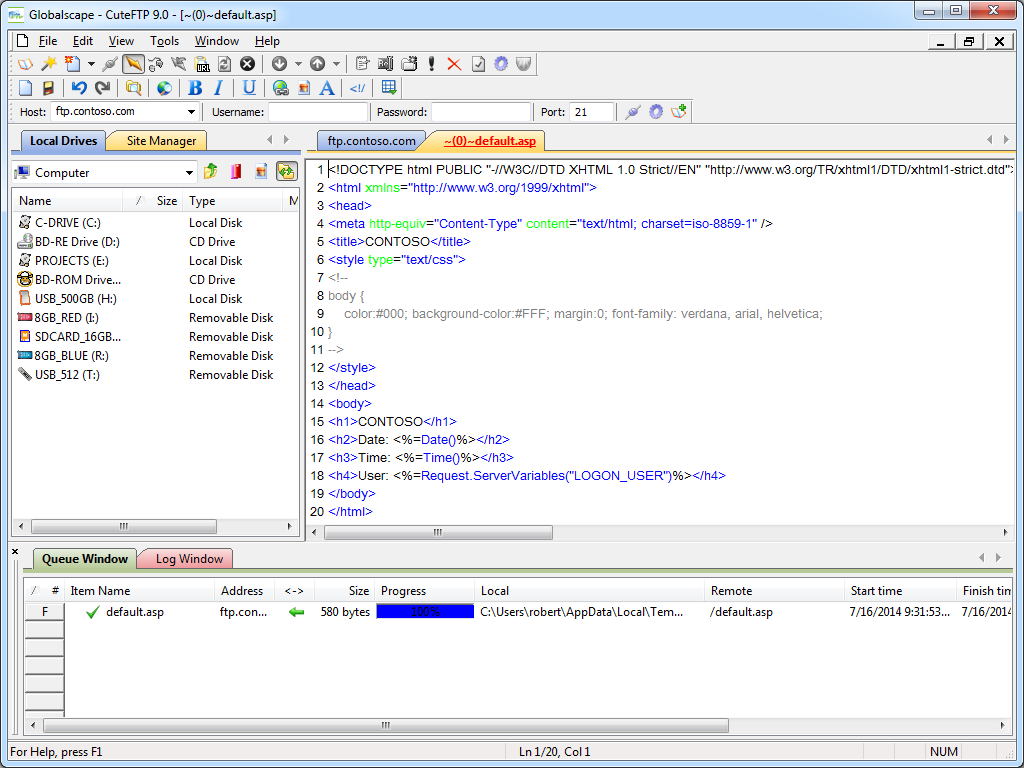 |
| Fig. 9 - CuteFTP's Integrated HTML editor. |
Using CuteFTP 9.0 with FTP over SSL (FTPS)
CuteFTP 9.0 has built-in support for FTP over SSL (FTPS), and it supports both Explicit and Implicit FTPS. To specify which type of encryption to use for FTPS, you need to choose the appropriate option from the Protocol type drop-down menu in the Site Properties dialog box for an FTP site.
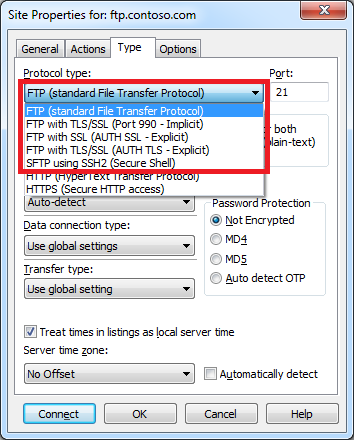 |
| Fig. 10 - Specifying the FTPS encryption. |
I was really happy to discover that I could use CuteFTP 9.0 to configure an FTP connection to drop out of FTPS on either the data channel or command channel once a connection is established. This is a very flexible design, because it allows you to configure FTPS for just your user credentials with no data and no post-login commands, or all commands and no data, or all data and all commands, etc.
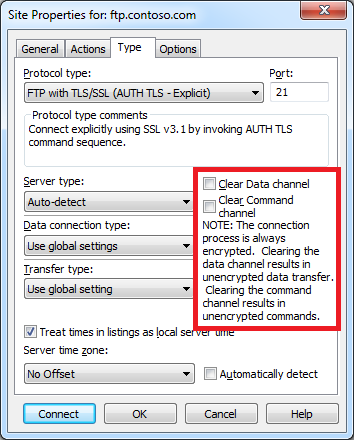 |
| Fig. 11 - Specifying additional FTPS options. |
Using Using CuteFTP 9.0 with True FTP Hosts
CuteFTP 9.0 does not have built-in support for the HOST command that is specified in RFC 7151, nor does CuteFTP have a first-class way to specify pre-login commands for a connection.
But that being said, I was able find a way to configure CuteFTP 9.0 to send a HOST command for a connection by specifying custom advanced proxy commands. Here are the steps to pull this off:
- Bring up the properties dialog for an FTP site in the CuteFTP Site Manager
- Click the Options
- Choose Use site specific option in the drop-down
- Enter your FTP domain name in the Host name field
- Click the Advanced button
- Specify Custom for the Authentication Type
- Enter the following information:
HOST ftp.example.com
USER %user%
PASS %pass%
Where ftp.example.com is your FTP domain name - Click OK for all of the open dialog boxes
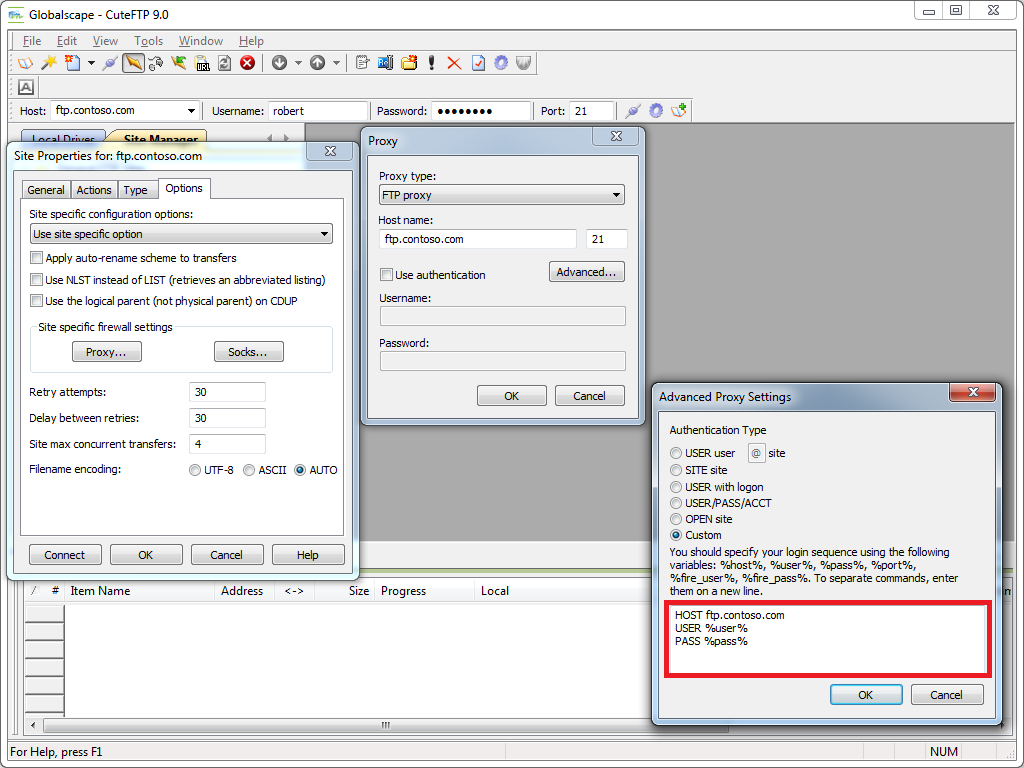 |
| Fig. 12 - Specifying a true FTP hostname via custom proxy settings. |
Note: I could not get this workaround to successfully connect with FTPS sessions; I could only get it to work with regular (non-encrypted) FTP sessions.
Using Using CuteFTP 9.0 with Virtual FTP Hosts
CuteFTP 9.0's login settings allow you to specify the virtual host name as part of the user credentials by using syntax like "ftp.example.com|username" or "ftp.example.com\username". So if you don't want to use the workaround that I listed earlier, or you need to use FTPS, you can use virtual FTP hosts with CuteFTP 9.0.
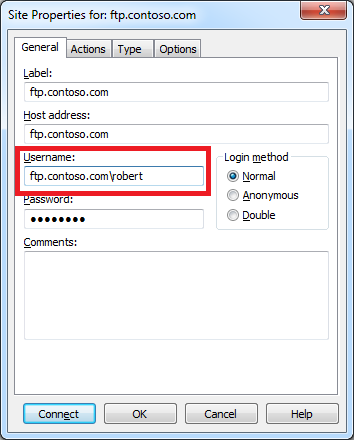 |
| Fig. 13 - Specifying an FTP virtual host. |
Scorecard for CuteFTP 9.0
This concludes my quick look at a few of the FTP features that are available with CuteFTP 9.0, and here are the scorecard results:
| Client Name | Directory Browsing | Explicit FTPS | Implicit FTPS | Virtual Hosts | True HOSTs | Site Manager | Extensibility |
|---|---|---|---|---|---|---|---|
| CuteFTP 9.0.5 | Rich | Y | Y | Y | Y/N1 | Y | N/A2 |
Notes:
|
|||||||
That wraps things up for today's review of CuteFTP 9.0. Your key take-aways should be: CuteFTP is good FTP client; it has added some great features over the years, and as with most of the FTP clients that I have reviewed, I am sure that I have barely scratched the surface of its potential.
Note: This blog was originally posted at http://blogs.msdn.com/robert_mcmurray/
RFC 7151 - File Transfer Protocol HOST Command for Virtual Hosts
14 March 2014 • by Bob • IIS, FTP, SSL, HOST
I received an email yesterday from the RFC Editor that a new Request for Comments (RFC) document has just been published, RFC 7151, which adds support for a new "HOST" command to FTP. This new command allows hosting multiple FTP sites on a single IP address, much like what Host Headers provide for HTTP.
Here's the URL to the new RFC on the RFC Editor website:
File Transfer Protocol HOST Command for Virtual Hosts
http://www.ietf.org/rfc/rfc7151.txt
Or you can see the HTML-based version at the following URL:
http://tools.ietf.org/html/rfc7151
One minor point which I would like to clarify is that this adds a new command for FTP to specify which virtual host to connect to. I periodically hear people referring to this as "FTP Host Headers", but that is technically incorrect since FTP does not have request headers like HTTP. Here's a simple example of what the communications flow looks like when the HOST command is used:
CLIENT> |
HOST ftp.example.com |
SERVER> |
220 Host accepted |
CLIENT> |
USER foo |
SERVER> |
331 Password required |
CLIENT> |
PASS bar |
SERVER> |
230 User logged in |
I need to make sure that I thank my co-author for this RFC, Paul Hethmon, who has authored other FTP-related RFCs over the years. For example, Paul wrote RFC 3659, and he co-wrote RFC 2389 with Robert Elz. As a result, the Internet community has Paul and Robert to thank for several great FTP command extensions in the past. (e.g. FEAT, OPTS, MDTM, SIZE, REST, MLST, MLSD, etc.) Paul and I co-wrote RFC 7151 over the past several years, and it was great working with him.
Support for the HOST command has been built-in to Microsoft's FTP service since IIS 7.0, but now that the RFC has been officially published I hope that this feature will be adopted by other FTP servers and clients. That being said, IIS is not the only implementation of the FTP HOST command; at the time of this blog post, these are the server and client implementations that I am aware of which already provide support for this new command. (Note: there may be more than I have listed here; these are just the implementations that I currently know about.)
- FTP Servers:
- FTP Daemon (see http://www.pro-bono-publico.de/projects/ftpd.html)
- Ipswitch (in the WS_FTP service; see http://www.ipswitchft.com/)
- Microsoft (in the IIS FTP service; see http://www.iis.net/)
- RhinoSoft (in the Serv-U File server; see http://www.serv-u.com/)
- FTP Clients:
- Microsoft (in the Visual Studio 2010/2012/2013 and Expression Web 4 products)
- Rebex (in the Rebex FTP/SSL for .NET library; see http://www.rebex.net/)
- RhinoSoft (in the FTP Voyager client; see http://www.rhinosoft.com/)
- Scooter Software (in the Beyond Compare client; see http://scootersoftware.com/)
- SmartFTP (in the SmartFTP client; see http://smartftp.com/)
In addition to the clients listed above, if you have been reading my series on FTP clients over the past few years, I have posted details on how to use the FTP HOST command with some other FTP clients which do not provide built-in support. For example, the Core FTP Client allows you to specific pre-login commands as part of an FTP site's connection properties, so you can manually type in the HOST command and save it along the site's settings.
A Little Bit of History
When I joined the feature team which was creating the FTP service for Windows Server 2008, one of the things that bothered us was that there was no way at the protocol level to host multiple FTP sites on the same IP address. There were several ways that FTP server implementations were approximating that sort of functionality, for example the User Isolation features that we ship with FTP for IIS, but each FTP server seemed to be implementing its own workaround and there was no standardization.
Because of this limitation, our team received a lot of requests to add "FTP Host Headers," although as I explained earlier FTP has no concept of request headers. To help address some of the questions which I was often seeing, I explained the lack of hostname support for FTP in detail in the comments section of my FTP User Isolation with Multiple User Accounts blog that I posted back in 2006, which was shortly before we began work on implementing the HOST command. I will paraphrase some of my comments here:
While I realize that the ability host multiple FTP sites on the same IP address and port like HTTP is a desired configuration, the simple answer is that FTP does not currently support this at the protocol level. To put things in perspective, RFC 959 is the governing document for FTP, and that was published in October of 1985. FTP was simply not designed for the Internet as we use and understand it today, even though it is a generally reliable protocol that many people will continue to use for some time. HTTP/1.1 was designed much later and resolved this problem, but only for HTTP requests.
There are three ways that you can create unique bindings for a web or HTTP site: IP address, port, or host header. FTP can create unique bindings by IP address or port, but the FTP protocol does not currently provide support for hostnames.
Here's why: HTTP packets consist of a set of request headers and possibly a block of data. Here's an example of a simple GET request:
GET /default.aspx HTTP/1.0 [CrLf]
Accept: */* [CrLf]
[CrLf]
When HTTP 1.1 was published in RFC 2068 and RFC 2616, it defined a header for specifying a "host" name in a separate name/value pair:
GET /default.aspx HTTP/1.1 [CrLf]
Host: example.com [CrLf]
Accept: */* [CrLf]
[CrLf]
The "Host" header allows multiple HTTP virtual servers ("hosts") on the same IP address and port that are differentiated by host name. While this works great for the HTTP protocol, FTP currently has no comparable functionality. As such, the FTP protocol would have to be updated to allow multiple hosts on the same IP address and port, then FTP servers and clients would need to be updated to accommodate the changes to FTP.
While my explanation may have clarified root cause of the FTP limitation for anyone who was asking about it, I personally thought the situation was unacceptable. This inspired me to research the addition of a new command for FTP which would allow FTP clients to specify hostnames. As I was researching how to propose a new RFC document to the IETF, I discovered that Paul Hethmon had been researching the same problem a few years earlier. I contacted Paul and offered to combine our work, and he agreed. After several years of work and a great deal of supportive assistance from dozens of great people whom I met through the IETF, RFC 7151 has finally been published.
There are a lot of people besides Paul whom I should thank, and we mention them in the acknowledgments section of our RFC, which you can read at the following URL:
http://tools.ietf.org/html/rfc7151#appendix-B
One final note - two of my coworkers, Jaroslav Dunajsky and Wade Hilmo, are mentioned in the acknowledgments section of the RFC. Jaroslav is the developer who implemented the FTP HOST command for IIS, and Wade is a senior developer on the IIS team who graciously allowed me to bounce ideas off him while I was doing my research over the past few years. (I probably I owe him a lunch or two.)
Note: This blog was originally posted at http://blogs.msdn.com/robert_mcmurray/
FTP Clients - Part 13: WinSCP
28 February 2014 • by Bob • FTP, SSL
For this next installment in my series about FTP clients, I want to take a look at WinSCP, which is an open source FTP/SFTP client that is available from the following URL:
For this blog post I used WinSCP 5.5.1, and it was available for free when I wrote this blog post. That being said, WinSCP's author (Martin Prikryl) takes donations. (And I think that it's a worthy cause; I like to support independent development work.)
WinSCP 5.5 Overview
When you open WinSCP 5.5, you will first see the Login dialog box, which will be empty until you add some sites to the list. The Login dialog allows you to create folders so you can categorize your sites, and the user interface is comparable to what you would expect in a Site Manager for other FTP clients.
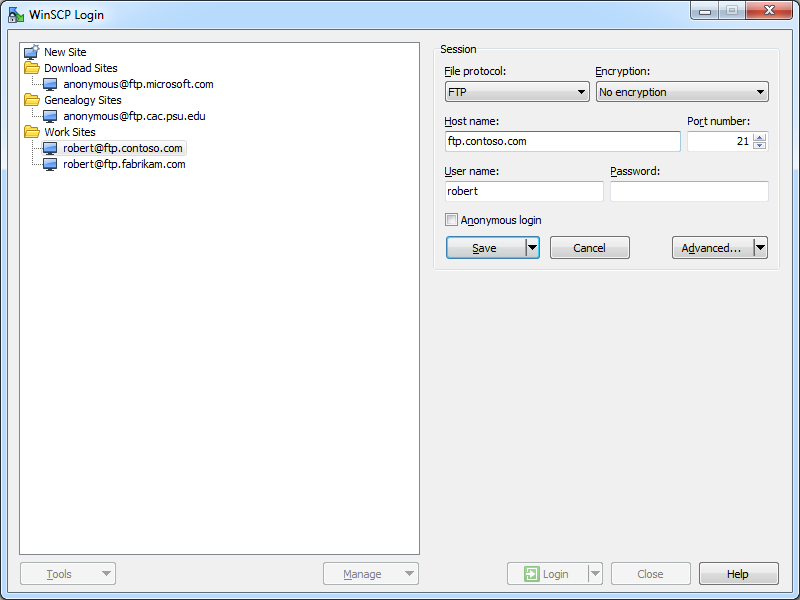 |
| Fig. 1 - The opening Login dialog in WinSCP 5.5. |
When you are adding FTP sites, you have three choices for the protocol: FTP, SCP, and SFTP; you also have four choices for encryption: No encryption, TLS/SSL Implicit encryption, TLS Explicit encryption, and SSL Explicit encryption. (I'll discuss those later.)
When you open a site for which you did not save the password, (which I highly recommend), you will be prompted for your password.
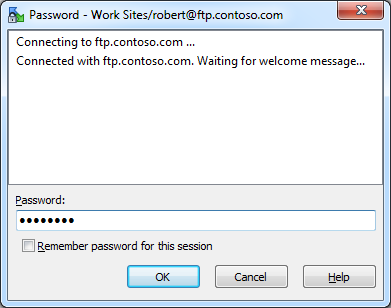 |
| Fig. 2 - The WinSCP 5.5 Password dialog. |
Once your FTP site is opened, the main application window is displayed, and it resembles a two-column file explorer interface with local and remote folders, which you might expect from a GUI-based FTP client. (Note: WinSCP refers to this as it's "Commander" interface.)
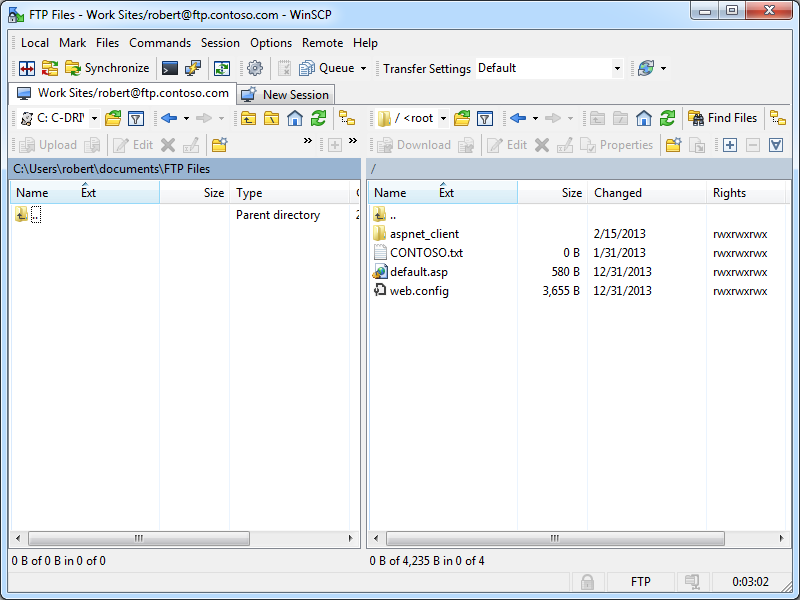 |
| Fig. 3 - Local and Remote Folders. |
That being said, if you change your application preferences, you can change the user interface so that it uses a single-column file explorer interface with a folder tree, which might be useful if you would rather use the FTP client as a drag-and-drop repository. (Note: WinSCP refers to this as it's "Explorer" interface.)
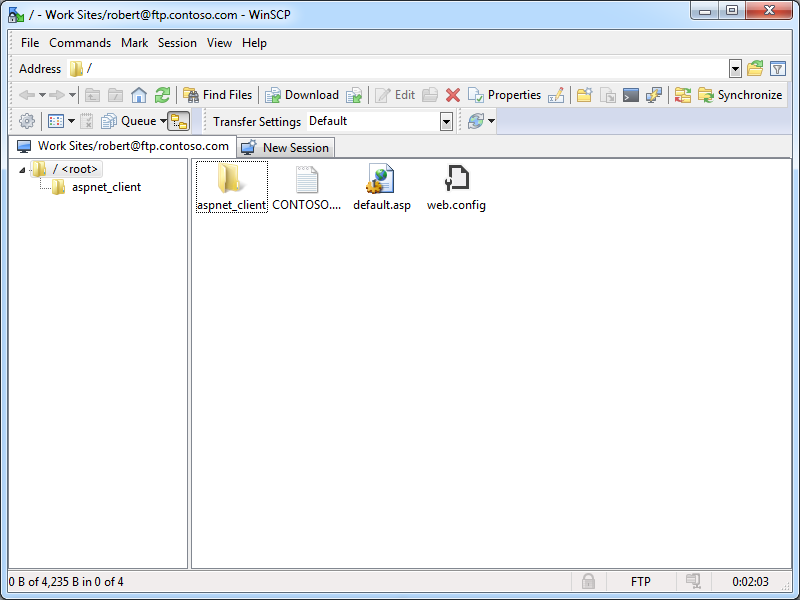 |
| Fig. 4 - Remote Folder Tree and Files. |
WinSCP 5.5 has support for automation through .NET and COM, and documentation about automating WinSCP 5.5 programmatically is available on the WinSCP website at the following URL:
WinSCP .NET Assembly and COM Library
There are several detailed automation examples on the WinSCP website that are written in C#, VB.NET, PowerShell, JavaScript, VBScript, etc., and the documentation is quite good. If you need to do a lot of FTP scripting and you are looking for a good way to automate your FTP sessions, you might want to consider this FTP client.
If you don't want to write a bunch of code, you can also automate WinSCP from a command line, and the documentation about that is available on the WinSCP website at the following URL:
Another great feature about WinSCP is that it can be downloaded as portable executables, which makes it easy to copy between systems. This is a great feature for me since I like to keep a collection of handy utilities in my SkyDrive/OneDrive folders.
Using WinSCP 5.5 with FTP over SSL (FTPS)
WinSCP 5.5 has built-in support for FTP over SSL (FTPS), and it supports both Explicit and Implicit FTPS. To specify which type of encryption to use for FTPS, you need to choose the appropriate option from the Encryption drop-down menu for an FTP site.
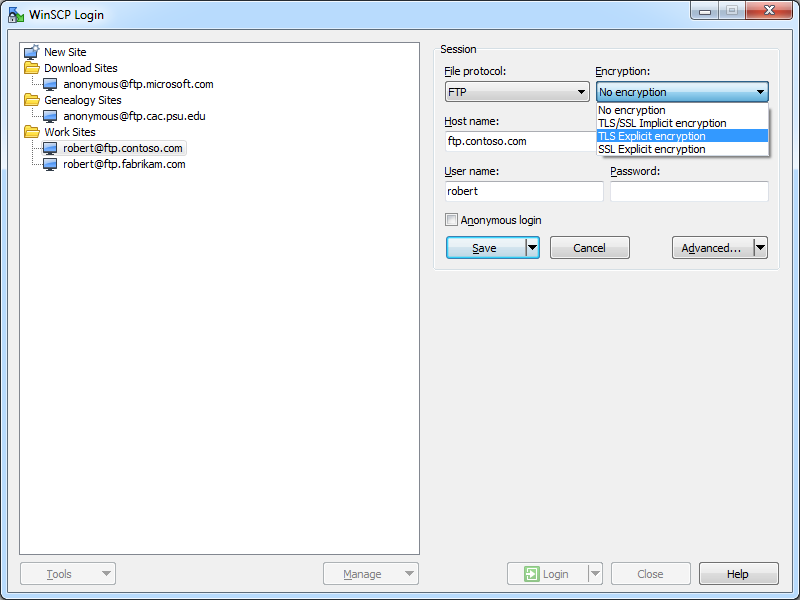 |
| Fig. 5 - Specifying the FTPS encryption. |
Once you have established an FTPS connection through WinSCP 5.5, the user experience is the same as it is for a standard FTP connection. That being said, I could not find a way to drop out of FTPS once a connection is established, so FTPS is an all or nothing option for your sessions.
Using Using WinSCP 5.5 with True FTP Hosts
True FTP hosts are not supported natively, and even though WinSCP 5.5 allows you to send post-login commands after an FTP site has been opened, I could not find a way to send a custom command before sending user credentials, so true FTP hosts cannot be used.
Using Using WinSCP 5.5 with Virtual FTP Hosts
WinSCP 5.5's login settings allow you to specify the virtual host name as part of the user credentials by using syntax like "ftp.example.com|username" or "ftp.example.com\username", so you can use virtual FTP hosts with WinSCP 5.5.
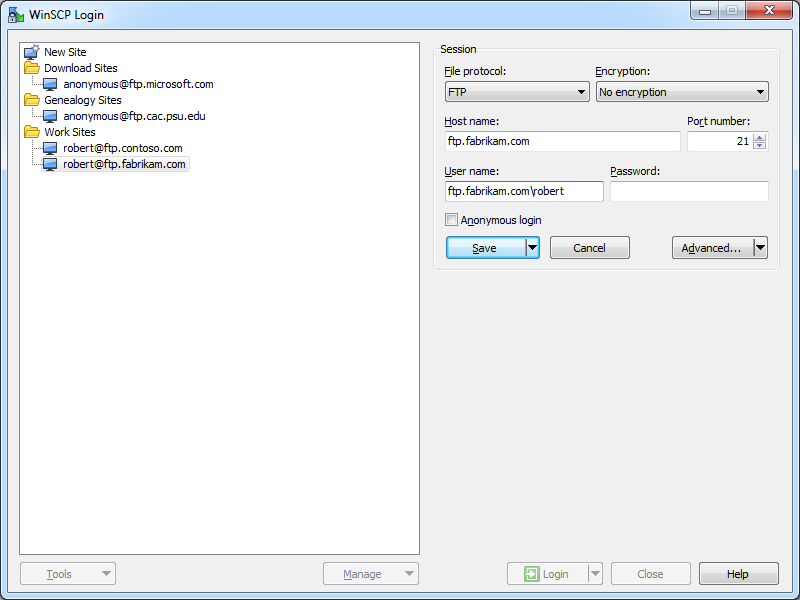 |
| Fig. 6 - Specifying an FTP virtual host. |
Scorecard for WinSCP 5.5
This concludes my quick look at a few of the FTP features that are available with WinSCP 5.5, and here are the scorecard results:
| Client Name | Directory Browsing | Explicit FTPS | Implicit FTPS | Virtual Hosts | True HOSTs | Site Manager | Extensibility |
|---|---|---|---|---|---|---|---|
| WinSCP 5.5.1 | Rich | Y | Y | Y | N | Y | N/A |
| Note: I could not find anyway to extend the functionality of WinSCP 5.5; but as I said earlier, it provides rich automation features for .NET, COM, and the command-line. |
|||||||
That wraps things up for today's blog. Your key take-aways should be: WinSCP 5.5 is good FTP client with a lot of options, and it has a very powerful automation story. As I mentioned earlier, if you have to do a lot of FTP automation, you should really take a look at this FTP client.
Note: This blog was originally posted at http://blogs.msdn.com/robert_mcmurray/
How to trust the IIS Express Self-Signed Certificate
15 November 2013 • by Bob • SSL, IIS Express, WebMatrix, Visual Studio, Internet Explorer
I had an interesting question from a coworker today that I thought would make a great blog. Here's the scenario...
Problem Description
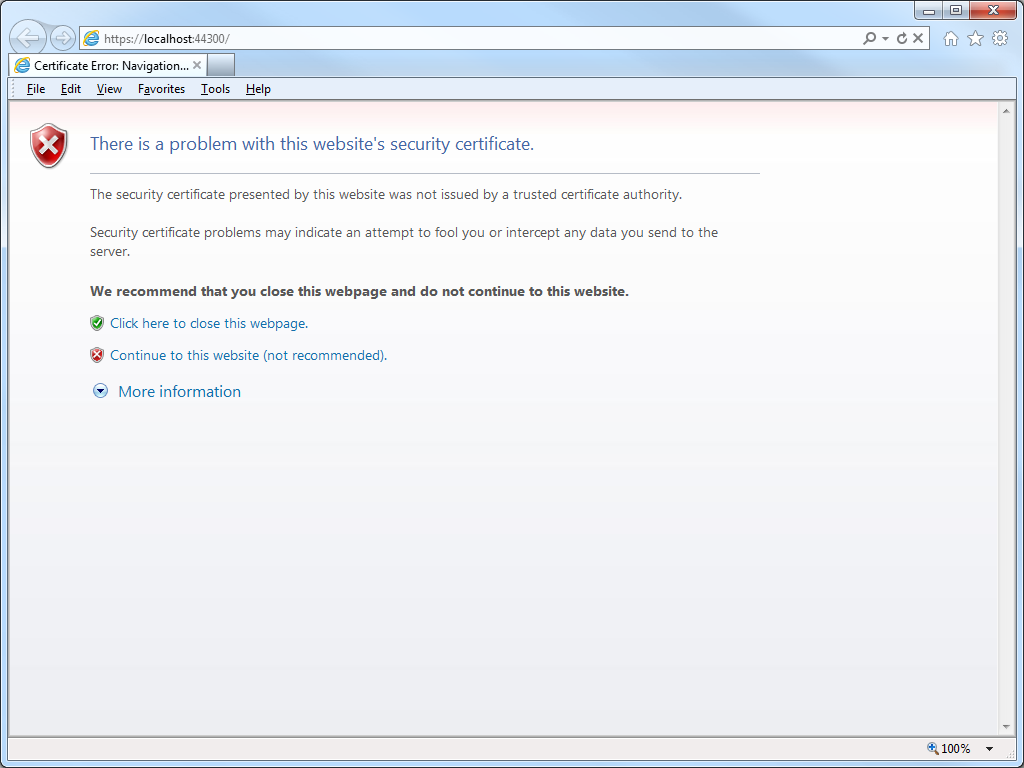
My coworker was using WebMatrix to create a website, although he could have been using Visual Studio and he would have run into the same problem. The problem he was seeing was that his application required HTTPS, but he was greeted with the following error message every time that he used Internet Explorer to browse to his development website at https://localhost:44300/:
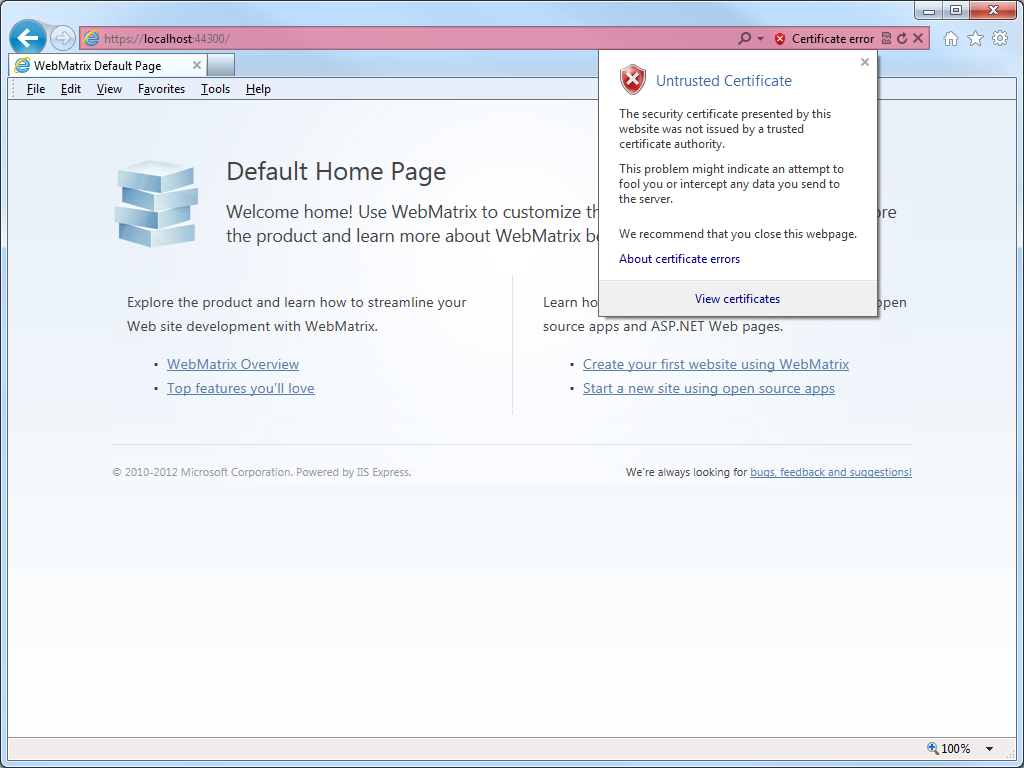
When he clicked the link to Continue to this website, he could click on Certificate error in the address bar, which would inform him that the website was using an Untrusted certificate:
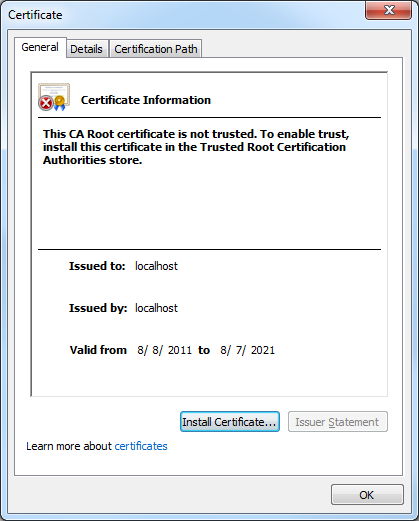
If he clicked View certificates, the Certificate dialog box informed him that the CA Root certificate was not trusted:
Cause
Since my coworker was using WebMatrix with IIS Express, which is the default development web server for WebMatrix and Visual Studio, all HTTPS communication was using the self-signed certificate from IIS Express. Since that certificate is self-signed, it is not trusted as if it was issued from a "Trusted Root Certification Authority," and therefore Internet Explorer (or any other security-conscious web browser) was doing the right thing by warning the end-user that they were using an untrusted certificate for HTTPS.
If you were seeing this error when browsing to an Internet website, this would be "A Very Bad Thing™", because you might be sending your confidential information to an untrusted website.
Resolutions
Fortunately this situation can be easily rectified, and there are two different approaches that you can use, and I will discuss both in the subsequent sections.
Resolution Number #1 - Configure your personal account to trust the IIS Express Certificate
The easiest solution is to configure your user account to trust the self-signed certificate as though it were issued by a trusted root certificate authority. To do so, use the following steps:
- Browse to https://localhost:44300/ (or whatever port IIS Express is using) using Internet Explorer and click Continue to this website:
- Click on Certificate error in the address bar, and then click View certificates:
- When the Certificate dialog box is displayed, click Install Certificate:
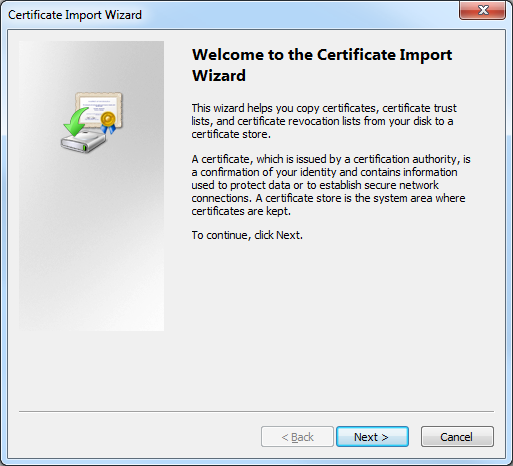
- When the Certificate Import Wizard is displayed, click Next:
- Click Place all certificates in the following store, and then click Browse:
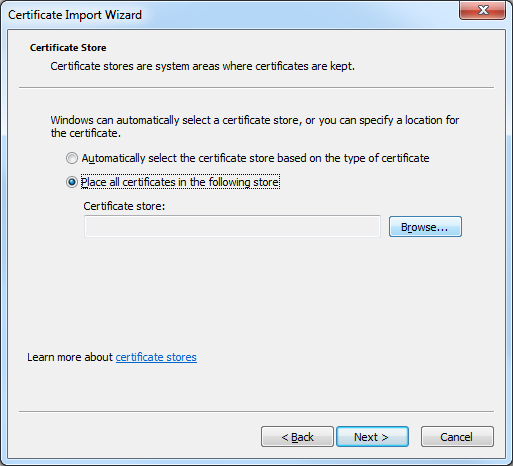
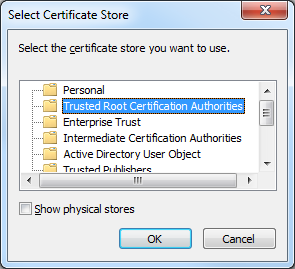
- When the Select Certificate Store dialog box is displayed, click Trusted Root Certification Authorities, and then click OK:
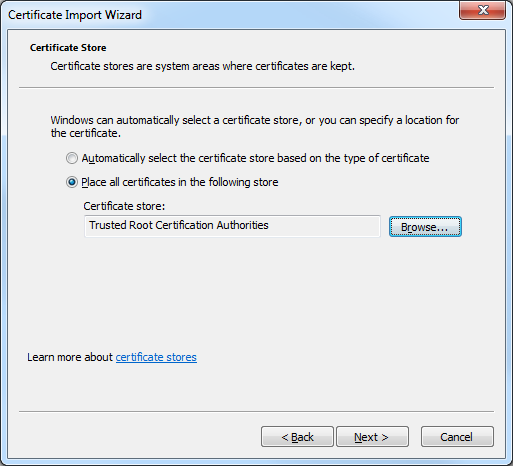
- On the Certificate Import Wizard, click Next:
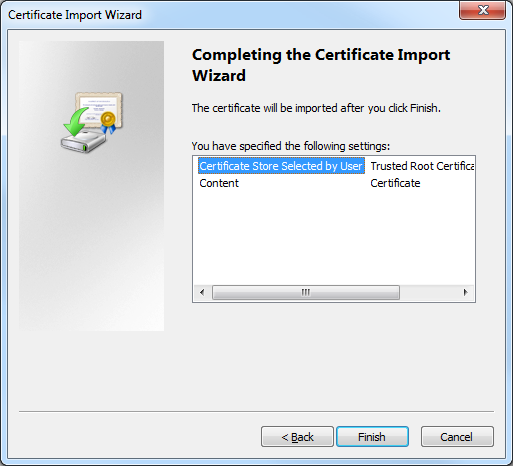
- When the Completing the Certificate Import Wizard page is displayed in the wizard, click Finish:
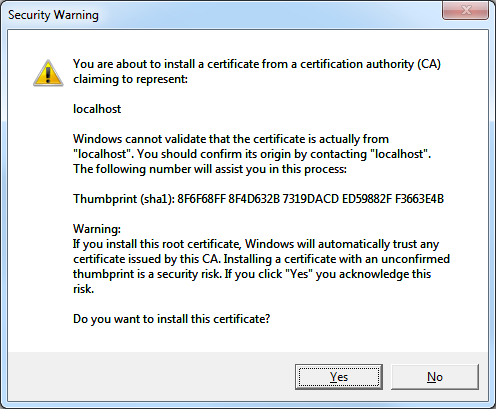
- When the Security Warning dialog box is displayed, click Yes to trust the certificate:
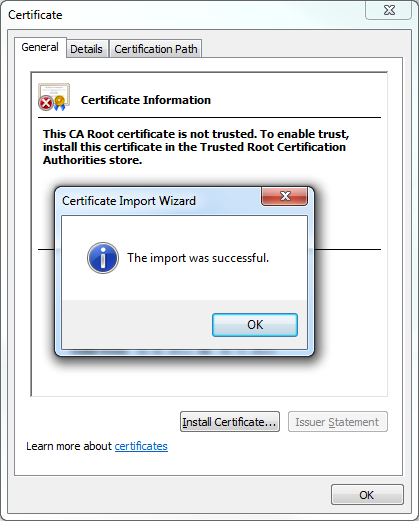
- Click OK when the Certificate Import Wizard informs you that the import was successful:
Resolution Number #2 - Configure your computer to trust the IIS Express Certificate
A more-detailed approach is to configure your computer system to trust the IIS Express certificate, and you might want to do this if your computer is shared by several developers who log in with their individual accounts. To configure your computer to trust the IIS Express certificate, use the following steps:
- Open a blank Microsoft Management Console by clicking Start, then Run, entering "mmc" and clicking OK:
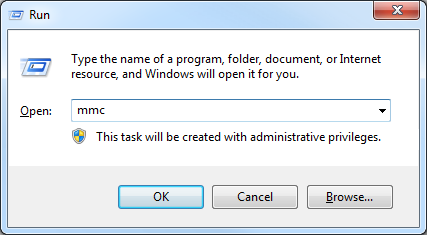
Note: You can also open a blank Microsoft Management Console by typing "mmc" from a command prompt and pressing the Enter key. - Add a snap-in to manage certificates for the local computer:
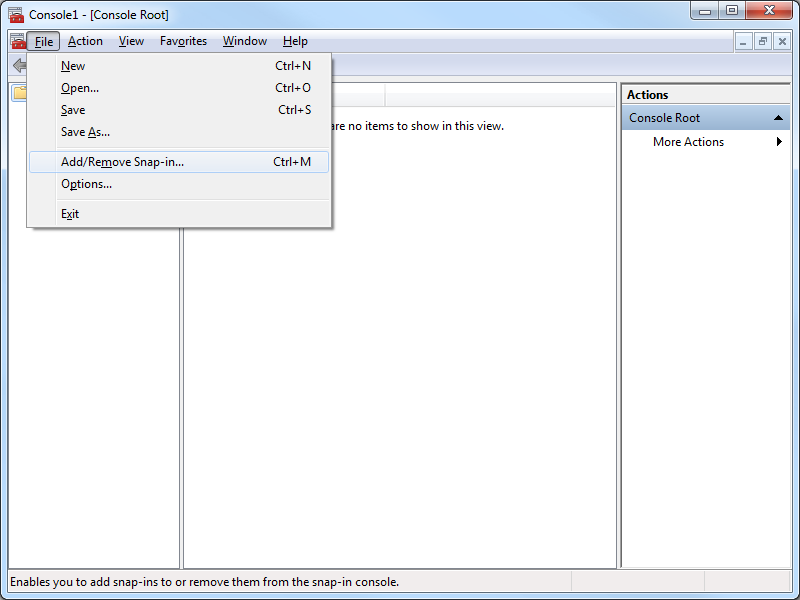
- Click File, and then click Add/Remove Snap-in:
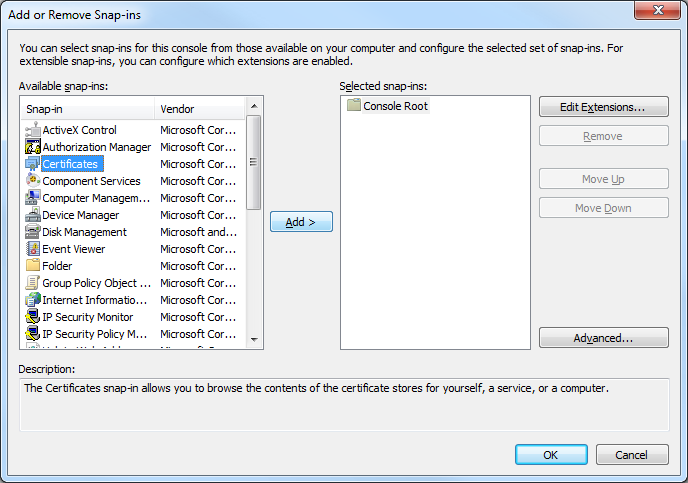
- When the Add or Remove Snap-ins dialog box is displayed, click Certificates, and then click Add:
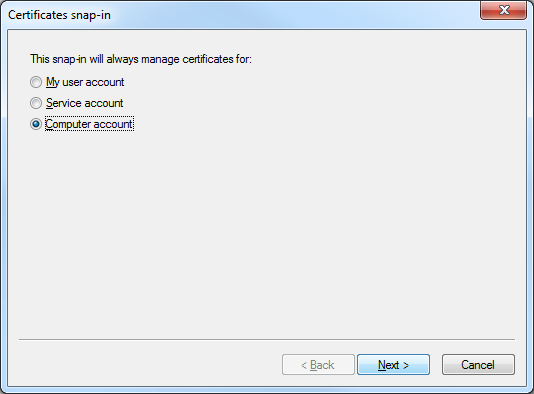
- When the Certificates Snap-ins dialog box is displayed, click Computer account, and then click Next:
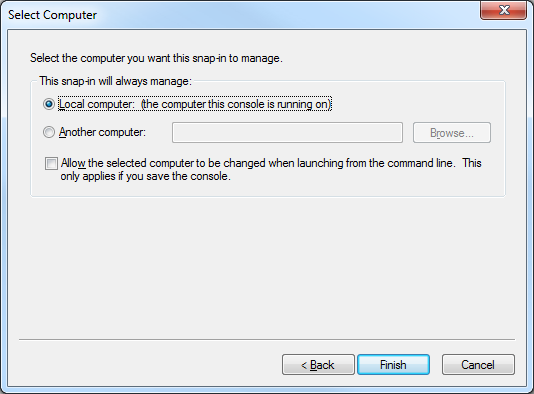
- Click Local computer, and then click Finish:
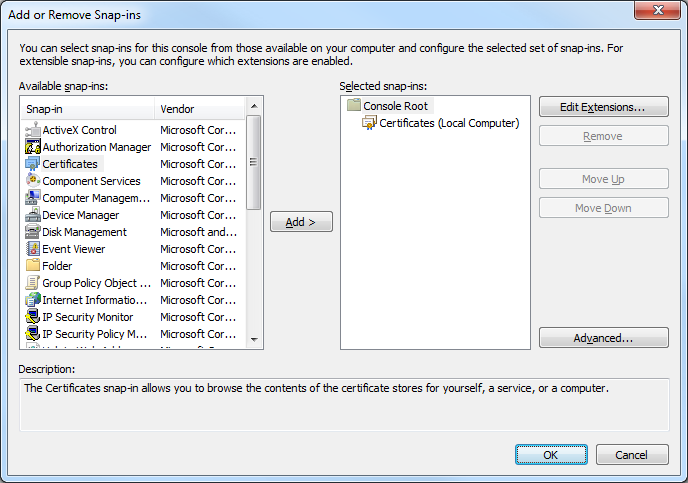
- Click OK to close the Add or Remove Snap-ins dialog box:
- Click File, and then click Add/Remove Snap-in:
- Export the IIS Express certificate from the computer's personal store:
- In the Console Root, expand Certificates (Local Computer), then expand Personal, and then click Certificates:
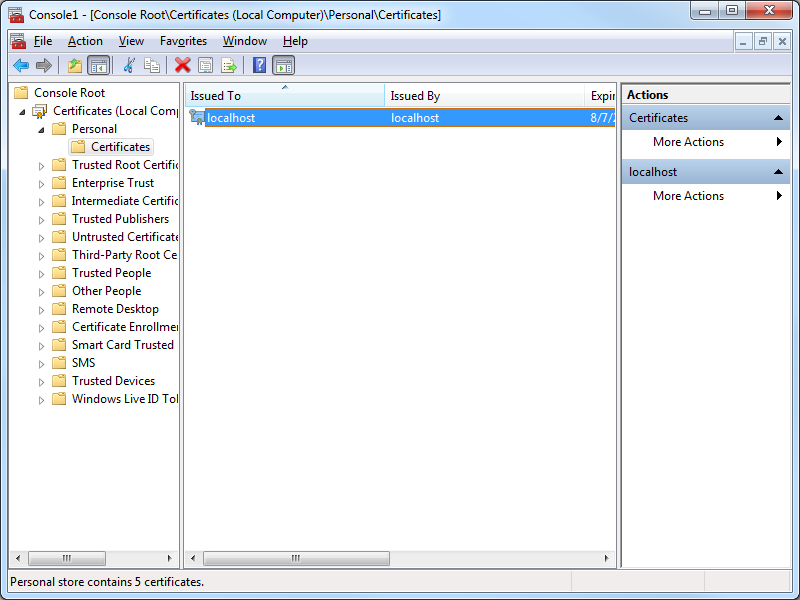
- Select the certificate with the following attributes:
- Issued to = "localhost"
- Issued by = "localhost"
- Friendly Name = "IIS Express Development Certificate"
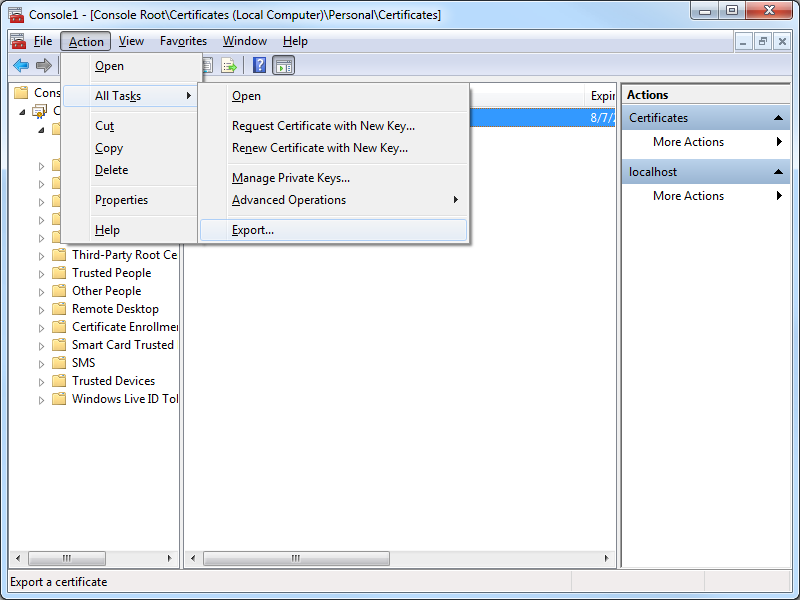
- Click Action, then click All Tasks, and then click Export:
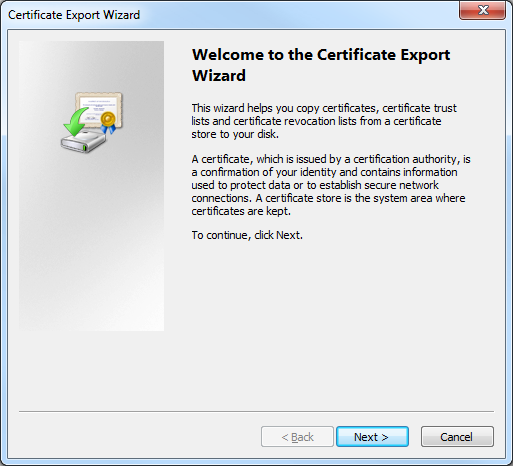
- When the Certificate Export Wizard is displayed, click Next:
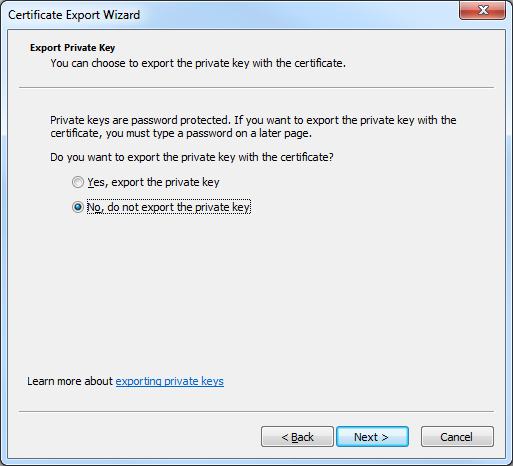
- Click No, do not export the private key, and then click Next:
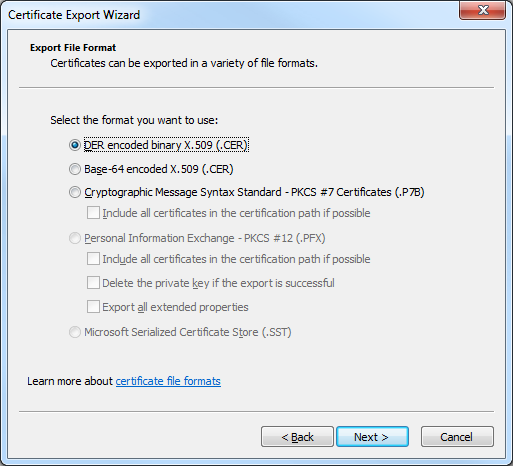
- Click DER encoded binary X.509 (.CER), and then click Next:
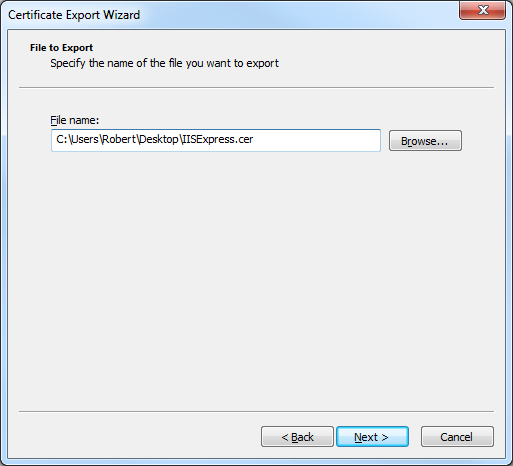
- Enter the path for exported certificate, e.g. "c:\users\robert\desktop\iisexpress.cer", and then click Next:
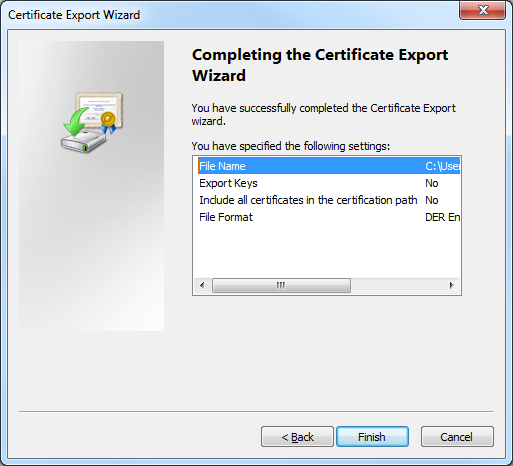
- Click Finish to export the certificate:
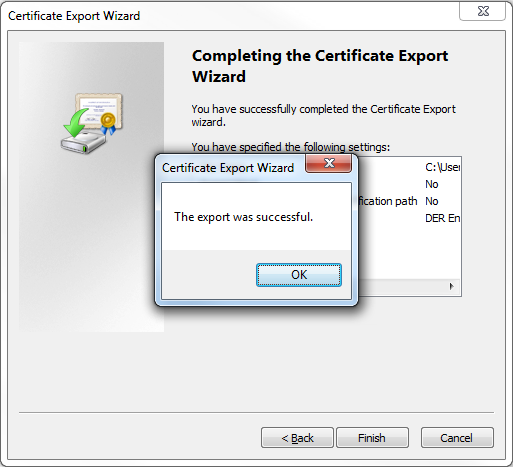
- Click OK when the Certificate Export Wizard displays a dialog box informing you that the export was successful:
- In the Console Root, expand Certificates (Local Computer), then expand Personal, and then click Certificates:
- Import the IIS Express certificate to the computer's Trusted Root Certification Authorities store:
- In the Console Root, expand Certificates (Local Computer), then expand Trusted Root Certification Authorities, and then click Certificates:
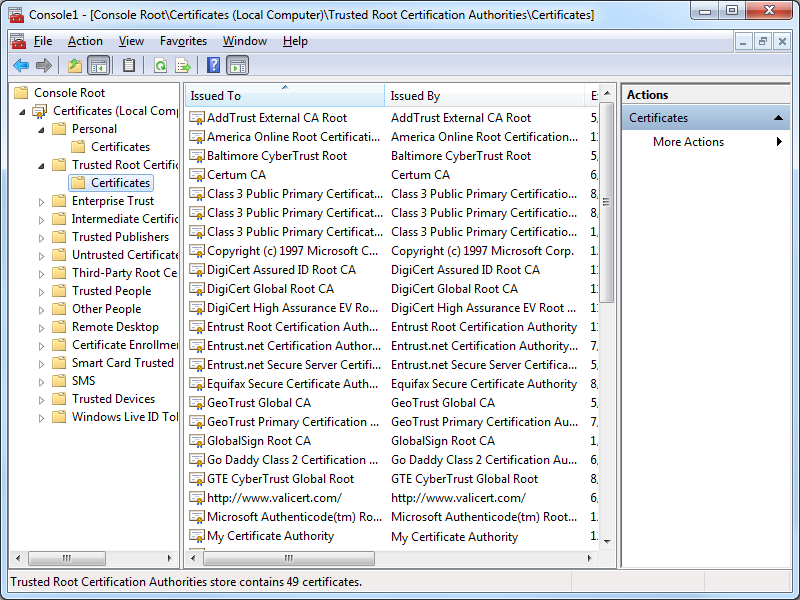
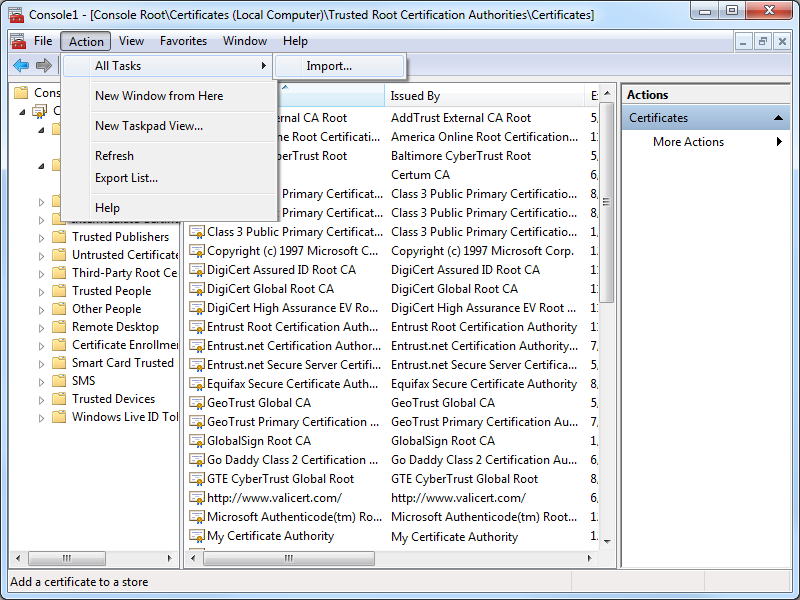
- Click Action, then click All Tasks, and then click Import:
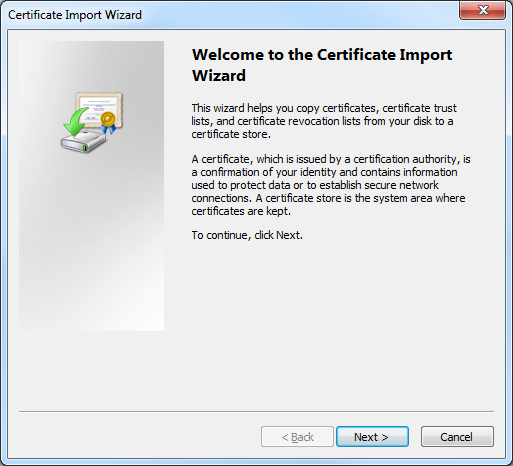
- When the Certificate Import Wizard is displayed, click Next:
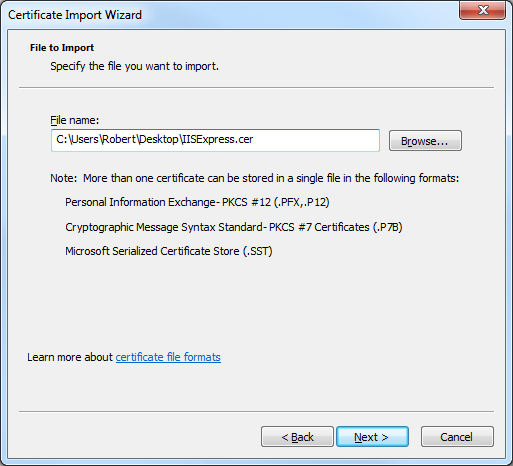
- Enter the path to your exported certificate, e.g. "c:\users\robert\desktop\iisexpress.cer", and then click Next:
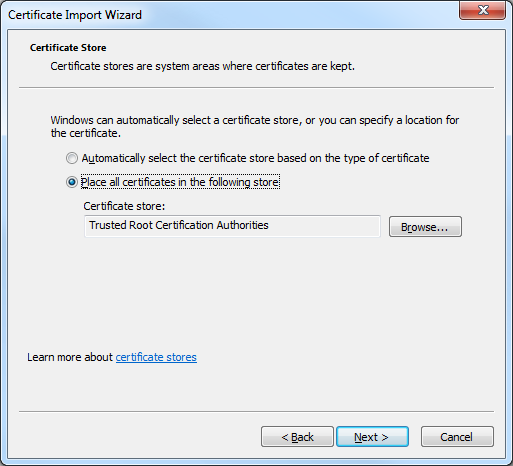
- Ensure that Place all certificates in the following store is checked and verify that the selected Certificate store is set to Trusted Root Certification Authorities, and then click click Next:
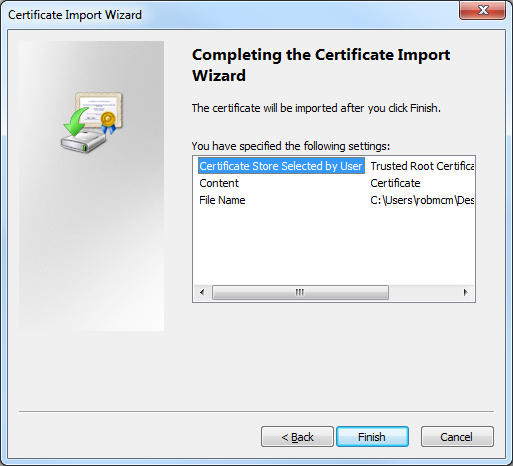
- Click Finish to import the certificate:
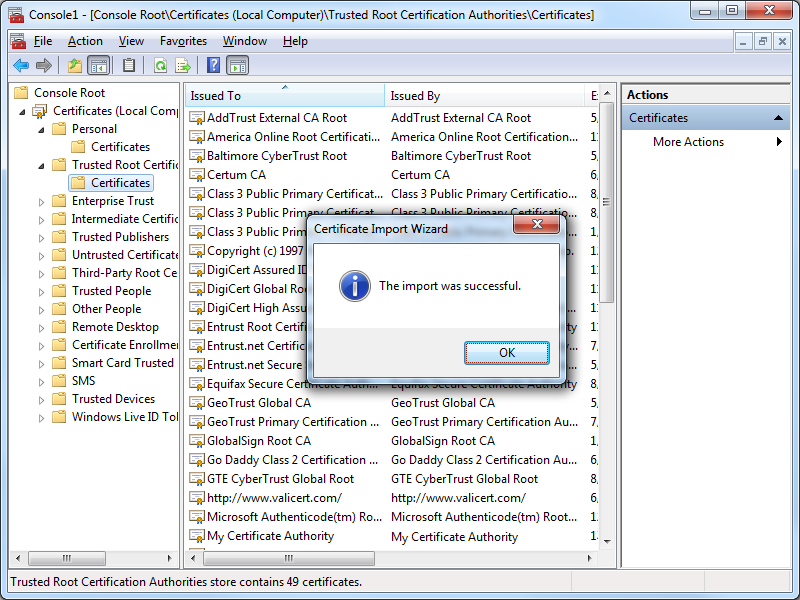
- Click OK when the Certificate Import Wizard displays a dialog box informing you that the import was successful:
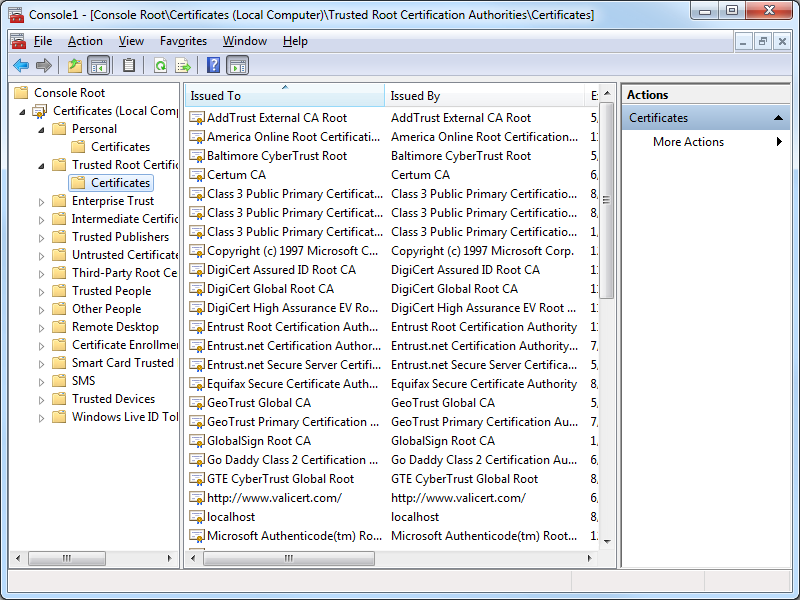
- You IIS Express certificate should now be displayed in the listed of Trusted Root Certification Authorities as "localhost":
- In the Console Root, expand Certificates (Local Computer), then expand Trusted Root Certification Authorities, and then click Certificates:
Testing the Certificate Installation
Once you have completed all of the steps in one of the resolutions, you should use the following steps to test the installation of your IIS Express certificate as a trusted root certification authority:
- Close all instances of Internet Explorer that you have open.
- Re-open Internet Explorer, then browse to to https://localhost:44300/ (or whatever port IIS Express is using); your website should be displayed without prompting you to verify that you want to continue to the website.
- Click the Security Report icon in the address bar you should see that the website has been identified as localhost:
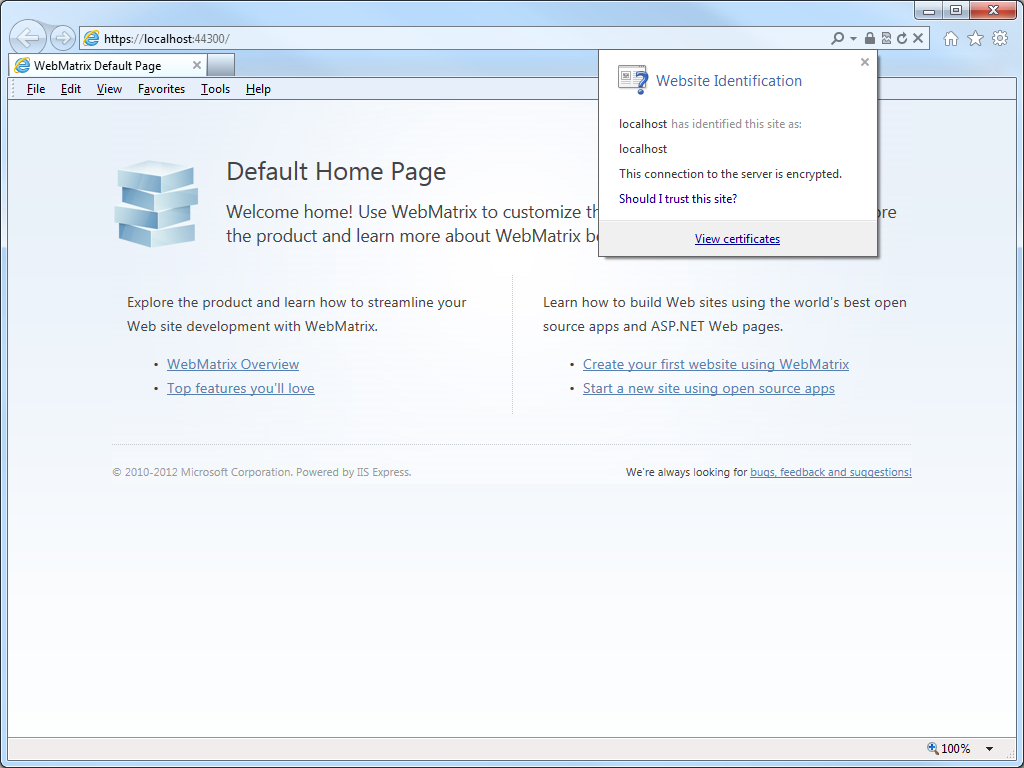
- If you click View certificates, you should now see that the certificate is trusted to ensure the identity of the computer:
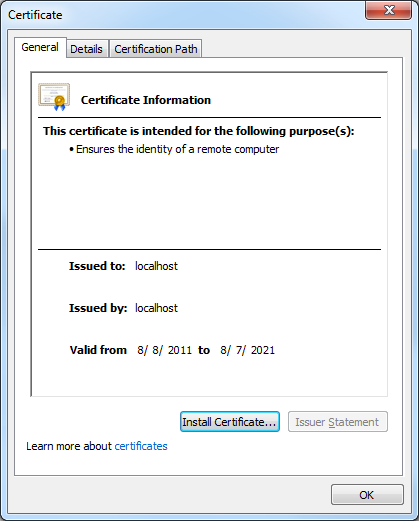
In Closing...
This blog was a little longer than some of my past blogs, but it should provide you with the information you need to trust HTTPS-based websites that you are developing with IIS Express.
That wraps it up for today's blog post. ;-]
Note: This blog was originally posted at http://blogs.msdn.com/robert_mcmurray/
FTP Clients - Part 11: Beyond Compare 3
30 November 2012 • by Bob • FTP, SSL
For this installment in my series about FTP clients, I want to take a look at Beyond Compare 3 from Scooter Software. At its heart, Beyond Compare is a file/folder comparison tool, so it might seem an unlikely candidate for an FTP client, but it has a lot of great FTP features packed into it.
 |
| Fig. 1 - The Help/About dialog in Beyond Compare 3. |
Note: For this blog I used Beyond Compare version 3.3.5.
Beyond Compare 3 Overview
Like many self-proclaimed computer geeks, over the years I have collected a lot of various utilities that perform specific actions that I need to take care of. Sometimes I discover these tools when Binging my way through the Internet, and other times they come highly recommended from other people. In this specific situation, Beyond Compare falls into the latter category - dozens of people had recommended Beyond Compare to me before I tried it out, and after falling in love with it I have recommended it to dozens of my friends. At the time I was using Microsoft WinDiff to compare files, which is still a great application to do simple comparisons, but Beyond Compare does so much more.
 |
| Fig. 2 - The Start New Session screen. |
 |
| Fig. 3 - Comparing the files within two folders. |
 |
| Fig. 4 - Comparing the HTML content of two files. |
I could go on about Beyond Compare as a comparison tool, but that's really outside the scope of this blog since I am supposed to be talking about FTP features. Needless to say, if you're looking for a good comparison tool, you might want to download the trial edition of Beyond Compare 3 and give it a try.
That being said, let's get back to the business at hand. Beyond Compare 3 has a collection of FTP Profiles, which you can think of as analogous to a site manager in more traditional FTP clients.
 |
| Fig. 5 - Opening Beyond Compare 3's FTP Profiles. |
Inside the FTP Profiles dialog, you can specify a wealth of connection options for remote FTP sites that you would expect to find in any other FTP client.
 |
| Fig. 6 - Specifying FTP connection options. |
Once you have established an FTP connection through Beyond Compare 3, you can view your local files and the files in your remote FTP site side-by-side, and then you can perform comparisons, updates, merges, etc.
 |
| Fig. 7 - Viewing local and remote files. |
Using Beyond Compare 3 with FTP over SSL (FTPS)
Beyond Compare 3 has built-in support for Explicit FTP over SSL (FTPS), which you specify when you are creating the FTP profile for a site.
 |
| Fig. 8 - Specifying an Explicit FTPS connection. |
Once you have established an Explicit FTPS connection through Beyond Compare 3, the user experience is the same as it is for a standard FTP connection.
 |
| Fig. 9 - Comparing files over FTPS. |
That being said, at first glance Beyond Compare 3 did not appear to support Implicit FTPS. For me this was not a deal-breaker by any stretch of the imagination since Explicit FTPS is preferred. (Even though Implicit FTPS is supported by IIS7 through IIS8, it is really an outdated protocol.)
10 January 2013 Update: I heard from Craig Peterson at Scooter Software that Beyond Compare 3 does support Implicit FTPS, but it does so implicitly. (No pun intended. ;-]) When you connect using FTP over SSL on port 990, it will automatically use implicit FTPS.
Using Using Beyond Compare 3 with True FTP Hosts
Beyond Compare 3 has built-in support for the HOST command, so you can use true FTP host names when using Beyond Compare 3 to connect to FTP7 and FTP8 sites that are configured with host names. This feature is enabled by default, but if you needed to disable it for some reason, that feature can be accessed on the Connection tab of Beyond Compare 3's FTP Profiles dialog.
 |
| Fig. 10 - Specifying support for the FTP HOST command. |
Using Using Beyond Compare 3 with Virtual FTP Hosts
Beyond Compare 3's login settings allow you to specify the virtual host name as part of the user credentials by using syntax like "ftp.example.com|username" or "ftp.example.com\username", but since Beyond Compare 3 allows you to use true FTP hosts this is really a moot point. Just the same, there's nothing to stop you from disabling the HOST command for a connection and specifying an FTP virtual host as part of your username, although I'm not sure why you would want to do that.
 |
| Fig. 11 - Specifying a virtual FTP host. |
Scorecard for Beyond Compare 3
This concludes our quick look at some of the FTP features that are available with Beyond Compare 3, and here are the scorecard results:
| Client Name | Directory Browsing | Explicit FTPS | Implicit FTPS | Virtual Hosts | True HOSTs | Site Manager | Extensibility |
|---|---|---|---|---|---|---|---|
| Beyond Compare 3.3.5 | Rich | Y | Y | Y | Y | Y | N/A 1 |
| As noted earlier, Beyond Compare 3 supports the FTP HOST command, and is enabled by default for new connections. 1 Note: I could not find anyway to extend the functionality of Beyond Compare 3, but it does have a scripting interface; see their Automating with Scripts and Scripting Reference pages for more details. |
|||||||
So there you have it - Beyond Compare 3 contains many of the features that would make up a great GUI-based FTP client with first-class support for all of the features that I have been examining in detail throughout my blog series about FTP clients. And as I have done with all of my blogs thus far, I included the following disclaimer in all of my preceding posts: there are a great number of additional features that Beyond Compare 3 provides - but once again I only focused on a few specific topic areas that apply to FTP7 and FTP8. For example, one particular feature that I might to experiment with in the future is Beyond Compare 3's support for FTP SSL Client Certificates. But I'll leave that for another day. ;-]
Note: This blog was originally posted at http://blogs.msdn.com/robert_mcmurray/
IIS 6: Setting up SSL - Appendix C: Processing a Certificate Request using Windows 2003 Certificate Services
03 August 2011 • by Bob • IIS, SSL
In this last appendix for my blog series about using SSL with IIS 6, I'll discuss processing a certificate request by using Windows 2003 Certificate Services. When you are running a certificate server for your network environment, you will need to physically issue the certificates that clients will request from your certificate server. There is a way that you can configure certificate services to automatically issue certificates, but I'd advise against that, unless you are only issuing certificates for testing purposes. If so, then you should read the Set the default action upon receipt of a certificate request topic on Microsoft's TechNet website.
That being said, the procedure to approve and issue a certificate is relatively easy; to do so, use the following steps:
- Open the "Certificate Authority" administrative tool:
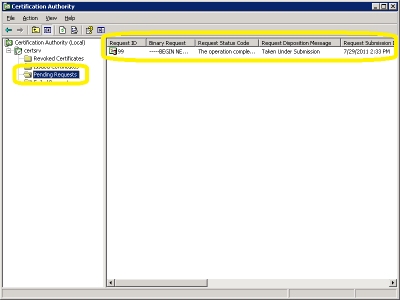
- Click on "Pending Requests":
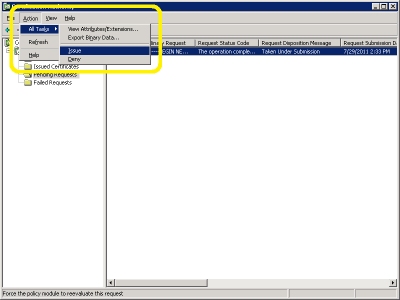
- Right-click the pending request and choose "All Tasks", then click "Issue":
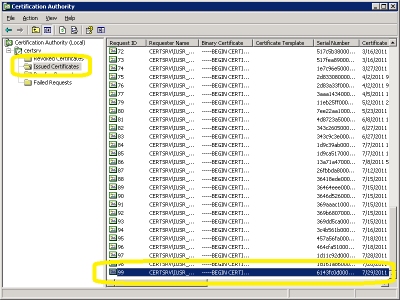
- The certificate will now show up under "Issued Certificates":
That wraps up the last post in this blog series about using Secure Sockets Layer (SSL) with IIS 6.0, as well as some related information about using Windows 2003 Certificate Services. I hope this information helps administrators that have yet to upgrade to Windows Server 2008 or Windows Server 2008 R2. ;-]
Note: This blog was originally posted at http://blogs.msdn.com/robert_mcmurray/
IIS 6: Setting up SSL - Appendix B: Obtaining a Root Certificate from Windows Server 2003 Certificate Services
29 July 2011 • by Bob • IIS, SSL
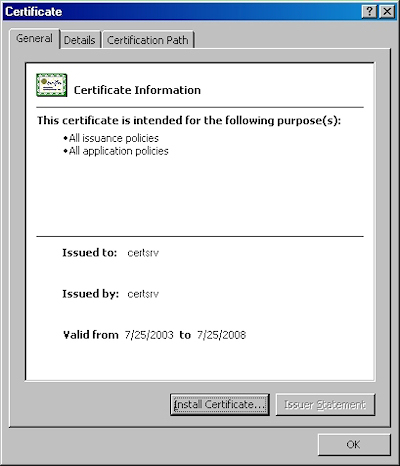
In this second appendix for my blog series about using SSL with IIS 6, I'm going to discuss obtaining the root certificate from Windows Server 2003 Certificate Services. By way of explanation, obtaining a root certificate is one of the most important steps for servers or clients that will use certificates that you issue. While this step is not necessary on the server where you installed Certificate Services, it is absolutely essential on your other servers or clients, because this step will allow those computers to trust your certificate server as a Certificate Authority (CA). Without that trust in place, you will either receive error messages or SSL simply won't work.
I've broken this process into two steps:
Downloading the Root Certificate
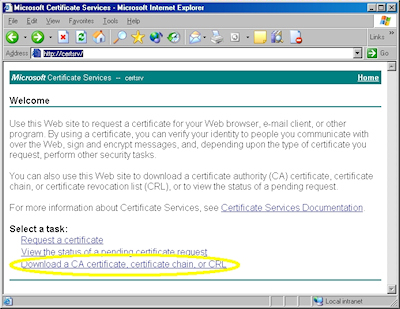
- Browse to your certificate server's address, (e.g. http://<server-name>/certsrv/), and choose to retrieve the CA certificate:
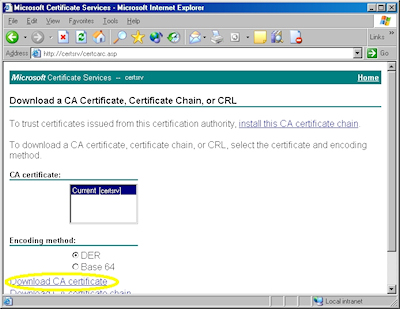
- Click the link to download the CA certificate:
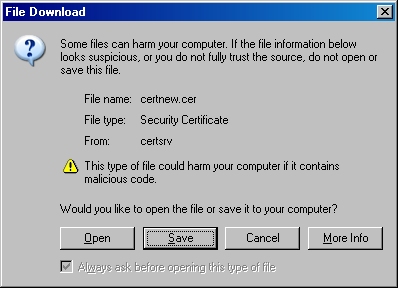
- Choose to save the certificate file to disk:
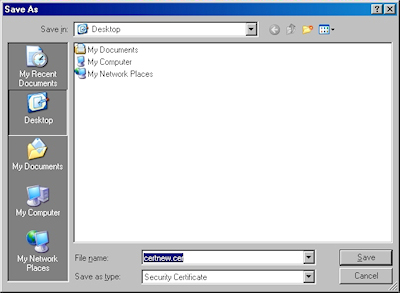
- Save the file to your desktop:
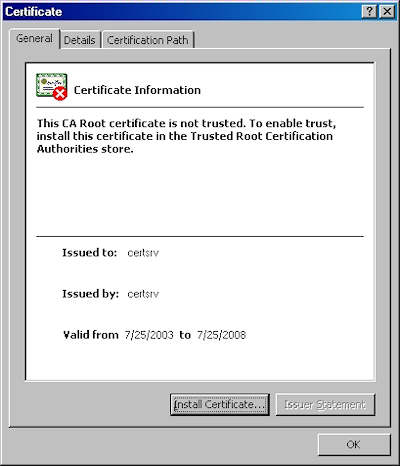
Note: If you were to bring up the properties for the root certificate, the certificate's icon should show an error; this is because the certificate has not been imported.
Installing the Root Certificate
Before using any certificates that you issue on a computer, you need to install the Root Certificate. (This includes web servers and clients.)
- Double-click the file on your desktop:

- Click the "Install Certificate" button:
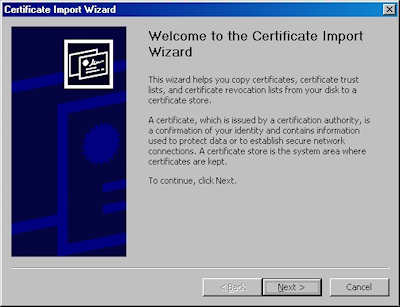
- Click "Next" to start the Certificate Import Wizard:
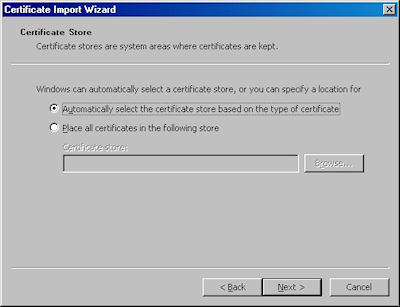
- Choose to automatically choose the store:
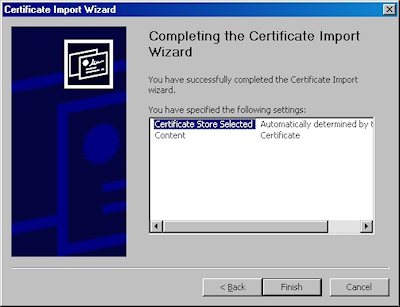
- Click the "Finish" button:
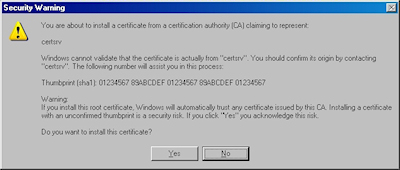
- Click "Yes" when asked if you want to add the certificate: NOTE: This step is very important. If you do not see this dialog, something went wrong, and you may need to manually place the certificate in the correct store.
- Click "OK" when informed that the import was successful.
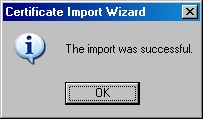
Note: If you were to bring up the properties for the root certificate after you have installed it on your computer, you should see that the icon for the certificate no longer shows an error.
That's it for this post. In my next blog post, I'll discuss processing a certificate request.
Note: This blog was originally posted at http://blogs.msdn.com/robert_mcmurray/
IIS 6: Setting up SSL - Appendix A: Installing Windows Server 2003 Certificate Services
28 July 2011 • by Bob • IIS, SSL
I needed to take a short break from my blog series about using SSL with IIS 6 in order to work on some other projects, but I wanted to finish the series by giving you a few appendices that give you some additional details that you might want to know if you are using SSL with IIS 6.
In this first appendix, I'll discuss how to install Certificate Services for Windows Server 2003. Installing Certificate Services will allow you to have your own Certificate Authority (CA), and thereby you will be able to issue certificates for your organization. It should be noted that Internet clients that are not part of your organization will not inherently trust your certificates - you will need to export your Root CA certificate, which I will describe in a later appendix for this blog series.
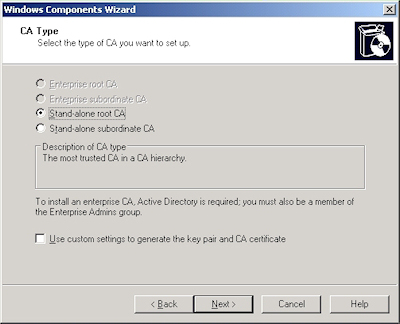
There are four different configurations that you can choose from when you are installing Certificate Services:
| Enterprise root CA | Integrated with Active Directory Acts as the root CA for your organization |
|---|---|
| Enterprise subordinate CA | Integrated with Active Directory Child of your organization's root CA |
| Stand-alone root CA | Not integrated with Active Directory Acts as the root CA for your certificate chain |
| Stand-alone subordinate CA | Not integrated with Active Directory Child of your certificate chain's root CA |
Note: More information about these options is available at http://technet.microsoft.com/en-us/library/cc756989.aspx
For this blog, I will discuss setting up a Stand-alone root CA.
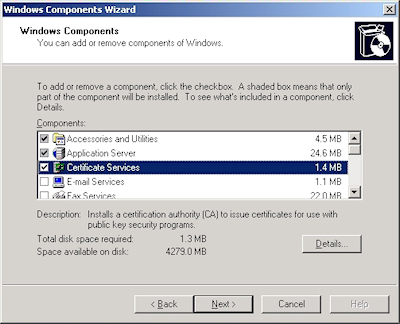
- Run the "Windows Component Wizard" in "Add/Remove Programs", choose "Certificate Services", and click "Next":
- Click "Yes" when prompted to continue:
- Accept the defaults, then click "Next":
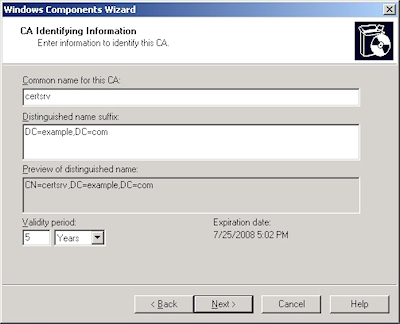
- Enter all requested information, then click "Next":
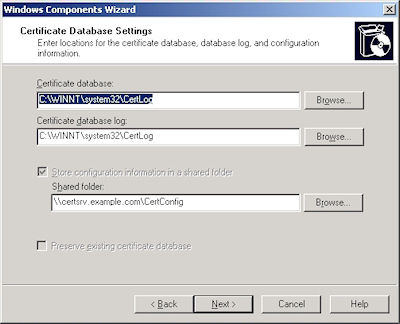
- Accept the defaults for the data locations and click "Next":
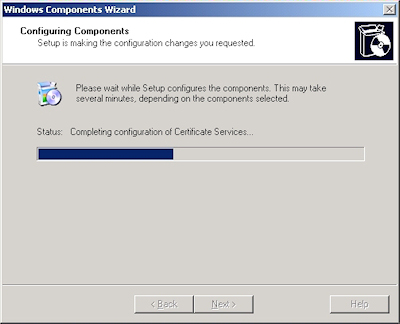
- The wizard will step through installing the services:
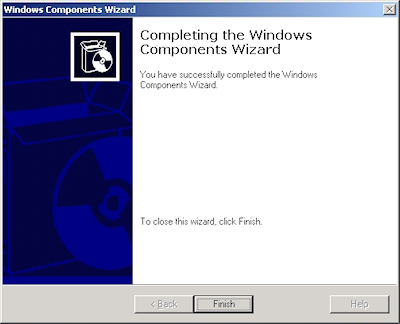
- When the wizard has completed, click "Finish" to exit the wizard:
That wraps up this blog post. In my next post I'll discuss obtaining the root certificate for your certificate server so you can install it on a client computer or an IIS server; this will allow other computers to trust the certificates that you issue.
Note: This blog was originally posted at http://blogs.msdn.com/robert_mcmurray/


