How to trust the IIS Express Self-Signed Certificate
15 November 2013 • by Bob • SSL, IIS Express, WebMatrix, Visual Studio, Internet Explorer
I had an interesting question from a coworker today that I thought would make a great blog. Here's the scenario...
Problem Description
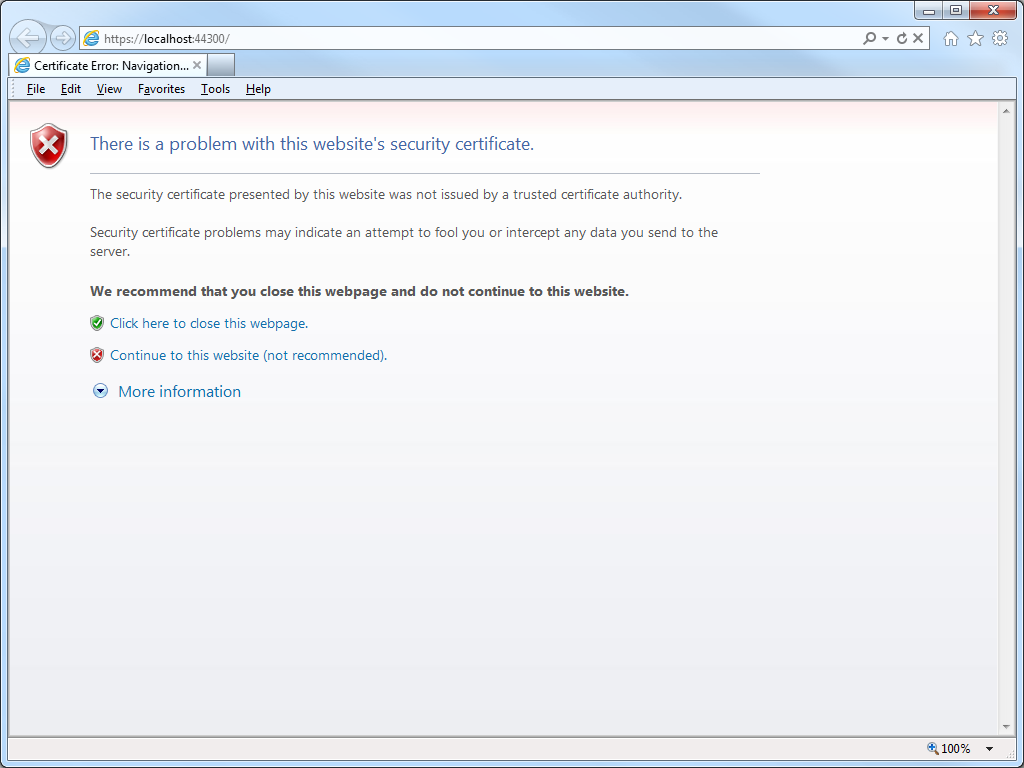
My coworker was using WebMatrix to create a website, although he could have been using Visual Studio and he would have run into the same problem. The problem he was seeing was that his application required HTTPS, but he was greeted with the following error message every time that he used Internet Explorer to browse to his development website at https://localhost:44300/:
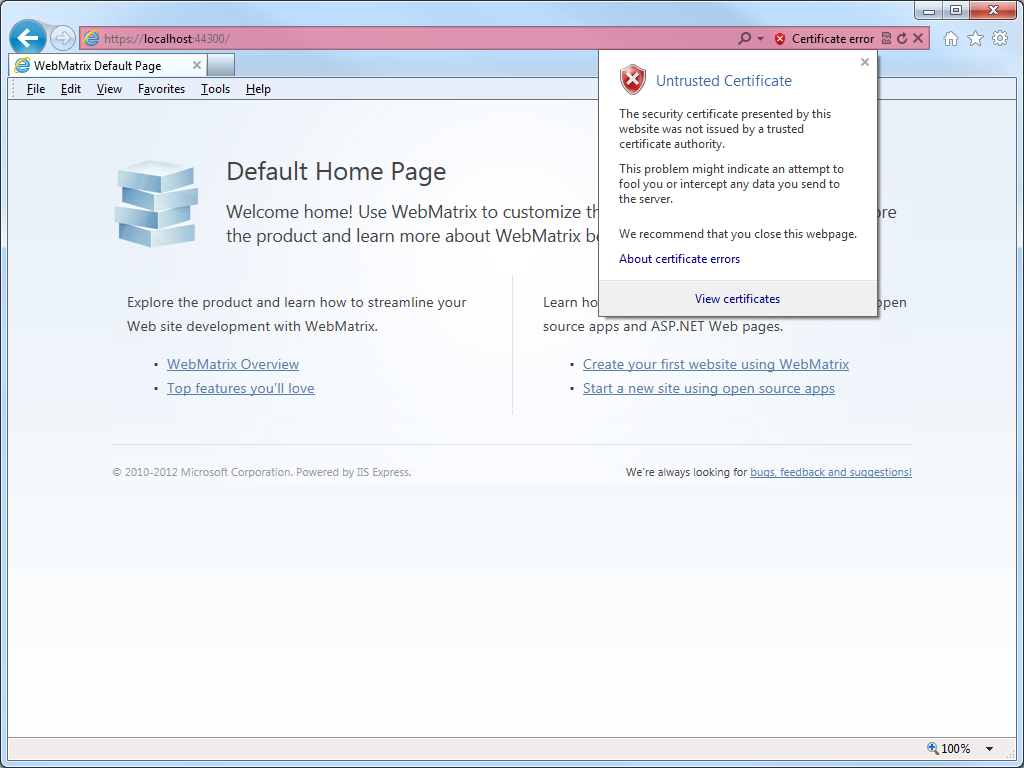
When he clicked the link to Continue to this website, he could click on Certificate error in the address bar, which would inform him that the website was using an Untrusted certificate:
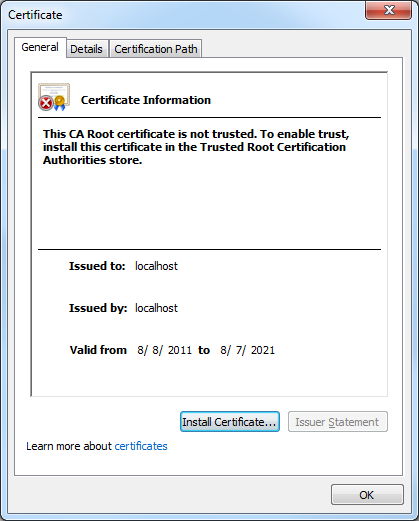
If he clicked View certificates, the Certificate dialog box informed him that the CA Root certificate was not trusted:
Cause
Since my coworker was using WebMatrix with IIS Express, which is the default development web server for WebMatrix and Visual Studio, all HTTPS communication was using the self-signed certificate from IIS Express. Since that certificate is self-signed, it is not trusted as if it was issued from a "Trusted Root Certification Authority," and therefore Internet Explorer (or any other security-conscious web browser) was doing the right thing by warning the end-user that they were using an untrusted certificate for HTTPS.
If you were seeing this error when browsing to an Internet website, this would be "A Very Bad Thing™", because you might be sending your confidential information to an untrusted website.
Resolutions
Fortunately this situation can be easily rectified, and there are two different approaches that you can use, and I will discuss both in the subsequent sections.
Resolution Number #1 - Configure your personal account to trust the IIS Express Certificate
The easiest solution is to configure your user account to trust the self-signed certificate as though it were issued by a trusted root certificate authority. To do so, use the following steps:
- Browse to https://localhost:44300/ (or whatever port IIS Express is using) using Internet Explorer and click Continue to this website:
- Click on Certificate error in the address bar, and then click View certificates:
- When the Certificate dialog box is displayed, click Install Certificate:
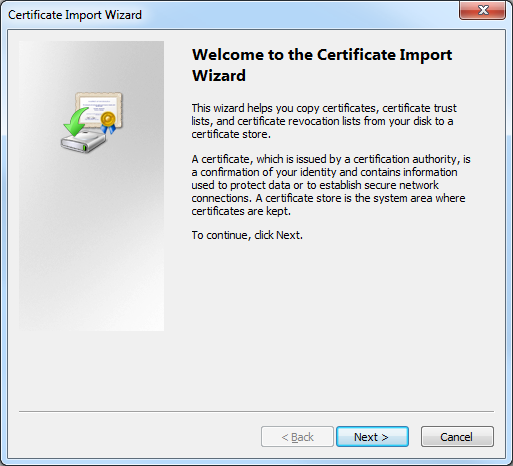
- When the Certificate Import Wizard is displayed, click Next:
- Click Place all certificates in the following store, and then click Browse:
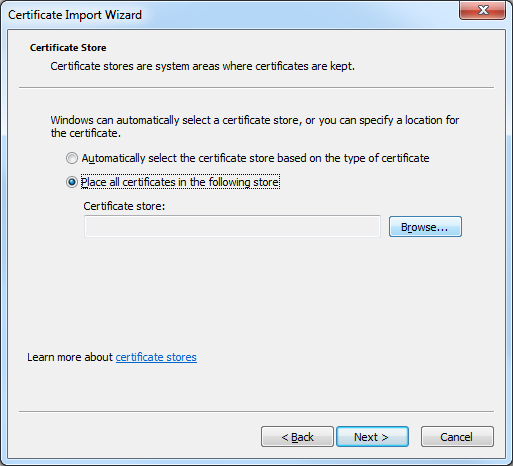
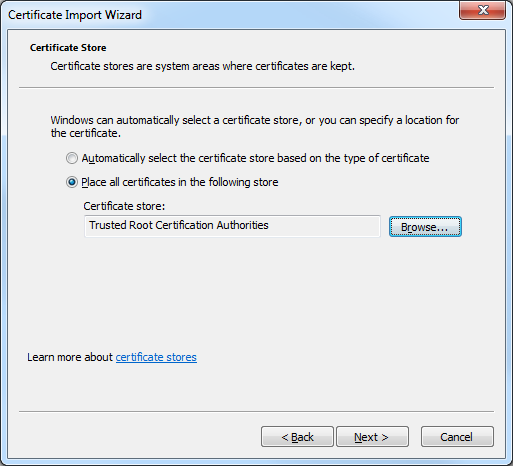
- When the Select Certificate Store dialog box is displayed, click Trusted Root Certification Authorities, and then click OK:
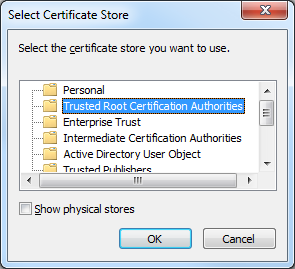
- On the Certificate Import Wizard, click Next:
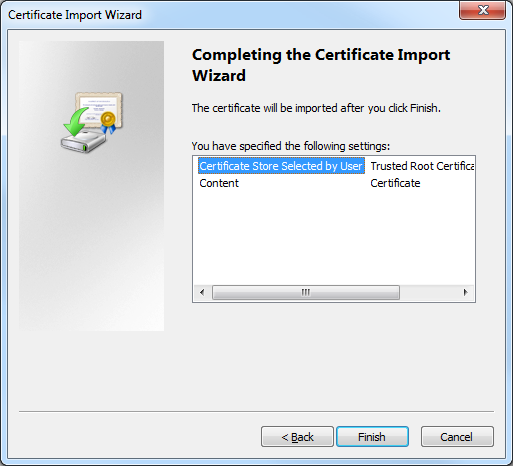
- When the Completing the Certificate Import Wizard page is displayed in the wizard, click Finish:
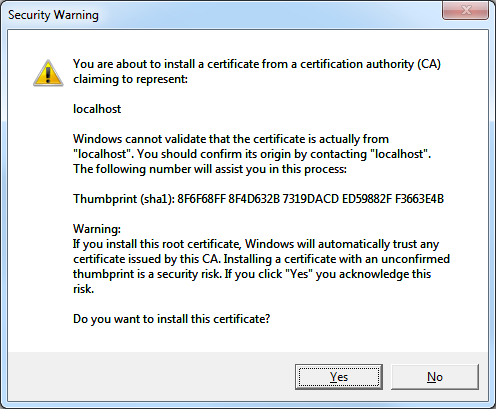
- When the Security Warning dialog box is displayed, click Yes to trust the certificate:
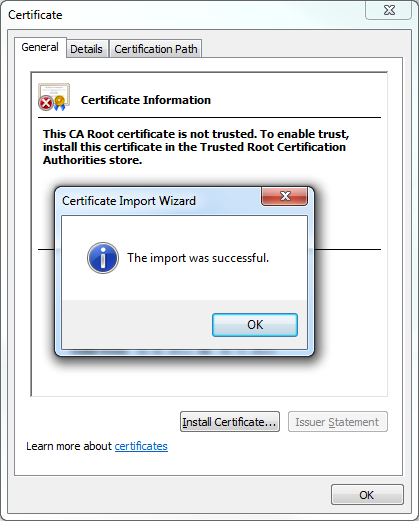
- Click OK when the Certificate Import Wizard informs you that the import was successful:
Resolution Number #2 - Configure your computer to trust the IIS Express Certificate
A more-detailed approach is to configure your computer system to trust the IIS Express certificate, and you might want to do this if your computer is shared by several developers who log in with their individual accounts. To configure your computer to trust the IIS Express certificate, use the following steps:
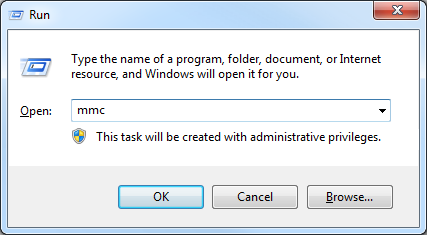
- Open a blank Microsoft Management Console by clicking Start, then Run, entering "mmc" and clicking OK:
Note: You can also open a blank Microsoft Management Console by typing "mmc" from a command prompt and pressing the Enter key. - Add a snap-in to manage certificates for the local computer:
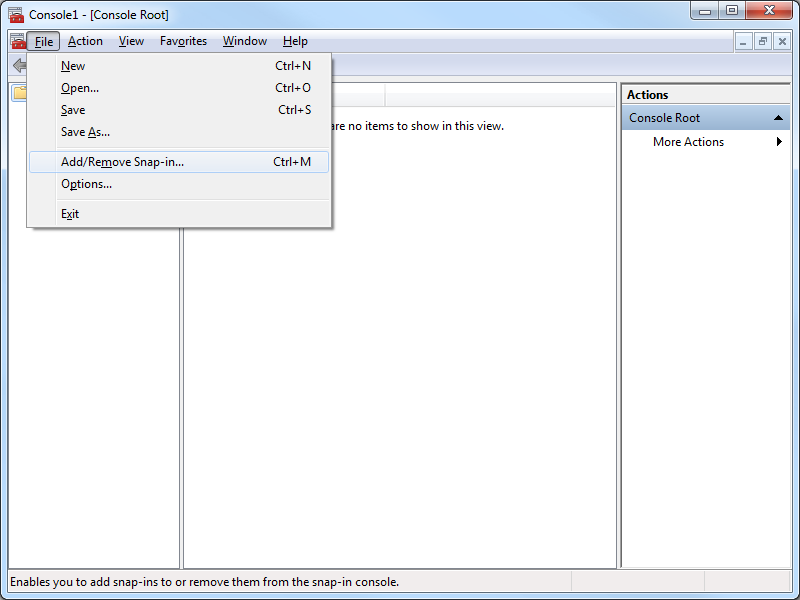
- Click File, and then click Add/Remove Snap-in:
- When the Add or Remove Snap-ins dialog box is displayed, click Certificates, and then click Add:
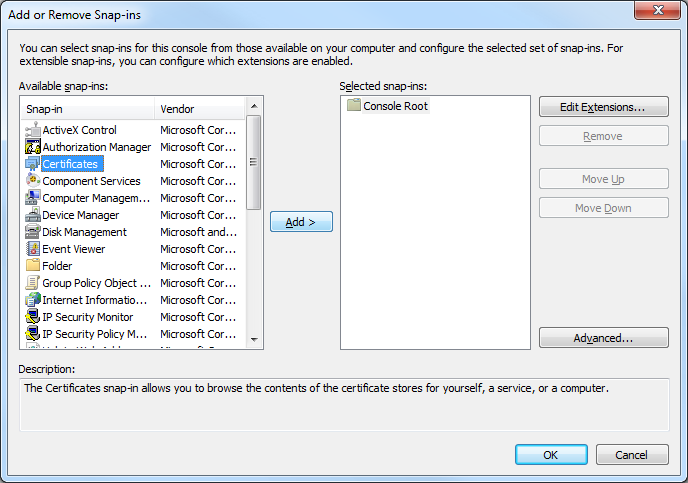
- When the Certificates Snap-ins dialog box is displayed, click Computer account, and then click Next:
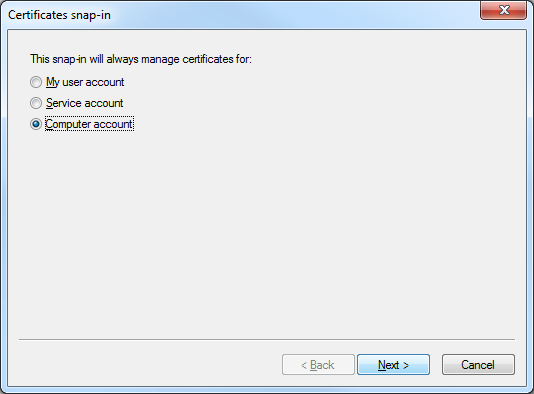
- Click Local computer, and then click Finish:
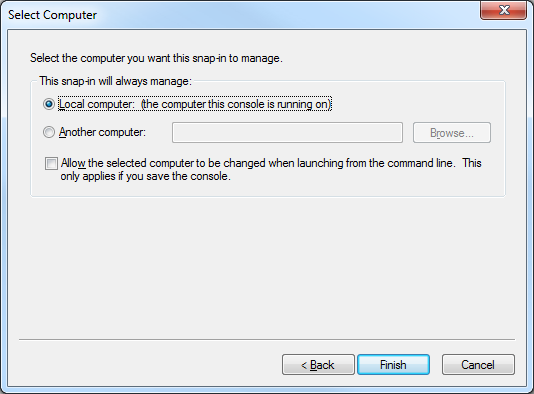
- Click OK to close the Add or Remove Snap-ins dialog box:
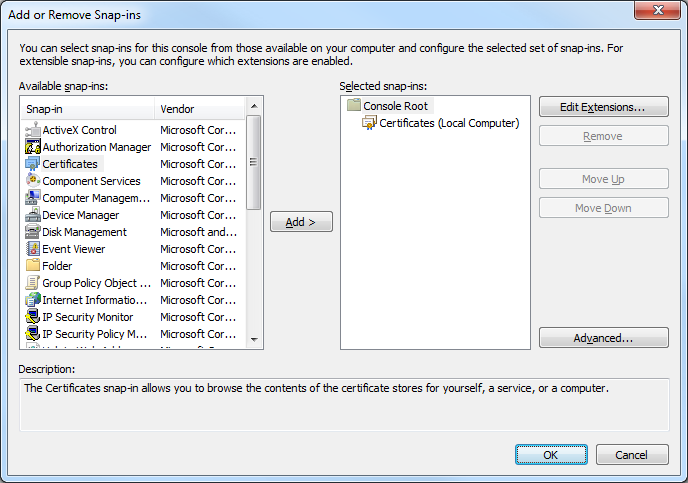
- Click File, and then click Add/Remove Snap-in:
- Export the IIS Express certificate from the computer's personal store:
- In the Console Root, expand Certificates (Local Computer), then expand Personal, and then click Certificates:
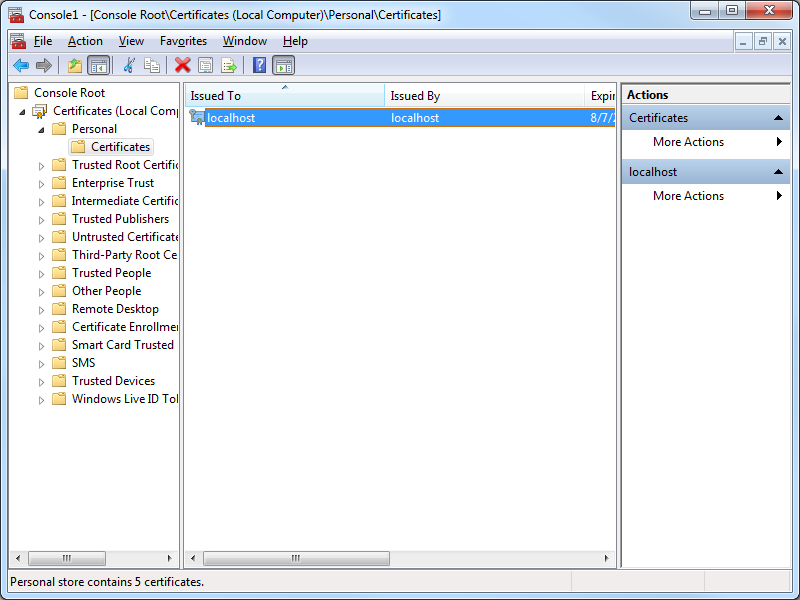
- Select the certificate with the following attributes:
- Issued to = "localhost"
- Issued by = "localhost"
- Friendly Name = "IIS Express Development Certificate"
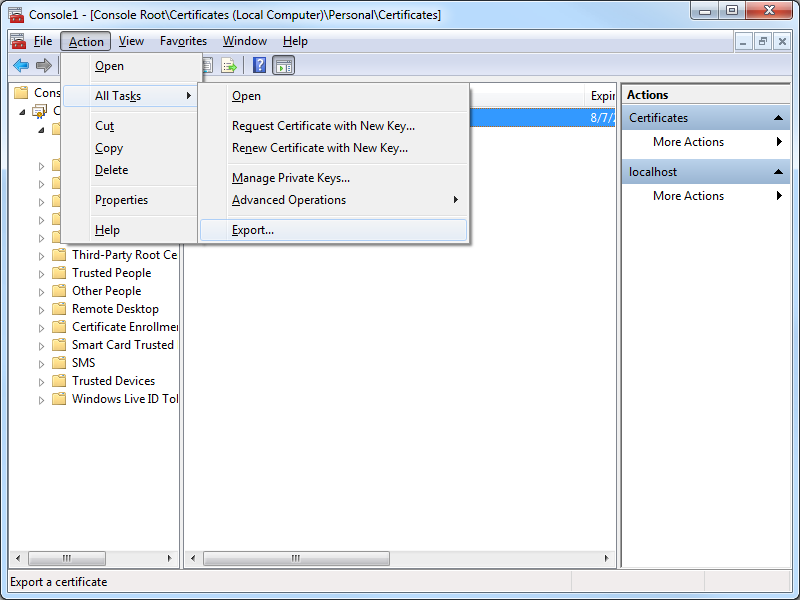
- Click Action, then click All Tasks, and then click Export:
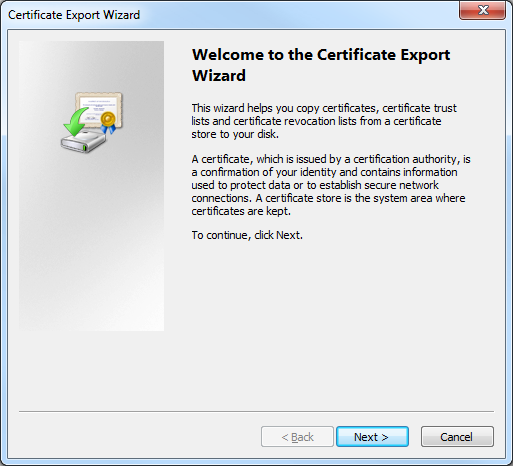
- When the Certificate Export Wizard is displayed, click Next:
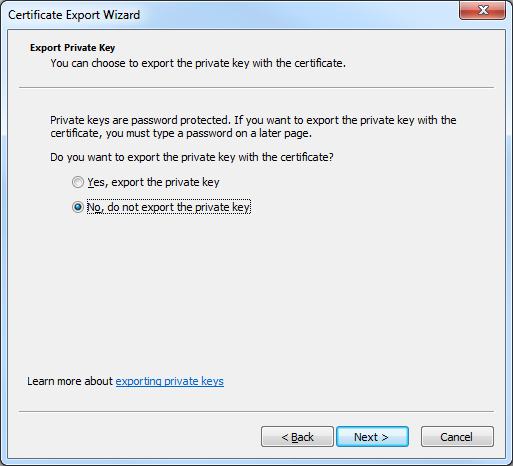
- Click No, do not export the private key, and then click Next:
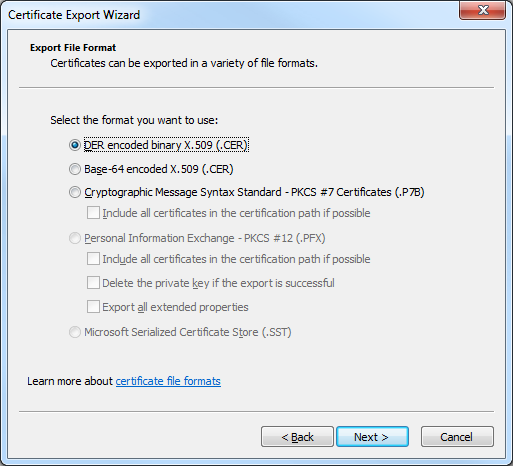
- Click DER encoded binary X.509 (.CER), and then click Next:
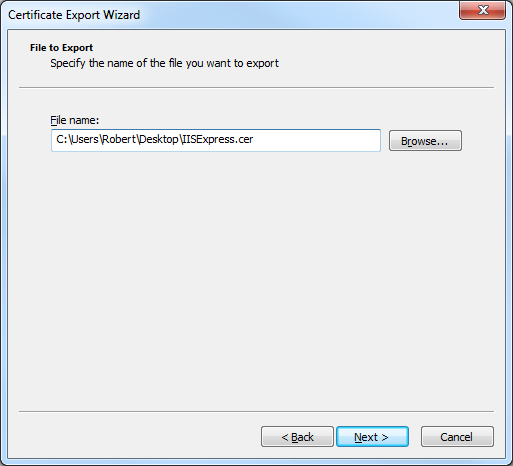
- Enter the path for exported certificate, e.g. "c:\users\robert\desktop\iisexpress.cer", and then click Next:
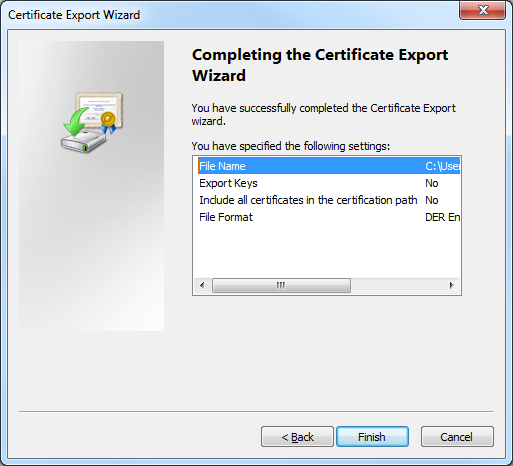
- Click Finish to export the certificate:
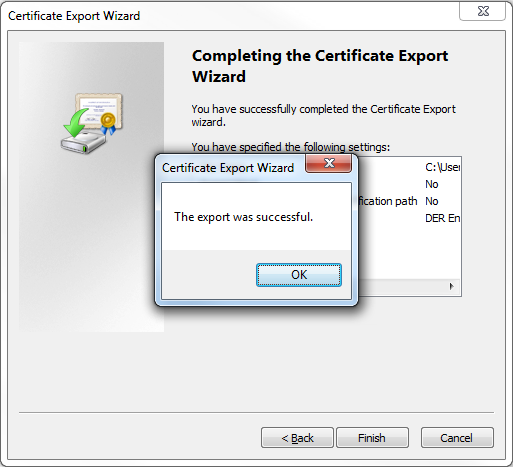
- Click OK when the Certificate Export Wizard displays a dialog box informing you that the export was successful:
- In the Console Root, expand Certificates (Local Computer), then expand Personal, and then click Certificates:
- Import the IIS Express certificate to the computer's Trusted Root Certification Authorities store:
- In the Console Root, expand Certificates (Local Computer), then expand Trusted Root Certification Authorities, and then click Certificates:
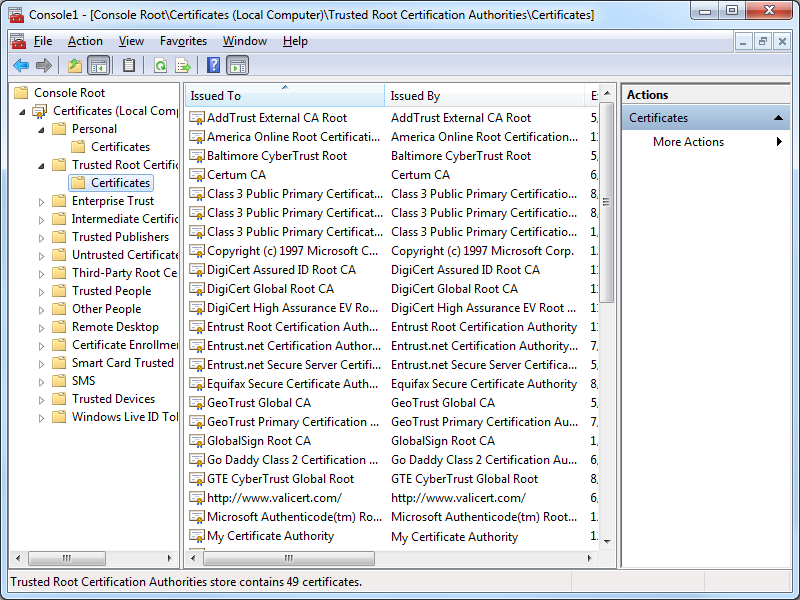
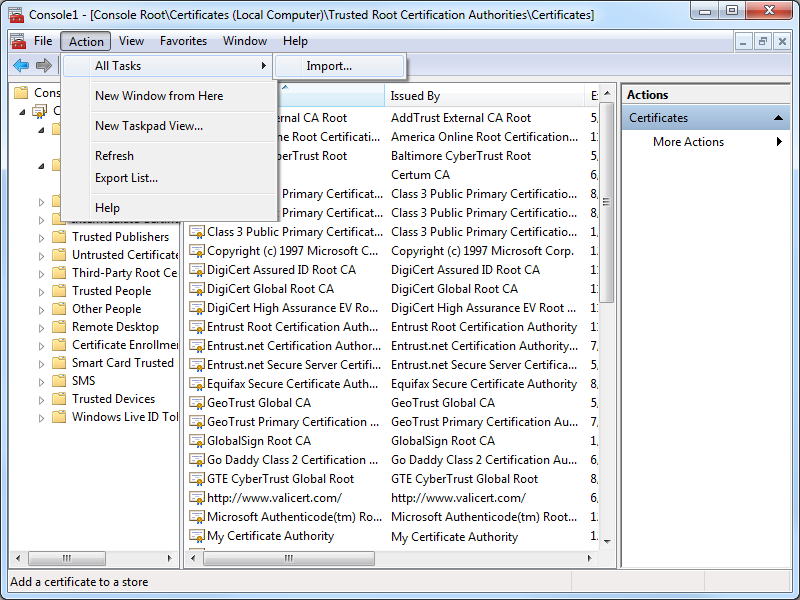
- Click Action, then click All Tasks, and then click Import:
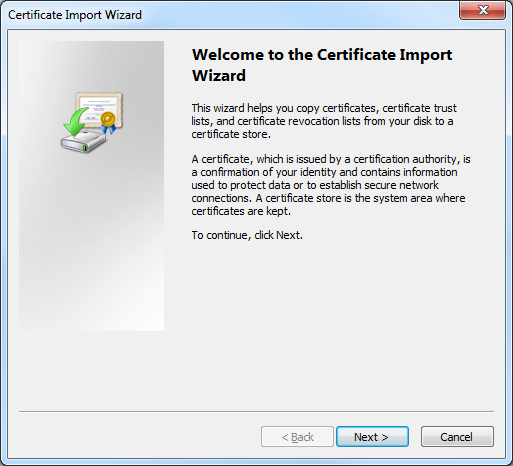
- When the Certificate Import Wizard is displayed, click Next:
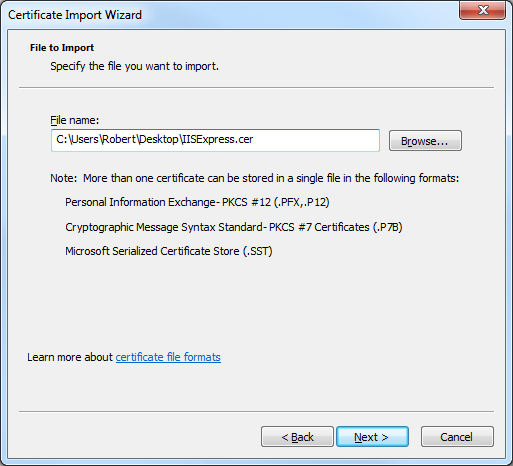
- Enter the path to your exported certificate, e.g. "c:\users\robert\desktop\iisexpress.cer", and then click Next:
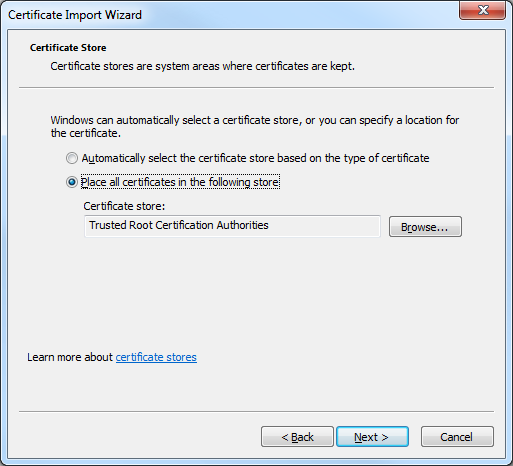
- Ensure that Place all certificates in the following store is checked and verify that the selected Certificate store is set to Trusted Root Certification Authorities, and then click click Next:
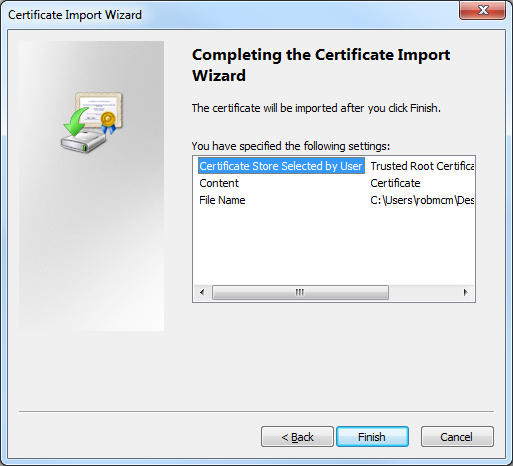
- Click Finish to import the certificate:
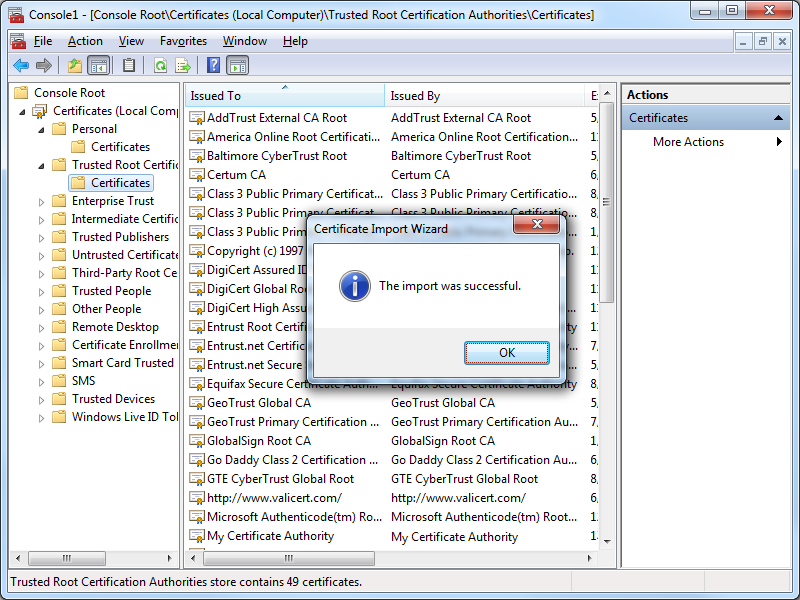
- Click OK when the Certificate Import Wizard displays a dialog box informing you that the import was successful:
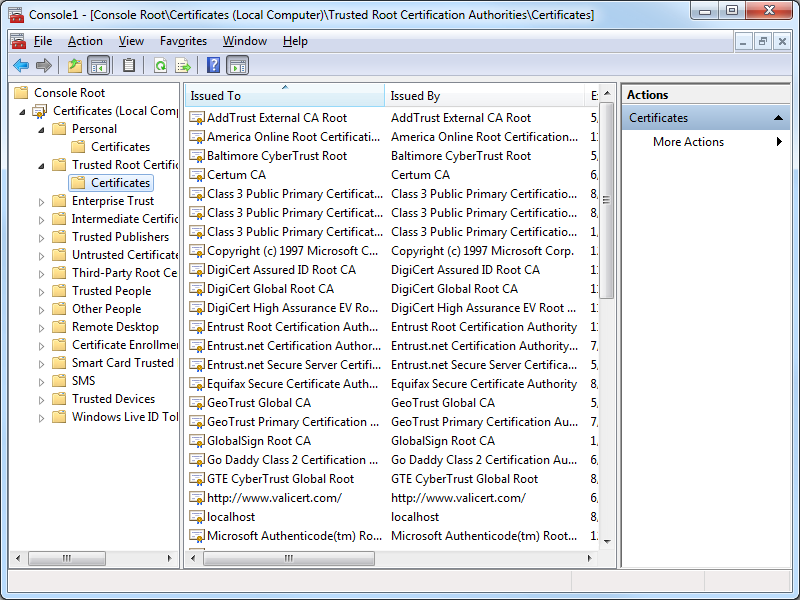
- You IIS Express certificate should now be displayed in the listed of Trusted Root Certification Authorities as "localhost":
- In the Console Root, expand Certificates (Local Computer), then expand Trusted Root Certification Authorities, and then click Certificates:
Testing the Certificate Installation
Once you have completed all of the steps in one of the resolutions, you should use the following steps to test the installation of your IIS Express certificate as a trusted root certification authority:
- Close all instances of Internet Explorer that you have open.
- Re-open Internet Explorer, then browse to to https://localhost:44300/ (or whatever port IIS Express is using); your website should be displayed without prompting you to verify that you want to continue to the website.
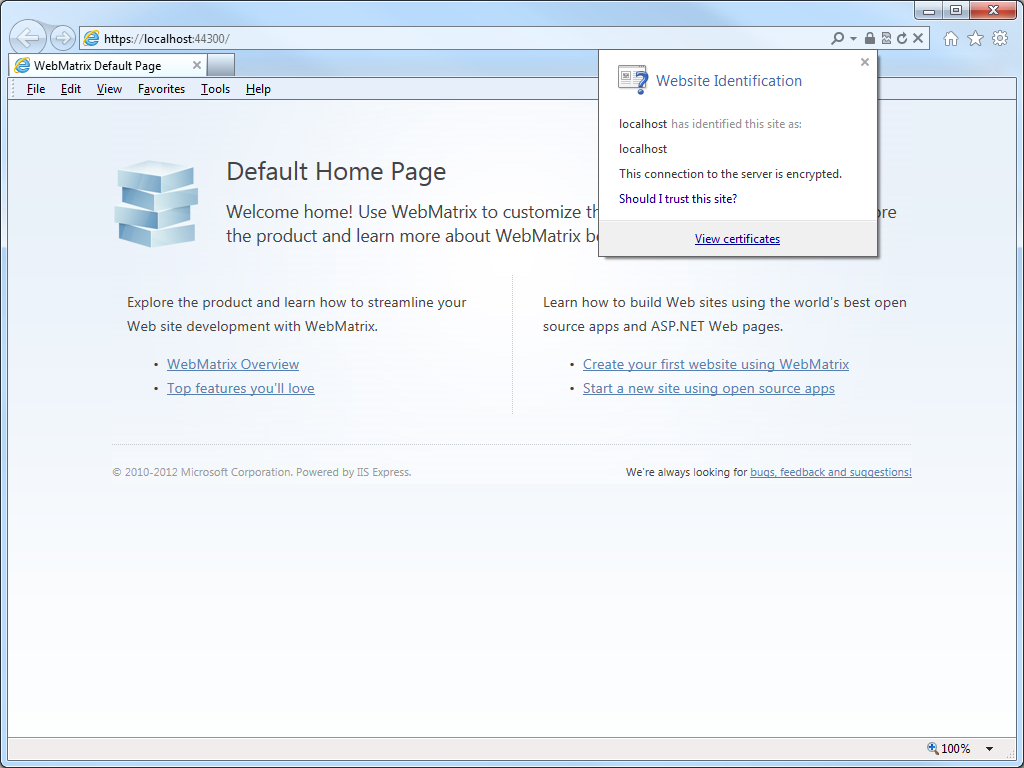
- Click the Security Report icon in the address bar you should see that the website has been identified as localhost:
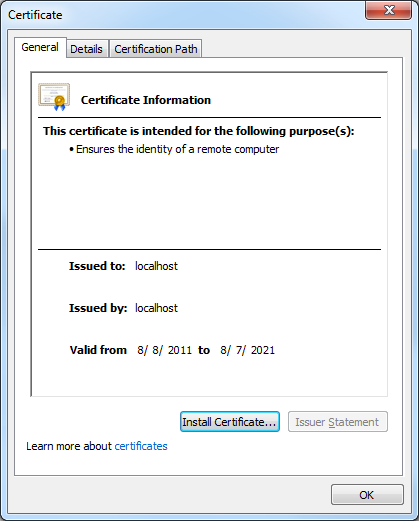
- If you click View certificates, you should now see that the certificate is trusted to ensure the identity of the computer:
In Closing...
This blog was a little longer than some of my past blogs, but it should provide you with the information you need to trust HTTPS-based websites that you are developing with IIS Express.
That wraps it up for today's blog post. ;-]
Note: This blog was originally posted at http://blogs.msdn.com/robert_mcmurray/
IntelliSense for jQuery in WebMatrix
28 June 2013 • by Bob • Scripting, WebMatrix
I recently had the opportunity to take a day-long class about jQuery from the good folks at Wintellect. The class went great, and I wrote all of my code for the class in WebMatrix. You might recall from my previous blogs that I am a big fan of WebMatrix, but at first there was one thing that was missing from WebMatrix's arsenal of cool features; in order for WebMatrix to really be useful as an editor for jQuery, I really wanted to have IntelliSense support for jQuery. Thankfully, even though IntelliSense support for jQuery is not built-in, adding IntelliSense for jQuery is extremely easy, and I thought that would make a great subject for today's blog.
To start things off, let's take a look at a jQuery sample that is little more than a Hello World sample:
<!DOCTYPE html>
<html lang="en">
    <head>
        <meta charset="utf-8" />
        <title>jQuery Test Page</title>
    </head>
    <body>
        <script src="http://ajax.microsoft.com/ajax/jQuery/jquery-2.0.0.min.js" type="text/javascript"></script>
        <script>
        $(function() {
           $("#bar").text($("#foo").text());
           $("#foo").text("This is some custom text");
        });
        </script>
        <h1 id="foo">This is the first line</h1>
        <h2 id="bar">This is the second line</h2>
    </body>
</html>
This example does very little: it loads the jQuery library from Microsoft's AJAX Content Delivery Network (CDN), and it uses jQuery to replace the text in a couple of HTML tags. (The example isn't really important - getting IntelliSense to work is the topic du jour.) This sample would look like the following illustration if you opened it in WebMatrix 3:
When you are using a JavaScript library for which there is no built-in support, Microsoft's developer tools allow you to add IntelliSense support by adding Reference Directives to your page, and the files that you would use for your reference directives are available at the same Microsoft CDN where you can get the jQuery library:
http://www.asp.net/ajaxlibrary/cdn.ashx
In order to use IntelliSense for jQuery, you need to download the appropriate jquery-n.n.n-vsdoc.js file for the version of jQuery that you are using and store that in your website. For example, if you are using jQuery version 2.0.0, you would add a script reference to the CDN path for http://ajax.aspnetcdn.com/ajax/jQuery/jquery-2.0.0.min.js, and you would download the http://ajax.aspnetcdn.com/ajax/jQuery/jquery-2.0.0-vsdoc.js file for your website.
Like many developers, I usually add a folder named scripts in the root of my website, and this is where I will typically store the jquery-n.n.n-vsdoc.js file that I am using. Once you have added the appropriate jquery-n.n.n-vsdoc.js file to your website, all that you need to do is add the appropriate reference directive to your script, as I demonstrate in the highlighted section of the following code sample:
<!DOCTYPE html>
<html lang="en">
    <head>
        <meta charset="utf-8" />
        <title>jQuery Test Page</title>
    </head>
    <body>
        <script src="http://ajax.microsoft.com/ajax/jQuery/jquery-2.0.0.min.js" type="text/javascript"></script>
        <script>
        /// <reference path="scripts/jquery-2.0.0-vsdoc.js" />
        $(function() {
           $("#bar").text($("#foo").text());
           $("#foo").text("This is some custom text");
        });
        </script>
        <h1 id="foo">This is the first line</h1>
        <h2 id="bar">This is the second line</h2>
    </body>
</html>
Once you have added the reference directive for your jquery-n.n.n-vsdoc.js file, IntelliSense will begin working for jQuery in WebMatrix, as shown in the following illustration:
In Closing...
One last thing that I would like to mention is that is always a good idea to load JavaScript libraries like jQuery from a CDN, and there are lots of CDNs to choose from. There are some additional steps that you can take to ensure that your website works with jQuery even if the CDN is down, but that subject is outside the scope of this blog. ;-]
Note: This blog was originally posted at http://blogs.msdn.com/robert_mcmurray/
Using WebMatrix to Take a PHP Class
29 November 2012 • by Bob • PHP, WebMatrix
With the release of WebMatrix 2, I thought that it would be great to take a PHP class and use WebMatrix exclusively for the entire class. Much to my surprise, this proved to be a great experience. Seriously, I did not expect it to go as well as it did. This has nothing to do with WebMatrix, it's just that I've picked up some cynicism over the years where editors are concerned. This pessimistic outlook is largely due to the fact that I've tried a lot of editors based on the recommendations of my fellow geeks, and those have often been bad experiences. Usually they say something like, "Dude, if you're going to write code in <some language> then you have to use the <some editor> application."
Unfortunately, most of these editors fail to live up to their hype, and I am forced to endure trials and tribulations where I loudly exclaim "If I was using <my favorite editor> I would be done by now!" (I periodically accompany those moments with language that is best reserved for a golf course when you've just hit your last Titlelist into the water hazard.)
But those experiences never happened with WebMatrix 2 - not even once; WebMatrix did pretty much everything that I needed it to do, and it did everything really well. As a result, my cynical skepticism quickly gave way to optimistic impression.
I took copious notes about my experiences with WebMatrix throughout the class, and with that in mind, I thought that it would be great to write a blog with my genuinely unbiased thoughts about using WebMatrix exclusively as my PHP authoring platform for the two-month duration of my class. (As a point of trivia, the PHP class that I took was BMIS 410 - Web Enterprise Technologies at Liberty University. Quick shout out to my professor, Michael Hart, who was a great instructor.)
What Went Well
First of all, the intellisense for PHP was quite good - and having the URLs to the PHP.net reference pages in the tooltip help for PHP functions was extremely useful; I spent a lot of time clicking through to the PHP.net website for assistance for one function or other.
 |
| Fig. 1 - WebMatrix's Intellisense for PHP. |
Using WebMatrix to preview in IE and WP7/iPhone/iPad emulators was great; in my opinion, this experience was much better than the SuperPreview feature of Expression Web.
 |
| Fig. 2 - Options for previewing your website. |
 |
| Fig. 3 - Testing my website in the iPad simulator. |
Using the WebMatrix database editor to create tables for my MySQL database was great - in many ways it was much better than using the MySQL Workbench. The biggest drawback in WebMatrix was the inability to create auto-number fields, and I couldn't enter dates in the correct format in the database UI. (That was undoubtedly something that I was doing wrong.) So every once in a while I had to go back to the MySQL Workbench to fix something. That being said, the interface for creating relationships in WebMatrix is great, and much better than using MySQL Workbench.
 |
| Fig. 4 - Editing the data in a MySql Database. |
FTP publishing is much better in version 2 of WebMatrix. I used an IIS7 web server, so I was able to use FTP7's virtual hosts to publish to a specific site on a shared server. WebMatrix has no FTPS support, so that is something of a loss. (WebMatrix also lacks full WebDAV support, but I've already talked about that in other blogs.)
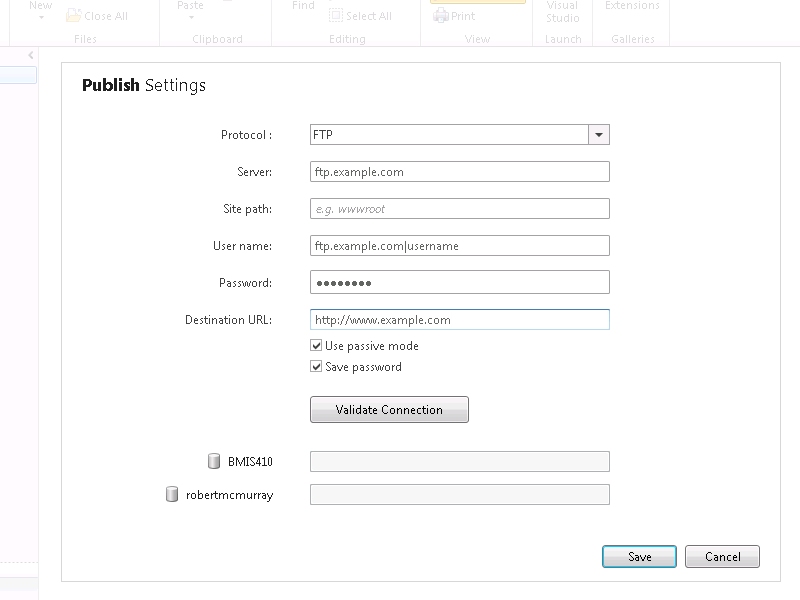 |
| Fig. 5 - FTP Publish Settings. |
This last point might seem trivial, and I realize that a lot of editors have similar features, but the way that WebMatrix keeps track of opening/closing parentheses, brackets, and curly braces saved me more times than I can count.
 |
| Fig. 6 - Helping me keep track of what I'm doing. |
What Could Have Been Better
Here are the few problems that I encountered with WebMatrix during the course:
My first issue was not a problem that was due to WebMatrix per-se, but every once in a while a page would get stuck in the cache and I couldn't see changes that I had made to a page, so I would have to restart IIS Express. I'll have to investigate why that was happening; it could be IIS Express, or it could be the PHP engine - I'm still not sure where the fault lies. Fortunately WebMatrix makes it very easy to restart IIS Express from inside WebMatrix, but still - it was a minor frustration.
WebMatrix only wanted to validate against HTML5, but my class required all assignments to use XHTML 1.0 Transitional DOCTYPE, and that showed up as errors in WebMatrix. Yes - the world is moving to HTML5, but still - that shouldn't cause an error.
Perhaps the biggest feature that WebMatrix lacks is the really cool local and remote side-by-side publishing view that both Expression Web and it's predecessor FrontPage had.
When you have a lot of pages open the WebMatrix tab bar fills up, and it's really difficult to keep track of which pages are open.
It would be nice to tear pages out of the editor like you can do with Internet Explorer and Visual Studio.
I have to mention this last item because it was in my notes, but it's technically not an issue for WebMatrix. One of my personal coding self-annoyances was that I would write the text for a string and then realize that I forgot to put it in quotes; when I would type an opening quote, WebMatrix would try to help me out by adding the closing quote - which would now be outside my string, so I always had to delete one of the quotes. There is an option to turn off that feature; see File->Options->Code in WebMatrix. But that being said, this is a useful feature when I remember to create the quotes before I start typing in a string. So once again, this is really more of a complaint against myself; it's my fault that I sometimes have lousy typing skillz. [sic]
Summary
I should start off by saying that I got an "A" in the course, and I can honestly give WebMatrix some of the credit for that. If I had spent a great deal of time fighting with an editor, I would have had less time to focus on writing PHP code. But in the end, WebMatrix actually made it easier for me to write PHP code.
So in closing, WebMatrix rocks, PHP rocks, and using WebMatrix with PHP definitely rocks.
Note: This blog was originally posted at http://blogs.msdn.com/robert_mcmurray/
WebDAV Website Importer for WebMatrix
21 July 2012 • by Bob • WebDAV, WebMatrix
The other day I was talking with one of my coworkers, Yishai Galatzer, about Microsoft's WebMatrix. By way of introduction, Yishai is one of our senior developers on the WebMatrix project; I'm not sure if you've used WebMatrix, but it's a pretty handy website editor. Here's a few generic screen shots:
 |
| WebMatrix 2 Splash Screen |
 |
| WebMatrix 2 Quick Start Screen |
 |
| Editing QDIG in WebMatrix 2 |
In any event, I was explaining how easy it is to work with WebDAV, and I mentioned that I had written some some blogs about working with WebDAV websites programmatically. (See my Sending WebDAV Requests in .NET Revisited blog for an example.) Since WebMatrix 2 has some pretty cool extensibility, Yishai challenged me to write a WebDAV extension for WebMatrix. His idea was just too good for me to pass up, so I stayed up late that night and I wrote a simple WebDAV Website Import extension for WebMatrix 2.
With that in mind, there are a few things that I need to explain in this blog:
- What this extension actually does.
- How to install this extension.
- How to use this extension.
What the WebDAV Website Importer Extension Actually Does
The WebDAV Website Importer extension does just what its name implies - it allows you to import a website into WebMatrix over WebDAV. This allows you to download your website to your local computer, where you can make changes to your source files and test them on your local system with IIS Express.
It should be noted that this extension is only designed to create a new local website by downloading a copy of your website's files in order to create a local copy of your website - it is not designed to be a website publishing feature like WebMatrix's built-in FTP and Web Deploy features. (I would like to write a full-featured website import/export/sync extension, but that's another project for another day.)
How to Install the WebDAV Website Importer Extension
To install this extension, you first need to install WebMatrix. You can find details about installing WebMatrix at the following URL:
Once you have WebMatrix installed, click the Extensions menu on the ribbon, and then click Gallery.
When the Extensions Gallery appears, you will see the WebDAV Website Importer in the list of extensions.
When you click Install, the WebDAV Website Importer details page will be displayed.
When you click Install, the End User License Agreement for the WebDAV Website Importer will be displayed.
When you click I Accept, WebMatrix will download and install the extension.
How to Use the WebDAV Website Importer Extension
Once you have downloaded and installed the WebDAV Website Importer extension, it will show up whenever you are creating a new website in WebMatrix.
When you click Import Site from WebDAV, WebMatrix will prompt you for the credentials to your WebDAV website.
Once you enter your credentials and click OK, the extension will import the content from your WebDAV website and save it in a new local website folder.
Summary
So - there you have it; this is a pretty simple extension, but it opens up some WebDAV possibilities for WebMatrix. As I mentioned earlier, this extension is import-only - perhaps I'll write a full-featured import/export/sync extension in the future, but for now - this was a cool test for combining WebMatrix extensibility and WebDAV.
Note: This blog was originally posted at http://blogs.msdn.com/robert_mcmurray/


