Using the WebDAV Redirector with OneDrive Part 2 - Two-Step Verification
30 September 2014 • by Bob • WebDAV, OneDrive, SkyDrive
This blog is Part 2 of a series about mapping a drive letter to your OneDrive account. In Part 1 of this series, I showed you how to map a drive letter to your OneDrive account when you are using standard security, and in this blog I will show you how to map a drive letter to your OneDrive account after you have enabled two-step verification for your account security. The process is largely similar, with the notable exception that you need to generate an application password which you will use when you are mapping the drive letter with the WebDAV Redirector.
A quick note about two-step verification: enabling this security feature adds an additional requirement so that you will need to use a secondary method to verify your identity when you are logging in. (For example, you can use a phone app, text message, or second email account.) However, you cannot use a secondary login method when you are using the WebDAV Redirector, so you will need to create an application password. (Note: More information about two-step verification for your Microsoft is available in the Two-step verification: FAQ.)
Step 1 - Log Into Your OneDrive Account
The first thing that you need to do is to browse to 
Your Customer ID is the value that is specified after the "cid=" in the URL; for example: "https://onedrive.live.com/?cid=426f62526f636b73". You will need this value when you map a drive letter.
Step 3 - Generate an Application Password
To map a WebDAV drive to your OneDrive account after you have enabled two-step account verification, you will need to generate an application password which you will use when you enter your credentials. (Note: More information about two-step verification can be found in the App passwords and two-step verification article.)
To generate an application password, you first need to log into your Microsoft account settings at 
Once you have logged in, click on Security & password and then Create a new app password:
When the app password page is displayed, copy the password for later:
Step 4 - Map the Drive Letter
Your next step is to map the drive letter, and there are a few ways to do this. I have documented several methods in my Using the WebDAV Redirector article on the IIS.net website, but I will show a few ways in this blog.
Method #1 - Using the Windows User Interface and Wizards
On most of my systems I have the Network and This PC or My Computer icons on my desktop, which makes it easy to simply right-click one of those icons and select Map network drive:
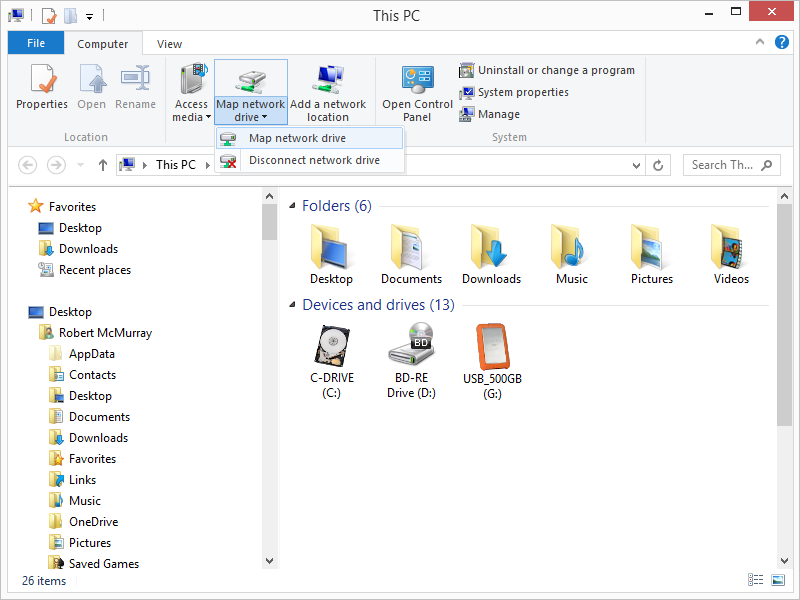
An alternate method on Windows 8 is to open This PC and Map network drive will be listed as an icon on the Windows Explorer ribbon:
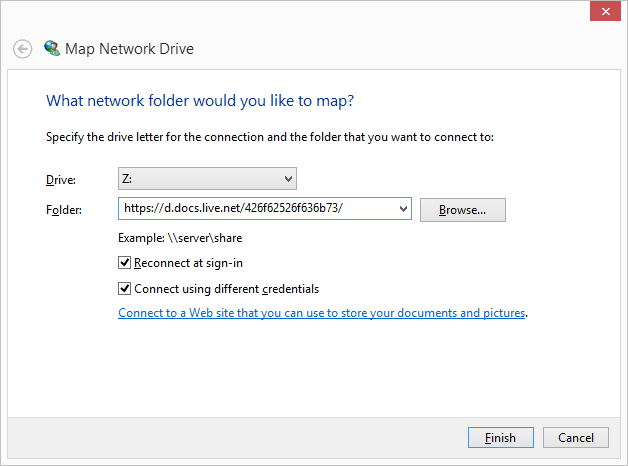
Once the Map Network Drive Wizard appears, enter "https://d.docs.live.net/" followed by your Customer ID from Step 2. For example: "https://d.docs.live.net/426f62526f636b73/"
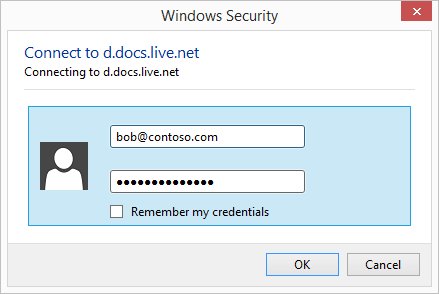
When the Windows Security dialog box appears, enter your email address that you used to log into your OneDrive account in Step 1 and the application password that you created in Step 3.
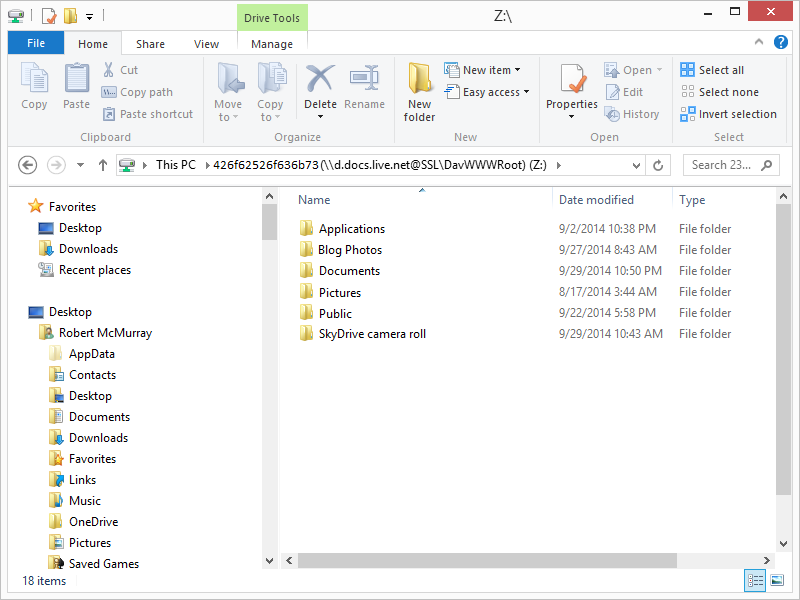
Once the mapping has been completed, you will be able to view your OneDrive files in Windows Explorer via the mapped drive:
Method #2 - Using the Windows Command Line
You can also map a WebDAV drive letter to your OneDrive account from a command line. The general syntax is listed below:
|
For example:
C:\>net use * https://d.docs.live.net/426f62526f636b73/ /user:"bob@contoso.com" "426f62526f636b73" C:\>dir Volume in drive Z has no label. Volume Serial Number is 0000-0000 Directory of Z:\ 09/02/2014 10:38 PM <DIR> Applications 09/27/2014 08:43 AM <DIR> Blog Photos 09/29/2014 10:50 PM <DIR> Documents 08/17/2014 03:44 AM <DIR> Pictures 09/22/2014 05:58 PM <DIR> Public 09/29/2014 10:43 AM <DIR> SkyDrive camera roll C:\> |
That wraps it up for Part 2 of this blog series - I hope this helps!
Note: This blog was originally posted at http://blogs.msdn.com/robert_mcmurray/
Using the WebDAV Redirector with OneDrive Part 1 - Standard Security
30 September 2014 • by Bob • WebDAV, OneDrive, SkyDrive
If you have read some of my previous blog posts and IIS.NET articles about WebDAV, you will see that I often use the WebDAV Redirector that is built-in to Windows in order to connect to various WebDAV websites. This allows me to access my files via a mapped drive letter, which also enables me to use WebDAV with applications that do not have native WebDAV support. (Like Visual Studio.) I'm also a big fan of OneDrive, but sometimes I'm on a legacy system where I don't have OneDrive installed. With that in mind, I thought that I would put together a quick blog series to show you how to map a drive letter to your OneDrive files.
In Part 1 of this series, I will show you how to map a drive letter to your OneDrive account by using standard security. In Part 2 of this series, I will show you how to map a drive letter to your OneDrive account after you have enabled two-step verification for your account security.
Step 1 - Log Into Your OneDrive Account
The first thing that you need to do is to browse to 
Your Customer ID is the value that is specified after the "cid=" in the URL; for example: "https://onedrive.live.com/?cid=426f62526f636b73". You will need this value when you map a drive letter.
Step 3 - Map the Drive Letter
Your next step is to map the drive letter, and there are a few ways to do this. I have documented several methods in my Using the WebDAV Redirector article on the IIS.net website, but I will show a few ways in this blog.
Method #1 - Using the Windows User Interface and Wizards
On most of my systems I have the Network and This PC or My Computer icons on my desktop, which makes it easy to simply right-click one of those icons and select Map network drive:
An alternate method on Windows 8 is to open This PC and Map network drive will be listed as an icon on the Windows Explorer ribbon:
Once the Map Network Drive Wizard appears, enter "https://d.docs.live.net/" followed by your Customer ID from Step 2. For example: "https://d.docs.live.net/426f62526f636b73/"
When the Windows Security dialog box appears, enter the email address and password that you used to log into your OneDrive account in Step 1.
Once the mapping has been completed, you will be able to view your OneDrive files in Windows Explorer via the mapped drive:
Method #2 - Using the Windows Command Line
You can also map a WebDAV drive letter to your OneDrive account from a command line. The general syntax is listed below:
|
For example:
C:\>net use * https://d.docs.live.net/426f62526f636b73/ /user:"bob@contoso.com" "P@ssw0rd" C:\>dir Volume in drive Z has no label. Volume Serial Number is 0000-0000 Directory of Z:\ 09/02/2014 10:38 PM <DIR> Applications 09/27/2014 08:43 AM <DIR> Blog Photos 09/29/2014 10:50 PM <DIR> Documents 08/17/2014 03:44 AM <DIR> Pictures 09/22/2014 05:58 PM <DIR> Public 09/29/2014 10:43 AM <DIR> SkyDrive camera roll C:\> |
That wraps it up for Part 1 of this blog series. In Part 2, I will show how to map a WebDAV drive to your OneDrive account after you have enabled two-step verification for your account security.
Note: This blog was originally posted at http://blogs.msdn.com/robert_mcmurray/
Updating my HTML Application for Configuring your WebDAV Redirector Settings
20 September 2013 • by Bob • IIS, Scripting, WebDAV
A couple of years ago I wrote a blog that was titled "How to create an HTML Application to configure your WebDAV Redirector settings", where I showed how to use HTMLA to create a simple editor for most of the WebDAV Redirector settings. These settings have no other user interface, so prior to my blog post users had to manually edit the registry in order to modify their WebDAV Redirector settings.
 |
| Click image to expand |
In the past two years since I wrote that blog, I have found myself using that simple application so often that I now keep it in my personal utilities folder on my SkyDrive so I can have it with me no matter where I am travelling. But that being said, I ran into an interesting situation the other day that made me want to update the application, so I thought that it was time to write a new blog with the updated changes.
Here's what happened - I had opened my application for modifying my WebDAV Redirector settings, but then something happened which distracted me, and then I headed off to lunch before I committed my changes to the registry. When I came back to my office, I noticed that my WebDAV Redirector settings application was still open and I clicked the Exit Application button. The application popped up a dialog which informed me that I had changes that hadn't been saved to the registry, but I forgot what they were. This put me in a quandary - I could simply click Yes and hope for the best, or I could click No and lose whatever changes that I had made and re-open the application to start over.
It was at that time that I thought to myself, "If only I had a Reset Values button..."
By now you can probably see where this blog is going, and here's what the new application looks like - it's pretty much the same as the last application, with the additional button that allows you to reset your values without exiting the application. (Note - the application will prompt you for confirmation if you attempt to reset the values and you have unsaved changes.)
 |
| Click image to expand |
Creating the Updated HTML Application
To create this HTML Application, you need to use the same steps as my last blog: save the following HTMLA code as "WebDAV Redirector Settings.hta" to your computer, and then double-click its icon to run the application.
<html> <head> <title>WebDAV Redirector Settings</title> <HTA:APPLICATION APPLICATIONNAME="WebDAV Redirector Settings" ID="WebDAV Redirector Settings" VERSION="1.0" BORDER="dialog" BORDERSTYLE="static" INNERBORDER="no" SYSMENU="no" MAXIMIZEBUTTON="no" MINIMIZEBUTTON="no" SCROLL="no" SCROLLFLAT="yes" SINGLEINSTANCE="yes" CONTEXTMENU="no" SELECTION="no"/> <script language="vbscript"> ' ---------------------------------------- ' Start of main code section. ' ---------------------------------------- Option Explicit Const intDialogWidth = 700 Const intDialogHeight = 620 Const HKEY_LOCAL_MACHINE = &H80000002 Const strWebClientKeyPath = "SYSTEM\CurrentControlSet\Services\WebClient\Parameters" Const strLuaKeyPath = "Software\Microsoft\Windows\CurrentVersion\Policies\System" Dim objRegistry Dim blnHasChanges ' ---------------------------------------- ' Start the application. ' ---------------------------------------- Sub Window_OnLoad On Error Resume Next ' Set up the UI dimensions. Self.resizeTo intDialogWidth,intDialogHeight Self.moveTo (Screen.AvailWidth - intDialogWidth) / 2, _ (Screen.AvailHeight - intDialogHeight) / 2 ' Retrieve the current settings. Document.all.TheBody.ClassName = "hide" Set objRegistry = GetObject( _ "winmgmts:{impersonationLevel=impersonate}!\\.\root\default:StdRegProv") Call CheckForLUA() Call GetValues() Document.All.TheBody.ClassName = "show" End Sub ' ---------------------------------------- ' Check for User Access Control ' ---------------------------------------- Sub CheckForLUA() If GetRegistryDWORD(strLuaKeyPath,"EnableLUA",1)<> 0 Then MsgBox "User Access Control (UAC) is enabled on this computer." & _ vbCrLf & vbCrLf & "UAC must be disabled in order to edit " & _ "the registry and restart the service for the WebDAV Redirector. " & _ "Please disable UAC before running this application again. " & _ "This application will now exit.", _ vbCritical, "User Access Control" Self.close End If End Sub ' ---------------------------------------- ' Exit the application. ' ---------------------------------------- Sub ExitApplication() If blnHasChanges = False Then If MsgBox("Are you sure you want to exit?", _ vbQuestion Or vbYesNo Or vbDefaultButton2, _ "Exit Application") = vbNo Then Exit Sub End If Else Dim intRetVal intRetVal = MsgBox("You have unsaved changes. " & _ "Do you want to save them before you exit?", _ vbQuestion Or vbYesNoCancel Or vbDefaultButton1, _ "Reset Application") If intRetVal = vbYes Then Call SetValues() ElseIf intRetVal = vbCancel Then Exit Sub End If End If Self.close End Sub ' ---------------------------------------- ' Reset the application. ' ---------------------------------------- Sub ResetApplication() If blnHasChanges = True Then Dim intRetVal intRetVal = MsgBox("You have unsaved changes. " & _ "Do you want to save them before you reset the values?", _ vbQuestion Or vbYesNoCancel Or vbDefaultButton1, _ "Reset Application") If intRetVal = vbYes Then Call SetValues() ElseIf intRetVal = vbCancel Then Exit Sub End If End If Call GetValues() End Sub ' ---------------------------------------- ' Flag the application as having changes. ' ---------------------------------------- Sub FlagChanges() blnHasChanges = True End Sub ' ---------------------------------------- ' Retrieve the settings from the registry. ' ---------------------------------------- Sub GetValues() On Error Resume Next Dim tmpCount,tmpArray,tmpString ' Get the radio button values Call SetRadioValue(Document.all.BasicAuthLevel, _ GetRegistryDWORD(strWebClientKeyPath, _ "BasicAuthLevel",1)) Call SetRadioValue(Document.all.SupportLocking, _ GetRegistryDWORD(strWebClientKeyPath, _ "SupportLocking",1)) ' Get the text box values Document.all.InternetServerTimeoutInSec.Value = _ GetRegistryDWORD(strWebClientKeyPath, _ "InternetServerTimeoutInSec",30) Document.all.FileAttributesLimitInBytes.Value = _ GetRegistryDWORD(strWebClientKeyPath, _ "FileAttributesLimitInBytes",1000000) Document.all.FileSizeLimitInBytes.Value = _ GetRegistryDWORD(strWebClientKeyPath, _ "FileSizeLimitInBytes",50000000) Document.all.LocalServerTimeoutInSec.Value = _ GetRegistryDWORD(strWebClientKeyPath, _ "LocalServerTimeoutInSec",15) Document.all.SendReceiveTimeoutInSec.Value = _ GetRegistryDWORD(strWebClientKeyPath, _ "SendReceiveTimeoutInSec",60) Document.all.ServerNotFoundCacheLifeTimeInSec.Value = _ GetRegistryDWORD(strWebClientKeyPath, _ "ServerNotFoundCacheLifeTimeInSec",60) ' Get the text area values tmpArray = GetRegistryMULTISZ( _ strWebClientKeyPath,"AuthForwardServerList") For tmpCount = 0 To UBound(tmpArray) tmpString = tmpString & tmpArray(tmpCount) & vbTab Next If Len(tmpString)>0 Then Document.all.AuthForwardServerList.Value = _ Replace(Left(tmpString,Len(tmpString)-1),vbTab,vbCrLf) End If blnHasChanges = False End Sub ' ---------------------------------------- ' Save the settings in the registry. ' ---------------------------------------- Sub SetValues() On Error Resume Next ' Set the radio button values Call SetRegistryDWORD( _ strWebClientKeyPath, _ "BasicAuthLevel", _ GetRadioValue(Document.all.BasicAuthLevel)) Call SetRegistryDWORD( _ strWebClientKeyPath, _ "SupportLocking", _ GetRadioValue(Document.all.SupportLocking)) ' Set the text box values Call SetRegistryDWORD( _ strWebClientKeyPath, _ "InternetServerTimeoutInSec", _ Document.all.InternetServerTimeoutInSec.Value) Call SetRegistryDWORD( _ strWebClientKeyPath, _ "FileAttributesLimitInBytes", _ Document.all.FileAttributesLimitInBytes.Value) Call SetRegistryDWORD( _ strWebClientKeyPath, _ "FileSizeLimitInBytes", _ Document.all.FileSizeLimitInBytes.Value) Call SetRegistryDWORD( _ strWebClientKeyPath, _ "LocalServerTimeoutInSec", _ Document.all.LocalServerTimeoutInSec.Value) Call SetRegistryDWORD( _ strWebClientKeyPath, _ "SendReceiveTimeoutInSec", _ Document.all.SendReceiveTimeoutInSec.Value) Call SetRegistryDWORD( _ strWebClientKeyPath, _ "ServerNotFoundCacheLifeTimeInSec", _ Document.all.ServerNotFoundCacheLifeTimeInSec.Value) ' Set the text area values Call SetRegistryMULTISZ( _ strWebClientKeyPath, _ "AuthForwardServerList", _ Split(Document.all.AuthForwardServerList.Value,vbCrLf)) ' Prompt to restart the WebClient service If MsgBox("Do you want to restart the WebDAV Redirector " & _ "service so your settings will take effect?", _ vbQuestion Or vbYesNo Or vbDefaultButton2, _ "Restart WebDAV Redirector") = vbYes Then ' Restart the WebClient service. Call RestartWebClient() End If Call GetValues() End Sub ' ---------------------------------------- ' Start the WebClient service. ' ---------------------------------------- Sub RestartWebClient() On Error Resume Next Dim objWMIService,colServices,objService Document.All.TheBody.ClassName = "hide" Set objWMIService = GetObject( _ "winmgmts:{impersonationLevel=impersonate}!\\.\root\cimv2") Set colServices = objWMIService.ExecQuery( _ "Select * from Win32_Service Where Name='WebClient'") For Each objService in colServices objService.StopService() objService.StartService() Next Document.All.TheBody.ClassName = "show" End Sub ' ---------------------------------------- ' Retrieve a DWORD value from the registry. ' ---------------------------------------- Function GetRegistryDWORD( _ ByVal tmpKeyPath, _ ByVal tmpValueName, _ ByVal tmpDefaultValue) On Error Resume Next Dim tmpDwordValue If objRegistry.GetDWORDValue( _ HKEY_LOCAL_MACHINE, _ tmpKeyPath, _ tmpValueName, _ tmpDwordValue)=0 Then GetRegistryDWORD = CLng(tmpDwordValue) Else GetRegistryDWORD = CLng(tmpDefaultValue) End If End Function ' ---------------------------------------- ' Set a DWORD value in the registry. ' ---------------------------------------- Sub SetRegistryDWORD( _ ByVal tmpKeyPath, _ ByVal tmpValueName, _ ByVal tmpDwordValue) On Error Resume Next Call objRegistry.SetDWORDValue( _ HKEY_LOCAL_MACHINE, _ tmpKeyPath, _ tmpValueName, _ CLng(tmpDwordValue)) End Sub ' ---------------------------------------- ' Retrieve a MULTISZ value from the registry. ' ---------------------------------------- Function GetRegistryMULTISZ( _ ByVal tmpKeyPath, _ ByVal tmpValueName) On Error Resume Next Dim tmpMultiSzValue If objRegistry.GetMultiStringValue( _ HKEY_LOCAL_MACHINE, _ tmpKeyPath, _ tmpValueName, _ tmpMultiSzValue)=0 Then GetRegistryMULTISZ = tmpMultiSzValue Else GetRegistryMULTISZ = Array() End If End Function ' ---------------------------------------- ' Set a MULTISZ value in the registry. ' ---------------------------------------- Sub SetRegistryMULTISZ( _ ByVal tmpKeyPath, _ ByVal tmpValueName, _ ByVal tmpMultiSzValue) On Error Resume Next Call objRegistry.SetMultiStringValue( _ HKEY_LOCAL_MACHINE, _ tmpKeyPath, _ tmpValueName, _ tmpMultiSzValue) End Sub ' ---------------------------------------- ' Retrieve the value of a radio button group. ' ---------------------------------------- Function GetRadioValue(ByVal tmpRadio) On Error Resume Next Dim tmpCount For tmpCount = 0 To (tmpRadio.Length-1) If tmpRadio(tmpCount).Checked Then GetRadioValue = CLng(tmpRadio(tmpCount).Value) Exit For End If Next End Function ' ---------------------------------------- ' Set the value for a radio button group. ' ---------------------------------------- Sub SetRadioValue(ByVal tmpRadio, ByVal tmpValue) On Error Resume Next Dim tmpCount For tmpCount = 0 To (tmpRadio.Length-1) If CLng(tmpRadio(tmpCount).Value) = CLng(tmpValue) Then tmpRadio(tmpCount).Checked = True Exit For End If Next End Sub ' ---------------------------------------- ' ' ---------------------------------------- Sub Validate(tmpField) Dim tmpRegEx, tmpMatches Set tmpRegEx = New RegExp tmpRegEx.Pattern = "[0-9]" tmpRegEx.IgnoreCase = True tmpRegEx.Global = True Set tmpMatches = tmpRegEx.Execute(tmpField.Value) If tmpMatches.Count = Len(CStr(tmpField.Value)) Then If CDbl(tmpField.Value) => 0 And _ CDbl(tmpField.Value) =< 4294967295 Then Exit Sub End If End If MsgBox "Please enter a whole number between 0 and 4294967295.", _ vbCritical, "Validation Error" tmpField.Focus End Sub ' ---------------------------------------- ' ' ---------------------------------------- Sub BasicAuthWarning() MsgBox "WARNING:" & vbCrLf & vbCrLf & _ "Using Basic Authentication over non-SSL connections can cause " & _ "serious security issues. Usernames and passwords are transmitted " & _ "in clear text, therefore the use of Basic Authentication with " & _ "WebDAV is disabled by default for non-SSL connections. That " & _ "being said, this setting can override the default behavior for " & _ "Basic Authentication, but it is strongly discouraged.", _ vbCritical, "Basic Authentication Warning" End Sub ' ---------------------------------------- ' End of main code section. ' ---------------------------------------- </script> <style> body { color:#000000; background-color:#cccccc; font-family:'Segoe UI',Tahoma,Verdana,Arial; font-size:9pt; } fieldset { padding:10px; width:640px; } .button { width:150px; } .textbox { width:200px; height:22px; text-align:right; } .textarea { width:300px; height:50px; text-align:left; } .radio { margin-left:-5px; margin-top: -2px; } .hide { display:none; } .show { display:block; } select { width:300px; text-align:left; } table { border-collapse:collapse; empty-cells:hide; } h1 { font-size:14pt; } th { font-size:9pt; text-align:left; vertical-align:top; padding:2px; } td { font-size:9pt; text-align:left; vertical-align:top; padding:2px; } big { font-size:11pt; } small { font-size:8pt; } </style> </head> <body id="TheBody" class="hide"> <h1 align="center" id="TheTitle" style="margin-bottom:-20px;">WebDAV Redirector Settings</h1> <div align="center"> <p style="margin-bottom:-20px;"><i><small><b>Note</b>: See <a target="_blank" href="http://go.microsoft.com/fwlink/?LinkId=324291">Using the WebDAV Redirector</a> for additional details.</small></i></p> <form> <center> <table border="0" cellpadding="2" cellspacing="2" style="width:600px;"> <tr> <td style="width:600px;text-align:left"><fieldset title="Security Settings"> <legend> <b>Security Settings</b> </legend> These values affect the security behavior for the WebDAV Redirector.<br> <table style="width:600px;"> <tr title="Specifies whether the WebDAV Redirector can use Basic Authentication to communicate with a server."> <td style="width:300px"> <table border="0"> <tr> <td style="width:300px"><b>Basic Authentication Level</b></td> </tr> <tr> <td style="width:300px;"><span style="width:280px;padding-left:20px;"><small><i><b>Note</b>: Using basic authentication can cause <u>serious security issues</u> as the username and password are transmitted in clear text, therefore the use of basic authentication over WebDAV is disabled by default unless the connection is using SSL.</i></small></span></td> </tr> </table> </td> <td style="width:300px"> <table style="width:300px"> <tr> <td style="width:020px"><input class="radio" type="radio" value="0" name="BasicAuthLevel" onchange="VBScript:FlagChanges()" id="BasicAuthLevel0"></td> <td style="width:280px"><label for="BasicAuthLevel0">Basic Authentication is disabled</label></td> </tr> <tr> <td style="width:020px"><input class="radio" type="radio" value="1" checked name="BasicAuthLevel" onchange="VBScript:FlagChanges()" id="BasicAuthLevel1"></td> <td style="width:280px"><label for="BasicAuthLevel1">Basic Authentication is enabled for SSL web sites only</label></td> </tr> <tr> <td style="width:020px"><input class="radio" type="radio" value="2" name="BasicAuthLevel" onchange="VBScript:FlagChanges()" id="BasicAuthLevel2" onClick="VBScript:BasicAuthWarning()"></td> <td style="width:280px"><label for="BasicAuthLevel2">Basic Authentication is enabled for SSL and non-SSL web sites</label></td> </tr> </table> </td> </tr> <tr title="Specifies a list of local URLs for forwarding credentials that bypasses any proxy settings. (Note: This requires Windows Vista SP1 or later.)"> <td style="width:300px"> <table border="0"> <tr> <td style="width:300px"><b>Authentication Forwarding Server List</b></td> </tr> <tr> <td style="width:300px;"><span style="width:280px;padding-left:20px;"><small><i><b>Note</b>: Include one server name per line.</i></small></span></td> </tr> </table> </td> <td style="width:300px"><textarea class="textarea" name="AuthForwardServerList" onchange="VBScript:FlagChanges()"></textarea></td> </tr> <tr title="Specifies whether the WebDAV Redirector supports locking."> <td style="width:300px"><b>Support for WebDAV Locking</b></td> <td style="width:300px"> <table style="width:300px"> <tr> <td style="width:020px"><input class="radio" type="radio" value="1" checked name="SupportLocking" onchange="VBScript:FlagChanges()" id="SupportLocking1"></td> <td style="width:280px"><label for="SupportLocking1">Enable Lock Support</label></td> </tr> <tr> <td style="width:020px"><input class="radio" type="radio" value="0" name="SupportLocking" onchange="VBScript:FlagChanges()" id="SupportLocking0"></td> <td style="width:280px"><label for="SupportLocking0">Disable Lock Support</label></td> </tr> </table> </td> </tr> </table> </fieldset> </td> </tr> <tr> <td style="width:600px;text-align:left"><fieldset title="Time-outs"> <legend> <b>Time-outs and Maximum Sizes</b> </legend> These values affect the behavior for WebDAV Client/Server operations.<br> <table border="0" style="width:600px;"> <tr title="Specifies the connection time-out for the WebDAV Redirector uses when communicating with non-local WebDAV servers."> <td style="width:300px"><b>Internet Server Time-out</b> <small>(In Seconds)</small></td> <td style="width:300px"><input class="textbox" type="text" name="InternetServerTimeoutInSec" onchange="VBScript:FlagChanges()" onblur="VBScript:Validate(Me)" value="30"></td> </tr> <tr title="Specifies the connection time-out for the WebDAV Redirector uses when communicating with a local WebDAV server."> <td style="width:300px"><b>Local Server Time-out</b> <small>(In Seconds)</small></td> <td style="width:300px"><input class="textbox" type="text" name="LocalServerTimeoutInSec" onchange="VBScript:FlagChanges()" onblur="VBScript:Validate(Me)" value="15"></td> </tr> <tr title="Specifies the time-out in seconds that the WebDAV Redirector uses after issuing a request."> <td style="width:300px"><b>Send/Receive Time-out</b> <small>(In Seconds)</small></td> <td style="width:300px"><input class="textbox" type="text" name="SendReceiveTimeoutInSec" onchange="VBScript:FlagChanges()" onblur="VBScript:Validate(Me)" value="60"></td> </tr> <tr title="Specifies the period of time that a server is cached as non-WebDAV by the WebDAV Redirector. If a server is found in this list, a fail is returned immediately without attempting to contact the server."> <td style="width:300px"><b>Server Not Found Cache Time-out</b> <small>(In Seconds)</small></td> <td style="width:300px"><input class="textbox" type="text" name="ServerNotFoundCacheLifeTimeInSec" onchange="VBScript:FlagChanges()" onblur="VBScript:Validate(Me)" value="60"></td> </tr> <tr title="Specifies the maximum size in bytes that the WebDAV Redirector allows for file transfers."> <td style="width:300px"><b>Maximum File Size</b> <small>(In Bytes)</small></td> <td style="width:300px"><input class="textbox" type="text" name="FileSizeLimitInBytes" onchange="VBScript:FlagChanges()" onblur="VBScript:Validate(Me)" value="50000000"></td> </tr> <tr title="Specifies the maximum size that is allowed by the WebDAV Redirector for all properties on a specific collection."> <td style="width:300px"><b>Maximum Attributes Size</b> <small>(In Bytes)</small></td> <td style="width:300px"><input class="textbox" type="text" name="FileAttributesLimitInBytes" onchange="VBScript:FlagChanges()" onblur="VBScript:Validate(Me)" value="1000000"></td> </tr> </table> </fieldset> </td> </tr> <tr> <td style="text-align:center"> <table border="0"> <tr> <td style="text-align:center"><input class="button" type="button" value="Apply Settings" onclick="VBScript:SetValues()"> <td style="text-align:center"><input class="button" type="button" value="Reset Values" onclick="VBScript:ResetApplication()"> <td style="text-align:center"><input class="button" type="button" value="Exit Application" onclick="VBScript:ExitApplication()"> </tr> </table> </td> </tr> </table> </center> </form> </div> </body> </html>
Additional Notes
As with the last version of this HTML Application, you will need to run this application as an administrator in order to save the settings to the registry and restart the WebDAV Redirector service.
Have fun! ;-]
Note: This blog was originally posted at http://blogs.msdn.com/robert_mcmurray/
How to Create a Blind Drop WebDAV Share
17 September 2013 • by Bob • IIS, WebDAV, URL Rewrite
I had an interesting WebDAV question earlier today that I had not considered before: how can someone create a "Blind Drop Share" using WebDAV? By way of explanation, a Blind Drop Share is a path where users can copy files, but never see the files that are in the directory. You can setup something like this by using NTFS permissions, but that environment can be a little difficult to set up and maintain.
With that in mind, I decided to research a WebDAV-specific solution that didn't require mangling my NTFS permissions. In the end it was pretty easy to achieve, so I thought that it would make a good blog for anyone who wants to do this.
A Little Bit About WebDAV
NTFS permissions contain access controls that configure the directory-listing behavior for files and folders; if you modify those settings, you can control who can see files and folders when they connect to your shared resources. However, there are no built-in features for the WebDAV module which ships with IIS that will approximate the NTFS behavior. But that being said, there is an interesting WebDAV quirk that you can use that will allow you to restrict directory listings, and I will explain how that works.
WebDAV uses the PROPFIND command to retrieve the properties for files and folders, and the WebDAV Redirector will use the response from a PROPFIND command to display a directory listing. (Note: Official WebDAV terminology has no concept of files and folders, those physical objects are respectively called Resources and Collections in WebDAV jargon. But that being said, I will use files and folders throughout this blog post for ease of understanding.)
In any event, one of the HTTP headers that WebDAV uses with the PROPFIND command is the Depth header, which is used to specify how deep the folder/collection traversal should go:
- If you sent a
PROPFINDcommand for the root of your website with aDepth:0header/value, you would get the properties for just the root directory - with no files listed; aDepth:0header/value only retrieves properties for the single resource that you requested. - If you sent a
PROPFINDcommand for the root of your website with aDepth:1header/value, you would get the properties for every file and folder in the root of your website; aDepth:1header/value retrieves properties for the resource that you requested and all siblings. - If you sent a
PROPFINDcommand for the root of your website with aDepth:infinityheader/value, you would get the properties for every file and folder in your entire website; aDepth:infinityheader/value retrieves properties for every resource regardless of its depth in the hierarchy. (Note that retrieving directory listings with infinite depth are disabled by default in IIS 7 and IIS 8 because it can be CPU intensive.)
By analyzing the above information, it should be obvious that what you need to do is to restrict users to using a Depth:0 header/value. But that's where this scenario gets interesting: if your end-users are using the Windows WebDAV Redirector or other similar technology to map a drive to your HTTP website, you have no control over the value of the Depth header. So how can you restrict that?
In the past I would have written custom native-code HTTP module or ISAPI filter to modify the value of the Depth header; but once you understand how WebDAV works, you can use the URL Rewrite module to modify the headers of incoming HTTP requests to accomplish some pretty cool things - like modifying the values WebDAV-related HTTP headers.
Adding URL Rewrite Rules to Modify the WebDAV Depth Header
Here's how I configured URL Rewrite to set the value of the Depth header to 0, which allowed me to create a "Blind Drop" WebDAV site:
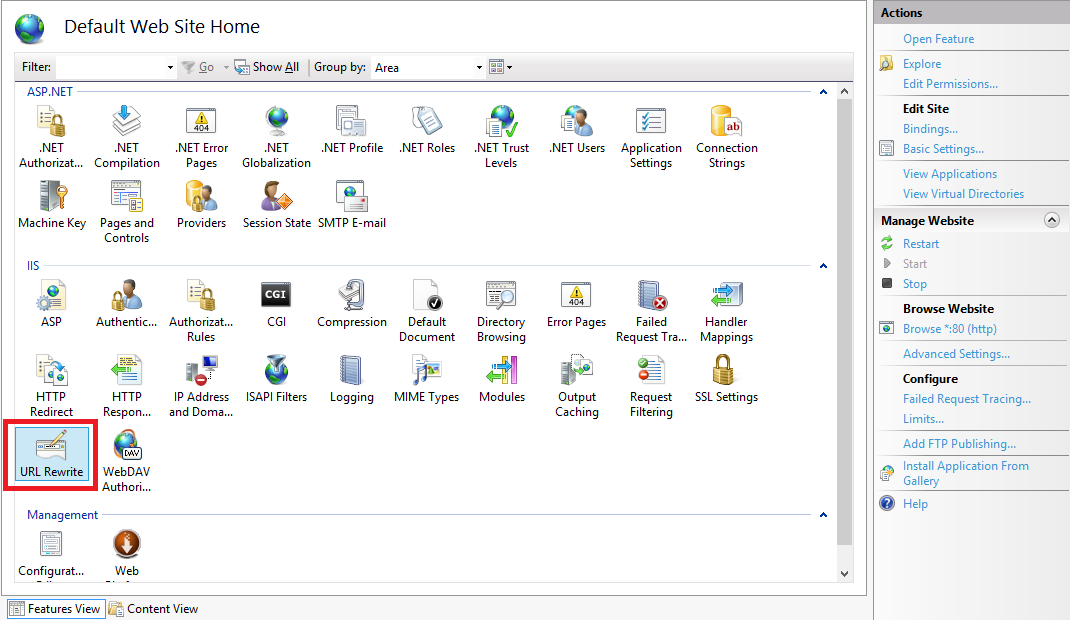
- Open the URL Rewrite feature in IIS Manager for your website.
Click image to expand - Click the Add Rules link in the Actionspane.
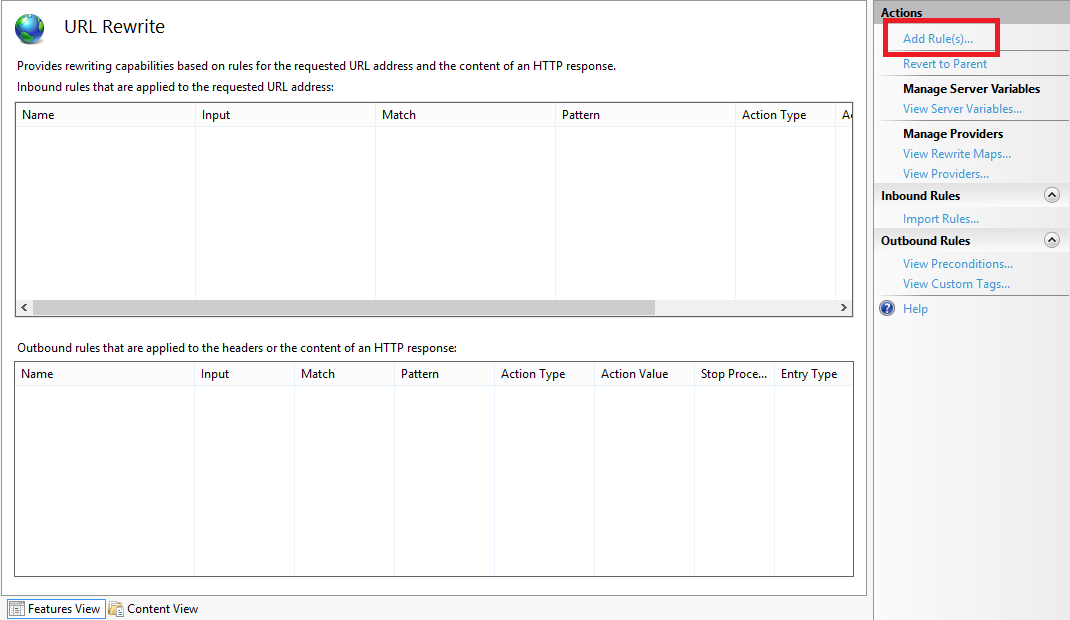
Click image to expand - When the Add Rules dialog box appears, highlight Blank rule and click OK.
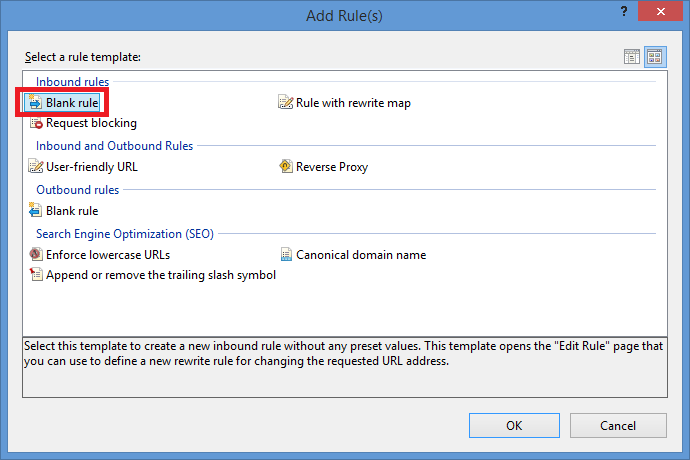
Click image to expand - When the Edit Inbound Rulepage appears, configure the following settings:
- Name the rule "Modify Depth Header".

Click image to expand - In the Match URLsection:
- Choose Matches the Pattern in the Requested URL drop-down menu.
- Choose Wildcards in the Using drop-down menu.
- Type a single asterisk "*" in the Pattern text box.
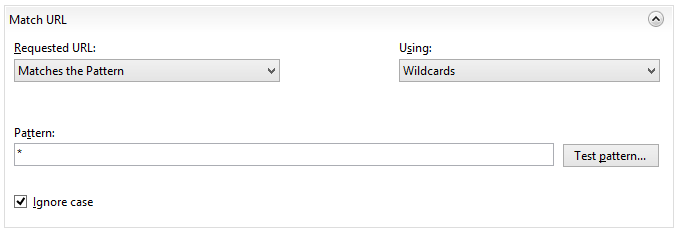
Click image to expand - Expand the Server Variables collection and click Add.
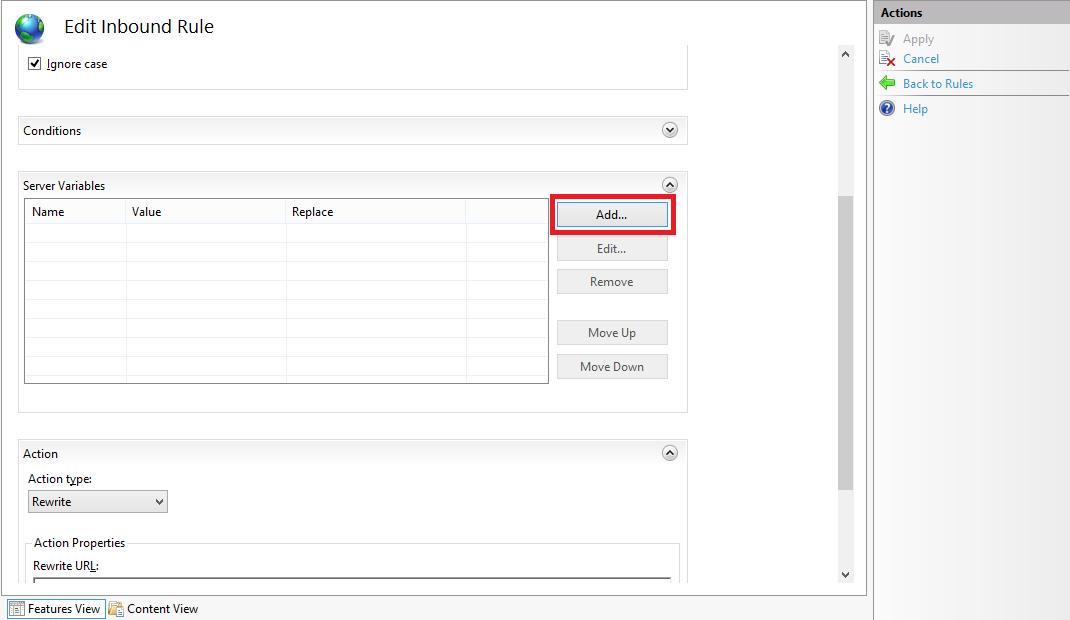
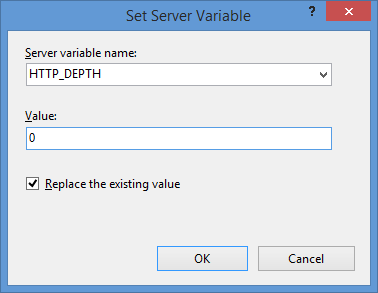
Click image to expand - When the Set Server Variabledialog box appears:
- Type "HTTP_DEPTH" in the Server variable name text box.
- Type "0" in the Value text box.
- Make sure that Replace the existing value checkbox is checked.
- Click OK.
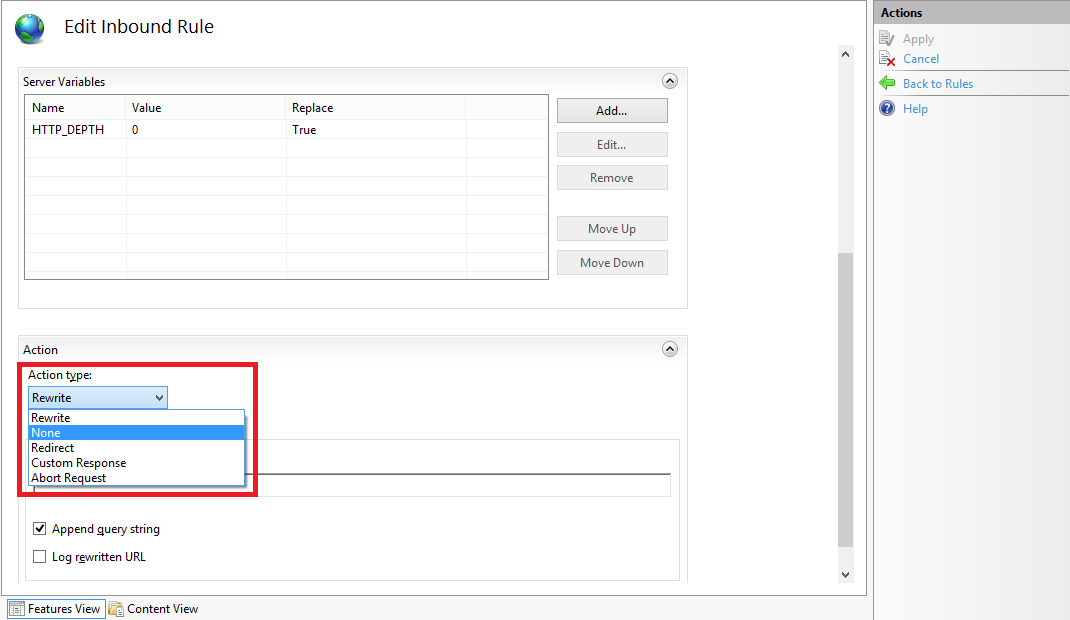
- In the Action group, choose None in the Action typedrop-down menu.
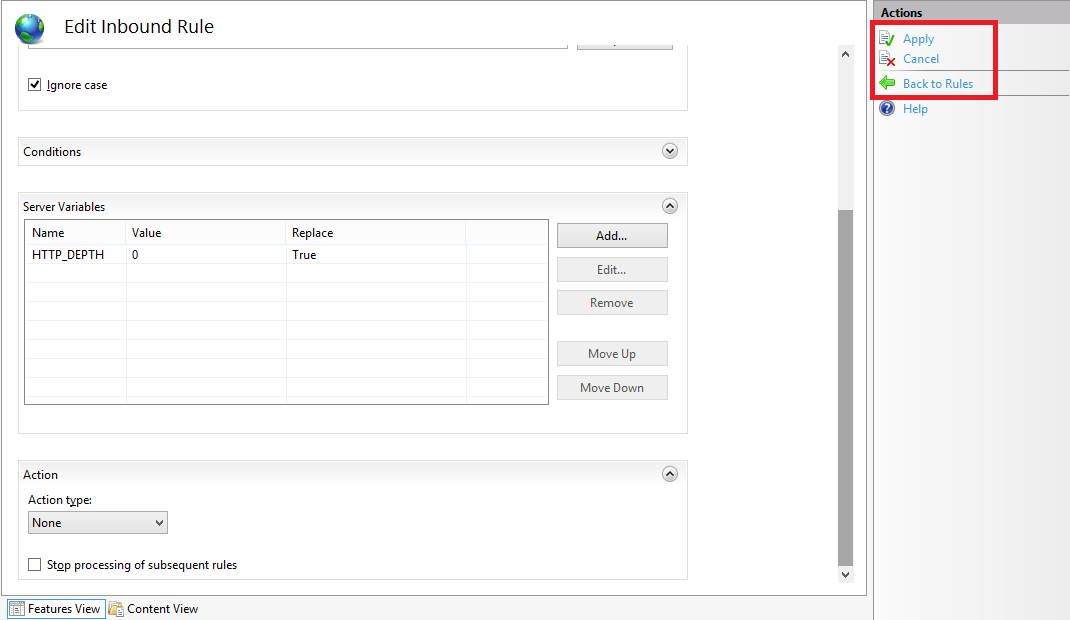
Click image to expand - Click Apply in the Actions pane, and then click Back to Rules.
Click image to expand
- Name the rule "Modify Depth Header".
- Click View Server Variables in the Actionspane.
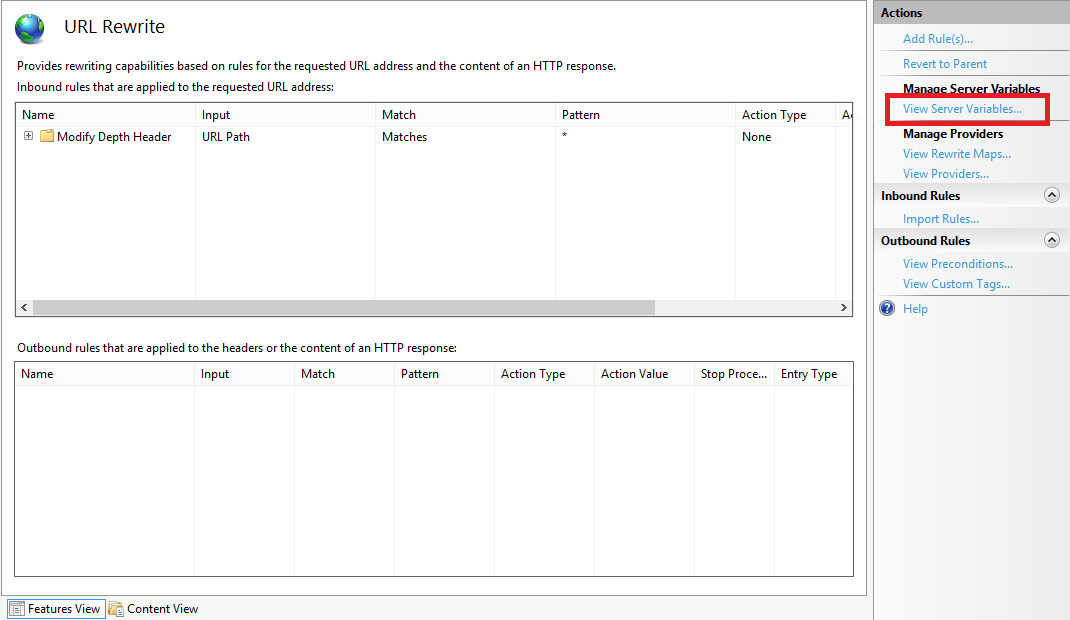
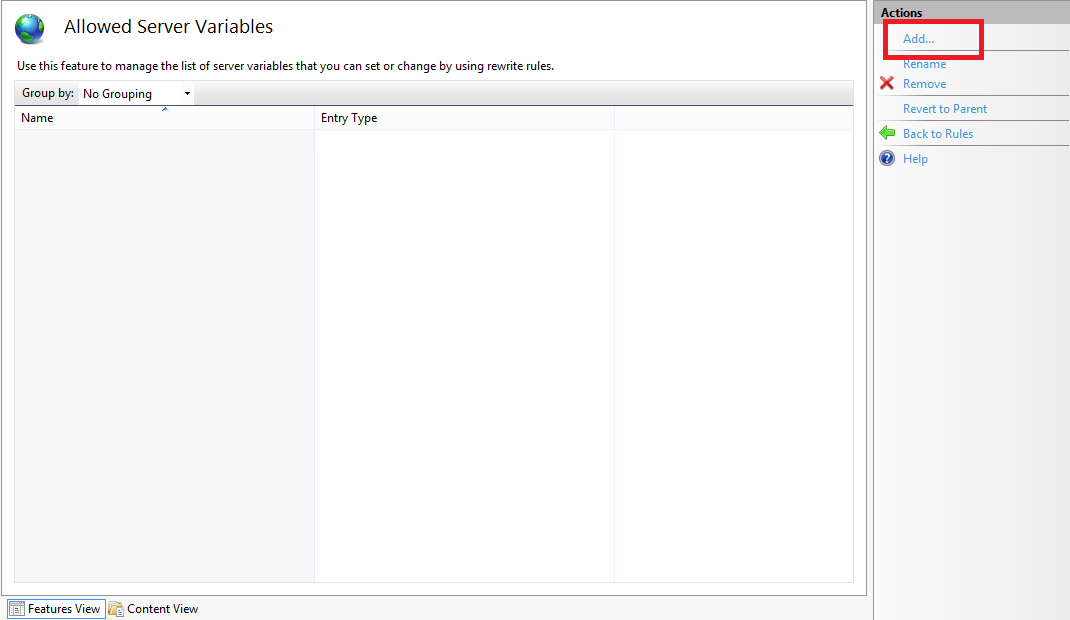
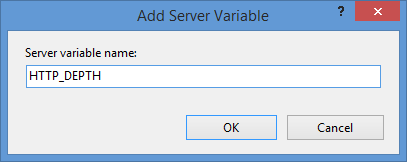
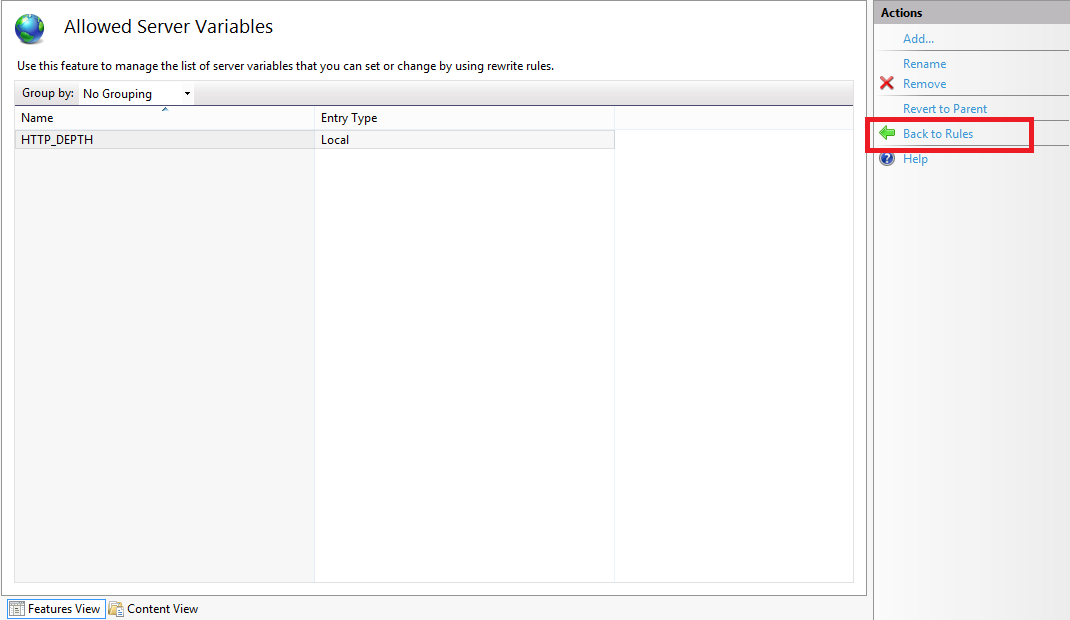
Click image to expand - When the Allowed Server Variablespage appears, configure the following settings:
If all of these changes were saved to your applicationHost.config file, the resulting XML might resemble the following example - with XML comments added by me to highlight some of the major sections:
<location path="Default Web Site">
    <system.webServer>

        <-- Start of Security Settings -->
        <security>
            <authentication>
                <anonymousAuthentication enabled="false" />
                <basicAuthentication enabled="true" />
            </authentication>
            <requestFiltering>
                <fileExtensions applyToWebDAV="false" />
                <verbs applyToWebDAV="false" />
                <hiddenSegments applyToWebDAV="false" />
            </requestFiltering>
        </security>

        <-- Start of WebDAV Settings -->
        <webdav>
            <authoringRules>
                <add roles="administrators" path="*" access="Read, Write, Source" />
            </authoringRules>
            <authoring enabled="true">
                <properties allowAnonymousPropfind="false" allowInfinitePropfindDepth="true">
                    <clear />
                    <add xmlNamespace="*" propertyStore="webdav_simple_prop" />
                </properties>
            </authoring>
        </webdav>

        <-- Start of URL Rewrite Settings -->
        <rewrite>
            <rules>
                <rule name="Modify Depth Header" enabled="true" patternSyntax="Wildcard">
                    <match url="*" />
                    <serverVariables>
                        <set name="HTTP_DEPTH" value="0" />
                    </serverVariables>
                    <action type="None" />
                </rule>
            </rules>
            <allowedServerVariables>
                <add name="HTTP_DEPTH" />
            </allowedServerVariables>
        </rewrite>

    </system.webServer>
</location>
In all likelihood, some of these settings will be stored in your applicationHost.config file, and the remaining settings will be stored in the web.config file of your website.
Testing the URL Rewrite Settings
If you did not have the URL Rewrite rule in place, or if you disabled the rule, then your web server might respond like the following example if you used the WebDAV Redirector to map a drive to your website from a command prompt:
C:\>net use z: http://www.contoso.com/
Enter the user name for 'www.contoso.com': www.contoso.com\robert
Enter the password for www.contoso.com:
The command completed successfully.

C:\>z:

Z:\>dir
Volume in drive Z has no label.
Volume Serial Number is 0000-0000

Directory of Z:\

09/16/2013 08:55 PM <DIR> .
09/16/2013 08:55 PM <DIR> ..
09/14/2013 12:39 AM <DIR> aspnet_client
09/16/2013 08:06 PM <DIR> scripts
09/16/2013 07:55 PM 66 default.aspx
09/14/2013 12:38 AM 98,757 iis-85.png
09/14/2013 12:38 AM 694 iisstart.htm
09/16/2013 08:55 PM 75 web.config
              4 File(s) 99,592 bytes
              8 Dir(s) 956,202,631,168 bytes free

Z:\>
However, when you have the URL Rewrite correctly configured and enabled, connecting to the same website will resemble the following example - notice how no files or folders are listed:
C:\>net use z: http://www.contoso.com/
Enter the user name for 'www.contoso.com': www.contoso.com\robert
Enter the password for www.contoso.com:
The command completed successfully.

C:\>z:

Z:\>dir
Volume in drive Z has no label.
Volume Serial Number is 0000-0000

Directory of Z:\

09/16/2013 08:55 PM <DIR> .
09/16/2013 08:55 PM <DIR> ..
              0 File(s) 0 bytes
              2 Dir(s) 956,202,803,200 bytes free

Z:\>
Despite the blank directory listing, you can still retrieve the properties for any file or folder if you know that it exists. So if you were to use the mapped drive from the preceding example, you could still use an explicit directory command for any object that you had uploaded or created:
Z:\>dir default.aspx
Volume in drive Z has no label.
Volume Serial Number is 0000-0000

Directory of Z:\

09/16/2013 07:55 PM 66 default.aspx
              1 File(s) 66 bytes
              0 Dir(s) 956,202,799,104 bytes free

Z:\>dir scripts
Volume in drive Z has no label.
Volume Serial Number is 0000-0000

Directory of Z:\scripts

09/16/2013 07:52 PM <DIR> .
09/16/2013 07:52 PM <DIR> ..
              0 File(s) 0 bytes
              2 Dir(s) 956,202,799,104 bytes free

Z:\>
The same is true for creating directories and files; you can create them, but they will not show up in the directory listings after you have created them unless you reference them explicitly:
Z:\>md foobar

Z:\>dir
Volume in drive Z has no label.
Volume Serial Number is 0000-0000

Directory of Z:\

09/16/2013 11:52 PM <DIR> .
09/16/2013 11:52 PM <DIR> ..
              0 File(s) 0 bytes
              2 Dir(s) 956,202,618,880 bytes free

Z:\>cd foobar

Z:\foobar>copy NUL foobar.txt
        1 file(s) copied.

Z:\foobar>dir
Volume in drive Z has no label.
Volume Serial Number is 0000-0000

Directory of Z:\foobar

09/16/2013 11:52 PM <DIR> .
09/16/2013 11:52 PM <DIR> ..
              0 File(s) 0 bytes
              2 Dir(s) 956,202,303,488 bytes free

Z:\foobar>dir foobar.txt
Volume in drive Z has no label.
Volume Serial Number is 0000-0000

Directory of Z:\foobar

09/16/2013 11:53 PM 0 foobar.txt
              1 File(s) 0 bytes
              0 Dir(s) 956,202,299,392 bytes free

Z:\foobar>
That wraps it up for today's post, although I should point out that if you see any errors when you are using the WebDAV Redirector, you should take a look at the Troubleshooting the WebDAV Redirector section of my Using the WebDAV Redirector article; I have done my best to list every error and resolution that I have discovered over the past several years.
Note: This blog was originally posted at http://blogs.msdn.com/robert_mcmurray/
IIS 6.0 WebDAV and Compound Document Format Files Revisited with Workarounds
24 April 2013 • by Bob • IIS, WebDAV, IIS 6
A few years ago I wrote the following blog, wherein I described how the WebDAV functionality in IIS 6.0 worked with files that are Compound Document format:
IIS 6.0 WebDAV and Compound Document Format Files
As I explained in that blog post, WebDAV needs somewhere to store "properties" for files that are uploaded to the server, and WebDAV uses the compound document format to accomplish this according to the following implementation logic:
- If the file is already in the compound document file format, IIS simply adds the WebDAV properties to the existing file. This data will not be used by the application that created the file - it will only be used by WebDAV. However, the file size will increase because WebDAV properties are added to the compound document.
- For other files, WebDAV stores a compound document in an NTFS alternate data stream that is attached to the file. You will never see this additional data from any directory listing, and the file size doesn't change because it's in an alternate data stream.
I recently had a customer contact me in order to ask if there was a way to disable this functionality since he didn't want his files modified in order to store the WebDAV properties. Unfortunately there is no built-in option for IIS that will disable this functionality, but there are a few workarounds.
Workaround #1 - Change the File Type
First and foremost - you can change your file type to something other than the compound document format. For example, if you are uploading files that were created in Microsoft Office, if you can upload your files in the newer Office Open XML formats, then you will not run into this problem. By way of explanation, older Microsoft Office files are in compound document format, whereas files that are that are created with Microsoft Office 2010 and later are in a zipped, XML-based file format. These files will have extensions like *.DOCX for Microsoft Word documents, *.XLSX for Microsoft Excel spreadsheets, and *.PPTX for Microsoft PowerPoint presentations.
Workaround #2 - Wrap Compound Document Files in a Separate File Type
If you are using a file that must be in compound document format, like a setup package in Microsoft Installer (*.MSI) format, you can upload the file in a *.ZIP file, or you can wrap the setup package inside a self-extracting executable by using a technology like Microsoft's IExpress Wizard (which ships as a built-in utility with most versions of Windows).
Workaround #3 - Block WebDAV Properties
If you absolutely cannot change your document from compound document format, I have a completely unsupported workaround that I can suggest. Since the problem arises when properties are added to a file, you can find a way to intercept the WebDAV commands that try to set properties. The actual HTTP verb that is used is PROPPATCH, so if you can find a way to keep this command from being used, then you can prevent files from being modified. Unfortunately you cannot simply suppress PROPPATCH commands by using a security tool like Microsoft's UrlScan to block the command, because this will cause many WebDAV clients to fail.
Instead, what I did as a workaround was to write an example ISAPI filter for IIS 6.0 that intercepts incoming PROPPATCH commands and always sends a successful (e.g. "200 OK") response to the WebDAV client, but in reality the filter does nothing with the properties and ends the request processing. This tricks a WebDAV client into thinking that it succeeded, and it prevents your files in compound document format from being modified. However, this also means that no WebDAV properties will ever be stored with your files; but if that's acceptable to you, (and it usually should be), then you can use this workaround.
With that in mind, here's the C++ code for my example ISAPI filter, and please remember that this is a completely unsupported workaround that is intended for use only when you cannot repackage your files to use something other than the compound document format.
#define _WIN32_WINNT 0x0400

#include <windows.h>
#include <httpfilt.h>

#define STRSAFE_LIB
#include <strsafe.h>

#define BUFFER_SIZE 2048

const char xmlpart1[] = "<?xml version=\"1.0\"?>"
  "<a:multistatus xmlns:a=\"DAV:\">"
  "<a:response>"
  "<a:href>";

const char xmlpart2[] = "</a:href>"
  "<a:propstat>"
  "<a:status>HTTP/1.1 200 OK</a:status>"
  "</a:propstat>"
  "</a:response>"
  "</a:multistatus>";

BOOL WINAPI GetFilterVersion(PHTTP_FILTER_VERSION pVer)
{
  HRESULT hr = S_OK;
  // Set the filter's version.
  pVer->dwFilterVersion = HTTP_FILTER_REVISION;
  // Set the filter's description.
  hr = StringCchCopyEx(
    pVer->lpszFilterDesc,256,"PROPPATCH",
    NULL,NULL,STRSAFE_IGNORE_NULLS);
  if (FAILED(hr)) return FALSE;
  // Set the filter's flags.
  pVer->dwFlags = SF_NOTIFY_ORDER_HIGH | SF_NOTIFY_PREPROC_HEADERS;
  return TRUE;
}

DWORD WINAPI HttpFilterProc(
  PHTTP_FILTER_CONTEXT pfc,
  DWORD NotificationType,
  LPVOID pvNotification )
{
  // Verify the correct notification.
  if ( NotificationType == SF_NOTIFY_PREPROC_HEADERS)
  {
    PHTTP_FILTER_PREPROC_HEADERS pHeaders;
    HRESULT hr = S_OK;

    bool fSecure = false;

    char szServerName[BUFFER_SIZE] = "";
    char szSecure[2] = "";
    char szResponseXML[BUFFER_SIZE] = "";
    char szResponseURL[BUFFER_SIZE] = "";
    char szRequestURL[BUFFER_SIZE] = "";
    char szMethod[BUFFER_SIZE] = "";

    DWORD dwBuffSize = 0;

    pHeaders = (PHTTP_FILTER_PREPROC_HEADERS) pvNotification;

    // Get the method of the request
    dwBuffSize = BUFFER_SIZE-1;
    // Exit with an error status if a failure occured.
    if (!pfc->GetServerVariable(
      pfc, "HTTP_METHOD", szMethod, &dwBuffSize))
      return SF_STATUS_REQ_ERROR;

    if (strcmp(szMethod, "PROPPATCH") == 0)
    {
      // Send the HTTP status to the client.
      if (!pfc->ServerSupportFunction(
        pfc, SF_REQ_SEND_RESPONSE_HEADER,"207 Multi-Status", 0, 0))
        return SF_STATUS_REQ_ERROR;

      // Get the URL of the request.
      dwBuffSize = BUFFER_SIZE-1;
      if (!pfc->GetServerVariable(
        pfc, "URL", szRequestURL, &dwBuffSize))
        return SF_STATUS_REQ_ERROR;

      // Determine if request was sent over secure port.
      dwBuffSize = 2;
      if (!pfc->GetServerVariable(
        pfc, "SERVER_PORT_SECURE", szSecure, &dwBuffSize))
        return SF_STATUS_REQ_ERROR;
      fSecure = (szSecure[0] == '1');

      // Get the server name.
      dwBuffSize = BUFFER_SIZE-1;
      if (!pfc->GetServerVariable(
        pfc, "SERVER_NAME", szServerName, &dwBuffSize))
        return SF_STATUS_REQ_ERROR;

      // Set the response URL.
      hr = StringCchPrintf(
        szResponseURL,BUFFER_SIZE-1, "http%s://%s/%s",
        (fSecure ? "s" : ""), szServerName, &szRequestURL[1]);
      // Exit with an error status if a failure occurs.
      if (FAILED(hr)) return SF_STATUS_REQ_ERROR;

      // Set the response body.
      hr = StringCchPrintf(
        szResponseXML,BUFFER_SIZE-1, "%s%s%s",
        xmlpart1, szResponseURL, xmlpart2);
      // Exit with an error status if a failure occurs.
      if (FAILED(hr)) return SF_STATUS_REQ_ERROR;

      // Write the response body to the client.
      dwBuffSize = strlen(szResponseXML);
      if (!pfc->WriteClient(
        pfc, szResponseXML, &dwBuffSize, 0))
        return SF_STATUS_REQ_ERROR;

      // Flag the request as completed.
      return SF_STATUS_REQ_FINISHED;
    }
  }

  return SF_STATUS_REQ_NEXT_NOTIFICATION;
}
I hope this helps. ;-]
Note: This blog was originally posted at http://blogs.msdn.com/robert_mcmurray/
WebDAV Website Importer for WebMatrix
21 July 2012 • by Bob • WebDAV, WebMatrix
The other day I was talking with one of my coworkers, Yishai Galatzer, about Microsoft's WebMatrix. By way of introduction, Yishai is one of our senior developers on the WebMatrix project; I'm not sure if you've used WebMatrix, but it's a pretty handy website editor. Here's a few generic screen shots:
 |
| WebMatrix 2 Splash Screen |
 |
| WebMatrix 2 Quick Start Screen |
 |
| Editing QDIG in WebMatrix 2 |
In any event, I was explaining how easy it is to work with WebDAV, and I mentioned that I had written some some blogs about working with WebDAV websites programmatically. (See my Sending WebDAV Requests in .NET Revisited blog for an example.) Since WebMatrix 2 has some pretty cool extensibility, Yishai challenged me to write a WebDAV extension for WebMatrix. His idea was just too good for me to pass up, so I stayed up late that night and I wrote a simple WebDAV Website Import extension for WebMatrix 2.
With that in mind, there are a few things that I need to explain in this blog:
- What this extension actually does.
- How to install this extension.
- How to use this extension.
What the WebDAV Website Importer Extension Actually Does
The WebDAV Website Importer extension does just what its name implies - it allows you to import a website into WebMatrix over WebDAV. This allows you to download your website to your local computer, where you can make changes to your source files and test them on your local system with IIS Express.
It should be noted that this extension is only designed to create a new local website by downloading a copy of your website's files in order to create a local copy of your website - it is not designed to be a website publishing feature like WebMatrix's built-in FTP and Web Deploy features. (I would like to write a full-featured website import/export/sync extension, but that's another project for another day.)
How to Install the WebDAV Website Importer Extension
To install this extension, you first need to install WebMatrix. You can find details about installing WebMatrix at the following URL:
Once you have WebMatrix installed, click the Extensions menu on the ribbon, and then click Gallery.
When the Extensions Gallery appears, you will see the WebDAV Website Importer in the list of extensions.
When you click Install, the WebDAV Website Importer details page will be displayed.
When you click Install, the End User License Agreement for the WebDAV Website Importer will be displayed.
When you click I Accept, WebMatrix will download and install the extension.
How to Use the WebDAV Website Importer Extension
Once you have downloaded and installed the WebDAV Website Importer extension, it will show up whenever you are creating a new website in WebMatrix.
When you click Import Site from WebDAV, WebMatrix will prompt you for the credentials to your WebDAV website.
Once you enter your credentials and click OK, the extension will import the content from your WebDAV website and save it in a new local website folder.
Summary
So - there you have it; this is a pretty simple extension, but it opens up some WebDAV possibilities for WebMatrix. As I mentioned earlier, this extension is import-only - perhaps I'll write a full-featured import/export/sync extension in the future, but for now - this was a cool test for combining WebMatrix extensibility and WebDAV.
Note: This blog was originally posted at http://blogs.msdn.com/robert_mcmurray/
Storing IIS 7.5 WebDAV Properties in NTFS Alternate Data Streams
30 December 2011 • by Bob • IIS, Scripting, WebDAV
Two months ago Microsoft published an update for the WebDAV module that shipped with IIS 7.5 in Windows 7 and Windows Server 2008 R2, and this update is documented in the Microsoft Knowledge Base article ID 2593591:
This update enables administrators to configure the IIS 7.5 WebDAV module to store WebDAV-based properties in NTFS alternate data streams instead of properties.dav files. By way of explanation, WebDAV has two HTTP methods - PROPFIND and PROPPATCH - which enable WebDAV clients to store custom properties on a WebDAV server. These properties may contain anything that makes sense to the WebDAV client. For example, if you were creating a WebDAV client that stored Microsoft Office documents on a WebDAV server, you could store metadata in WebDAV properties for each document, like the author's name, document abstract, etc.
By default, the IIS 7.5 WebDAV module stores properties in system files in each folder of a website that are called properties.dav. These files are essentially text-based INI files that contain the encoded WebDAV properties for the various files in each folder. In contrast, the WebDAV functionality in IIS 6 had used NTFS alternate data streams to store WebDAV properties, which are described in the following Microsoft TechNet article:
After we shipped IIS 6, we received a lot of complaints from customers who were losing their WebDAV properties when they were copying their website files between NTFS and FAT file systems. This was expected behavior - NTFS alternate data streams will be removed when you copy files from NTFS to FAT. To remedy this situation, in IIS 7.0 we decided to switch to using INI-based functionality in order to prevent losing custom WebDAV properties when files are copied between disparate file systems.
When we were designing IIS 7.5, we wanted to add optional support for storing WebDAV properties in NTFS alternate data streams, and we wanted to do so because NTFS alternate data streams might perform faster when you are working with larger websites; however, we ran out of time to implement that functionality before we shipped Windows 7 and Windows Server 2008 R2. That being said, we still wanted to implement the feature, and the update that I listed at the beginning of this blog contains the functionality that is required to enable storing WebDAV properties in NTFS alternate data streams.
Enabling Alternate Data Streams for WebDAV Properties
The above information is good news for anyone who is storing large quantities of WebDAV properties, so your next logical question might be: "How do I enable NTFS alternate data streams for WebDAV properties ?"
Actually, it's really simple. In the KB article that I listed in the beginning of this blog, I documented two methods that show you how to enable storing WebDAV properties in NTFS alternate data streams:
- By modifying your applicationHost.config file
- By using AppCmd.exe
For the sake of completeness, I will repost some of the information here.
Method #1: Modifying your applicationHost.config file
You can enable storing WebDAV properties in alternate data streams for the simple property provider by adding a "useAlternateDataStreams" attribute to the property provider’s registration settings in your applicationHost.config file, which is highlighted in the following global configuration snippet:
<webdav>
  <globalSettings>
    <propertyStores>
      <add name="webdav_simple_prop"
        image="%windir%\system32\inetsrv\webdav_simple_prop.dll"
        image32="%windir%\syswow64\inetsrv\webdav_simple_prop.dll"
        useAlternateDataStreams="true" />
    </propertyStores>
    <lockStores>
      <add name="webdav_simple_lock"
        image="%windir%\system32\inetsrv\webdav_simple_lock.dll"
        image32="%windir%\syswow64\inetsrv\webdav_simple_lock.dll" />
    </lockStores>
  </globalSettings>
  <authoring>
    <locks enabled="true" lockStore="webdav_simple_lock" />
    <properties>
      <clear />
      <add xmlNamespace="*" propertyStore="webdav_simple_prop" />
    </properties>
  </authoring>
  <authoringRules />
</webdav>
Once you have enabled the feature, you have to restart IIS in order for it to take effect.
Method #2: Using AppCmd.exe
I wrote the following batch file for the KB article, which uses AppCmd.exe to enable the NTFS alternate data streams functionality, and it automatically restarts IIS for you:
pushd "%SystemRoot%\System32\Inetsrv"
iisreset /stop
appcmd.exe set config -section:system.webServer/webdav/globalSettings -propertyStores.[name='webdav_simple_prop'].useAlternateDataStreams:true /commit:apphost
iisreset /start
popd
Migrating IIS 7 WebDAV Properties into Alternate Data Streams
Once you've enabled storing WebDAV properties in alternate data streams, you are presented with a new challenge: "How do I migrate my existing WebDAV properties?"
Here's the situation, once you have enabled the alternate data streams feature, the WebDAV property provider is going to ignore any properties that have already been set in properties.dav files. With this in mind, I wrote a script that will migrate all of the WebDAV properties from all of the properties.dav files in a website into their corresponding per-file NTFS alternate data streams.
To use the following script, you will need to update the folder path in the third line of the script with the path to your website. Once you have done that, you can run the script to migrate your existing WebDAV properties.
NOTE: You need to run this script as an administrator!
Option Explicit

Dim arrFolderTree, intFolderCount

arrFolderTree = BuildFolderTree("C:\inetpub\wwwroot")

For intFolderCount = 1 To UBound(arrFolderTree)
  MigratePropertiesToADS arrFolderTree(intFolderCount)
Next

Sub MigratePropertiesToADS(strFolderPath)
  On Error Resume Next

  ' Declare all our variables
  Dim objTempFSO, objTempFolder
  Dim objTempPropertiesFile, objTempAlternateDataStream
  Dim strTempLine, strTempObjectName, blnTempOpenStream
  Const strTempPropertiesDAV = "\properties.dav"
  Const strTempAlternateDataStream = ":properties.dav:$DATA"

  ' Create a file system object.
  Set objTempFSO = WScript.CreateObject("Scripting.FileSystemObject")

  ' Flag the function as having a closed output stream.
  blnTempOpenStream = False

  ' Retrieve a folder object for the path.
  Set objTempFolder = objTempFSO.GetFolder(strFolderPath)

  ' Check for a properties.dav file in the current folder.
  If objTempFSO.FileExists(objTempFolder.Path & strTempPropertiesDAV) Then
    ' Open the properties.dav file for the current folder.
    Set objTempPropertiesFile = objTempFSO.OpenTextFile(objTempFolder.Path & _
      strTempPropertiesDAV,1,False,-1)
    ' Loop through the properties.dav file.
    Do While Not objTempPropertiesFile.AtEndOfStream
      ' Retrieve a line from the properties.dav file.
      strTempLine = Trim(objTempPropertiesFile.ReadLine)
      ' Check if it's a section heading.
      If Left(strTempLine,1) = "[" And Right(strTempLine,1) = "]" Then
        ' Parse the name of the object (file/folder).
        strTempObjectName = Replace(Trim(Mid(strTempLine,2,Len(strTempLine)-2)),"/","\")
        ' Strip off a backslash from the parent folder.
        If Len(strTempObjectName) = 1 Then strTempObjectName = ""
        ' Check to see if the file/folder exists.
        If objTempFSO.FileExists(objTempFolder.Path & _
             strTempObjectName) Or objTempFSO.FolderExists(objTempFolder.Path & _
             strTempObjectName) Then
          ' Create a file object for the alternate data stream.
          Set objTempAlternateDataStream = objTempFSO.CreateTextFile(objTempFolder.Path & _
             strTempObjectName & _
             strTempAlternateDataStream,True,-1)
          ' Write the WebDAV section header.
          objTempAlternateDataStream.WriteLine "[WebDAV]"
          ' Flag the function as having an open output stream.
          blnTempOpenStream = True
        Else
          ' Flag the function as having a closed output stream.
          blnTempOpenStream = False
        End If
      Else
        ' Check if we have an open output stream.
        If blnTempOpenStream = True Then
          ' Output a property.
          objTempAlternateDataStream.WriteLine strTempLine
        End If
      End If
    Loop
    ' Close the properties.dav file.
    objTempPropertiesFile.Close
  End If
  Set objTempFSO = Nothing
End Sub

Function BuildFolderTree(strTempBaseFolder)
  On Error Resume Next

  ' Declare all our variables
  Dim objTempFSO
  Dim objTempFolder
  Dim objTempSubFolder
  Dim lngTempFolderCount
  Dim lngTempBaseCount

  ' Create our file system object.
  Set objTempFSO = WScript.CreateObject("Scripting.FileSystemObject")

  ' Define the initial values for our folder counters.
  lngTempFolderCount = 1
  lngTempBaseCount = 0

  ' Dimension an array to hold the folder names.
  ReDim strTempFolders(1)

  ' Store the root folder in our array.
  strTempFolders(lngTempFolderCount) = strTempBaseFolder

  ' Loop while we still have folders to process.
  While lngTempFolderCount <> lngTempBaseCount
    ' Set up a folder object to a base folder.
    Set objTempFolder = objTempFSO.GetFolder(strTempFolders(lngTempBaseCount+1))
    ' Loop through the collection of subfolders for the base folder.
    For Each objTempSubFolder In objTempFolder.SubFolders
      ' Increment our folder count.
      lngTempFolderCount = lngTempFolderCount + 1
      ' Increase our array size
      ReDim Preserve strTempFolders(lngTempFolderCount)
      ' Store the folder name in our array.
      strTempFolders(lngTempFolderCount) = objTempSubFolder.Path
    Next
    ' Increment the base folder counter.
    lngTempBaseCount = lngTempBaseCount + 1
  Wend

  ' Return the array of folder names.
  BuildFolderTree = strTempFolders

End Function
In Closing
I have a couple final notes for you to consider:
- Enabling NTFS alternate data streams is a global WebDAV setting; you cannot do this on a per-site basis.
- As with IIS 6, once you enable storing WebDAV properties in NTFS alternate data streams, you will lose your WebDAV properties if you copy your files between NTFS and FAT file systems.
Note: This blog was originally posted at http://blogs.msdn.com/robert_mcmurray/
Sending WebDAV Requests in .NET Revisited
18 October 2011 • by Bob • WebDAV
I recently spoke with a great customer in India, and he was experimenting with the code from my Sending WebDAV Requests in .NET blog post. He had a need to send the WebDAV LOCK/UNLOCK commands, so I wrote a quick addition to the code in my original blog post to send those commands, and I thought that I'd share that code in an updated blog post.
Using WebDAV Locks
First of all, you may need to enable WebDAV locks on your server. To do so, follow the instructions in the following walkthrough:
How to Use WebDAV Locks
http://learn.iis.net/page.aspx/596/how-to-use-webdav-locks/
If you were writing a WebDAV client, sending the LOCK/UNLOCK commands would help to avoid two clients attempting to author the same resource. So if your WebDAV client was editing a file named "foo.txt", the flow of events would be something like the following:
- LOCK foo.txt
- GET foo.txt
- [make some changes to foo.txt]
- PUT foo.txt
- UNLOCK foo.txt
Description for the Sample Application
The updated code sample in this blog post shows how to send most of the common WebDAV requests using C# and common .NET libraries. In addition to adding the LOCK/UNLOCK commands to this version, I also changed the sample files to upload/download Classic ASP pages instead of text files; I did this so you can see that the WebDAV requests are correctly accessing the source code of the ASP pages instead of the translated output.
Having said that, I need to mention once again that I create more objects than are necessary for each section of the sample, which creates several intentional redundancies; I did this because I wanted to make each section somewhat self-sufficient, which helps you to copy and paste a little easier. I present the WebDAV methods the in the following order:
| WebDAV Method | Notes |
|---|---|
| PUT | This section of the sample writes a string as a text file to the destination server as "foobar1.asp". Sending a raw string is only one way of writing data to the server, in a more common scenario you would probably open a file using a steam object and write it to the destination. One thing to note in this section of the sample is the addition of the "Overwrite" header, which specifies that the destination file can be overwritten. |
| LOCK | This section of the sample sends a WebDAV request to lock the "foobar1.asp" before downloading it with a GET request. |
| GET | This section of the sample sends a WebDAV-specific form of the HTTP GET method to retrieve the source code for the destination URL. This is accomplished by sending the "Translate: F" header and value, which instructs IIS to send the source code instead of the processed URL. In this specific sample I am using Classic ASP, but if the requests were for ASP.NET or PHP files you would also need to specify the "Translate: F" header/value pair. |
| PUT | This section of the sample sends an updated version of the "foobar1.asp" script to the server, which overwrites the original file. The purpose of this PUT command is to simulate creating a WebDAV client that can update files on the server. |
| GET | This section of the sample retrieves the updated version of the "foobar1.asp" script from the server, just to show that the updated version was saved successfully. |
| UNLOCK | This section of the sample uses the lock token from the earlier LOCK request to unlock the "foobar1.asp" |
| COPY | This section of the sample copies the file from "foobar1.asp" to "foobar2.asp", and uses the "Overwrite" header to specify that the destination file can be overwritten. One thing to note in this section of the sample is the addition of the "Destination" header, which obviously specifies the destination URL. The value for this header can be a relative path or an FQDN, but it may not be an FQDN to a different server. |
| MOVE | This section of the sample moves the file from "foobar2.asp" to "foobar1.asp", thereby replacing the original uploaded file. As with the previous two sections of the sample, this section of the sample uses the "Overwrite" and "Destination" headers. |
| DELETE | This section of the sample deletes the original file, thereby removing the sample file from the destination server. |
| MKCOL | This section of the sample creates a folder named "foobar3" on the destination server; as far as WebDAV on IIS is concerned, the MKCOL method is a lot like the old DOS MKDIR command. |
| DELETE | This section of the sample deletes the folder from the destination server. |
Source Code for the Sample Application
Here is the source code for the updated sample application:
using System;
using System.Net;
using System.IO;
using System.Text;

class WebDavTest
{
  static void Main(string[] args)
  {
    try
    {
      // Define the URLs.
      string szURL1 = @"http://localhost/foobar1.asp";
      string szURL2 = @"http://localhost/foobar2.asp";
      string szURL3 = @"http://localhost/foobar3";

      // Some sample code to put in an ASP file.
      string szAspCode1 = @"<%=Year()%>";
      string szAspCode2 = @"<%=Time()%>";

      // Some XML to put in a lock request.
      string szLockXml = "<?xml version=\"1.0\" encoding=\"utf-8\" ?>" +
        "<D:lockinfo xmlns:D='DAV:'>" +
        "<D:lockscope><D:exclusive/></D:lockscope>" +
        "<D:locktype><D:write/></D:locktype>" +
        "<D:owner><D:href>mailto:someone@example.com</D:href></D:owner>" +
        "</D:lockinfo>";

      // Define username, password, and lock token strings.
      string szUsername  = @"username";
      string szPassword  = @"password";
      string szLockToken = null;

      // --------------- PUT REQUEST #1 --------------- //

      // Create an HTTP request for the URL.
      HttpWebRequest httpPutRequest1 =
         (HttpWebRequest)WebRequest.Create(szURL1);

      // Set up new credentials.
      httpPutRequest1.Credentials =
         new NetworkCredential(szUsername, szPassword);

      // Pre-authenticate the request.
      httpPutRequest1.PreAuthenticate = true;

      // Define the HTTP method.
      httpPutRequest1.Method = @"PUT";

      // Specify that overwriting the destination is allowed.
      httpPutRequest1.Headers.Add(@"Overwrite", @"T");

      // Specify the content length.
      httpPutRequest1.ContentLength = szAspCode1.Length;

      // Optional, but allows for larger files.
      httpPutRequest1.SendChunked = true;

      // Retrieve the request stream.
      Stream putRequestStream1 =
         httpPutRequest1.GetRequestStream();

      // Write the string to the destination as text bytes.
      putRequestStream1.Write(
         Encoding.UTF8.GetBytes((string)szAspCode1),
         0, szAspCode1.Length);

      // Close the request stream.
      putRequestStream1.Close();

      // Retrieve the response.
      HttpWebResponse httpPutResponse1 =
         (HttpWebResponse)httpPutRequest1.GetResponse();

      // Write the response status to the console.
      Console.WriteLine(@"PUT Response #1: {0}",
         httpPutResponse1.StatusDescription);

      // --------------- LOCK REQUEST --------------- //

      // Create an HTTP request for the URL.
      HttpWebRequest httpLockRequest =
         (HttpWebRequest)WebRequest.Create(szURL1);

      // Set up new credentials.
      httpLockRequest.Credentials =
         new NetworkCredential(szUsername, szPassword);

      // Pre-authenticate the request.
      httpLockRequest.PreAuthenticate = true;

      // Define the HTTP method.
      httpLockRequest.Method = @"LOCK";

      // Specify the request timeout.
      httpLockRequest.Headers.Add(@"Timeout", "Infinite");

      // Specify the request content type.
      httpLockRequest.ContentType = "text/xml; charset=\"utf-8\"";

      // Retrieve the request stream.
      Stream lockRequestStream =
         httpLockRequest.GetRequestStream();

      // Write the lock XML to the destination.
      lockRequestStream.Write(
         Encoding.UTF8.GetBytes((string)szLockXml),
         0, szLockXml.Length);

      // Close the request stream.
      lockRequestStream.Close();

      // Retrieve the response.
      HttpWebResponse httpLockResponse =
         (HttpWebResponse)httpLockRequest.GetResponse();

      // Retrieve the lock token for the request.
      szLockToken = httpLockResponse.GetResponseHeader("Lock-Token");

      // Write the response status to the console.
      Console.WriteLine(
         @"LOCK Response: {0}",
         httpLockResponse.StatusDescription);
      Console.WriteLine(
         @" LOCK Token: {0}",
         szLockToken);

      // --------------- GET REQUEST #1 --------------- //

      // Create an HTTP request for the URL.
      HttpWebRequest httpGetRequest1 =
         (HttpWebRequest)WebRequest.Create(szURL1);

      // Set up new credentials.
      httpGetRequest1.Credentials =
         new NetworkCredential(szUsername, szPassword);

      // Pre-authenticate the request.
      httpGetRequest1.PreAuthenticate = true;

      // Define the HTTP method.
      httpGetRequest1.Method = @"GET";

      // Specify the request for source code.
      httpGetRequest1.Headers.Add(@"Translate", "F");

      // Retrieve the response.
      HttpWebResponse httpGetResponse1 =
         (HttpWebResponse)httpGetRequest1.GetResponse();

      // Retrieve the response stream.
      Stream getResponseStream1 =
         httpGetResponse1.GetResponseStream();

      // Create a stream reader for the response.
      StreamReader getStreamReader1 =
         new StreamReader(getResponseStream1, Encoding.UTF8);

      // Write the response status to the console.
      Console.WriteLine(
         @"GET Response #1: {0}",
         httpGetResponse1.StatusDescription);
      Console.WriteLine(
         @" Response Length: {0}",
         httpGetResponse1.ContentLength);
      Console.WriteLine(
         @" Response Text: {0}",
         getStreamReader1.ReadToEnd());

      // Close the response streams.
      getStreamReader1.Close();
      getResponseStream1.Close();

      // --------------- PUT REQUEST #2 --------------- //

      // Create an HTTP request for the URL.
      HttpWebRequest httpPutRequest2 =
         (HttpWebRequest)WebRequest.Create(szURL1);

      // Set up new credentials.
      httpPutRequest2.Credentials =
         new NetworkCredential(szUsername, szPassword);

      // Pre-authenticate the request.
      httpPutRequest2.PreAuthenticate = true;

      // Define the HTTP method.
      httpPutRequest2.Method = @"PUT";

      // Specify that overwriting the destination is allowed.
      httpPutRequest2.Headers.Add(@"Overwrite", @"T");

      // Specify the lock token.
      httpPutRequest2.Headers.Add(@"If",
        String.Format(@"({0})",szLockToken));

      // Specify the content length.
      httpPutRequest2.ContentLength = szAspCode1.Length;

      // Optional, but allows for larger files.
      httpPutRequest2.SendChunked = true;

      // Retrieve the request stream.
      Stream putRequestStream2 =
         httpPutRequest2.GetRequestStream();

      // Write the string to the destination as a text file.
      putRequestStream2.Write(
         Encoding.UTF8.GetBytes((string)szAspCode2),
         0, szAspCode1.Length);

      // Close the request stream.
      putRequestStream2.Close();

      // Retrieve the response.
      HttpWebResponse httpPutResponse2 =
         (HttpWebResponse)httpPutRequest2.GetResponse();

      // Write the response status to the console.
      Console.WriteLine(@"PUT Response #2: {0}",
         httpPutResponse2.StatusDescription);

      // --------------- GET REQUEST #2 --------------- //

      // Create an HTTP request for the URL.
      HttpWebRequest httpGetRequest2 =
         (HttpWebRequest)WebRequest.Create(szURL1);

      // Set up new credentials.
      httpGetRequest2.Credentials =
         new NetworkCredential(szUsername, szPassword);

      // Pre-authenticate the request.
      httpGetRequest2.PreAuthenticate = true;

      // Define the HTTP method.
      httpGetRequest2.Method = @"GET";

      // Specify the request for source code.
      httpGetRequest2.Headers.Add(@"Translate", "F");

      // Retrieve the response.
      HttpWebResponse httpGetResponse2 =
         (HttpWebResponse)httpGetRequest2.GetResponse();

      // Retrieve the response stream.
      Stream getResponseStream2 =
         httpGetResponse2.GetResponseStream();

      // Create a stream reader for the response.
      StreamReader getStreamReader2 =
         new StreamReader(getResponseStream2, Encoding.UTF8);

      // Write the response status to the console.
      Console.WriteLine(
         @"GET Response #2: {0}",
         httpGetResponse2.StatusDescription);
      Console.WriteLine(
         @" Response Length: {0}",
         httpGetResponse2.ContentLength);
      Console.WriteLine(
         @" Response Text: {0}",
         getStreamReader2.ReadToEnd());

      // Close the response streams.
      getStreamReader2.Close();
      getResponseStream2.Close();

      // --------------- UNLOCK REQUEST --------------- //

      // Create an HTTP request for the URL.
      HttpWebRequest httpUnlockRequest =
         (HttpWebRequest)WebRequest.Create(szURL1);

      // Set up new credentials.
      httpUnlockRequest.Credentials =
         new NetworkCredential(szUsername, szPassword);

      // Pre-authenticate the request.
      httpUnlockRequest.PreAuthenticate = true;

      // Define the HTTP method.
      httpUnlockRequest.Method = @"UNLOCK";

      // Specify the lock token.
      httpUnlockRequest.Headers.Add(@"Lock-Token", szLockToken);

      // Retrieve the response.
      HttpWebResponse httpUnlockResponse =
         (HttpWebResponse)httpUnlockRequest.GetResponse();

      // Write the response status to the console.
      Console.WriteLine(
         @"UNLOCK Response: {0}",
         httpUnlockResponse.StatusDescription);

      // --------------- COPY REQUEST --------------- //

      // Create an HTTP request for the URL.
      HttpWebRequest httpCopyRequest =
         (HttpWebRequest)WebRequest.Create(szURL1);

      // Set up new credentials.
      httpCopyRequest.Credentials =
         new NetworkCredential(szUsername, szPassword);

      // Pre-authenticate the request.
      httpCopyRequest.PreAuthenticate = true;

      // Define the HTTP method.
      httpCopyRequest.Method = @"COPY";

      // Specify the destination URL.
      httpCopyRequest.Headers.Add(@"Destination", szURL2);

      // Specify that overwriting the destination is allowed.
      httpCopyRequest.Headers.Add(@"Overwrite", @"T");

      // Retrieve the response.
      HttpWebResponse httpCopyResponse =
         (HttpWebResponse)httpCopyRequest.GetResponse();

      // Write the response status to the console.
      Console.WriteLine(@"COPY Response: {0}",
         httpCopyResponse.StatusDescription);

      // --------------- MOVE REQUEST --------------- //

      // Create an HTTP request for the URL.
      HttpWebRequest httpMoveRequest =
         (HttpWebRequest)WebRequest.Create(szURL2);

      // Set up new credentials.
      httpMoveRequest.Credentials =
         new NetworkCredential(szUsername, szPassword);

      // Pre-authenticate the request.
      httpMoveRequest.PreAuthenticate = true;

      // Define the HTTP method.
      httpMoveRequest.Method = @"MOVE";

      // Specify the destination URL.
      httpMoveRequest.Headers.Add(@"Destination", szURL1);

      // Specify that overwriting the destination is allowed.
      httpMoveRequest.Headers.Add(@"Overwrite", @"T");

      // Retrieve the response.
      HttpWebResponse httpMoveResponse =
         (HttpWebResponse)httpMoveRequest.GetResponse();

      // Write the response status to the console.
      Console.WriteLine(@"MOVE Response: {0}",
         httpMoveResponse.StatusDescription);

      // --------------- DELETE FILE REQUEST --------------- //

      // Create an HTTP request for the URL.
      HttpWebRequest httpDeleteFileRequest =
         (HttpWebRequest)WebRequest.Create(szURL1);

      // Set up new credentials.
      httpDeleteFileRequest.Credentials =
         new NetworkCredential(szUsername, szPassword);

      // Pre-authenticate the request.
      httpDeleteFileRequest.PreAuthenticate = true;

      // Define the HTTP method.
      httpDeleteFileRequest.Method = @"DELETE";

      // Retrieve the response.
      HttpWebResponse httpDeleteFileResponse =
         (HttpWebResponse)httpDeleteFileRequest.GetResponse();

      // Write the response status to the console.
      Console.WriteLine(@"DELETE File Response: {0}",
         httpDeleteFileResponse.StatusDescription);

      // --------------- MKCOL REQUEST --------------- //

      // Create an HTTP request for the URL.
      HttpWebRequest httpMkColRequest =
         (HttpWebRequest)WebRequest.Create(szURL3);

      // Set up new credentials.
      httpMkColRequest.Credentials =
         new NetworkCredential(szUsername, szPassword);

      // Pre-authenticate the request.
      httpMkColRequest.PreAuthenticate = true;

      // Define the HTTP method.
      httpMkColRequest.Method = @"MKCOL";

      // Retrieve the response.
      HttpWebResponse httpMkColResponse =
         (HttpWebResponse)httpMkColRequest.GetResponse();

      // Write the response status to the console.
      Console.WriteLine(@"MKCOL Response: {0}",
         httpMkColResponse.StatusDescription);

      // --------------- DELETE FOLDER REQUEST --------------- //

      // Create an HTTP request for the URL.
      HttpWebRequest httpDeleteFolderRequest =
         (HttpWebRequest)WebRequest.Create(szURL3);

      // Set up new credentials.
      httpDeleteFolderRequest.Credentials =
         new NetworkCredential(szUsername, szPassword);

      // Pre-authenticate the request.
      httpDeleteFolderRequest.PreAuthenticate = true;

      // Define the HTTP method.
      httpDeleteFolderRequest.Method = @"DELETE";

      // Retrieve the response.
      HttpWebResponse httpDeleteFolderResponse =
         (HttpWebResponse)httpDeleteFolderRequest.GetResponse();

      // Write the response status to the console.
      Console.WriteLine(@"DELETE Folder Response: {0}",
         httpDeleteFolderResponse.StatusDescription);
    }
    catch (Exception ex)
    {
      Console.WriteLine(ex.Message);
    }
  }
}
Running the Sample Application
When you run the code sample, if there are no errors you should see something like the following output:
If you looked at the IIS logs after running the sample application, you should see entries like the following example:
#Software: Microsoft Internet Information Services 7.5
#Version: 1.0
#Date: 2011-10-18 06:49:07
#Fields: date time s-ip cs-method cs-uri-stem cs-uri-query s-port cs-username c-ip sc-status sc-substatus sc-win32-status
2011-10-18 06:49:07 ::1 PUT /foobar1.asp - 80 - ::1 401 2 5
2011-10-18 06:49:07 ::1 PUT /foobar1.asp - 80 username ::1 201 0 0
2011-10-18 06:49:07 ::1 LOCK /foobar1.asp - 80 username ::1 200 0 0
2011-10-18 06:49:07 ::1 GET /foobar1.asp - 80 username ::1 200 0 0
2011-10-18 06:49:07 ::1 PUT /foobar1.asp - 80 username ::1 204 0 0
2011-10-18 06:49:07 ::1 GET /foobar1.asp - 80 username ::1 200 0 0
2011-10-18 06:49:07 ::1 UNLOCK /foobar1.asp - 80 username ::1 204 0 0
2011-10-18 06:49:07 ::1 COPY /foobar1.asp http://localhost/foobar2.asp 80 username ::1 201 0 0
2011-10-18 06:49:07 ::1 MOVE /foobar2.asp http://localhost/foobar1.asp 80 username ::1 204 0 0
2011-10-18 06:49:07 ::1 DELETE /foobar1.asp - 80 username ::1 200 0 0
2011-10-18 06:49:07 ::1 MKCOL /foobar3 - 80 username ::1 201 0 0
2011-10-18 06:49:07 ::1 DELETE /foobar3 - 80 username ::1 200 0 0
Closing Notes
Since the code sample cleans up after itself, you should not see any files or folders on the destination server when it has completed executing. To see the files and folders that are actually created and deleted on the destination server, you would need to step through the code in a debugger.
This updated version does not include examples of the WebDAV PROPPATCH/PROPFIND methods in this sample for the same reason that I did not do so in my previous blog - those commands require processing the XML responses, and that is outside the scope of what I wanted to do with this sample.
I hope this helps!
Note: This blog was originally posted at http://blogs.msdn.com/robert_mcmurray/
How to create an HTML Application to configure your WebDAV Redirector settings
07 October 2011 • by Bob • IIS, Scripting, WebDAV
I've mentioned in previous blog posts that I use the Windows WebDAV Redirector a lot. (And believe me, I use it a lot.) Having said that, there are a lot of registry settings that control how the Windows WebDAV Redirector operates, and I tend to tweak those settings fairly often.
I documented all of those registry settings in my Using the WebDAV Redirector walkthrough, but unfortunately there isn't a built-in interface for managing the settings. With that in mind, I decided to write my own user interface.
I knew that it would be pretty simple to create a basic Windows Form application that does everything, but my trouble is that I would want to share the code in a blog, and the steps create a Windows application are probably more than I would want to write in such a short space. So I decided to reach into my scripting past and create an HTML Application for Windows that configures all of the Windows WebDAV Redirector settings.
It should be noted, like everything else these days, that this code is provided as-is. ;-]
Using the HTML Application
When you run the application, it will present you with the following user interface, which allows you to configure most of the useful Windows WebDAV Redirector settings:
Creating the HTML Application
To create this HTML Application, save the following HTMLA code as "WebDAV Redirector Settings.hta" to your computer, and then double-click its icon to run the application.
<html> <head> <title>WebDAV Redirector Settings</title> <HTA:APPLICATION APPLICATIONNAME="WebDAV Redirector Settings" ID="WebDAV Redirector Settings" VERSION="1.0" BORDER="dialog" BORDERSTYLE="static" INNERBORDER="no" SYSMENU="no" MAXIMIZEBUTTON="no" MINIMIZEBUTTON="no" SCROLL="no" SCROLLFLAT="yes" SINGLEINSTANCE="yes" CONTEXTMENU="no" SELECTION="no"/> <script language="vbscript"> ' ---------------------------------------- ' Start of main code section. ' ---------------------------------------- Option Explicit Const intDialogWidth = 700 Const intDialogHeight = 620 Const HKEY_LOCAL_MACHINE = &H80000002 Const strWebClientKeyPath = "SYSTEM\CurrentControlSet\Services\WebClient\Parameters" Const strLuaKeyPath = "Software\Microsoft\Windows\CurrentVersion\Policies\System" Dim objRegistry Dim blnHasChanges ' ---------------------------------------- ' Start the application. ' ---------------------------------------- Sub Window_OnLoad On Error Resume Next ' Set up the UI dimensions. Self.resizeTo intDialogWidth,intDialogHeight Self.moveTo (Screen.AvailWidth - intDialogWidth) / 2, _ (Screen.AvailHeight - intDialogHeight) / 2 ' Retrieve the current settings. Document.all.TheBody.ClassName = "hide" Set objRegistry = GetObject( _ "winmgmts:{impersonationLevel=impersonate}!\\.\root\default:StdRegProv") Call CheckForLUA() Call GetValues() Document.All.TheBody.ClassName = "show" End Sub ' ---------------------------------------- ' Check for User Access Control ' ---------------------------------------- Sub CheckForLUA() If GetRegistryDWORD(strLuaKeyPath,"EnableLUA",1)<> 0 Then MsgBox "User Access Control (UAC) is enabled on this computer." & _ vbCrLf & vbCrLf & "UAC must be disabled in order to edit " & _ "the registry and restart the service for the WebDAV Redirector. " & _ "Please disable UAC before running this application again. " & _ "This application will now exit.", _ vbCritical, "User Access Control" Self.close End If End Sub ' ---------------------------------------- ' Exit the application. ' ---------------------------------------- Sub ExitApplication() If blnHasChanges = False Then If MsgBox("Are you sure you want to exit?", _ vbQuestion Or vbYesNo Or vbDefaultButton2, _ "Exit Application") = vbNo Then Exit Sub End If Else Dim intRetVal intRetVal = MsgBox("You have unsaved changes. " & _ "Do you want to save them before you exit?", _ vbQuestion Or vbYesNoCancel Or vbDefaultButton1, _ "Exit Application") If intRetVal = vbYes Then Call SetValues() ElseIf intRetVal = vbCancel Then Exit Sub End If End If Self.close End Sub ' ---------------------------------------- ' Flag the application as having changes. ' ---------------------------------------- Sub FlagChanges() blnHasChanges = True End Sub ' ---------------------------------------- ' Retrieve the settings from the registry. ' ---------------------------------------- Sub GetValues() On Error Resume Next Dim tmpCount,tmpArray,tmpString ' Get the radio button values Call SetRadioValue(Document.all.BasicAuthLevel, _ GetRegistryDWORD(strWebClientKeyPath, _ "BasicAuthLevel",1)) Call SetRadioValue(Document.all.SupportLocking, _ GetRegistryDWORD(strWebClientKeyPath, _ "SupportLocking",1)) ' Get the text box values Document.all.InternetServerTimeoutInSec.Value = _ GetRegistryDWORD(strWebClientKeyPath, _ "InternetServerTimeoutInSec",30) Document.all.FileAttributesLimitInBytes.Value = _ GetRegistryDWORD(strWebClientKeyPath, _ "FileAttributesLimitInBytes",1000000) Document.all.FileSizeLimitInBytes.Value = _ GetRegistryDWORD(strWebClientKeyPath, _ "FileSizeLimitInBytes",50000000) Document.all.LocalServerTimeoutInSec.Value = _ GetRegistryDWORD(strWebClientKeyPath, _ "LocalServerTimeoutInSec",15) Document.all.SendReceiveTimeoutInSec.Value = _ GetRegistryDWORD(strWebClientKeyPath, _ "SendReceiveTimeoutInSec",60) Document.all.ServerNotFoundCacheLifeTimeInSec.Value = _ GetRegistryDWORD(strWebClientKeyPath, _ "ServerNotFoundCacheLifeTimeInSec",60) ' Get the text area values tmpArray = GetRegistryMULTISZ( _ strWebClientKeyPath,"AuthForwardServerList") For tmpCount = 0 To UBound(tmpArray) tmpString = tmpString & tmpArray(tmpCount) & vbTab Next If Len(tmpString)>0 Then Document.all.AuthForwardServerList.Value = _ Replace(Left(tmpString,Len(tmpString)-1),vbTab,vbCrLf) End If blnHasChanges = False End Sub ' ---------------------------------------- ' Save the settings in the registry. ' ---------------------------------------- Sub SetValues() On Error Resume Next ' Set the radio button values Call SetRegistryDWORD( _ strWebClientKeyPath, _ "BasicAuthLevel", _ GetRadioValue(Document.all.BasicAuthLevel)) Call SetRegistryDWORD( _ strWebClientKeyPath, _ "SupportLocking", _ GetRadioValue(Document.all.SupportLocking)) ' Set the text box values Call SetRegistryDWORD( _ strWebClientKeyPath, _ "InternetServerTimeoutInSec", _ Document.all.InternetServerTimeoutInSec.Value) Call SetRegistryDWORD( _ strWebClientKeyPath, _ "FileAttributesLimitInBytes", _ Document.all.FileAttributesLimitInBytes.Value) Call SetRegistryDWORD( _ strWebClientKeyPath, _ "FileSizeLimitInBytes", _ Document.all.FileSizeLimitInBytes.Value) Call SetRegistryDWORD( _ strWebClientKeyPath, _ "LocalServerTimeoutInSec", _ Document.all.LocalServerTimeoutInSec.Value) Call SetRegistryDWORD( _ strWebClientKeyPath, _ "SendReceiveTimeoutInSec", _ Document.all.SendReceiveTimeoutInSec.Value) Call SetRegistryDWORD( _ strWebClientKeyPath, _ "ServerNotFoundCacheLifeTimeInSec", _ Document.all.ServerNotFoundCacheLifeTimeInSec.Value) ' Set the text area values Call SetRegistryMULTISZ( _ strWebClientKeyPath, _ "AuthForwardServerList", _ Split(Document.all.AuthForwardServerList.Value,vbCrLf)) ' Prompt to restart the WebClient service If MsgBox("Do you want to restart the WebDAV Redirector " & _ "service so your settings will take effect?", _ vbQuestion Or vbYesNo Or vbDefaultButton2, _ "Restart WebDAV Redirector") = vbYes Then ' Restart the WebClient service. Call RestartWebClient() End If Call GetValues() End Sub ' ---------------------------------------- ' Start the WebClient service. ' ---------------------------------------- Sub RestartWebClient() On Error Resume Next Dim objWMIService,colServices,objService Document.All.TheBody.ClassName = "hide" Set objWMIService = GetObject( _ "winmgmts:{impersonationLevel=impersonate}!\\.\root\cimv2") Set colServices = objWMIService.ExecQuery( _ "Select * from Win32_Service Where Name='WebClient'") For Each objService in colServices objService.StopService() objService.StartService() Next Document.All.TheBody.ClassName = "show" End Sub ' ---------------------------------------- ' Retrieve a DWORD value from the registry. ' ---------------------------------------- Function GetRegistryDWORD( _ ByVal tmpKeyPath, _ ByVal tmpValueName, _ ByVal tmpDefaultValue) On Error Resume Next Dim tmpDwordValue If objRegistry.GetDWORDValue( _ HKEY_LOCAL_MACHINE, _ tmpKeyPath, _ tmpValueName, _ tmpDwordValue)=0 Then GetRegistryDWORD = CLng(tmpDwordValue) Else GetRegistryDWORD = CLng(tmpDefaultValue) End If End Function ' ---------------------------------------- ' Set a DWORD value in the registry. ' ---------------------------------------- Sub SetRegistryDWORD( _ ByVal tmpKeyPath, _ ByVal tmpValueName, _ ByVal tmpDwordValue) On Error Resume Next Call objRegistry.SetDWORDValue( _ HKEY_LOCAL_MACHINE, _ tmpKeyPath, _ tmpValueName, _ CLng(tmpDwordValue)) End Sub ' ---------------------------------------- ' Retrieve a MULTISZ value from the registry. ' ---------------------------------------- Function GetRegistryMULTISZ( _ ByVal tmpKeyPath, _ ByVal tmpValueName) On Error Resume Next Dim tmpMultiSzValue If objRegistry.GetMultiStringValue( _ HKEY_LOCAL_MACHINE, _ tmpKeyPath, _ tmpValueName, _ tmpMultiSzValue)=0 Then GetRegistryMULTISZ = tmpMultiSzValue Else GetRegistryMULTISZ = Array() End If End Function ' ---------------------------------------- ' Set a MULTISZ value in the registry. ' ---------------------------------------- Sub SetRegistryMULTISZ( _ ByVal tmpKeyPath, _ ByVal tmpValueName, _ ByVal tmpMultiSzValue) On Error Resume Next Call objRegistry.SetMultiStringValue( _ HKEY_LOCAL_MACHINE, _ tmpKeyPath, _ tmpValueName, _ tmpMultiSzValue) End Sub ' ---------------------------------------- ' Retrieve the value of a radio button group. ' ---------------------------------------- Function GetRadioValue(ByVal tmpRadio) On Error Resume Next Dim tmpCount For tmpCount = 0 To (tmpRadio.Length-1) If tmpRadio(tmpCount).Checked Then GetRadioValue = CLng(tmpRadio(tmpCount).Value) Exit For End If Next End Function ' ---------------------------------------- ' Set the value for a radio button group. ' ---------------------------------------- Sub SetRadioValue(ByVal tmpRadio, ByVal tmpValue) On Error Resume Next Dim tmpCount For tmpCount = 0 To (tmpRadio.Length-1) If CLng(tmpRadio(tmpCount).Value) = CLng(tmpValue) Then tmpRadio(tmpCount).Checked = True Exit For End If Next End Sub ' ---------------------------------------- ' ' ---------------------------------------- Sub Validate(tmpField) Dim tmpRegEx, tmpMatches Set tmpRegEx = New RegExp tmpRegEx.Pattern = "[0-9]" tmpRegEx.IgnoreCase = True tmpRegEx.Global = True Set tmpMatches = tmpRegEx.Execute(tmpField.Value) If tmpMatches.Count = Len(CStr(tmpField.Value)) Then If CDbl(tmpField.Value) => 0 And _ CDbl(tmpField.Value) =< 4294967295 Then Exit Sub End If End If MsgBox "Please enter a whole number between 0 and 4294967295.", _ vbCritical, "Validation Error" tmpField.Focus End Sub ' ---------------------------------------- ' ' ---------------------------------------- Sub BasicAuthWarning() MsgBox "WARNING:" & vbCrLf & vbCrLf & _ "Using Basic Authentication over non-SSL connections can cause " & _ "serious security issues. Usernames and passwords are transmitted " & _ "in clear text, therefore the use of Basic Authentication with " & _ "WebDAV is disabled by default for non-SSL connections. That " & _ "being said, this setting can override the default behavior for " & _ "Basic Authentication, but it is strongly discouraged.", _ vbCritical, "Basic Authentication Warning" End Sub ' ---------------------------------------- ' End of main code section. ' ---------------------------------------- </script> <style> body { color:#000000; background-color:#cccccc; font-family:'Segoe UI',Tahoma,Verdana,Arial; font-size:9pt; } fieldset { padding:10px; width:640px; } .button { width:150px; } .textbox { width:200px; height:22px; text-align:right; } .textarea { width:300px; height:50px; text-align:left; } .radio { margin-left:-5px; margin-top: -2px; } .hide { display:none; } .show { display:block; } select { width:300px; text-align:left; } table { border-collapse:collapse; empty-cells:hide; } h1 { font-size:14pt; } th { font-size:9pt; text-align:left; vertical-align:top; padding:2px; } td { font-size:9pt; text-align:left; vertical-align:top; padding:2px; } big { font-size:11pt; } small { font-size:8pt; } </style> </head> <body id="TheBody" class="hide"> <h1 align="center" id="TheTitle" style="margin-bottom:-20px;">WebDAV Redirector Settings</h1> <div align="center"> <p style="margin-bottom:-20px;"><i><small><b>Note</b>: See <a target="_blank" href="https://docs.microsoft.com/iis/publish/using-webdav/using-the-webdav-redirector/">Using the WebDAV Redirector</a> for additional details.</small></i></p> <form> <center> <table border="0" cellpadding="2" cellspacing="2" style="width:600px;"> <tr> <td style="width:600px;text-align:left"><fieldset title="Security Settings"> <legend> <b>Security Settings</b> </legend> These values affect the security behavior for the WebDAV Redirector.<br> <table style="width:600px;"> <tr title="Specifies whether the WebDAV Redirector can use Basic Authentication to communicate with a server."> <td style="width:300px"> <table border="0"> <tr> <td style="width:300px"><b>Basic Authentication Level</b></td> </tr> <tr> <td style="width:300px;"><span style="width:280px;padding-left:20px;"><small><i><b>Note</b>: Using basic authentication can cause <u>serious security issues</u> as the username and password are transmitted in clear text, therefore the use of basic authentication over WebDAV is disabled by default unless the connection is using SSL.</i></small></span></td> </tr> </table> </td> <td style="width:300px"> <table style="width:300px"> <tr> <td style="width:020px"><input class="radio" type="radio" value="0" name="BasicAuthLevel" onchange="VBScript:FlagChanges()" id="BasicAuthLevel0"></td> <td style="width:280px"><label for="BasicAuthLevel0">Basic Authentication is disabled</label></td> </tr> <tr> <td style="width:020px"><input class="radio" type="radio" value="1" checked name="BasicAuthLevel" onchange="VBScript:FlagChanges()" id="BasicAuthLevel1"></td> <td style="width:280px"><label for="BasicAuthLevel1">Basic Authentication is enabled for SSL web sites only</label></td> </tr> <tr> <td style="width:020px"><input class="radio" type="radio" value="2" name="BasicAuthLevel" onchange="VBScript:FlagChanges()" id="BasicAuthLevel2" onClick="VBScript:BasicAuthWarning()"></td> <td style="width:280px"><label for="BasicAuthLevel2">Basic Authentication is enabled for SSL and non-SSL web sites</label></td> </tr> </table> </td> </tr> <tr title="Specifies a list of local URLs for forwarding credentials that bypasses any proxy settings. (Note: This requires Windows Vista SP1 or later.)"> <td style="width:300px"> <table border="0"> <tr> <td style="width:300px"><b>Authentication Forwarding Server List</b></td> </tr> <tr> <td style="width:300px;"><span style="width:280px;padding-left:20px;"><small><i><b>Note</b>: Include one server name per line.</i></small></span></td> </tr> </table> </td> <td style="width:300px"><textarea class="textarea" name="AuthForwardServerList" onchange="VBScript:FlagChanges()"></textarea></td> </tr> <tr title="Specifies whether the WebDAV Redirector supports locking."> <td style="width:300px"><b>Support for WebDAV Locking</b></td> <td style="width:300px"> <table style="width:300px"> <tr> <td style="width:020px"><input class="radio" type="radio" value="1" checked name="SupportLocking" onchange="VBScript:FlagChanges()" id="SupportLocking1"></td> <td style="width:280px"><label for="SupportLocking1">Enable Lock Support</label></td> </tr> <tr> <td style="width:020px"><input class="radio" type="radio" value="0" name="SupportLocking" onchange="VBScript:FlagChanges()" id="SupportLocking0"></td> <td style="width:280px"><label for="SupportLocking0">Disable Lock Support</label></td> </tr> </table> </td> </tr> </table> </fieldset> </td> </tr> <tr> <td style="width:600px;text-align:left"><fieldset title="Time-outs"> <legend> <b>Time-outs and Maximum Sizes</b> </legend> These values affect the behavior for WebDAV Client/Server operations.<br> <table border="0" style="width:600px;"> <tr title="Specifies the connection time-out for the WebDAV Redirector uses when communicating with non-local WebDAV servers."> <td style="width:300px"><b>Internet Server Time-out</b> <small>(In Seconds)</small></td> <td style="width:300px"><input class="textbox" type="text" name="InternetServerTimeoutInSec" onchange="VBScript:FlagChanges()" onblur="VBScript:Validate(Me)" value="30"></td> </tr> <tr title="Specifies the connection time-out for the WebDAV Redirector uses when communicating with a local WebDAV server."> <td style="width:300px"><b>Local Server Time-out</b> <small>(In Seconds)</small></td> <td style="width:300px"><input class="textbox" type="text" name="LocalServerTimeoutInSec" onchange="VBScript:FlagChanges()" onblur="VBScript:Validate(Me)" value="15"></td> </tr> <tr title="Specifies the time-out in seconds that the WebDAV Redirector uses after issuing a request."> <td style="width:300px"><b>Send/Receive Time-out</b> <small>(In Seconds)</small></td> <td style="width:300px"><input class="textbox" type="text" name="SendReceiveTimeoutInSec" onchange="VBScript:FlagChanges()" onblur="VBScript:Validate(Me)" value="60"></td> </tr> <tr title="Specifies the period of time that a server is cached as non-WebDAV by the WebDAV Redirector. If a server is found in this list, a fail is returned immediately without attempting to contact the server."> <td style="width:300px"><b>Server Not Found Cache Time-out</b> <small>(In Seconds)</small></td> <td style="width:300px"><input class="textbox" type="text" name="ServerNotFoundCacheLifeTimeInSec" onchange="VBScript:FlagChanges()" onblur="VBScript:Validate(Me)" value="60"></td> </tr> <tr title="Specifies the maximum size in bytes that the WebDAV Redirector allows for file transfers."> <td style="width:300px"><b>Maximum File Size</b> <small>(In Bytes)</small></td> <td style="width:300px"><input class="textbox" type="text" name="FileSizeLimitInBytes" onchange="VBScript:FlagChanges()" onblur="VBScript:Validate(Me)" value="50000000"></td> </tr> <tr title="Specifies the maximum size that is allowed by the WebDAV Redirector for all properties on a specific collection."> <td style="width:300px"><b>Maximum Attributes Size</b> <small>(In Bytes)</small></td> <td style="width:300px"><input class="textbox" type="text" name="FileAttributesLimitInBytes" onchange="VBScript:FlagChanges()" onblur="VBScript:Validate(Me)" value="1000000"></td> </tr> </table> </fieldset> </td> </tr> <tr> <td style="text-align:center"> <table border="0"> <tr> <td style="text-align:center"><input class="button" type="button" value="Apply Settings" onclick="VBScript:SetValues()"> <td style="text-align:center"><input class="button" type="button" value="Exit Application" onclick="VBScript:ExitApplication()"> </tr> </table> </td> </tr> </table> </center> </form> </div> </body> </html>
Additional Notes
You will need to run this HTML Application as an administrator in order to save the settings and restart the Windows WebDAV Redirector. (Which is listed as the "WebClient" service in your Administrative Tools.)
This HTML Application performs basic validation for the numeric fields, and it prevents you from exiting the application when you have unsaved changes, but apart from that there's not much functionality other than setting and retrieving the registry values. How else can you get away with posting an application in a blog with only 500 lines of code and no compilation required? ;-]
Note: This blog was originally posted at http://blogs.msdn.com/robert_mcmurray/
Life after FPSE (Part 6)
31 January 2011 • by Bob • FrontPage, IIS, WebDAV
In this latest installment on my series about configuring your server for hosting without the FrontPage Server Extensions (FPSE), I'd like to discuss a couple of WebDAV best practices that I like to use.
Blocking FPSE-related Folders with Request Filtering
In my How to Migrate FPSE Sites to WebDAV walkthough, I discuss the following FPSE-related folders:
| Folder | Notes |
| _fpclass | Should contain publicly-available FrontPage code - but should be secured. |
| _private | The FrontPage Server Extensions often keep sensitive data files in this folder, so it should be secured to prevent browsing. |
| _vti_bin | This is the virtual directory for the FrontPage Server Extensions executables. This path is configured to allow executables to function, and since we are migrating sites to WebDAV it should be secured to prevent browsing. |
| _vti_cnf | The FrontPage Server Extensions keep sensitive metadata files in this folder, so it should be deleted or secured to prevent browsing. |
| _vti_log | The FrontPage Server Extensions keep author logs in this folder, so it should be deleted or secured to prevent browsing. |
| _vti_pvt | This folder holds several files that contain various metadata for your website, and should be secured. |
| _vti_txt | This folder contains the text indices and catalogs for the older FrontPage WAIS search. Since later versions of FrontPage only used Index Server, it is safe to delete this folder, but at the very least it should be secured to prevent browsing. |
| fpdb | FrontPage keeps databases in this folder, so it should be secured to prevent browsing. |
One of the actions that I usually take on my servers is to lock down all of these folders for my entire server using Request Filtering. To do so, open a command prompt and enter the following commands:
cd %WinDir%\System32\inetsrv
appcmd.exe set config -section:system.webServer/security/requestFiltering /+"hiddenSegments.[segment='_vti_cnf']" /commit:apphost
appcmd.exe set config -section:system.webServer/security/requestFiltering /+"hiddenSegments.[segment='_fpclass']" /commit:apphost
appcmd.exe set config -section:system.webServer/security/requestFiltering /+"hiddenSegments.[segment='_private']" /commit:apphost
appcmd.exe set config -section:system.webServer/security/requestFiltering /+"hiddenSegments.[segment='_vti_log']" /commit:apphost
appcmd.exe set config -section:system.webServer/security/requestFiltering /+"hiddenSegments.[segment='_vti_pvt']" /commit:apphost
appcmd.exe set config -section:system.webServer/security/requestFiltering /+"hiddenSegments.[segment='_vti_txt']" /commit:apphost
appcmd.exe set config -section:system.webServer/security/requestFiltering /+"hiddenSegments.[segment='fpdb']" /commit:apphost
Note: You should only enter the following commands if you are sure that you will not be using FPSE anywhere on your server!
cd %WinDir%\System32\inetsrv
appcmd.exe set config -section:system.webServer/security/requestFiltering /+"hiddenSegments.[segment='_vti_bin']" /commit:apphost
These settings will prevent any of the FPSE-related paths from being viewed over HTTP from a web browser; web clients will receive an HTTP Error 404.8 - Not Found message when they attempt to access those paths. But that being said - when you enable WebDAV for a website by using the Internet Information Services (IIS) Manager, it will configure the Request Filtering settings that enable WebDAV clients to access those paths through WebDAV requests, even though access from a web browser is still blocked. (All of this is made possible through the built-in integration between WebDAV and Request Filtering.
Two Sites are Better Than One
In part 4 of this blog series I discussed why I like to set up two websites when using WebDAV; as a quick review, here is the general idea for that environment:
- The first website (e.g. www.example.com) is used for normal HTTP web browsing
- The second website (e.g. authoring.example.com) is used for for WebDAV authoring
There is a list of several reasons in that blog post why using two sites that point to the same content can be beneficial, and I won't bother quoting that list in this blog post - you can view that information by looking at that post.
But that being said, one of the items that I mentioned in that list was using separate application pools for each website. For example:
- The first application pool (e.g. www.example.com) is configured to use delegated configuration
- The second application pool (e.g. authoring.example.com) is configured to ignore delegated configuration
This configuration helps alleviate problems from uploading invalid Web.config files that might otherwise prevent HTTP access to your website. By way of explanation, the WebDAV module attempts to validate Web.config files when they are uploaded over WebDAV - this is done to try and prevent crashing your HTTP functionality for a website and being unable to fix it. Here's what I mean by that: IIS 7 allows configuration settings to be delegated to Web.config files, but if there is a mistake in a Web.config file, IIS 7 will return an HTTP Error 500.19 - Internal Server Error message for all HTTP requests. Since WebDAV is HTTP-based, that means that you won't be able to fix the problem over WebDAV. (If the WebDAV module didn't perform any validation, that means that your website would become unusable and unrepairable if you had uploaded the bad Web.config file over WebDAV.) To help alleviate this, the WebDAV module performs a simple validation check to prevent uploading invalid Web.config files. But if you save an invalid Web.config file through some other means, like the local file system or over FTP, then you will have no way to repair the situation through WebDAV.
This leads us back to the idea that you can implement when you are using two websites - you can configure the application pool for the WebDAV-enabled website to ignore delegated configuration settings; so it doesn't matter if you have an invalid Web.config file - you will always be able to fix the problem over WebDAV. To configure an application pool to ignore delegated configuration settings, open a command prompt and enter the following commands:
cd %WinDir%\System32\inetsrv
appcmd.exe set config -section:system.applicationHost/applicationPools /[name='authoring.example.com'].enableConfigurationOverride:"False" /commit:apphost
Note: you need to update the highlighted section of that example with the name of your website, such as "Default Web Site," etc.
When you have two websites configured in this example and you have an invalid Web.config file that is causing the HTTP 500 error for the www.example.com website, you can still connect to authoring.example.com via WebDAV and fix the problem.
More Information
For additional information on the concepts that were discussing in this blog, see the following topics:
- Life after FPSE (Part 4) - This blog post discusses a couple of WebDAV-related topics, and includes my list of additional reasons why configuring two websites when you are using WebDAV can be advantageous.
- Adding Application Pools - This topic contains the detailed information about the enableConfigurationOverride setting for an application pool.
- Using the WebDAV Redirector - This walkthrough discusses mapping drives to WebDAV-enabled websites.
I hope this helps.
Note: This blog was originally posted at http://blogs.msdn.com/robert_mcmurray/


