I've written a lot of walkthroughs and blog posts about creating custom FTP providers over the past several years, and I usually include instructions for adding these custom providers to IIS. When you create a custom FTP authentication provider, IIS has a user interface for adding that provider to FTP. But if you are adding a custom home directory or logging provider, there is no dedicated user interface for adding those types of FTP providers. In addition, if you create a custom FTP provider that requires settings that are stored in your IIS configuration, there is no user interface to add or manage those settings.
With this in mind, I include instructions in my blogs and walkthroughs that describe how to add those type of providers by using AppCmd.exe from a command line. For example, if you take a look at my How to Use Managed Code (C#) to Create an FTP Authentication and Authorization Provider using an XML Database walkthrough, I include the following instructions:
Adding the Provider
- Determine the assembly information for the extensibility provider:
- In Windows Explorer, open your "C:\Windows\assembly" path, where C: is your operating system drive.
- Locate the FtpXmlAuthorization assembly.
- Right-click the assembly, and then click Properties.
- Copy the Culture value; for example: Neutral.
- Copy the Version number; for example: 1.0.0.0.
- Copy the Public Key Token value; for example: 426f62526f636b73.
- Click Cancel.
- Using the information from the previous steps, add the extensibility provider to the global list of FTP providers and configure the options for the provider:
- At the moment there is no user interface that enables you to add properties for custom authentication or authorization modules, so you will have to use the following command line:
cd %SystemRoot%\System32\Inetsrv

appcmd.exe set config -section:system.ftpServer/providerDefinitions /+"[name='FtpXmlAuthorization',type='FtpXmlAuthorization,FtpXmlAuthorization,version=1.0.0.0,Culture=neutral,PublicKeyToken=426f62526f636b73']" /commit:apphost

appcmd.exe set config -section:system.ftpServer/providerDefinitions /+"activation.[name='FtpXmlAuthorization']" /commit:apphost

appcmd.exe set config -section:system.ftpServer/providerDefinitions /+"activation.[name='FtpXmlAuthorization'].[key='xmlFileName',value='C:\Inetpub\XmlSample\Users.xml']" /commit:apphost
- Note: The file path that you specify in the xmlFileName attribute must match the path where you saved the "Users.xml" file on your computer in the earlier in this walkthrough.
This example adds a custom FTP provider, and then it adds a custom setting for that provider that is stored in your IIS configuration settings.
That being said, there is actually a way to add custom FTP providers with settings like the ones that I have just described through the IIS interface by using the IIS Configuration Editor. This feature was first available through the IIS Administration Pack for IIS 7.0, and is built-in for IIS 7.5 and IIS 8.0.
Before I continue, if would probably be prudent to take a look at the settings that we are trying to add, because these settings might help you to understand the rest of steps in this blog. Here is an example from my applicationhost.config file for three custom FTP authentication providers; the first two providers are installed with the FTP service, and the third provider is a custom provider that I created with a single provider-specific configuration setting:
<system.ftpServer>
  <providerDefinitions>
    <add name="IisManagerAuth" type="Microsoft.Web.FtpServer.Security.IisManagerAuthenticationProvider, Microsoft.Web.FtpServer, version=7.5.0.0, Culture=neutral, PublicKeyToken=31bf3856ad364e35" />
    <add name="AspNetAuth" type="Microsoft.Web.FtpServer.Security.AspNetFtpMembershipProvider, Microsoft.Web.FtpServer, version=7.5.0.0, Culture=neutral, PublicKeyToken=31bf3856ad364e35" />
    <add name="FtpXmlAuthorization" type="FtpXmlAuthorization, FtpXmlAuthorization, version=1.0.0.0, Culture=neutral, PublicKeyToken=426f62526f636b73" />
    <activation>
      <providerData name="FtpXmlAuthorization">
        <add key="xmlFileName" value="C:\inetpub\FtpUsers\Users.xml" />
      </providerData>
    </activation>
  </providerDefinitions>
</system.ftpServer>
With that in mind, in part 1 of this blog series, I will show you how to use the IIS Configuration Editor to add a custom FTP provider with provider-specific configuration settings.
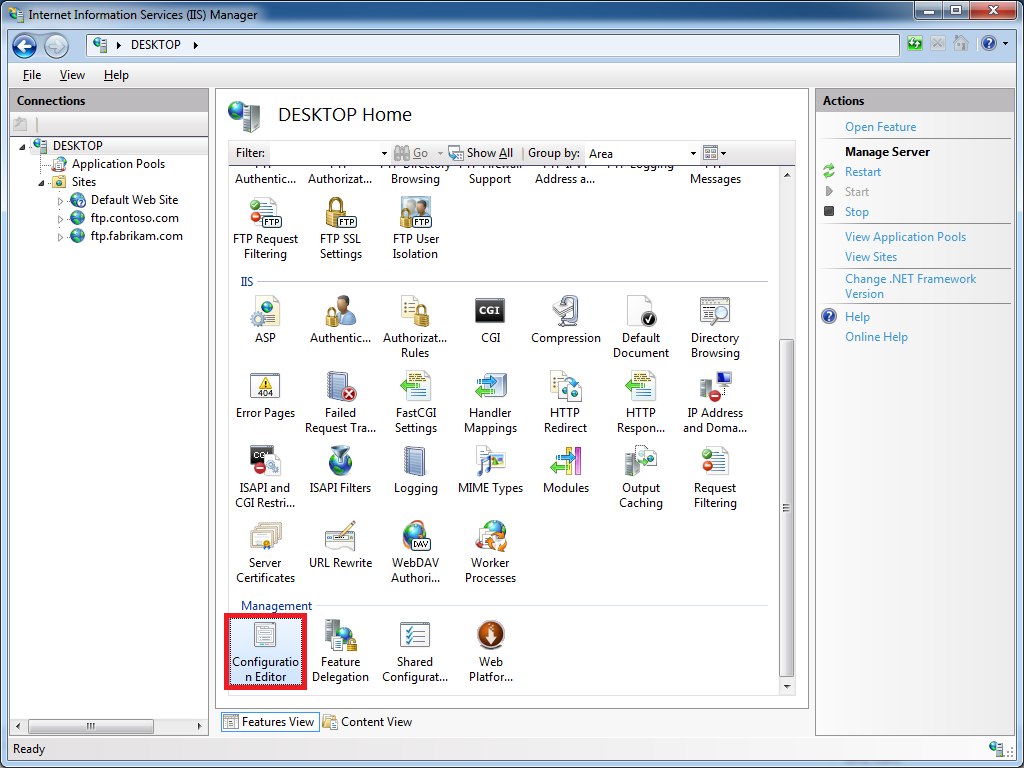
Step 1 - Open the IIS Manager and click on the Configuration Editor at feature the server level:
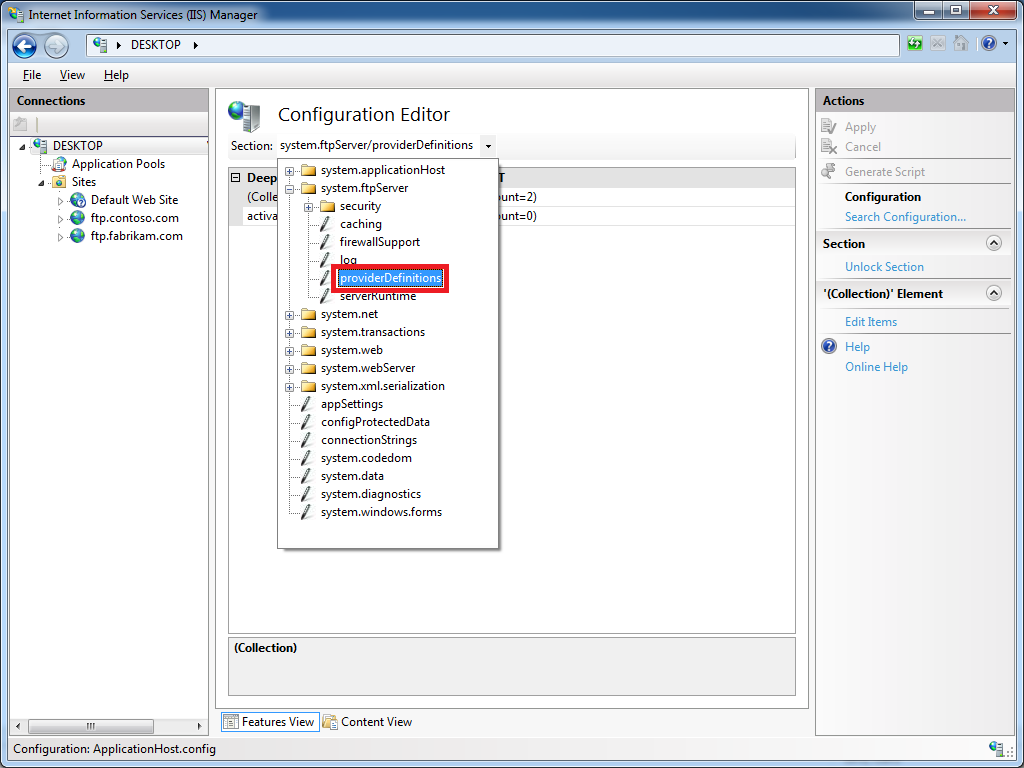
Step 2 - Click the Section drop-down menu, expand the the system.ftpServer collection, and then highlight the providerDefinitions node:
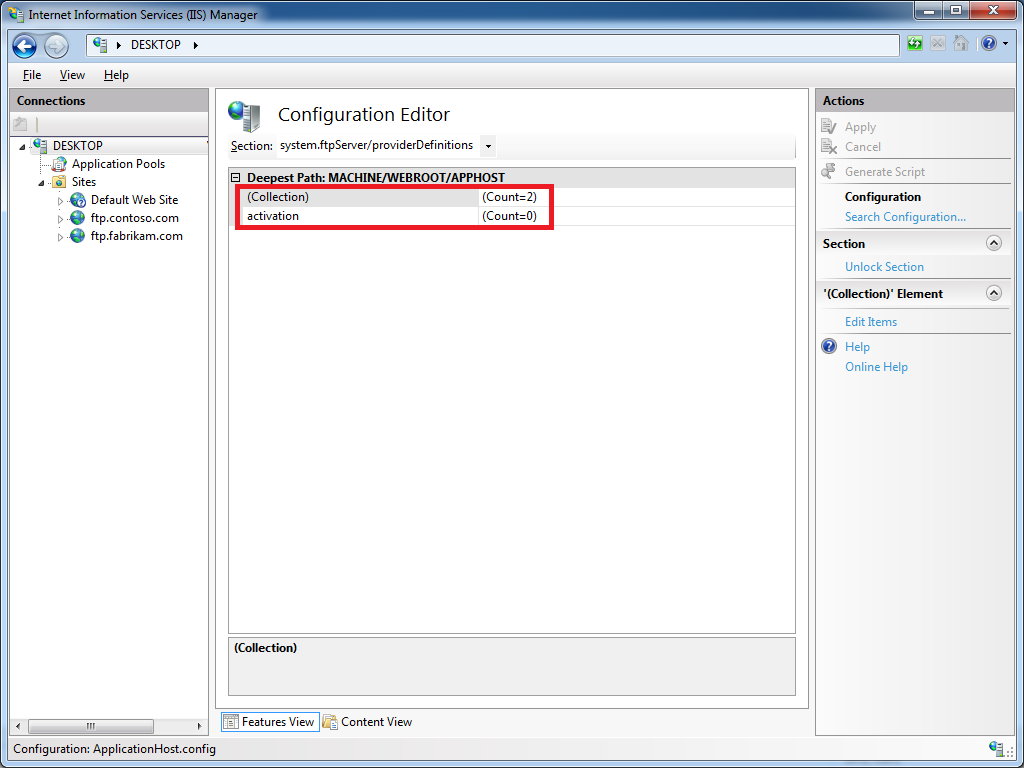
Step 3 - A default installation IIS with the FTP service should show a Count of 2 providers in the Collection row, and no settings in the activation row:
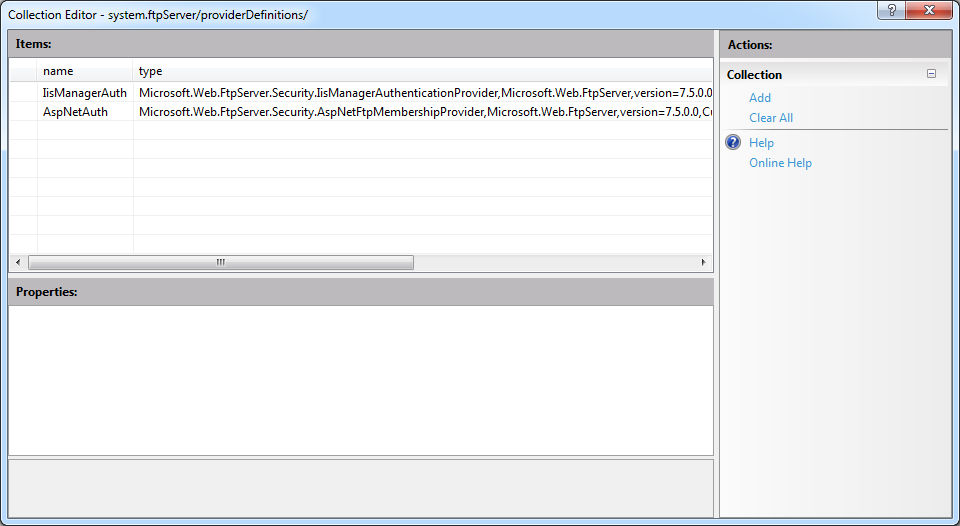
Step 4 - If you click on the Collection row, an ellipsis [...] will appear, and when you click that, IIS will display the Collection Editor dialog for FTP providers. By default you should see just the two built-in providers for the IisManagerAuth and AspNetAuth providers:
Step 5 - When you click Add in the Actions pane, you can enter the registration information for your provider. At a minimum you must provide a name for your provider, but you will need to enter either the clsid for a COM-based provider or the type for a managed-code provider:
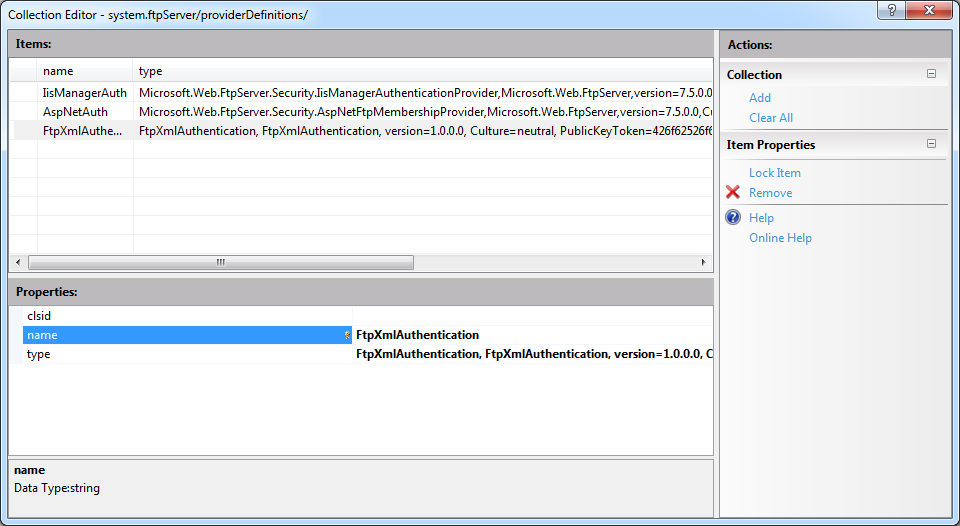
Step 6 - When you close the Collection Editor dialog, the Count of providers in the Collection should now reflect the provider that we just added; click Apply in the Actions pane to save the changes:
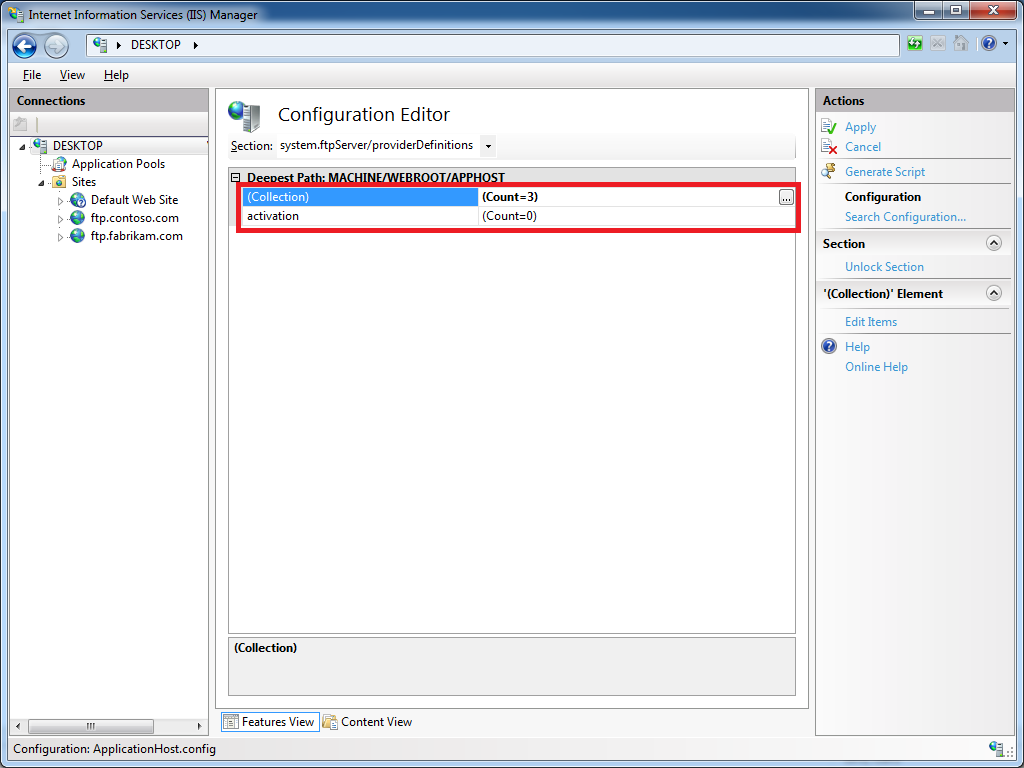
Step 7 - If you click on the activation row, an ellipsis [...] will appear, and when you click that, IIS will display the Collection Editor dialog for provider data; this is where you will enter provider-specific settings. When you click Add in the Actions pane, you must specify the name for your provider's settings, and this name must match the exact name that you provided in Step 5 earlier:
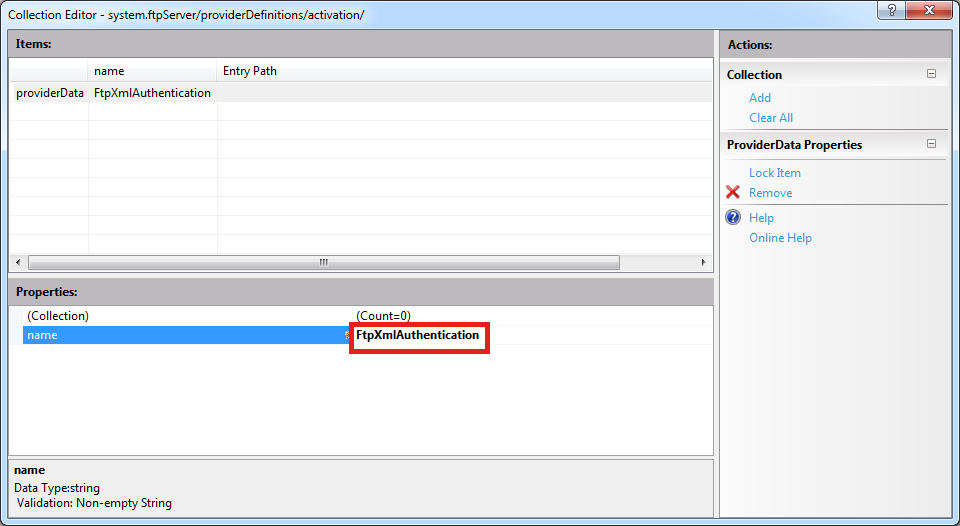
Step 8 - If you click on the Collection row, an ellipsis [...] will appear, and when you click that, IIS will display the Collection Editor dialog for the activation data for an FTP provider. At a minimum you must provide a key for your provider, which will depend on the settings that your provider expects to retrieve from your configuration settings. (For example, in the XML file that I provided earlier, my FtpXmlAuthorization provider expects to retrieve the path to an XML that contains a list of users, roles, and authorization rules.) You also need to enter the either the value or encryptedValue for your provider; although you can specify either setting, should generally specify the value when the settings are not sensitive in nature, and specify the encryptedValue for settings like usernames and passwords:
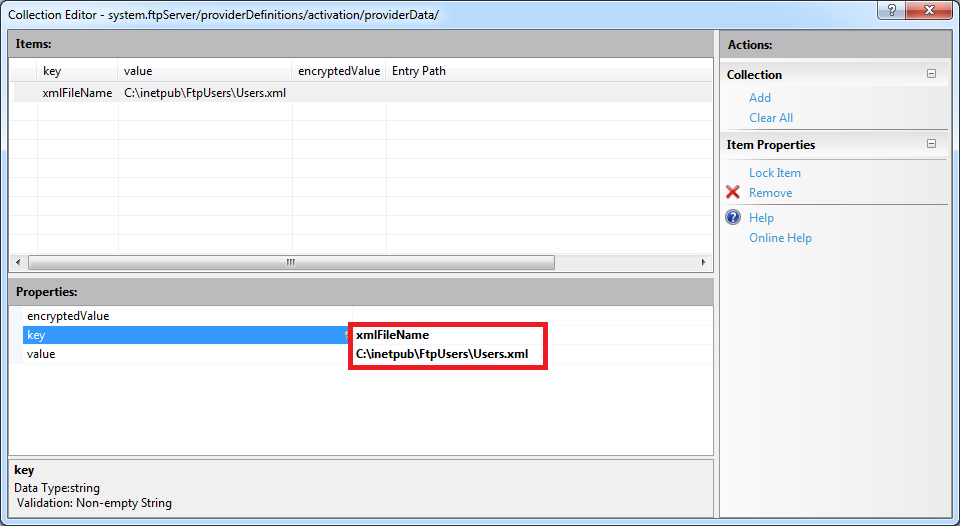
Step 9 - When you close the Collection Editor dialog for the activation data, the Count of key/value pairs in the Collection should now reflect the value that we just added:
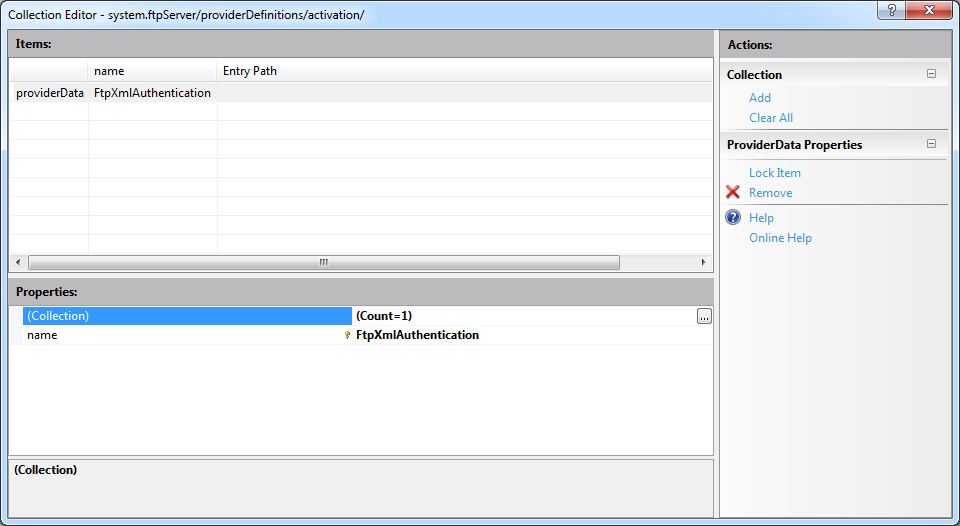
Step 10 - When you close the Collection Editor dialog for the provider data, the Count of provider data settings in the activation row should now reflect the custom settings that we just added; click Apply in the Actions pane to save the changes:
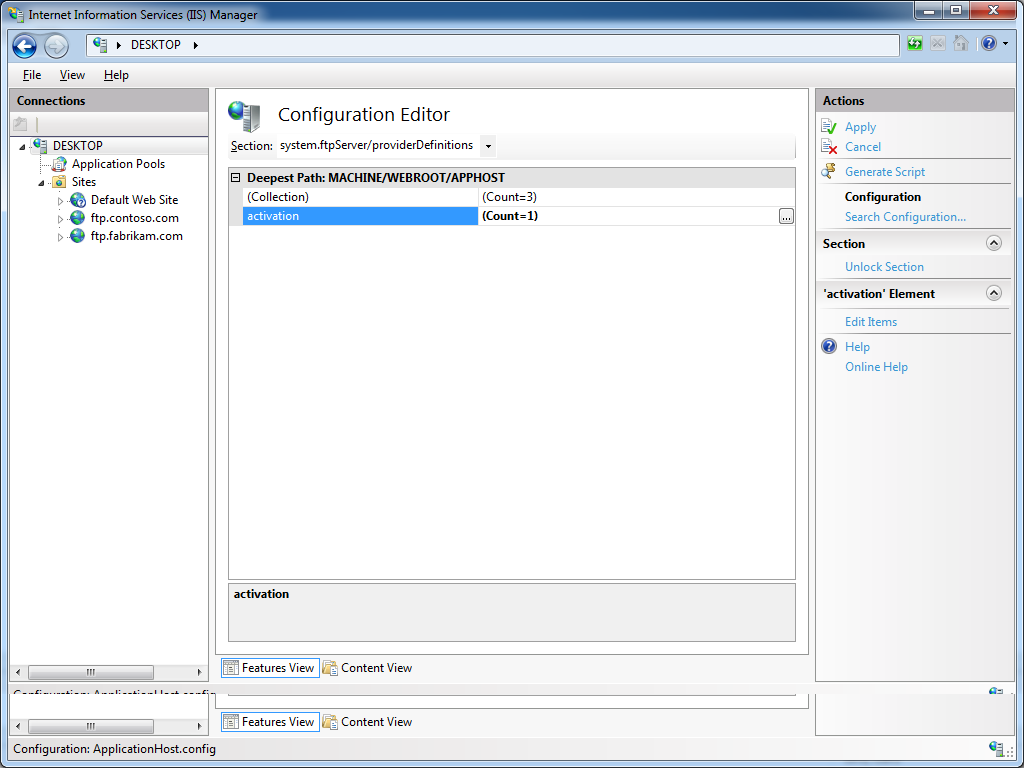
That's all that there is to adding a custom FTP provider with provider-specific settings; I admit that it might seem like a lot of steps until you get the hang of it.
In the next blog for this series, I will show you how to add custom providers to FTP sites by using the IIS Configuration Editor.
Note: This blog was originally posted at http://blogs.msdn.com/robert_mcmurray/