Using URL Rewrite with QDIG
28 June 2012 • by Bob • IIS, URL Rewrite
One of the applications that I like to use on my websites it the Quick Digital Image Gallery (QDIG), which is a simple PHP-based image gallery that has just enough features to be really useful without a lot of work on my part to get it working. (Simple is always better - ;-].) Here's a screenshot of QDIG in action with some Bing photos:
 |
| (Click to enlarge photo.) |
The trouble is, QDIG creates some really heinous query string lines; see the URL line in the following screenshot for an example:
 |
| (Click to enlarge photo.) |
I don't know about you, but in today's SEO-friendly world, I hate long and convoluted query strings. Which brings me to one of my favorite subjects: URL Rewrite for IIS
If you've been around IIS for a while, you probably already know that there are a lot of great things that you can do with the IIS URL Rewrite module, and one of the things that URL Rewrite is great at is cleaning up complex query strings into something that's a little more intuitive.
It would take way to long to describe all of the steps to create the following rules with the URL Rewrite interface, so I'll just include the contents of my web.config file for my QDIG directory - which is a physical folder called "QDIG" that is under the root of my website:
<?xml version="1.0" encoding="UTF-8"?> <configuration> <system.webServer> <rewrite> <rules> <!-- Rewrite the inbound URLs into the correct query string. --> <rule name="RewriteInboundQdigURLs" stopProcessing="true"> <match url="Qif/(.*)/Qiv/(.*)/Qis/(.*)/Qwd/(.*)" /> <conditions> <add input="{REQUEST_FILENAME}" matchType="IsFile" negate="true" /> <add input="{REQUEST_FILENAME}" matchType="IsDirectory" negate="true" /> </conditions> <action type="Rewrite" url="/QDIG/?Qif={R:1}&Qiv={R:2}&Qis={R:3}&Qwd={R:4}" appendQueryString="false" /> </rule> </rules> <outboundRules> <!-- Rewrite the outbound URLs into user-friendly URLs. --> <rule name="RewriteOutboundQdigURLs" preCondition="ResponseIsHTML" enabled="true"> <match filterByTags="A, Img, Link" pattern="^(.*)\?Qwd=([^=&]+)&(?:amp;)?Qif=([^=&]+)&(?:amp;)?Qiv=([^=&]+)&(?:amp;)?Qis=([^=&]+)(.*)" /> <action type="Rewrite" value="/QDIG/Qif/{R:3}/Qiv/{R:4}/Qis/{R:5}/Qwd/{R:2}" /> </rule> <!-- Rewrite the outbound relative QDIG URLs for the correct path. --> <rule name="RewriteOutboundRelativeQdigFileURLs" preCondition="ResponseIsHTML" enabled="true"> <match filterByTags="Img" pattern="^\.\/qdig-files/(.*)$" /> <action type="Rewrite" value="/QDIG/qdig-files/{R:1}" /> </rule> <!-- Rewrite the outbound relative file URLs for the correct path. --> <rule name="RewriteOutboundRelativeFileURLs" preCondition="ResponseIsHTML" enabled="true"> <match filterByTags="Img" pattern="^\.\/(.*)$" /> <action type="Rewrite" value="/QDIG/{R:1}" /> </rule> <preConditions> <!-- Define a precondition so the outbound rules only apply to HTML responses. --> <preCondition name="ResponseIsHTML"> <add input="{RESPONSE_CONTENT_TYPE}" pattern="^text/html" /> </preCondition> </preConditions> </outboundRules> </rewrite> </system.webServer> </configuration>
Here's the breakdown of what all of the rules do:
- RewriteInboundQdigURLs - This rule will rewrite inbound user-friendly URLs into the appropriate query string values that QDIG expects. I should point out that I rearrange the parameters from the way that QDIG would normally define them; more specifically, I pass the value Qwd parameter last, and I do this so that the current directory "." does not get ignored by browsers and break the functionality.
- RewriteOutboundQdigURLs - This rule will rewrite outbound HTML so that all anchor, link, and image tags are in the new format. This is where I actually rearrange the parameters that I mentioned earlier.
- RewriteOutboundRelativeQdigFileURLs - There are several files that QDIG creates in the "/qdig-files/" folder of your application; when the application paths are rewritten, you need to make sure that the those paths won't just break. For example, once you have a path that is rewritten as http://localhost/QDIG/Qif/foo.jpg/Qiv/name/Qis/M/Qwd/, the relative paths will seem to be offset from that URL space as though it were a physical path; since it isn't, you'd get HTTP 404 errors throughout your application.
- RewriteOutboundRelativeFileURLs - This rule is related to the previous rule, although this works for the files in your actual gallery. Since the paths are relative, you need to make sure that they will work in the rewritten URL namespace.
- ResponseIsHTML - This pre-condition verifies if an outbound response is HTML; this is used by the three outbound rules to make sure that URL Rewrite doesn't try to rewrite responses where it's not warranted.
Once you have these rules in place, you get nice user-friendly URLs in QDIG:
 |
| (Click to enlarge photo.) |
I should also point out that these rules also support changing the style from thumbnails to file names to file numbers, etc.
 |
| (Click to enlarge photo.) |
All of that being said, there is one thing that these rules do not support - and that's nested folders under my QDIG application. I don't like to use folders under my QDIG folder - I like to use separate folders with the QDIG file in it, because this makes each gallery self-contained and easily transportable. That being said, after I had written the text for this blog, I tried to use a subfolder under my QDIG application and that didn't work. By looking at what was going on, I'm pretty sure that it would be pretty trivial to write some URL Rewrite rules that would accommodate using subfolders, but that's another project for another day. ;-]
Note: This blog was originally posted at http://blogs.msdn.com/robert_mcmurray/
Bad Christians
27 June 2012 • by bob • Rants
I recently saw this video: http://youtu.be/vnJBW49afzg
Let's put this in perspective - a group of self-professed 'Christians' shows up uninvited to a Muslim Arab Festival, where they are confrontational to the Muslims and insulting to the police, and they are carrying signs with slogans like "Repent - your party will burn in the lake of fire (01:14)," "Islam is a religion of Blood & Murder! (03:26)," "Be not believers in drunkards, whoremongers, idolaters, sodomites, fornicators (04:30)," "I am truth and the life - all others are thieves are robbers (04:30)."
No - this was not an act of random violence by a group of Muslim extremists who were targeting an innocent group of Christians; this was a deliberately-staged set of contentious actions by some very unbalanced people who claim to be Christians in order to provoke the very attack that transpired. These otherwise peaceful Arab-Americans were enjoying a day of celebration of their faith and heritage, and these so-called Christians showed up and behaved in an extremely insulting manner, shouting insults with a megaphone and slandering the Muslim faith - these 'Christians' might just as well have been Nazis based on their behavior. The police were 100% correct is telling these fools that they were the cause of the trouble.
Let's reverse things for a moment - let's say that you were a Christian at a peaceful church gathering when a group of atheists showed up to protest by using a megaphone to hurl insults at your religion and they carried signs that proclaimed that Jesus was a drunkard & whoremonger who was the illegitimate son of unwed slut, you would be more than a little offended. You might not personally react with physical violence, but if you had a few thousand Christians in one place when a publicly-outspoken group of atheists or Buddhists or Hindus or Muslims showed up and behaved as provocatively as these 'Christians' did, I can 100% guarantee that someone would eventually lose their cool and start throwing things.
This video is a perfect example of how Christians should NOT behave, and they are certainly not following Christ's example. This is not a question of exercising freedom of speech or freedom of religion - this is a question of exercising good judgment and Christ's love; this group of 'Christians' exhibited neither.
Self-professed 'Christians' like those in this video should be ashamed of themselves.
Microsoft IIS 8.0 Express Release Candidate is Released!
31 May 2012 • by Bob • IIS Express
In addition to all of the other great products that Microsoft has released today, I’m happy to announce the release of the Internet Information Services (IIS) 8.0 Express Release Candidate. You can install the IIS 8.0 Express Release Candidate through the Microsoft Download Center by using the following URL:
http://go.microsoft.com/fwlink/?LinkId=254247
IIS 8.0 Express Release Candidate supports the following new features:
- X64 Support
- IIS 8.0 Express supports both 32-bit and 64-bit architectures.
- Shared Features with IIS 8.0
- IIS 8.0 Express shares a great number of features with the full version of IIS; for example, IIS 8.0 Express uses many of the same binaries, configuration files, and error codes as the full version of IIS, so migrating projects between your development environment and your production environment should be easier than ever.
- Changing the User Home Directory
- IIS 8.0 Express supports changing the user's home directory, which is mapped to the %IIS_USER_HOME% variable in configuration. By default this path is located at %UserProfile%\Documents\IISExpress, but users can change this by setting a CustomUserHome registry property in HKCU\Software\Microsoft\IISExpress, or by specifying the "/userhome" parameter when launching iisexpress.exe.
- WebSocket Support
- IIS 8.0 Express supports writing WebSocket applications. For more information, see the WebSocket protocol specification or the System.Net.WebSockets Namespace topic on Microsoft's MSDN website.
- AppCmd Support for editing multiple configuration files
- The AppCmd utility now supports a "/AppHostConfig" parameter, which makes it possible to use AppCmd to edit multiple ApplicationHost.config files and not just the primary configuration file.
For more information, see the IIS 8.0 Express ReadMe file.
My thanks to Eok Kim, Jeong Hwan Kim, Yamini Jagadeesan, Wade Hilmo, and Won Yoo!
Note: This blog was originally posted at http://blogs.msdn.com/robert_mcmurray/
Advanced Log Parser Charts Part 4 - Adding Custom Input Formats
25 May 2012 • by Bob • IIS, LogParser
In Part 4 of this series, I'll show you how you can do a couple of cool things:
- Create a new input format for Log Parser (and I'll use FTP RSCA data as an example)
- Create charts from your custom input format
For the data source for my custom plug-in, I thought that it would be cool to consume the data from FTP 7's Runtime Status (RSCA). If you've followed some of my old blogs, you would have seen that around five years ago I wrote the following pair of blogs about programmatically viewing FTP 7 sessions:
I'm going to recycle some of the FTP RSCA concepts from those blogs in order to create my COM plug-in.
Log Parser Input Formats
If you're like me, you already realize that the existing features of Log Parser simply rock. But what most people don't realize is that Log Parser lets you extend the functionality by adding new input formats, so you can consume the data from any place where you feel compelled to sit down and write your own Log Parser module.
As a quick reminder, Log Parser supports the following built-in input formats:
- IIS Log File Input Formats
- IISW3C: parses IIS log files in the W3C Extended Log File Format.
- IIS: parses IIS log files in the Microsoft IIS Log File Format.
- BIN: parses IIS log files in the Centralized Binary Log File Format.
- IISODBC: returns database records from the tables logged to by IIS when configured to log in the ODBC Log Format.
- HTTPERR: parses HTTP error log files generated by Http.sys.
- URLSCAN: parses log files generated by the URLScan IIS filter.
- Generic Text File Input Formats
- CSV: parses comma-separated values text files.
- TSV: parses tab-separated and space-separated values text files.
- XML: parses XML text files.
- W3C: parses text files in the W3C Extended Log File Format.
- NCSA: parses web server log files in the NCSA Common, Combined, and Extended Log File Formats.
- TEXTLINE: returns lines from generic text files.
- TEXTWORD: returns words from generic text files.
- System Information Input Formats
- EVT: returns events from the Windows Event Log and from Event Log backup files (.evt files).
- FS: returns information on files and directories.
- REG: returns information on registry values.
- ADS: returns information on Active Directory objects.
- Special-purpose Input Formats
- NETMON: parses network capture files created by NetMon.
- ETW: parses Enterprise Tracing for Windows trace log files and live sessions.
- COM: provides an interface to Custom Input Format COM plug-ins.
This last input format, COM, is how you interface with Log Parser in order to create your own input formats. When you install Log Parser, there are a few COM-based samples in the Log Parser directory, and you can take a look at those when you get the chance.
A Brief Introduction to Creating a COM plug-ins for Log Parser
To start with, your COM plug-in has to support a few public methods - and each of these will be more clear when I create my plug-in later:
| Method Name | Description |
|---|---|
OpenInput |
Opens your data source and sets up any initial environment settings. |
GetFieldCount |
Returns the number of fields that your plug-in will provide. |
GetFieldName |
Returns the name of a specified field. |
GetFieldType |
Returns the datatype of a specified field. |
GetValue |
Returns the value of a specified field. |
ReadRecord |
Reads the next record from your data source. |
CloseInput |
Closes your data source and cleans up any environment settings. |
After you've created and registered your COM plug-in, you will call it by using something like the following syntax:
logparser "SELECT * FROM FOO" -i:COM -iProgID:BAR
In this example, FOO is some data source that makes sense to your plug-in, and BAR is the COM class name for your plug-in.
Creating the COM plug-in for FTP RSCA Data
I'm going to demonstrate how to create a COM component as a scriptlet, and then I'll call that from Log Parser to process the data. I chose to use a scriptlet for this demo because they are quick to design and they're easily portable. Since no compilation is required, updates take place on the fly. All of that being said, if I were writing a real COM plug-in for Log Parser, I would use C# or C++.
To create the sample COM plug-in, copy the following code into a text file, and save that file as "MSUtil.LogQuery.FtpRscaScriptlet.sct" to your computer. (Note: The *.SCT file extension tells Windows that this is a scriptlet file.)
<SCRIPTLET>
  <registration
    Description="FTP RSCA for Log Parser Scriptlet"
    Progid="MSUtil.LogQuery.FtpRscaScriptlet"
    Classid="{4e616d65-6f6e-6d65-6973-526f62657274}"
    Version="1.00"
    Remotable="False" />
  <comment>
  EXAMPLE 1: logparser "SELECT * FROM ftp.example.com" -i:COM -iProgID:MSUtil.LogQuery.FtpRscaScriptlet
  EXAMPLE 2: logparser "SELECT * FROM 1" -i:COM -iProgID:MSUtil.LogQuery.FtpRscaScriptlet
  </comment>
  <implements id="Automation" type="Automation">
    <method name="OpenInput">
      <parameter name="strValue"/>
    </method>
    <method name="GetFieldCount" />
    <method name="GetFieldName">
      <parameter name="intFieldIndex"/>
    </method>
    <method name="GetFieldType">
      <parameter name="intFieldIndex"/>
    </method>
    <method name="ReadRecord" />
    <method name="GetValue">
      <parameter name="intFieldIndex"/>
    </method>
    <method name="CloseInput">
      <parameter name="blnAbort"/>
    </method>
  </implements>
  <SCRIPT LANGUAGE="VBScript">

Option Explicit

Dim objAdminManager,objSessionDictionary
Dim objSitesSection,objSitesCollection
Dim objSiteElement,objFtpServerElement
Dim objSessionsElement,objSessionElement
Dim intSiteElementPos,intSession,intRecordIndex
Dim clsSession

intRecordIndex = -1

' --------------------------------------------------------------------------------
' Open an input session that reads FTP RSCA data and stores it in a dictionary object.
' --------------------------------------------------------------------------------

Public Function OpenInput(strValue)
  Set objSessionDictionary = CreateObject("Scripting.Dictionary")
  Set objAdminManager = CreateObject("Microsoft.ApplicationHost.WritableAdminManager")
  objAdminManager.CommitPath = "MACHINE/WEBROOT/APPHOST"
  Set objSitesSection = objAdminManager.GetAdminSection("system.applicationHost/sites", "MACHINE/WEBROOT/APPHOST")
  Set objSitesCollection = objSitesSection.Collection
  If IsNumeric(strValue) Then
    intSiteElementPos = FindElement(objSitesCollection, "site", Array("id", strValue))
  Else
    intSiteElementPos = FindElement(objSitesCollection, "site", Array("name", strValue))
  End If
  If intSiteElementPos > -1 Then
    Set objSiteElement = objSitesCollection.Item(intSiteElementPos)
    Set objFtpServerElement = objSiteElement.ChildElements.Item("ftpServer")
    Set objSessionsElement = objFtpServerElement.ChildElements.Item("sessions").Collection
    For intSession = 0 To CLng(objSessionsElement.Count)-1
       Set objSessionElement = objSessionsElement.Item(intSession)
       Set clsSession = New Session
       clsSession.CurrentDateTime = GetUtcDate()
       clsSession.ClientIp = objSessionElement.GetPropertyByName("clientIp").Value
       clsSession.SessionId = objSessionElement.GetPropertyByName("sessionId").Value
       clsSession.SessionStartTime = objSessionElement.GetPropertyByName("sessionStartTime").Value
       clsSession.UserName = objSessionElement.GetPropertyByName("userName").Value
       clsSession.CurrentCommand = objSessionElement.GetPropertyByName("currentCommand").Value
       clsSession.PreviousCommand = objSessionElement.GetPropertyByName("previousCommand").Value
       clsSession.CommandStartTime = objSessionElement.GetPropertyByName("commandStartTime").Value
       clsSession.BytesSent = objSessionElement.GetPropertyByName("bytesSent").Value
       clsSession.BytesReceived = objSessionElement.GetPropertyByName("bytesReceived").Value
       clsSession.LastErrorStatus = objSessionElement.GetPropertyByName("lastErrorStatus").Value
       objSessionDictionary.Add intSession,clsSession
    Next
  End If
End Function

' --------------------------------------------------------------------------------
' Close the input session.
' --------------------------------------------------------------------------------

Public Function CloseInput(blnAbort)
  intRecordIndex = -1
  objSessionDictionary.RemoveAll
End Function

' --------------------------------------------------------------------------------
' Return the count of fields.
' --------------------------------------------------------------------------------

Public Function GetFieldCount()
  GetFieldCount = 11
End Function

' --------------------------------------------------------------------------------
' Return the specified field's name.
' --------------------------------------------------------------------------------

Public Function GetFieldName(intFieldIndex)
  Select Case intFieldIndex
    Case 0
      GetFieldName = "currentDateTime"
    Case 1
      GetFieldName = "clientIp"
    Case 2
      GetFieldName = "sessionId"
    Case 3
      GetFieldName = "sessionStartTime"
    Case 4
      GetFieldName = "userName"
    Case 5
      GetFieldName = "currentCommand"
    Case 6
      GetFieldName = "previousCommand"
    Case 7
      GetFieldName = "commandStartTime"
    Case 8
      GetFieldName = "bytesSent"
    Case 9
      GetFieldName = "bytesReceived"
    Case 10
      GetFieldName = "lastErrorStatus"
  End Select
End Function

' --------------------------------------------------------------------------------
' Return the specified field's type.
' --------------------------------------------------------------------------------

Public Function GetFieldType(intFieldIndex)
  Const TYPE_INTEGER   = 1
  Const TYPE_REAL      = 2
  Const TYPE_STRING    = 3
  Const TYPE_TIMESTAMP = 4
  Const TYPE_NULL      = 5

  Select Case intFieldIndex
    Case 0
      GetFieldType = TYPE_STRING
    Case 1
      GetFieldType = TYPE_STRING
    Case 2
      GetFieldType = TYPE_STRING
    Case 3
      GetFieldType = TYPE_STRING
    Case 4
      GetFieldType = TYPE_STRING
    Case 5
      GetFieldType = TYPE_STRING
    Case 6
      GetFieldType = TYPE_STRING
    Case 7
      GetFieldType = TYPE_STRING
    Case 8
      GetFieldType = TYPE_INTEGER
    Case 9
      GetFieldType = TYPE_INTEGER
    Case 10
      GetFieldType = TYPE_INTEGER
  End Select
End Function

' --------------------------------------------------------------------------------
' Return the specified field's value.
' --------------------------------------------------------------------------------

Public Function GetValue(intFieldIndex)
  If objSessionDictionary.Count > 0 Then
    Select Case intFieldIndex
      Case 0
        GetValue = objSessionDictionary(intRecordIndex).CurrentDateTime
      Case 1
        GetValue = objSessionDictionary(intRecordIndex).ClientIp
      Case 2
        GetValue = objSessionDictionary(intRecordIndex).SessionId
      Case 3
        GetValue = objSessionDictionary(intRecordIndex).SessionStartTime
      Case 4
        GetValue = objSessionDictionary(intRecordIndex).UserName
      Case 5
        GetValue = objSessionDictionary(intRecordIndex).CurrentCommand
      Case 6
        GetValue = objSessionDictionary(intRecordIndex).PreviousCommand
      Case 7
        GetValue = objSessionDictionary(intRecordIndex).CommandStartTime
      Case 8
        GetValue = objSessionDictionary(intRecordIndex).BytesSent
      Case 9
        GetValue = objSessionDictionary(intRecordIndex).BytesReceived
      Case 10
        GetValue = objSessionDictionary(intRecordIndex).LastErrorStatus
    End Select
  End If
End Function

' --------------------------------------------------------------------------------
' Read the next record, and return true or false if there is more data.
' --------------------------------------------------------------------------------

Public Function ReadRecord()
  If objSessionDictionary.Count > 0 Then
    If intRecordIndex < (objSessionDictionary.Count-1) Then
      intRecordIndex = intRecordIndex + 1
      ReadRecord = True
    Else
      ReadRecord = False
    End If
  End If
End Function

' --------------------------------------------------------------------------------
' Return the current UTC date/time.
' --------------------------------------------------------------------------------

Private Function GetUtcDate()
  Dim dtmNow,dtmUtc,strUtc
  Dim objShell,lngActiveTimeBias
  dtmNow = Now()
  Set objShell = CreateObject("WScript.Shell")
  lngActiveTimeBias = CLng(objShell.RegRead("HKEY_LOCAL_MACHINE\System\CurrentControlSet\Control\TimeZoneInformation\ActiveTimeBias"))
  dtmUtc = DateAdd("n",lngActiveTimeBias,dtmNow)
  strUtc = Year(dtmUtc) & "-" & _
    Right("0" & Month(dtmUtc),2) & "-" & _
    Right("0" & Day(dtmUtc),2) & "T" & _
    Right("0" & Hour(dtmUtc),2) & ":" & _
    Right("0" & Minute(dtmUtc),2) & ":" & _
    Right("0" & Second(dtmUtc),2) & ".000Z"
  GetUtcDate = strUtc
End Function

' --------------------------------------------------------------------------------
' Return an element's position in a collection.
' --------------------------------------------------------------------------------

Private Function FindElement(objCollection, strElementTagName, arrValuesToMatch)
  Dim i,elem,matches,j,prop,value
  For i = 0 To CInt(objCollection.Count) - 1
    Set elem = objCollection.Item(i)
    If elem.Name = strElementTagName Then
      matches = True
      For j = 0 To UBound(arrValuesToMatch) Step 2
        Set prop = elem.GetPropertyByName(arrValuesToMatch(j))
        value = prop.Value
        If Not IsNull(value) Then
          value = CStr(value)
        End If
        If Not value = CStr(arrValuesToMatch(j + 1)) Then
          matches = False
          Exit For
        End If
      Next
      If matches Then
        Exit For
      End If
    End If
  Next
  If matches Then
    FindElement = i
  Else
    FindElement = -1
  End If
End Function

' --------------------------------------------------------------------------------
' Define a generic class for holding session data.
' --------------------------------------------------------------------------------

Class Session
  Public CurrentDateTime
  Public ClientIp
  Public SessionId
  Public SessionStartTime
  Public UserName
  Public CurrentCommand
  Public PreviousCommand
  Public CommandStartTime
  Public BytesSent
  Public BytesReceived
  Public LastErrorStatus
End Class

  </SCRIPT>

</SCRIPTLET>
After you've saved the scriptlet code to your computer, you will register it by using the following syntax:
regsvr32 MSUtil.LogQuery.FtpRscaScriptlet.sct
At the very minimum, you can now use the COM plug-in with Log Parser by using syntax like the following:
logparser "SELECT * FROM ftp.example.com" -i:COM -iProgID:MSUtil.LogQuery.FtpRscaScriptlet
Next, we'll analyze what the scriptlet does.
Examining the COM plug-in in Detail
Here are the different parts of the scriptlet and what they do:
- The <registration> section of the scriptlet sets up the COM registration information; you'll notice the COM component class name and GUID, as well as version information and a general description.
- The <implements> section declares the public methods that the COM plug-in has to support.
- The <script> section contains the actual implementation:
- The first part of the script section declares the global variables that will be used.
- The second part of the script contains the required methods:
- The
OpenInput()method opens the FTP RSCA data for a specific FTP site:- The site will be specified in your Log Parser query, and the COM plug-in supports using either the site name or the site's numeric ID:
- "
SELECT * FROM ftp.example.com" - "
SELECT * FROM 1"
- "
- All of the RSCA data for the site in stored in classes that will be cached in a global dictionary for quick access
- The site will be specified in your Log Parser query, and the COM plug-in supports using either the site name or the site's numeric ID:
- The
CloseInput()method doesn't do much in this script, but your COM plug-ins may require more clean up depending on your data source. - The
GetFieldCount()method simply returns the number of data fields in each record of your data. - The
GetFieldName()method returns the name of a field that is passed to the method as a number. - The
GetFieldType()method returns the data type of a field that is passed to the method as a number; Log Parser supports the following five data types for COM plug-ins:TYPE_INTEGERTYPE_REALTYPE_STRINGTYPE_TIMESTAMPTYPE_NULL
- The
GetValue()method returns the data value of a field that is passed to the method as a number. - The
ReadRecord()method moves to the next record in your data set; this method returns True if there is data to read, or False when the end of data is reached.
- The
- The third part of the script contains some helper features:
- The
GetUtcDate()method returns the current date and time in Universal Coordinated Time (UTC) format. - The
FindElement()method locates a specified element's position within an IIS collection, or -1 if the element cannot be found. This method is used to determine the specified FTP site within the IIS configuration. - The
Sessionclass is a generic construct to hold the information for a single FTP RSCA data record.
- The
This wraps up the description of how the scriptlet works as a COM plug-in, in the next part of my blog we'll look at how to actually use it.
Using the COM plug-in with Log Parser
Earlier I showed you how you can use the COM plug-in with Log Parser by using syntax like the following:
logparser "SELECT * FROM ftp.example.com" -i:COM -iProgID:MSUtil.LogQuery.FtpRscaScriptlet
This will return output that resembles something like the following:
currentDateTime |
clientIp |
sessionId |
sessionStartTime |
userName |
currentCommand |
previousCommand |
commandStartTime |
bytesSent |
bytesReceived |
lastErrorStatus |
|---|---|---|---|---|---|---|---|---|---|---|
---------------- |
-------- |
--------- |
---------------- |
-------- |
-------------- |
--------------- |
---------------- |
--------- |
------------- |
--------------- |
2012-05-25T11:42:11.000Z |
10.121.75.26 |
3950d1e5-3e94-4734-a89a-9768c52aa924 |
2012-05-25T10:08:09.861Z |
robert |
PASS |
USER |
2012-05-25T11:42:06.080Z |
6049 |
1193 |
0 |
2012-05-25T11:42:11.000Z |
10.121.75.26 |
d1591fa8-3b09-4afd-b2c0-950421ba79fe |
2012-05-25T10:08:18.184Z |
robert |
RETR |
NLST |
2012-05-25T11:42:07.172Z |
5887 |
1169 |
0 |
2012-05-25T11:42:11.000Z |
10.121.75.26 |
0f92b5ed-920a-441d-a15d-39056a36f2a4 |
2012-05-25T10:08:22.327Z |
robert |
NOOP |
NLST |
2012-05-25T11:41:40.917Z |
5857 |
1163 |
0 |
2012-05-25T11:42:11.000Z |
10.121.75.26 |
16925f0d-1fc5-4cb7-be19-ab33face2da9 |
2012-05-25T10:08:48.756Z |
NLST |
SYST |
2012-05-25T11:41:44.770Z |
6026 |
1192 |
0 |
|
2012-05-25T11:42:11.000Z |
10.121.75.26 |
aeb68389-869b-4afc-8c81-47b578e74824 |
2012-05-25T10:08:54.214Z |
USER |
HOST |
2012-05-25T11:41:42.087Z |
5864 |
1168 |
0 |
|
2012-05-25T11:42:11.000Z |
10.121.75.26 |
4ed55569-ee25-47d1-8388-12cdb90a1c07 |
2012-05-25T10:12:31.555Z |
alice |
RETR |
NLST |
2012-05-25T11:42:01.789Z |
5780 |
1138 |
0 |
2012-05-25T11:42:11.000Z |
10.121.75.26 |
d6b16bb4-cb65-492d-a9fa-fbd6b72de0f3 |
2012-05-25T10:12:54.591Z |
bob |
NOOP |
NLST |
2012-05-25T11:41:46.563Z |
5748 |
1130 |
0 |
Statistics: |
||||||||||
----------- |
||||||||||
Elements processed: |
7 |
|||||||||
Elements output: |
7 |
|||||||||
Execution time: |
0.12 seconds |
That information is something of a jumbled mess, and we can clean that up a bit by simply choosing the fields that we might be interested in:
userName |
currentCommand |
commandStartTime |
|---|---|---|
-------- |
-------------- |
---------------- |
robert |
PASS |
2012-05-25T11:42:06.080Z |
robert |
RETR |
2012-05-25T11:42:07.172Z |
robert |
NOOP |
2012-05-25T11:41:40.917Z |
NLST |
2012-05-25T11:41:44.770Z |
|
USER |
2012-05-25T11:41:42.087Z |
|
alice |
RETR |
2012-05-25T11:42:01.789Z |
bob |
NOOP |
2012-05-25T11:41:46.563Z |
Statistics: |
||
----------- |
||
Elements processed: |
7 |
|
Elements output: |
7 |
|
Execution time: |
0.12 seconds |
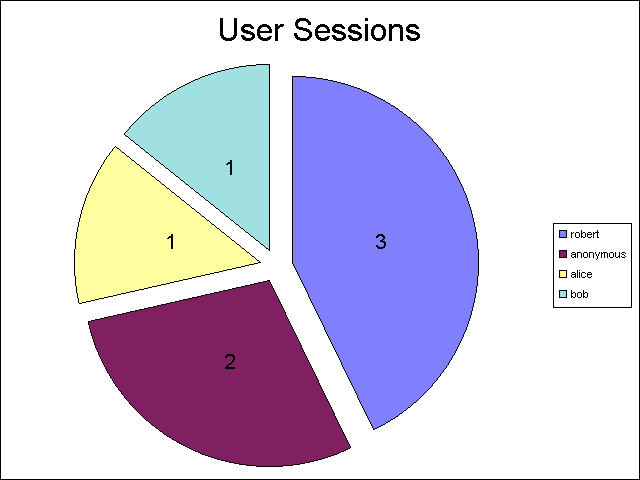
Now let's look at some interesting data - one of the main focuses for this blog series is charting with Log Parser, so let's look at doing something useful with the data. To start with, here's how to create a pie chart that counts the number of sessions by user name:
logparser "SELECT
This will generate a chart like the following:
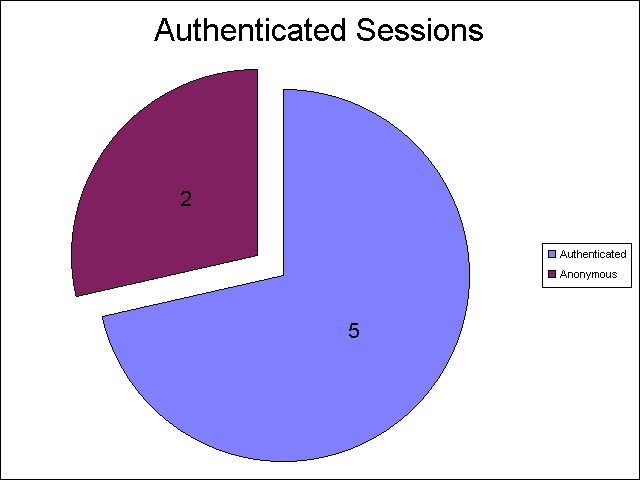
Here's a variation on that script that illustrates how to create a pie chart that counts the number of authenticated sessions versus anonymous sessions:
logparser "SELECT
This will generate a chart like the following:
We can also do line, bar, and column charts with the data:
logparser "SELECT
The above code sample will generate a chart like the following:

There's a lot more that we could do with this, but eventually I have to get some sleep, so I think that's enough fun for the day.
Summary
In this blog post, I've shown you how to add your own custom input format to Log Parser by creating scriptlet as a COM plug-in. I hope that you take this information and create some great Log Parser plug-ins of your own.
;-]
Advanced Log Parser Charts Part 3 - Missing Office Web Components for Charting
25 May 2012 • by Bob • IIS, LogParser
In Part 3 of this series, I'll explain what to do when you're missing the Office Web Components that are required for creating the charts that I have been demonstrating in this series.
Here's a brief explanation of the symptoms: you try a simple query that will create a chart like the following example:
logparser.exe "SELECT Date,
And you get the following error message:
Error creating output format "CHART": This output format requires a licensed Microsoft Office Chart Web Component to be installed on the local machine
More often than not, this simply means that you have Office 2007 or Office 2010, which do not contain the Office Web Components that are used by Log Parser to create charts. Fortunately, you can download the missing components from the following URL on Microsoft's website:
Office 2003 Add-in: Office Web Components
http://www.microsoft.com/en-us/download/details.aspx?id=22276
When you run the installation, you will see the following license agreement:

When you check the box to accept the license agreement and click Install, you will eventually receive the following dialog box to let you know that the Office 2003 Web Components have been installed:

Once you have the Office 2003 Web Components installed, you can run the same query successfully:
logparser.exe "SELECT Date,
Statistics:
-----------
Note: The above query generates the following somewhat uninteresting chart:

That being said, the point of this blog was to let you know how to get charting back, not how to make pretty charts. I'll save pretty charts for a future blog. ;-]
Note: This blog was originally posted at http://blogs.msdn.com/robert_mcmurray/
Configuring FTP Client Certificate Authentication in FTP 7
26 April 2012 • by Bob • FTP, Scripting
We had a customer question the other day about configuring FTP Client Certificate Authentication in FTP 7.0 and in FTP 7.5. It had been a while since the last time that I had configured those settings on an FTP server, so I thought that it would be great to re-familiarize myself with that feature. To my initial dismay, it was a little more difficult than I had remembered, because there are a lot of parts to be configured.
That being said, there are a few primary activities that you need to know about and configure correctly:
I will explain each of those in this blog, although I will defer some of the details for Active Directory mapping to an excellent blog series that I discovered by Vivek Kumbhar.
Configuring the FTP Service
There are several settings that you need to configure for the FTP server; unfortunately there is no user interface for those settings, so you might want to familiarize yourself with the following settings:
- FTP Client Certificate Authentication <clientCertAuthentication>
- FTP over SSL <ssl>
- FTP SSL Client Certificates <sslClientCertificates>
At first I had made a batch file that was configuring these settings by using AppCmd, but I eventually abandoned that script and wrote the following VBScript code to configure all of the settings at one time - the only parts that you need to change is your site name and the hash value your SSL certificate, which are highlighted in yellow:
Set adminManager = CreateObject("Microsoft.ApplicationHost.WritableAdminManager")
adminManager.CommitPath = "MACHINE/WEBROOT/APPHOST"
Set sitesSection = adminManager.GetAdminSection("system.applicationHost/sites", "MACHINE/WEBROOT/APPHOST")
Set sitesCollection = sitesSection.Collection

siteElementPos = FindElement(sitesCollection, "site", Array("name", "ftp.contoso.com"))
If (addElementPos = -1) Then
   WScript.Echo "Element not found!"
   WScript.Quit
End If
Set siteElement = sitesCollection.Item(siteElementPos)

Set ftpServerElement = siteElement.ChildElements.Item("ftpServer")
Set securityElement = ftpServerElement.ChildElements.Item("security")

Set sslClientCertificatesElement = securityElement.ChildElements.Item("sslClientCertificates")
sslClientCertificatesElement.Properties.Item("clientCertificatePolicy").Value = "CertRequire"
sslClientCertificatesElement.Properties.Item("useActiveDirectoryMapping").Value = True

Set authenticationElement = securityElement.ChildElements.Item("authentication")
Set clientCertAuthenticationElement = authenticationElement.ChildElements.Item("clientCertAuthentication")
clientCertAuthenticationElement.Properties.Item("enabled").Value = True

Set sslElement = securityElement.ChildElements.Item("ssl")
sslElement.Properties.Item("serverCertHash").Value = "57686f6120447564652c2049495320526f636b73"
sslElement.Properties.Item("controlChannelPolicy").Value = "SslRequire"
sslElement.Properties.Item("dataChannelPolicy").Value = "SslRequire"

adminManager.CommitChanges

Function FindElement(collection, elementTagName, valuesToMatch)
   For i = 0 To CInt(collection.Count) - 1
      Set element = collection.Item(i)
      If element.Name = elementTagName Then
         matches = True
         For iVal = 0 To UBound(valuesToMatch) Step 2
            Set property = element.GetPropertyByName(valuesToMatch(iVal))
            value = property.Value
            If Not IsNull(value) Then
               value = CStr(value)
            End If
            If Not value = CStr(valuesToMatch(iVal + 1)) Then
               matches = False
               Exit For
            End If
         Next
         If matches Then
            Exit For
         End If
      End If
   Next
   If matches Then
      FindElement = i
   Else
      FindElement = -1
   End If
End Function
Once you have configured your FTP settings, you should have an FTP site that resembles the following in your ApplicationHost.config file:
<site name="ftp.contoso.com" id="2">
   <application path="/">
      <virtualDirectory path="/" physicalPath="c:\inetpub\ftproot" />
   </application>
   <bindings>
      <binding protocol="ftp" bindingInformation="*:21:" />
   </bindings>
   <ftpServer>
      <security>
         <ssl serverCertHash="57686f6120447564652c2049495320526f636b73"  ssl128="false"  controlChannelPolicy="SslRequire"  dataChannelPolicy="SslRequire" />
         <authentication>
            <basicAuthentication enabled="false" />
            <anonymousAuthentication enabled="false" />
            <clientCertAuthentication enabled="true" />
         </authentication>
         <sslClientCertificates  clientCertificatePolicy="CertRequire"  useActiveDirectoryMapping="true" />
      </security>
   </ftpServer>
</site>
More details about these settings can be found in the configuration reference articles that I mentioned in the beginning of this blog post, and additional information about configuring FTP over SSL can be found in the following walkthrough:
Configuring Active Directory Mapping
The next part of this process is kind of tricky; you need to accomplish all of the following:
- Obtain and install a client certificate on the system where your FTP client is installed. Hare some additional notes to consider:
- This may involve setting up your client system to trust the CA that issued your client certificate.
- This may also involve setting up your FTP server to trust the CA that issued both your client certificate and the server certificate that you are using for your FTP site.
- Configure Active Directory to map the client certificate to an Active Directory account.
- Configure your FTP client to use a client certificate when connecting to your FTP server.
That makes it all sound so easy, but it can be very tricky. That being said, as I mentioned earlier, as I was putting together my notes to write this blog, I stumbled across a great blog series by Vivek Kumbhar, where he goes into great detail when describing all of the steps to set up the Active Directory mapping. With that in mind, instead of trying to rewrite what Vivek has already documented, I will include links to his blog series:
- Configure Client Certificate Mapping in FTP 7.5 - Part 1
Describes how to set up your Active Directory server, IIS server, and FTP client systems. - Configure Client Certificate Mapping in FTP 7.5 - Part 2
Walks you through obtaining and installing a server certificate, which you will use later for your FTP site. - Configure Client Certificate Mapping in FTP 7.5 - Part 3
Walks you through setting up an FTP site with SSL. - Configure Client Certificate Mapping in FTP 7.5 - Part 4
Describes how to configure Active Directory mapping for a user account.
I have to give Vivek full credit where it's due - he wrote a truly great blog series, and he included a lot more detail in his blog series than I had originally planned to include in this blog. (In my humble opinion, Vivek's blog series is the best documentation that I have seen for this feature.)
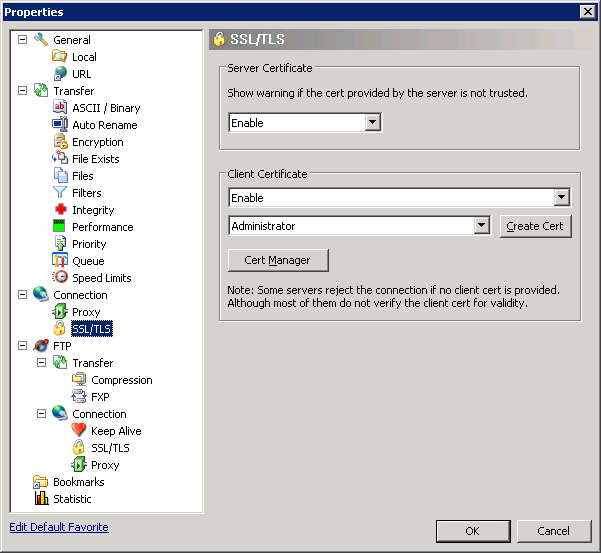
Configuring your FTP Client
To test out client certificates, I used both the SmartFTP GUI-based FTP client and the MOVEit-Freely command-line FTP client; both of which I discussed in my FTP Clients blog series some time ago.
Using the SmartFTP Client
To configure the SmartFTP client, I just needed to enable and specify the correct client certificate in the properties for my connection:
Using the MOVEit-Freely FTP Client
For the MOVEit-Freely FTP client, I just needed to specify the correct parameters on the command line:
ftps.exe -z -e:on -pfxfile:administrator.pfx -pfxpw:"P@ssw0rd" -user:anonymous -password:"someone@contoso.com"
The important settings are the pfxfile and pfxpw values, where pfxfile is the name of the PFX file that holds your client certificate, and pfxpw is the password for the PFX file. (The username and password values will be ignored for the most part, because you will actually be logged in through your client certificate, so you can leave those as anonymous.)
Client Recap
For more information about these two FTP clients, see the following blog posts:
- FTP Clients - Part 8: SmartFTP Client
- FTP Clients - Part 5: MOVEit Freely Command-Line Secure FTP Client
Summary
FTP client certificates are definitely a bit of a challenge to configure correctly, but it's not an impossible task to get this feature working.
Note: This blog was originally posted at http://blogs.msdn.com/robert_mcmurray/
Extensibility Updates in the FTP 8.0 Service
20 April 2012 • by Bob • IIS, FTP, Extensibility
A few years ago I wrote a blog that was titled "FTP 7.5 Service Extensibility References", in which I discussed the extensibility APIs that we added in FTP 7.5. Over the next couple of years I followed that initial blog with a series of walkthroughs on IIS.net and several related blog posts. Here are just a few examples:
- How to use Managed Code (C#) to create an FTP Home Directory Provider that is based on the Remote Client IP Address
- How to Use Managed Code (C#) to Create an FTP Home Directory Provider for the Days of the Week
- FTP and LDAP - How to Use Managed Code (C#) to Create an FTP Authentication Provider that uses an LDAP Server
- How to Create an Authentication Provider for FTP 7.5 using BlogEngine.NET's XML Membership Files
- Merging FTP Extensibility Walkthroughs - Part 1
- Merging FTP Extensibility Walkthroughs - Part 2
- Automatically Creating Checksum Files for FTP Uploads
- Changing the Identity of the FTP 7 Extensibility Process
- etc.
In today's blog I'd like to discuss some of the extensibility features that we added in FTP 8.0, and show you how you can use those in your FTP providers.
Custom FTP Authorization
In FTP 7.5 we provided interfaces for IFtpAuthenticationProvider and IFtpRoleProvider, which respectively allowed developers to create FTP providers that performed user and role lookups. In FTP 8.0 we added a logical extension to that API set with IFtpAuthorizationProvider interface, which allows developers to create FTP providers that perform authorization tasks.
With that in mind, I wrote the following walkthrough on the IIS.net web site:
The title pretty much says it all: the provider that I describe in that walkthrough will walk you through the steps that are required to create an FTP provider that provides custom user authentication, verification of role memberships, and authorization lookups on a per-path basis.
Custom FTP Event Handling
In FTP 7.5 if you wanted your provider to respond to specific user activity, the best way to do so was to implement the IFtpLogProvider.Log() interface and use that to provide a form of pseudo-event handling. In FTP 8.0 we add two event handling interfaces, IFtpPreprocessProvider and IFtpPostprocessProvider, which respectively allow developers to write providers that implement functionality before or after events have occurred.
With that in mind, I wrote the following walkthrough on the IIS.net web site:
Once again, the title says it all: the provider that I describe in that walkthrough will walk you through the steps that are required to create an FTP provider that prevents FTP clients from downloading more files per-session than you have allowed in your configuration settings.
Happy coding!
Note: This blog was originally posted at http://blogs.msdn.com/robert_mcmurray/
FTP Logon Restrictions in IIS 8
19 March 2012 • by Bob • FTP, IIS
One of the biggest asks from our customers over the years was to provide a way to prevent brute-force password attacks on the FTP service. On several of the FTP sites that I host, I used to see a large number of fraudulent logon requests from hackers that were trying to guess a username/password combination. My first step in trying to prevent these kinds of attacks, like most good administrators, was to implement strong password requirements and password lockout policies. This was a good first step, but there is an unfortunate downside to password lockout policies - once a hacker locks out a user account, that means that a valid user is locked out of their account. What's more, a hacker can continue your server.
The FTP service has had a feature to block IP addresses, but this required something of a manual process to discover malicious behavior. To accomplish this, you had to query your log files for excessive activity, and then added the IP addresses from potential hackers to your blacklist of banned IP addresses. Besides the manual nature of this process, another big drawback to this approach is the fact that it isn't real-time, so a malicious client could be attacking your system for some time before you discover their activity.
With that in mind, my next step was to go after the hackers and block their IP addresses from accessing my server. To that end, I created the custom authentication provider for the FTP 7.5 service that I documented in the following walkthrough:
How to Use Managed Code (C#) to Create an FTP Authentication Provider with Dynamic IP Restrictions
That was pretty effective, but it was really intended to be a stop-gap measure while we were working on a built-in feature for the FTP service that ships with IIS 8, which allows you to block malicious logon attempts.
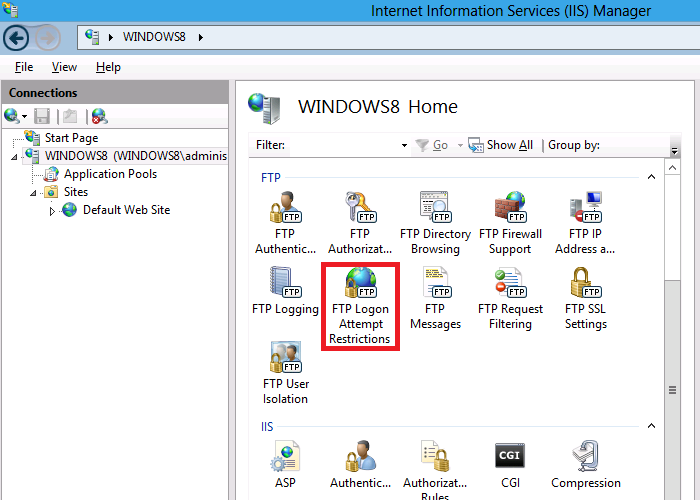
Here's the way this feature works - at the server level, you configure the maximum number of failed logon attempts that you will allow within a given time period; if someone fails to logon within that time frame, the FTP service will drop the connection, and the client will be blocked from accessing your server until the time frame has passed.

Additional details are available in the walkthrough that I wrote at the following URL:
IIS 8.0 FTP Logon Attempt Restrictions
If you'd like to try out the new FTP Logon Restrictions feature, you can download the Windows Server 8 Beta from the following URL:
http://www.microsoft.com/en-us/server-cloud/windows-server/v8-default.aspx
Note: This blog was originally posted at http://blogs.msdn.com/robert_mcmurray/
Microsoft IIS 8.0 Express Beta is Released!
05 March 2012 • by Bob • IIS Express
Earlier today the IIS Express team released the IIS 8.0 Express Beta, and there are some great new features in this release! Here are just a few of the highlights:
- 64-bit Support
- IIS 8.0 Express now fully supports 64-bit application development. When you install IIS Express on a 64-bit system, you actually get both 32-bit and 64-bit versions of IIS 8.0 Express installed, which allows you to use the version that matches your project's needs.
- Customizable Home Directory
- The default home directory for IIS Express is "%UserProfile%\Documents\IISExpress", but with IIS 8.0 Express you can start the iisexpress.exe process with the "/userhome" parameter to specify the home directory for your projects; this makes it easier for you to use IIS 8.0 Express with multiple development applications.
- AppCmd Support for Multiple ApplicationHost.config Files
- As a complement to allowing users to customize their IIS Express home directory, IIS 8.0 Express contains a new version of AppCmd.exe that supports a new "/AppHostConfig" parameter, which makes it possible to use AppCmd.exe to edit multiple ApplicationHost.config files. By default AppCmd.exe for IIS 7 or IIS 7.5 Express will only edit the ApplicationHost.config file in your "%WinDir%\System32\InetSrv\Config" or "%UserProfile%\Documents\IISExpress" folder, but the AppCmd.exe command-line utility that ships with IIS 8.0 Express allows you to edit ApplicationHost.config files anywhere on your system.
You can read more about this release at the following URL:
http://learn.iis.net/page.aspx/1266/iis-80-express-beta-readme/
Note: This blog was originally posted at http://blogs.msdn.com/robert_mcmurray/
Adventures with the Tooth Werewolf
09 February 2012 • by Bob • Humor
My oldest daughter just reminded me of something that I hadn't considered in years: when my children were young, my wife and I raised our kids somewhat differently than other parents. If you know me personally, then you're well aware that I'm not revealing anything surprising by that admission.
But let me explain what I mean: every parent has to choose which traditions they want their children to experience, and which traditions they want to skip. For example, some parents let their children celebrate Christmas, while other parents might not let their kids participate in Halloween festivities. My wife and I decided that Christmas and Easter were great, albeit with no Santa Claus and no Easter Bunny.
Now I know what many parents are thinking, and you can put the phone down - my children are all grown and you can't call Child Protective Services just because my children didn't set cookies by the Christmas tree in hopes that St. Nick would drop by.
But we had one tradition that we didn't skip, we just changed it a little; instead of the Tooth Fairy, we had the Tooth Werewolf. That's right, instead of Tinkerbell, we had Timberwolf.

I don't know why I chose to raise my kids with the belief that a big, hairy wolf snuck into their room and absconded with their baby teeth, but what's even more surprising is that my wife let me do it.
In all actuality, my children knew that it was me - I made sure of that. But it was pretty amusing when they would tell their friends that the Tooth Werewolf was coming to take away their teeth.
By the way, after a few successful years of the Tooth Werewolf, I decided that he needed a friend, and I invented the Easter Vampire.

Years from now, someone might need therapy. ![]()