FTP ETW Tracing and IIS 8 - Part 2
09 April 2014 • by Bob • Batch Files, ETW, IIS 8, Log Files, LogParser, Scripting, Troubleshooting, FTP, IIS, IIS 8, LogParser, FTP
Shortly after I published my FTP ETW Tracing and IIS 8 blog post, I was using the batch file from that blog to troubleshoot an issue that I was having with a custom FTP provider. One of the columns which I display in my results is Clock-Time, which is obviously a sequential timestamp that is used to indicate the time and order in which the events occurred.
| (Click the following image to view it full-size.) |
 |
At first glance the Clock-Time values might appear to be a range of useless numbers, but I use Clock-Time values quite often when I import the data from my ETW traces into something like Excel and I need to sort the data by the various columns.
That being said, apart from keeping the trace events in order, Clock-Time isn't a very user-friendly value. However, LogParser has some great built-in functions for crunching date/time values, so I decided to update the script to take advantage of some LogParser coolness and reformat the Clock-Time value into a human-readable Date/Time value.
My first order of business was to figure out how to decode the Clock-Time value; since Clock-Time increases for each event, it is obviously an offset from some constant, and after a bit of searching I found that the Clock-Time value is the offset in 100-nanosecond intervals since midnight on January 1, 1601. (Windows uses that value in a lot of places, not just ETW.) Once I had that information, it was pretty easy to come up with a LogParser formula to convert the Clock-Time value into the local time for my system, which is much easier to read.
With that in mind, here is the modified batch file:
@echo off

rem ======================================================================

rem Clean up old log files
for %%a in (ETL CSV) do if exist "%~n0.%%a" del "%~n0.%%a"

echo Starting the ETW session for full FTP tracing...
LogMan.exe start "%~n0" -p "IIS: Ftp Server" 255 5 -ets
echo.
echo Now reproduce your problem.
echo.
echo After you have reproduced your issue, hit any key to close the FTP
echo tracing session. Your trace events will be displayed automatically.
echo.
pause>nul

rem ======================================================================

echo.
echo Closing the ETW session for full FTP tracing...
LogMan.exe stop "%~n0" -ets

rem ======================================================================

echo.
echo Parsing the results - this may take a long time depending on the size of the trace...
if exist "%~n0.etl" (
   TraceRpt.exe "%~n0.etl" -o "%~n0.csv" -of CSV
   LogParser.exe "SELECT [Clock-Time], TO_LOCALTIME(ADD(TO_TIMESTAMP('1601-01-01 00:00:00', 'yyyy-MM-dd hh:mm:ss'), TO_TIMESTAMP(DIV([Clock-Time],10000000)))) AS [Date/Time], [Event Name], Type, [User Data] FROM '%~n0.csv'" -i:csv -e 2 -o:DATAGRID -rtp 20
)
When you run this new batch file, it will display an additional "Date/Time" column with a more-informative value in local time for the sever where you captured the trace.
| (Click the following image to view it full-size.) |
 |
The new Date/Time column is considerably more practical, so I'll probably keep it in the batch file that I use when I am troubleshooting. You will also notice that I kept the original Clock-Time column; I chose to do so because I will undoubtedly continue to use that column for sorting when I import the data into something else, but you can safely remove that column if you would prefer to use only the new Date/Time value.
That wraps it up for today's post. :-)
Note: This blog was originally posted at http://blogs.msdn.com/robert_mcmurray/
FTP ETW Tracing and IIS 8
08 April 2014 • by Bob • FTP, IIS, IIS 8, LogParser, IIS, IIS 8, LogParser, ETW, Troubleshooting, Scripting, Batch Files, Log Files
In the past I have written a couple of blogs about using the FTP service's Event Tracing for Windows (ETW) features to troubleshoot issues; see FTP and ETW Tracing and Troubleshooting Custom FTP Providers with ETW for details. Those blog posts contain batch files which use the built-in Windows LogMan utility to capture an ETW trace, and they use downloadable LogParser utility to parse the results into human-readable form. I use the batch files from those blogs quite often, and I tend to use them a lot when I am developing custom FTP providers which add new functionality to my FTP servers.
Unfortunately, sometime around the release of Windows 8 and Windows Server 2012 I discovered that the ETW format had changed, and the current version of LogParser (version 2.2) cannot read the new ETW files. When you try to use the batch files from my blog with IIS 8, you see the following errors:
Verifying that LogParser.exe is in the path...
Done.

Starting the ETW session for full FTP tracing...
The command completed successfully.

Now reproduce your problem.

After you have reproduced your issue, hit any key to close the FTP tracing session. Your trace events will be displayed automatically.

Closing the ETW session for full FTP tracing...
The command completed successfully.

Parsing the results - this may take a long time depending on the size of the trace...
Task aborted.
Cannot open <from-entity>: Trace file "C:\temp\ftp.etl" has been created on a OS version (6.3) that is not compatible with the current OS version

Statistics:
-----------
Elements processed: 0
Elements output: 0
Execution time: 0.06 seconds
I meant to research a workaround at the time, but one thing led to another and I simply forgot about doing so. But I needed to use ETW the other day when I was developing something, so that seemed like a good time to quit slacking and come up with an answer. :-)
With that in mind, I came up with a very easy workaround, which I will present here. Once again, this batch file has a requirement on LogParser being installed on your system, but for the sake of brevity I have removed the lines from this version of the batch file which check for LogParser. (You can copy those lines from my previous blog posts if you want that functionality restored.)
Here's the way that this workaround is implemented: instead of creating an ETW log and then parsing it directly with LogParser, this new batch file invokes the built-in Windows TraceRpt command to parse the ETW file and save the results as a CSV file, which is then read by LogParser to view the results in a datagrid like the batch files in my previous blogs:
@echo off

rem ======================================================================

rem Clean up old log files
for %%a in (ETL CSV) do if exist "%~n0.%%a" del "%~n0.%%a"

echo Starting the ETW session for full FTP tracing...
LogMan.exe start "%~n0" -p "IIS: Ftp Server" 255 5 -ets
echo.
echo Now reproduce your problem.
echo.
echo After you have reproduced your issue, hit any key to close the FTP
echo tracing session. Your trace events will be displayed automatically.
echo.
pause>nul

rem ======================================================================

echo.
echo Closing the ETW session for full FTP tracing...
LogMan.exe stop "%~n0" -ets

rem ======================================================================

echo.
echo Parsing the results - this may take a long time depending on the size of the trace...
if exist "%~n0.etl" (
    TraceRpt.exe "%~n0.etl" -o "%~n0.csv" -of CSV
    LogParser.exe "SELECT [Clock-Time], [Event Name], Type, [User Data] FROM '%~n0.csv'" -i:csv -e 2 -o:DATAGRID -rtp 20
)
Here's another great thing about this new batch file - it will also work down-level on Windows 7 and Windows Server 2008; so if you have been using my previous batch files with IIS 7 - you can simply replace your old batch file with this new version. You will see a few differences between the results from my old batch files and this new version, namely that I included a couple of extra columns that I like to use for troubleshooting.
| (Click the following image to view it full-size.) |
 |
There is one last thing which I would like to mention in closing: I realize that it would be much easier on everyone if Microsoft simply released a new version of LogParser which works with the new ETW format, but unfortunately there are no plans at the moment to release a new version of LogParser. And trust me - I'm just as depressed about that fact as anyone else. :-(
Note: This blog was originally posted at http://blogs.msdn.com/robert_mcmurray/
Rapid PHP Deployment for IIS using a Batch File
30 January 2014 • by Bob • IIS, Scripting, IIS Express, PHP
Whenever I am delivering a presentation where I need to use PHP, I typically use a batch file that I wrote in order to rapidly deploy PHP on the system that I am using for my demos. The batch file usually takes less than a second to run, which always seems to amaze people in the audience. As a result, I usually have several people ask me for my batch file after each presentation, so I thought that it would make a good subject for today's blog.
I should mention that I have used this batch file in order to demonstrate PHP with IIS in a variety of scenarios, and one of my favorite demos is when I would borrow someone's laptop and plug in a flash drive where I had IIS Express pre-installed, and then I would run the batch file in this blog to deploy PHP. Next I would launch IIS Express, open a web browser on their system, and then browse to http://localhost/ in order to show that IIS Express was working correctly. Lastly I would write a simple PHP "Hello World" page to show that PHP was up-and-running on their system in a matter of seconds.
That being said, I have to point out that there is a very important prerequisite that you must have in order to follow the steps in the blog: you need to start with a known-good installation of PHP from one of your systems, and I'll explain what I mean by that.
My batch file expects to find a folder containing ready-to-run files for PHP in order to deploy PHP on a new system. I originally obtained my PHP files by using the Web Platform Installer (WebPI) to install PHP, and then I copied the files to my flash drive or some other repository. (Note that WebPI usually installs PHP in the "%ProgramFiles(x86)%\PHP" folder.) If you don't want to use WebPI, you can also download PHP from http://windows.php.net/, but you're on your own for configuration.
Once I have the files from a known-good installation of PHP, I create the following folder structure in the location where I will be storing the files that I use to deploy PHP on other systems:
- <root folder>
- SETUP_PHP.cmd (the batch file from this blog)
- PHP (the folder containing the PHP files)
- PHP.INI
- PHP-CGI.EXE
- etc. (all of the remaining PHP files and folders)
One thing to note is that the PHP.INI file you use may contain paths which refer to specific directories on the system from which you are copying your PHP files, so you need to make sure that those paths will exist on the system where you deploy PHP.
Here is an example: when I used WebPI to install PHP 5.5 on a system with IIS, it installed PHP into my "%ProgramFiles(x86)%\PHP\v5.5" folder. During the installation process, WebPI updated the PHP file to reflect any paths that need to be defined. At the time that I put together my notes for this blog, those updates mainly applied to the path where PHP expects to find it's extensions:
extension_dir="C:\Program Files (x86)\PHP\v5.5\ext\"
What this means is - if you want to deploy PHP to some other path on subsequent systems, you will need to update at least that line in the PHP.INI file that you are using to deploy PHP. In my particular case, I prefer to deploy PHP to the "%SystemDrive%\PHP" path, but it can be anywhere as long as you update everything accordingly.
The following batch file will deploy the PHP files in the "%SystemDrive%\PHP" folder on your system, and then it will update IIS with the necessary settings for this PHP deployment to work:
@echo off

REM Change to the installation folder
pushd "%~dp0"

REM Cheap test to see if IIS is installed
if exist "%SystemRoot%\System32\inetsrv" (
  REM Check for the PHP installation files in a subfolder
  if exist "%~dp0PHP" (
    REM Check for an existing installation of PHP
    if not exist "%SystemDrive%\PHP" (
      REM Create the folder for PHP
      md "%SystemDrive%\PHP"
      REM Deploy the PHP files
      xcopy /erhky "%~dp0PHP\*" "%SystemDrive%\PHP"
    )
    pushd "%SystemRoot%\System32\inetsrv"
    REM Configure the IIS settings for PHP
    appcmd.exe set config -section:system.webServer/fastCgi /+"[fullPath='%SystemDrive%\PHP\php-cgi.exe',monitorChangesTo='php.ini',activityTimeout='600',requestTimeout='600',instanceMaxRequests='10000']" /commit:apphost
    appcmd.exe set config -section:system.webServer/fastCgi /+"[fullPath='%SystemDrive%\PHP\php-cgi.exe',monitorChangesTo='php.ini',activityTimeout='600',requestTimeout='600',instanceMaxRequests='10000'].environmentVariables.[name='PHP_FCGI_MAX_REQUESTS',value='10000']" /commit:apphost
    appcmd.exe set config -section:system.webServer/fastCgi /+"[fullPath='%SystemDrive%\PHP\php-cgi.exe',monitorChangesTo='php.ini',activityTimeout='600',requestTimeout='600',instanceMaxRequests='10000'].environmentVariables.[name='PHPRC',value='%SystemDrive%\PHP']" /commit:apphost
    appcmd.exe set config -section:system.webServer/handlers /+"[name='PHP_via_FastCGI',path='*.php',verb='GET,HEAD,POST',modules='FastCgiModule',scriptProcessor='%SystemDrive%\PHP\php-cgi.exe',resourceType='Either']" /commit:apphost
    popd
  )
)
popd
Once you have all of that in place, it usually takes less than a second to deploy PHP, which is why so many people seem interested during my presentations.
Note that you can deploy PHP for IIS Express just as easily by updating the "%SystemRoot%\System32\inetsrv" paths in the batch file to "%ProgramFiles%\IIS Express" or "%ProgramFiles(x86)%\IIS Express" paths. You can also use this batch file as part of a deployment process for PHP within a web farm; in which case, you will need to pay attention to the paths inside your PHP.INI file which I mentioned earlier.
Note: This blog was originally posted at http://blogs.msdn.com/robert_mcmurray/
How to Create a Blind Drop WebDAV Share
17 September 2013 • by Bob • IIS, WebDAV, URL Rewrite
I had an interesting WebDAV question earlier today that I had not considered before: how can someone create a "Blind Drop Share" using WebDAV? By way of explanation, a Blind Drop Share is a path where users can copy files, but never see the files that are in the directory. You can setup something like this by using NTFS permissions, but that environment can be a little difficult to set up and maintain.
With that in mind, I decided to research a WebDAV-specific solution that didn't require mangling my NTFS permissions. In the end it was pretty easy to achieve, so I thought that it would make a good blog for anyone who wants to do this.
A Little Bit About WebDAV
NTFS permissions contain access controls that configure the directory-listing behavior for files and folders; if you modify those settings, you can control who can see files and folders when they connect to your shared resources. However, there are no built-in features for the WebDAV module which ships with IIS that will approximate the NTFS behavior. But that being said, there is an interesting WebDAV quirk that you can use that will allow you to restrict directory listings, and I will explain how that works.
WebDAV uses the PROPFIND command to retrieve the properties for files and folders, and the WebDAV Redirector will use the response from a PROPFIND command to display a directory listing. (Note: Official WebDAV terminology has no concept of files and folders, those physical objects are respectively called Resources and Collections in WebDAV jargon. But that being said, I will use files and folders throughout this blog post for ease of understanding.)
In any event, one of the HTTP headers that WebDAV uses with the PROPFIND command is the Depth header, which is used to specify how deep the folder/collection traversal should go:
- If you sent a
PROPFINDcommand for the root of your website with aDepth:0header/value, you would get the properties for just the root directory - with no files listed; aDepth:0header/value only retrieves properties for the single resource that you requested. - If you sent a
PROPFINDcommand for the root of your website with aDepth:1header/value, you would get the properties for every file and folder in the root of your website; aDepth:1header/value retrieves properties for the resource that you requested and all siblings. - If you sent a
PROPFINDcommand for the root of your website with aDepth:infinityheader/value, you would get the properties for every file and folder in your entire website; aDepth:infinityheader/value retrieves properties for every resource regardless of its depth in the hierarchy. (Note that retrieving directory listings with infinite depth are disabled by default in IIS 7 and IIS 8 because it can be CPU intensive.)
By analyzing the above information, it should be obvious that what you need to do is to restrict users to using a Depth:0 header/value. But that's where this scenario gets interesting: if your end-users are using the Windows WebDAV Redirector or other similar technology to map a drive to your HTTP website, you have no control over the value of the Depth header. So how can you restrict that?
In the past I would have written custom native-code HTTP module or ISAPI filter to modify the value of the Depth header; but once you understand how WebDAV works, you can use the URL Rewrite module to modify the headers of incoming HTTP requests to accomplish some pretty cool things - like modifying the values WebDAV-related HTTP headers.
Adding URL Rewrite Rules to Modify the WebDAV Depth Header
Here's how I configured URL Rewrite to set the value of the Depth header to 0, which allowed me to create a "Blind Drop" WebDAV site:
- Open the URL Rewrite feature in IIS Manager for your website.
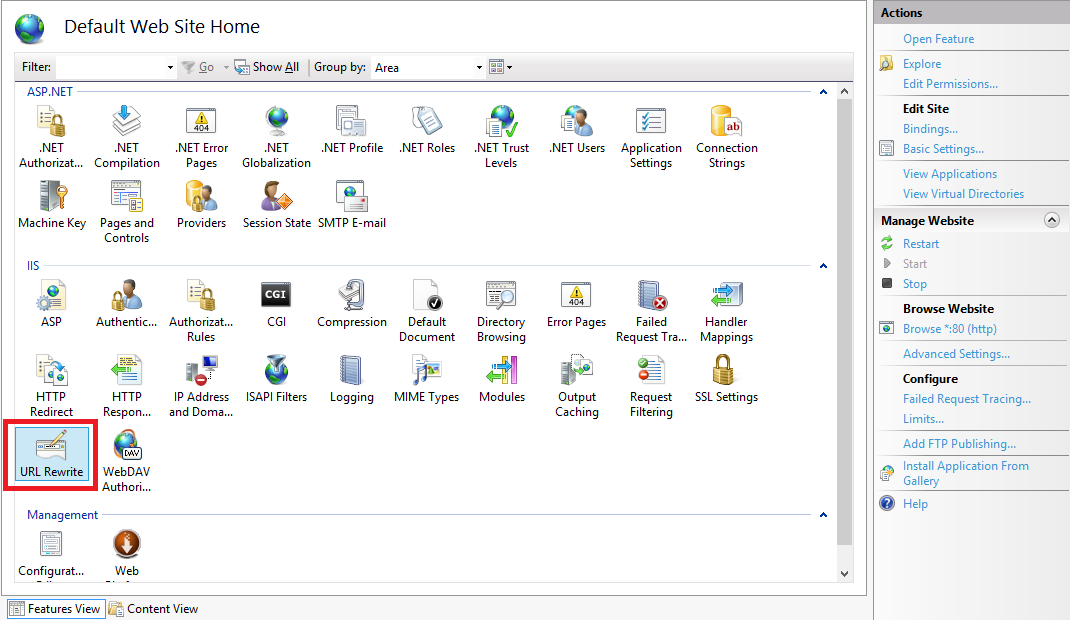
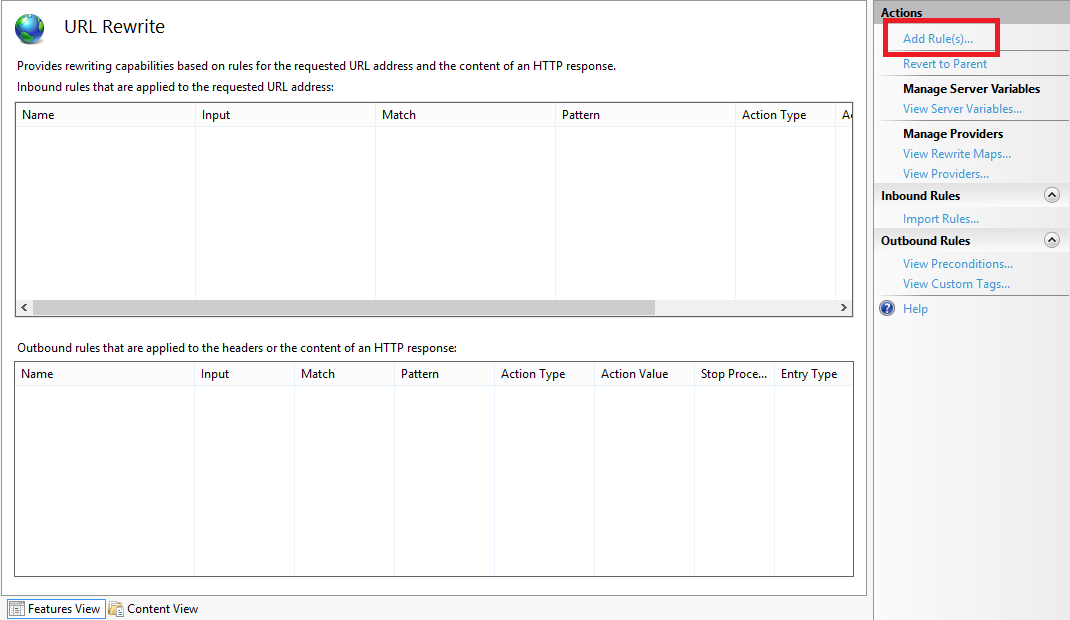
Click image to expand - Click the Add Rules link in the Actionspane.
Click image to expand - When the Add Rules dialog box appears, highlight Blank rule and click OK.
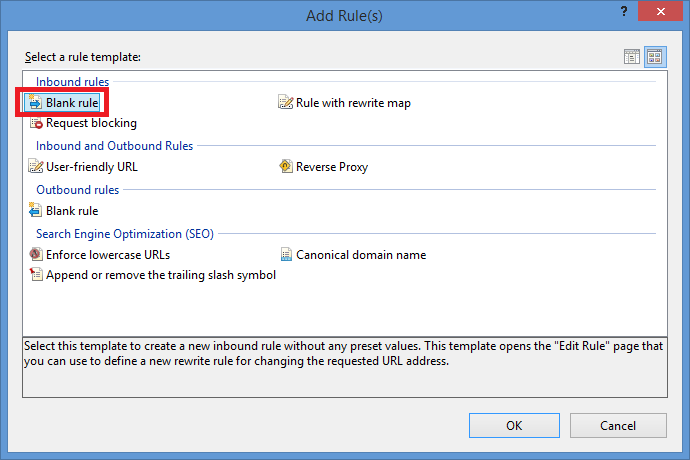
Click image to expand - When the Edit Inbound Rulepage appears, configure the following settings:
- Name the rule "Modify Depth Header".

Click image to expand - In the Match URLsection:
- Choose Matches the Pattern in the Requested URL drop-down menu.
- Choose Wildcards in the Using drop-down menu.
- Type a single asterisk "*" in the Pattern text box.
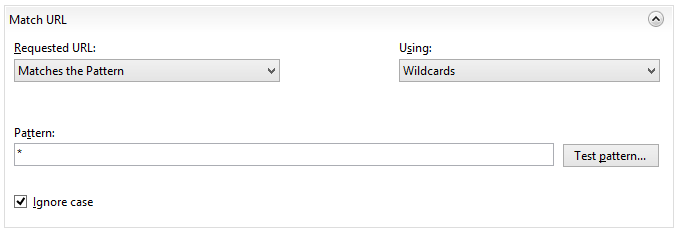
Click image to expand - Expand the Server Variables collection and click Add.
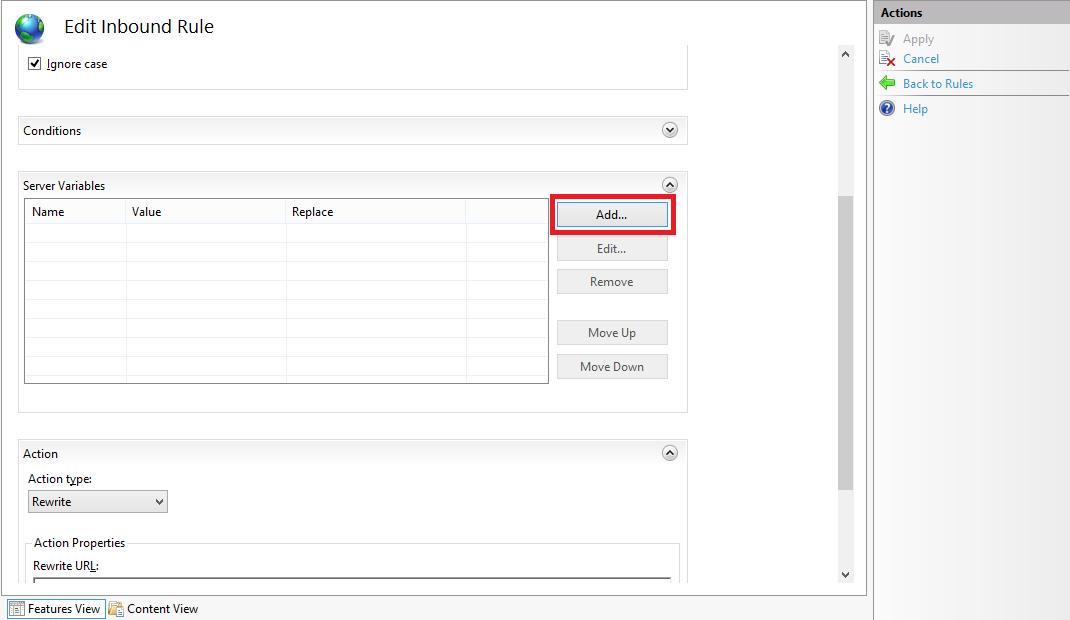
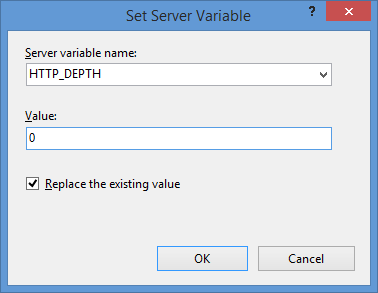
Click image to expand - When the Set Server Variabledialog box appears:
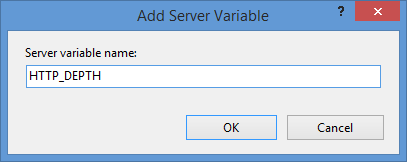
- Type "HTTP_DEPTH" in the Server variable name text box.
- Type "0" in the Value text box.
- Make sure that Replace the existing value checkbox is checked.
- Click OK.
- In the Action group, choose None in the Action typedrop-down menu.
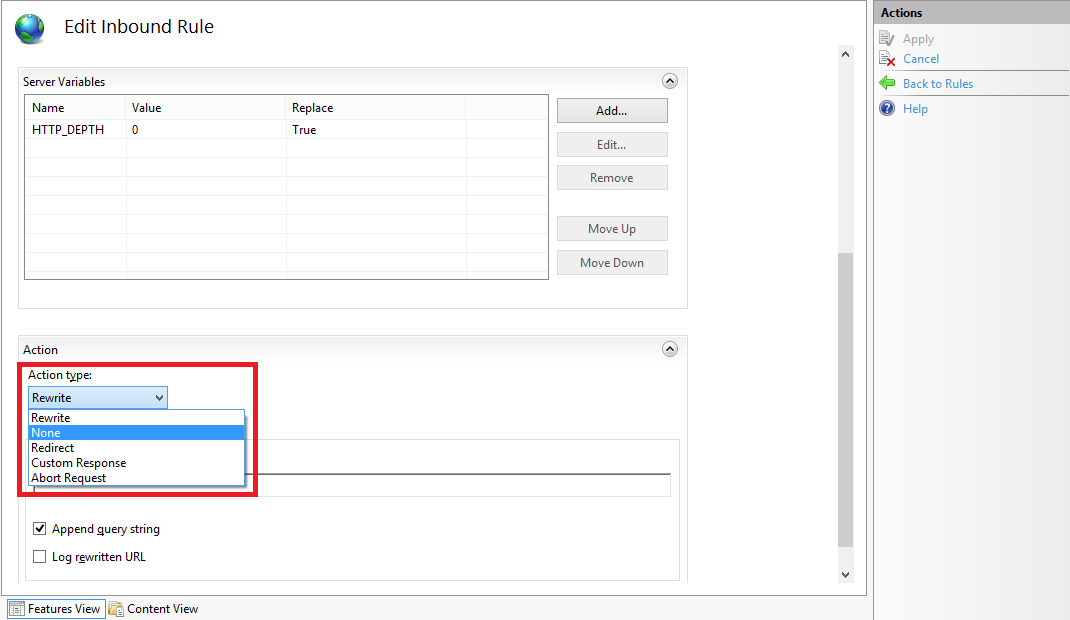
Click image to expand - Click Apply in the Actions pane, and then click Back to Rules.
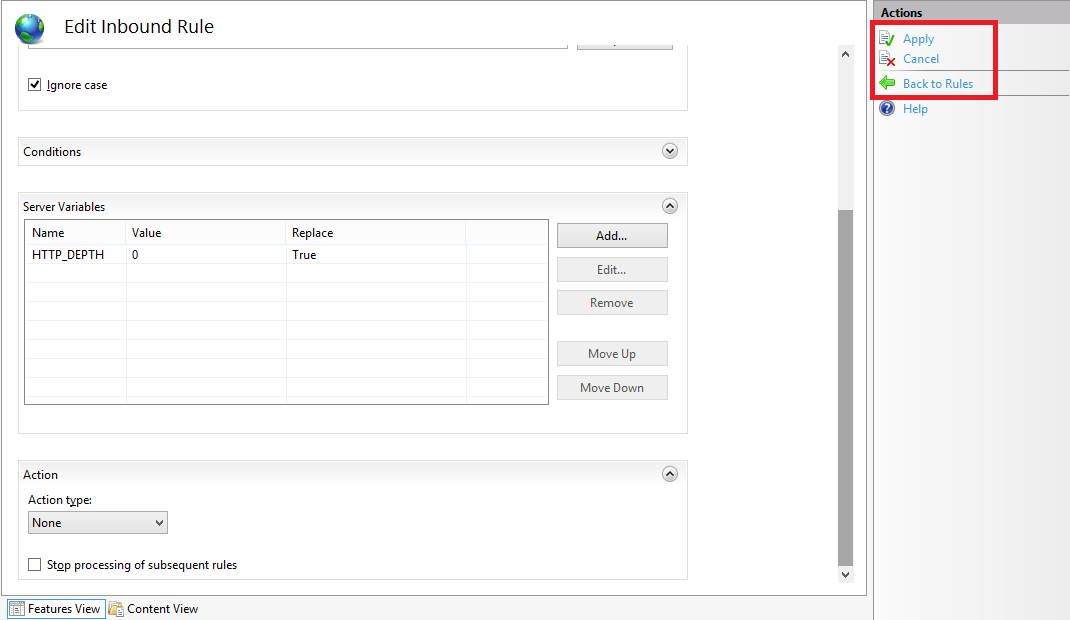
Click image to expand
- Name the rule "Modify Depth Header".
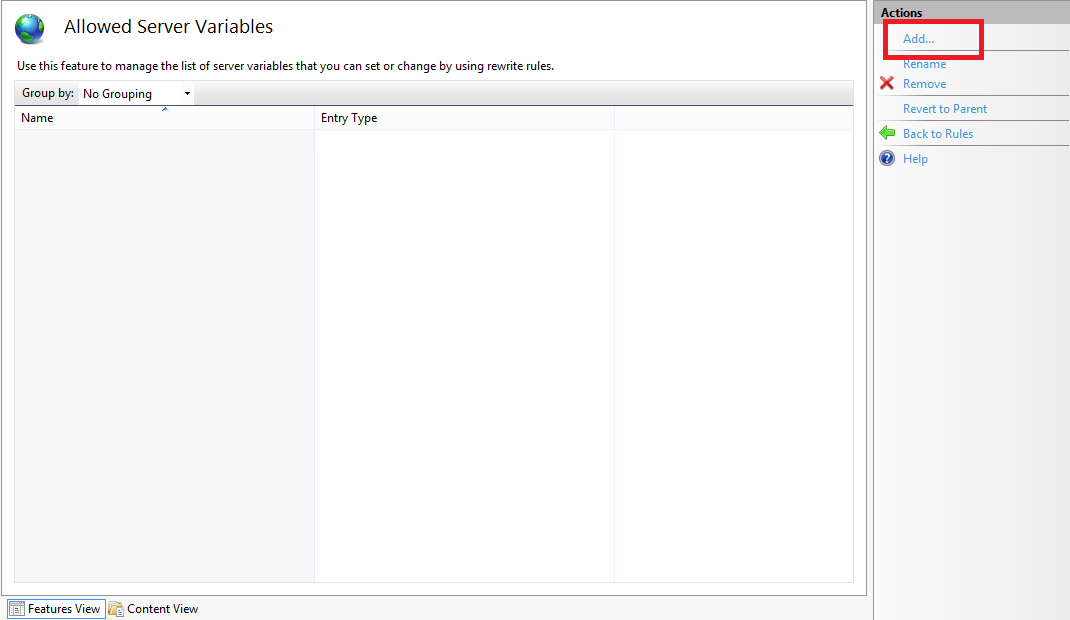
- Click View Server Variables in the Actionspane.
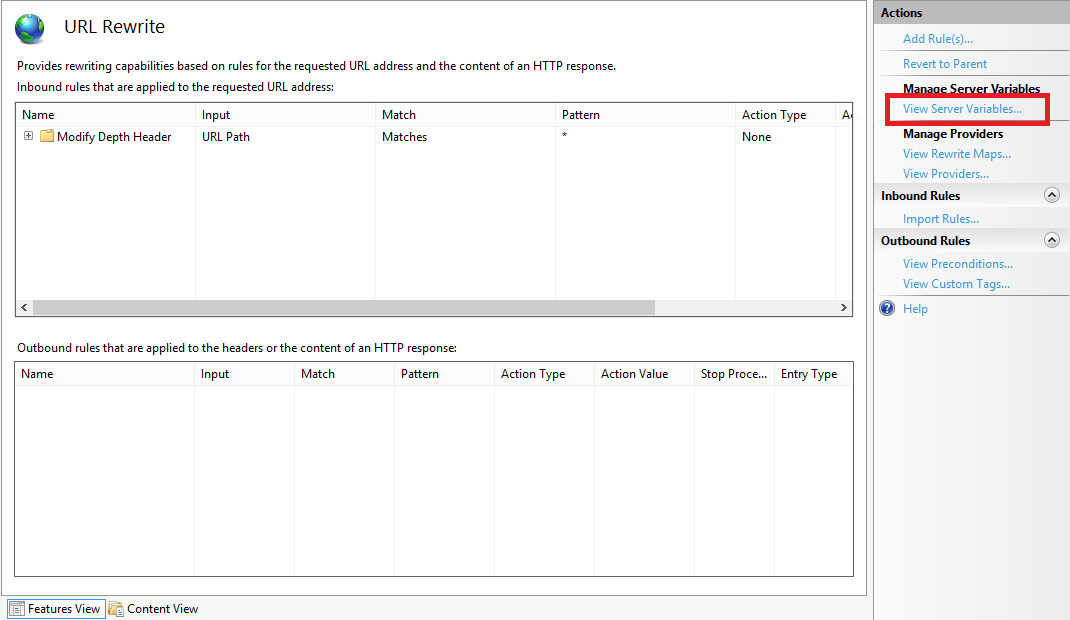
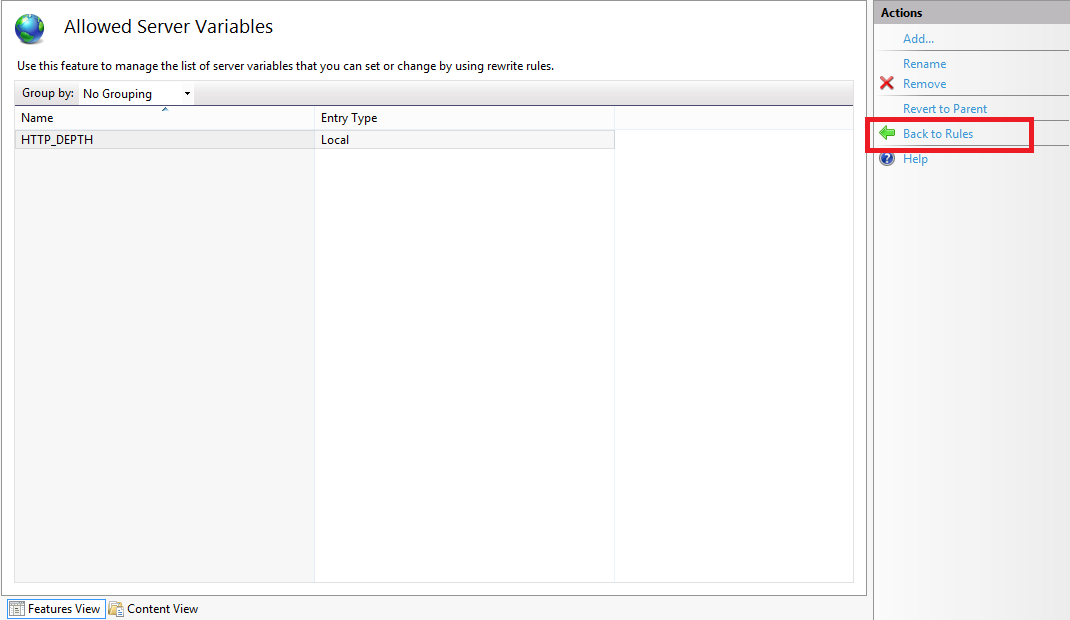
Click image to expand - When the Allowed Server Variablespage appears, configure the following settings:
If all of these changes were saved to your applicationHost.config file, the resulting XML might resemble the following example - with XML comments added by me to highlight some of the major sections:
<location path="Default Web Site">
    <system.webServer>

        <-- Start of Security Settings -->
        <security>
            <authentication>
                <anonymousAuthentication enabled="false" />
                <basicAuthentication enabled="true" />
            </authentication>
            <requestFiltering>
                <fileExtensions applyToWebDAV="false" />
                <verbs applyToWebDAV="false" />
                <hiddenSegments applyToWebDAV="false" />
            </requestFiltering>
        </security>

        <-- Start of WebDAV Settings -->
        <webdav>
            <authoringRules>
                <add roles="administrators" path="*" access="Read, Write, Source" />
            </authoringRules>
            <authoring enabled="true">
                <properties allowAnonymousPropfind="false" allowInfinitePropfindDepth="true">
                    <clear />
                    <add xmlNamespace="*" propertyStore="webdav_simple_prop" />
                </properties>
            </authoring>
        </webdav>

        <-- Start of URL Rewrite Settings -->
        <rewrite>
            <rules>
                <rule name="Modify Depth Header" enabled="true" patternSyntax="Wildcard">
                    <match url="*" />
                    <serverVariables>
                        <set name="HTTP_DEPTH" value="0" />
                    </serverVariables>
                    <action type="None" />
                </rule>
            </rules>
            <allowedServerVariables>
                <add name="HTTP_DEPTH" />
            </allowedServerVariables>
        </rewrite>

    </system.webServer>
</location>
In all likelihood, some of these settings will be stored in your applicationHost.config file, and the remaining settings will be stored in the web.config file of your website.
Testing the URL Rewrite Settings
If you did not have the URL Rewrite rule in place, or if you disabled the rule, then your web server might respond like the following example if you used the WebDAV Redirector to map a drive to your website from a command prompt:
C:\>net use z: http://www.contoso.com/
Enter the user name for 'www.contoso.com': www.contoso.com\robert
Enter the password for www.contoso.com:
The command completed successfully.

C:\>z:

Z:\>dir
Volume in drive Z has no label.
Volume Serial Number is 0000-0000

Directory of Z:\

09/16/2013 08:55 PM <DIR> .
09/16/2013 08:55 PM <DIR> ..
09/14/2013 12:39 AM <DIR> aspnet_client
09/16/2013 08:06 PM <DIR> scripts
09/16/2013 07:55 PM 66 default.aspx
09/14/2013 12:38 AM 98,757 iis-85.png
09/14/2013 12:38 AM 694 iisstart.htm
09/16/2013 08:55 PM 75 web.config
              4 File(s) 99,592 bytes
              8 Dir(s) 956,202,631,168 bytes free

Z:\>
However, when you have the URL Rewrite correctly configured and enabled, connecting to the same website will resemble the following example - notice how no files or folders are listed:
C:\>net use z: http://www.contoso.com/
Enter the user name for 'www.contoso.com': www.contoso.com\robert
Enter the password for www.contoso.com:
The command completed successfully.

C:\>z:

Z:\>dir
Volume in drive Z has no label.
Volume Serial Number is 0000-0000

Directory of Z:\

09/16/2013 08:55 PM <DIR> .
09/16/2013 08:55 PM <DIR> ..
              0 File(s) 0 bytes
              2 Dir(s) 956,202,803,200 bytes free

Z:\>
Despite the blank directory listing, you can still retrieve the properties for any file or folder if you know that it exists. So if you were to use the mapped drive from the preceding example, you could still use an explicit directory command for any object that you had uploaded or created:
Z:\>dir default.aspx
Volume in drive Z has no label.
Volume Serial Number is 0000-0000

Directory of Z:\

09/16/2013 07:55 PM 66 default.aspx
              1 File(s) 66 bytes
              0 Dir(s) 956,202,799,104 bytes free

Z:\>dir scripts
Volume in drive Z has no label.
Volume Serial Number is 0000-0000

Directory of Z:\scripts

09/16/2013 07:52 PM <DIR> .
09/16/2013 07:52 PM <DIR> ..
              0 File(s) 0 bytes
              2 Dir(s) 956,202,799,104 bytes free

Z:\>
The same is true for creating directories and files; you can create them, but they will not show up in the directory listings after you have created them unless you reference them explicitly:
Z:\>md foobar

Z:\>dir
Volume in drive Z has no label.
Volume Serial Number is 0000-0000

Directory of Z:\

09/16/2013 11:52 PM <DIR> .
09/16/2013 11:52 PM <DIR> ..
              0 File(s) 0 bytes
              2 Dir(s) 956,202,618,880 bytes free

Z:\>cd foobar

Z:\foobar>copy NUL foobar.txt
        1 file(s) copied.

Z:\foobar>dir
Volume in drive Z has no label.
Volume Serial Number is 0000-0000

Directory of Z:\foobar

09/16/2013 11:52 PM <DIR> .
09/16/2013 11:52 PM <DIR> ..
              0 File(s) 0 bytes
              2 Dir(s) 956,202,303,488 bytes free

Z:\foobar>dir foobar.txt
Volume in drive Z has no label.
Volume Serial Number is 0000-0000

Directory of Z:\foobar

09/16/2013 11:53 PM 0 foobar.txt
              1 File(s) 0 bytes
              0 Dir(s) 956,202,299,392 bytes free

Z:\foobar>
That wraps it up for today's post, although I should point out that if you see any errors when you are using the WebDAV Redirector, you should take a look at the Troubleshooting the WebDAV Redirector section of my Using the WebDAV Redirector article; I have done my best to list every error and resolution that I have discovered over the past several years.
Note: This blog was originally posted at http://blogs.msdn.com/robert_mcmurray/
Adding Custom FTP Providers with the IIS Configuration Editor - Part 2
02 May 2013 • by Bob • IIS, FTP, Extensibility
In Part 1 of this blog series about adding custom FTP providers with the IIS Configuration Editor, I showed you how to add a custom FTP provider with a custom setting for the provider that is stored in your IIS configuration settings. For my examples, I showed how to do this by using both the AppCmd.exe application from a command line and by using the IIS Configuration Editor. In part 2 of this blog series, I will show you how to use the IIS Configuration Editor to add custom FTP providers to your FTP sites.
As a brief review from Part 1, the following XML excerpt illustrates what the provider's settings should resemble when added to your IIS settings:
<system.ftpServer>
   <providerDefinitions>
     <add name="FtpXmlAuthorization"
       type="FtpXmlAuthorization, FtpXmlAuthorization, version=1.0.0.0, Culture=neutral, PublicKeyToken=426f62526f636b73" />
     <activation>
       <providerData name="FtpXmlAuthorization">
         <add key="xmlFileName"
           value="C:\inetpub\FtpUsers\Users.xml" />
       </providerData>
     </activation>
   </providerDefinitions>
 </system.ftpServer>
The above example shows the settings that are added globally to register an FTP provider. Note that this example only contains the settings for my custom provider; you would normally see the settings for the IisManagerAuth and AspNetAuth providers that ship with the FTP service in the providerDefinitions collection.
To actually use a provider for an FTP site, you would need to add the provider to the settings for the FTP site in your IIS settings. So for part 2 of this blog series, we will focus on how to add a custom provider to an FTP site by using the IIS Configuration Editor.
Having said all of that, the rest of this blog is broken down into the following sections:
- Step 1 - Looking at the configuration settings for custom FTP providers
- Step 2 - Navigate to an FTP Site in the Configuration Editor
- Step 3 - Add custom FTP providers to an FTP site
- Summary and Parting Thoughts
Before continuing, I should reiterate that custom FTP providers fall into two categories: providers that are used for authentication and providers that are used for everything else. This distinction is important, because the settings are stored in different sections of your IIS settings. With that in mind, let's take a look at the settings for an example FTP site.
Step 1 - Looking at the configuration settings for custom FTP providers
The following example shows an FTP site with several custom FTP providers added:
<site name="ftp.contoso.com" id="2">
   <application path="/">
     <virtualDirectory path="/"
       physicalPath="c:\inetpub\www.contoso.com\wwwroot" />
   </application>
   <bindings>
     <binding protocol="ftp"
       bindingInformation="*:21:ftp.contoso.com" />
   </bindings>
   <ftpServer>
     <security>
       <ssl controlChannelPolicy="SslAllow"
         dataChannelPolicy="SslAllow" />
       <authentication>
         <customAuthentication>
           <providers>
             <add name="MyCustomFtpAuthenticationProvider" />
           </providers>
         </customAuthentication>
       </authentication>
     </security>
     <customFeatures>
       <providers>
         <add name="MyCustomFtpHomeDirectoryProvider" />
         <add name="MyCustomFtpLoggingProvider" />
       </providers>
     </customFeatures>
     <userIsolation mode="Custom" />
   </ftpServer>
 </site>
If you look at the above example, you will notice the following providers have been added:
- A custom FTP authentication provider named MyCustomFtpAuthenticationProvider has been added to the ftpServer/security/authentication/customAuthentication/providers collection; this provider will obviously be used by the FTP service to validate usernames and passwords.
- A custom FTP home directory provider named MyCustomFtpHomeDirectoryProvider has been added to the ftpServer/customFeatures/providers collection; this will be used by the FTP service for custom user isolation. Note the mode for the userIsolation element is set to custom.
- A custom FTP logging provider named MyCustomFtpLoggingProvider has been added to the ftpServer/customFeatures/providers collection; this will be used by the FTP service for creating custom log files.
As I mentioned earlier, you will notice that the settings for FTP custom providers are stored in different sections of the ftpServer collection depending on whether they are used for authentication or some other purpose.
Step 2 - Navigate to an FTP Site in the Configuration Editor
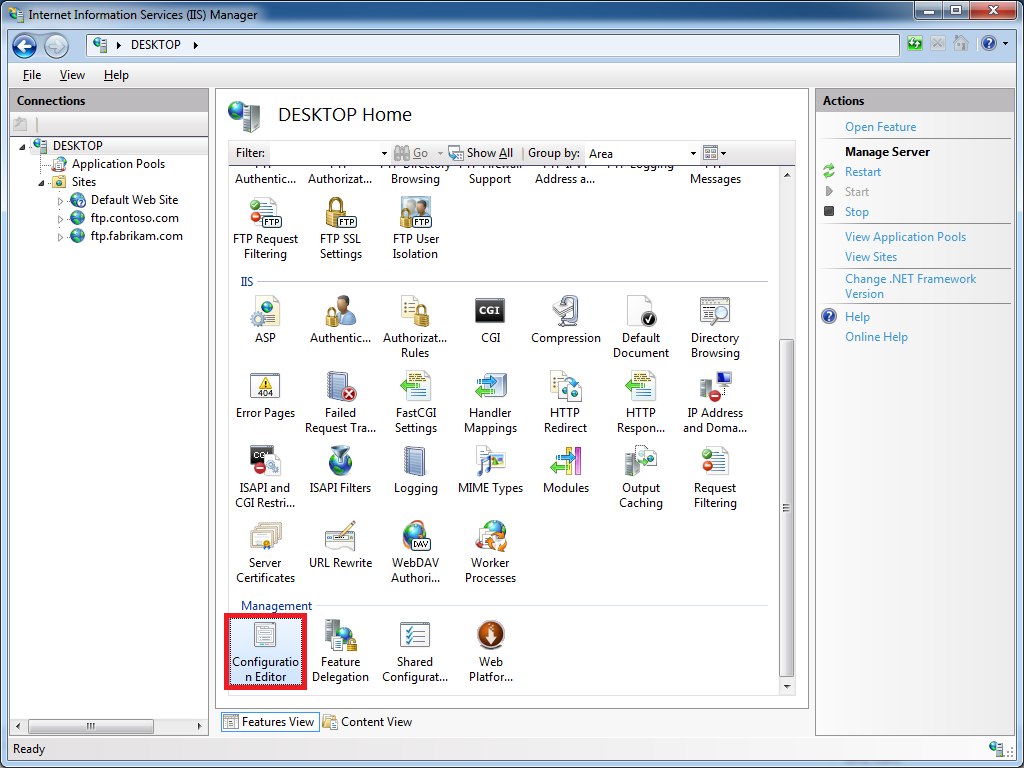
Open the IIS Manager and click on the Configuration Editor at feature the server level:
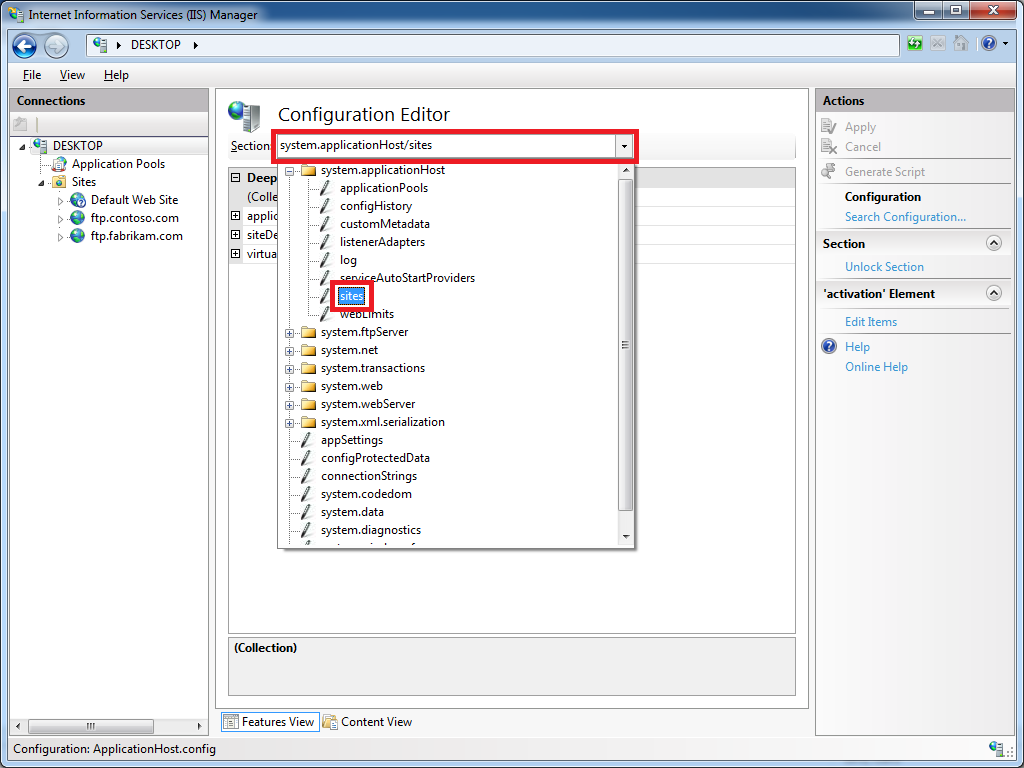
Click the Section drop-down menu, expand the the system.applicationHost collection, and then highlight the sites node:
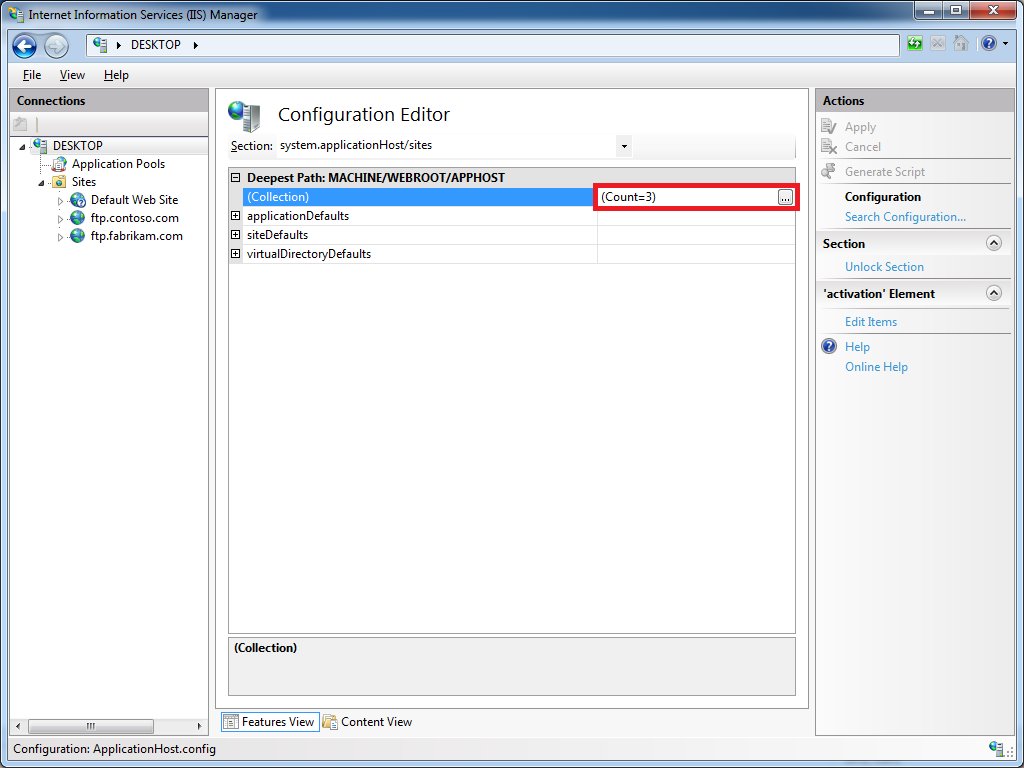
If you click on the Collection row, an ellipsis [...] will appear:
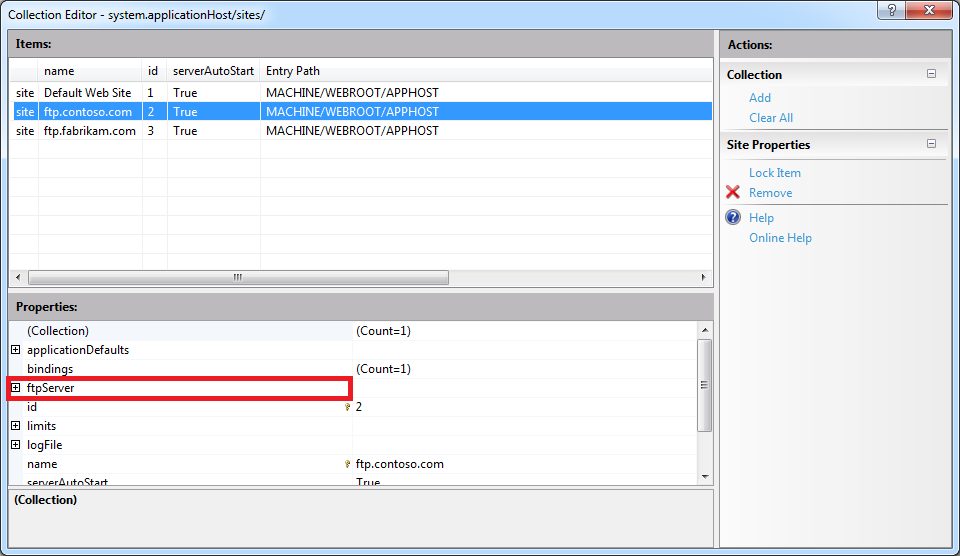
When you click the ellipsis [...], IIS will display the Collection Editor dialog box for your sites; both HTTP and FTP sites will be displayed:
Expand the ftpServer node, which is where all of the site-level settings for an FTP site are kept.
Step 3 - Add custom FTP providers to an FTP site
As I mentioned earlier, custom FTP providers fall into two categories: providers that are used for authentication and everything else. Because of this distinction, the following steps show you how to add a provider to the correct section of your settings depending on the provider's purpose.
Add a custom FTP provider to an FTP site that is not used for authentication
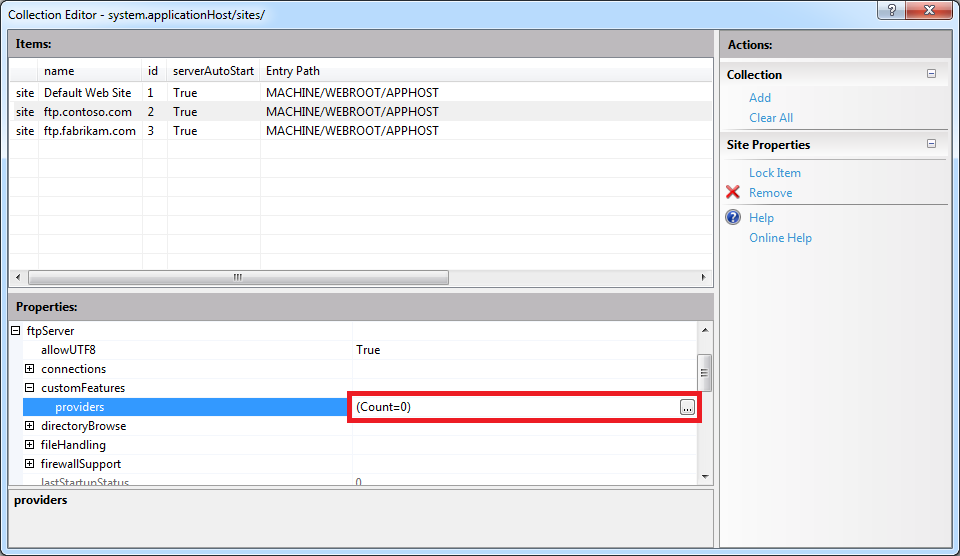
Expand the customFeatures node, which is located under the ftpServer node for an FTP site; this collection defines the custom providers for an FTP site that are not used for authentication, for example: home directory providers, logging providers, etc. When you highlight the providers row, an ellipsis [...] will appear:
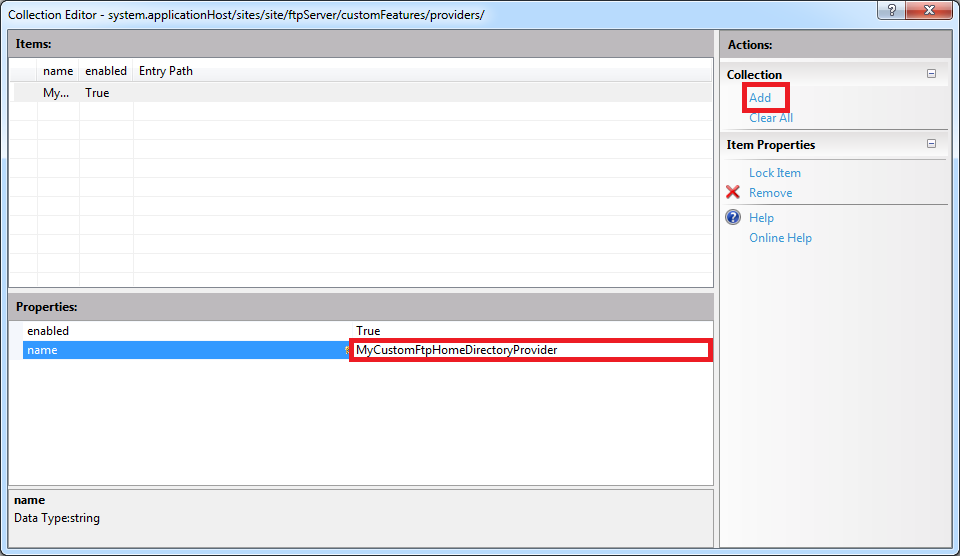
When you click the ellipsis [...], IIS will display the Collection Editor dialog box for your custom features (providers). When you click Add in the Actions pane, you need to enter the name of an FTP provider that you entered by following the instructions in Part 1 of this blog series:
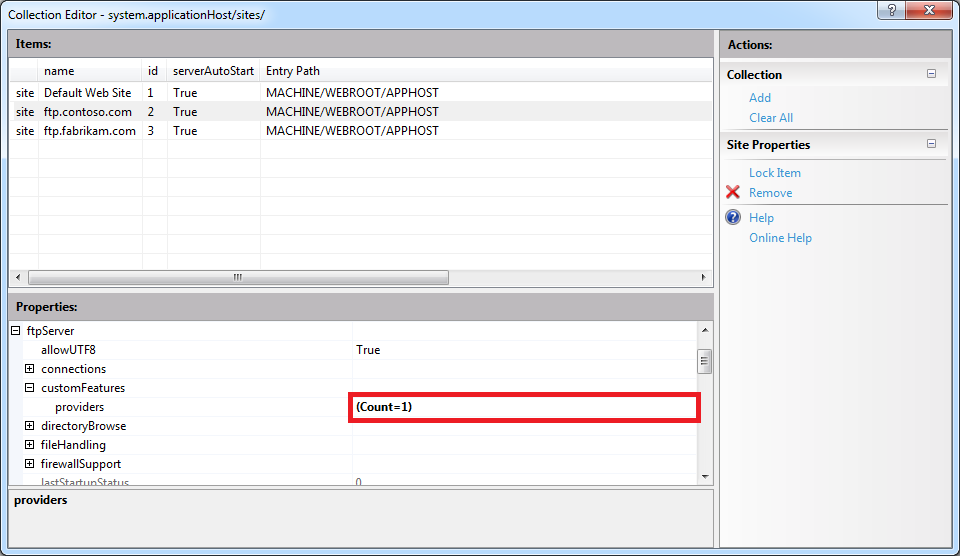
Once you enter the name of your FTP provider in the Collection Editor dialog box for your custom features, you can close that dialog box. The Collection Editor for your sites will reflect the updated provider count for your FTP site:
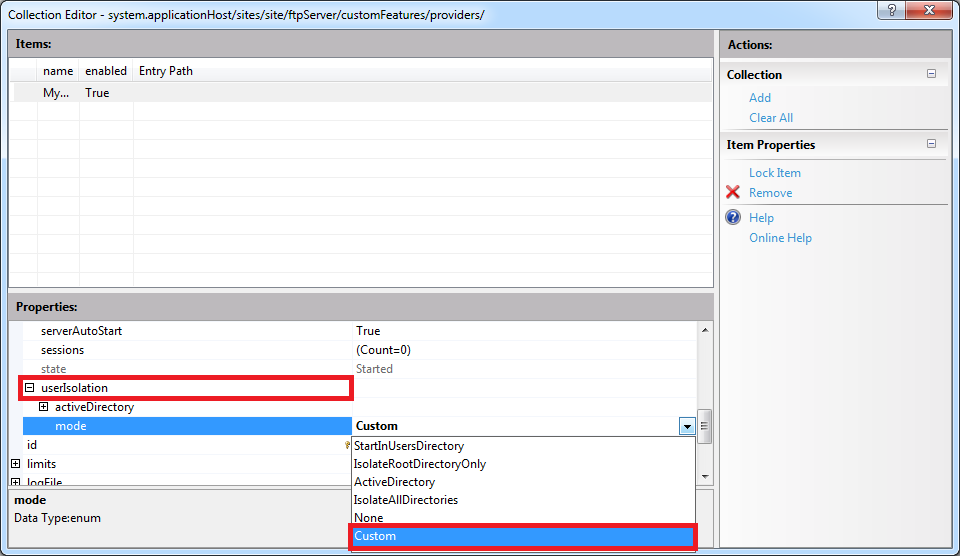
Important Note: If you are adding a custom FTP Home Directory Provider, you have to configure the mode for FTP's User Isolation features. To do so, you need to expand the userIsolation node, which is located under the ftpServer node for an FTP site. Once you have done so, click the mode drop-down menu and choose Custom from the list of choices:
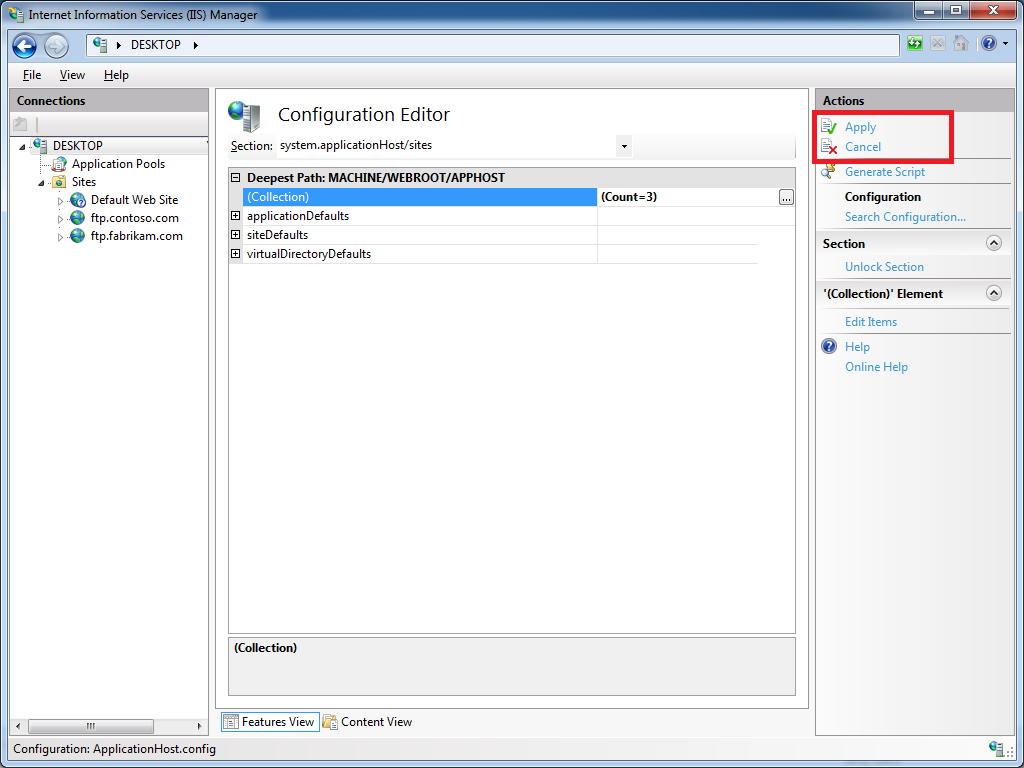
When you close the Collection Editor dialog box for your sites, you need to click Apply in the Actions pane to commit the changes to your IIS settings:
Add a custom FTP authentication provider to an FTP site
First and foremost - there is built-in support for adding custom authentication providers in IIS Manager; to see the steps to do so, see the FTP Custom Authentication <customAuthentication> article on the IIS.NET website. However, if you want to add a custom FTP authentication provider to an FTP site by using the IIS Configuration Editor, you can do so by using the following steps.
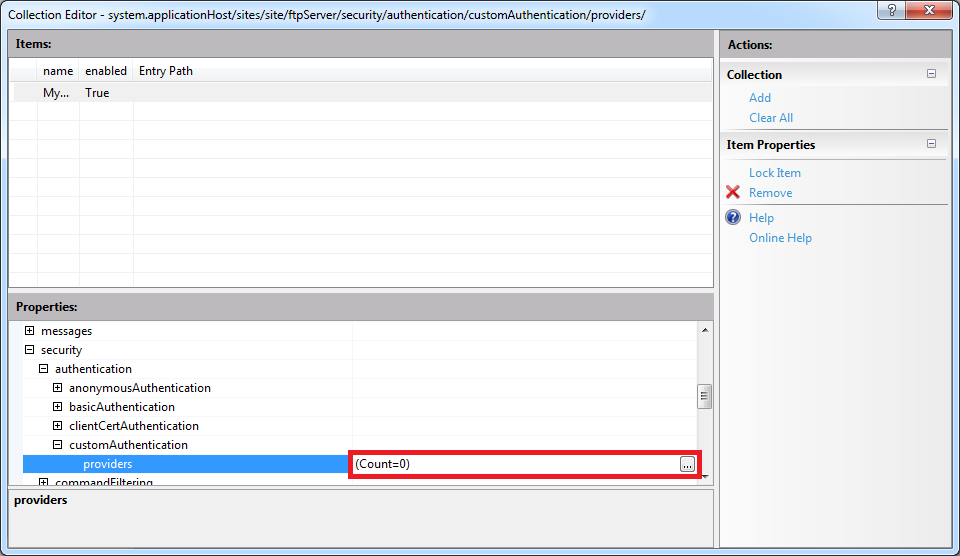
Expand the security node under the ftpServer node for an FTP site, then expand the authentication node, and then expand the customAuthentication node; this collection defines the custom authentication providers for an FTP site. When you highlight the providers row, an ellipsis [...] will appear:
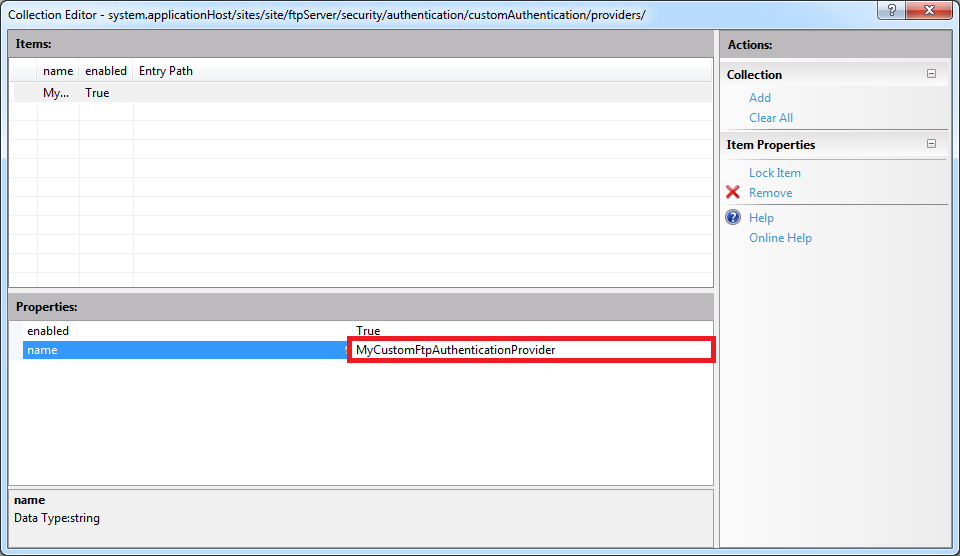
When you click the ellipsis [...], IIS will display the Collection Editor dialog box for your custom authentication providers. When you click Add in the Actions pane, you need to enter the name of an FTP authentication provider that you entered by following the instructions in Part 1 of this blog series:
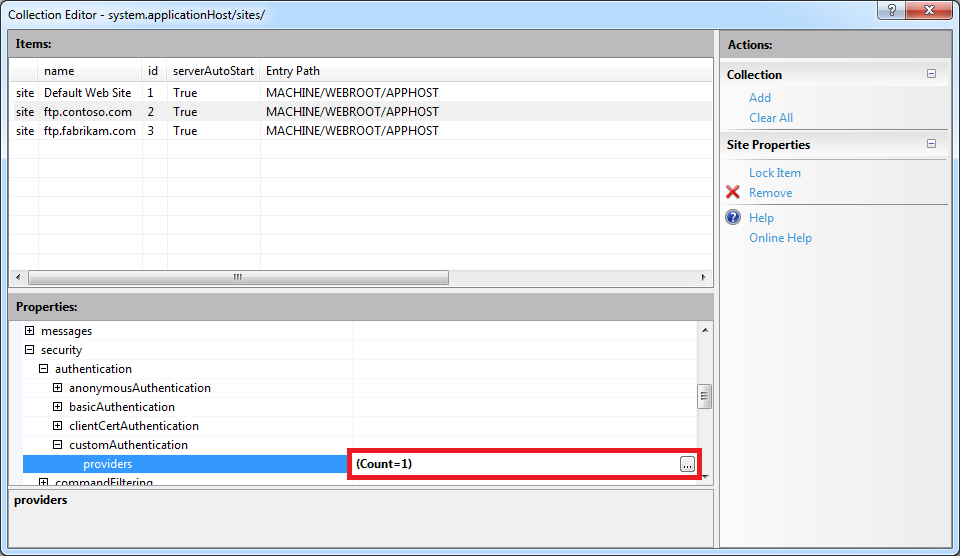
Once you enter the name of your FTP authentication provider in the Collection Editor dialog box for your custom authentication providers, you can close that dialog box. The Collection Editor for your sites will reflect the updated authentication provider count for your FTP site:
When you close the Collection Editor dialog box for your sites, you need to click Apply in the Actions pane to commit the changes to your IIS settings:
Summary and Parting Thoughts
As I mentioned in part 1 of this series, I admit that this might seem like a lot of steps to go through, but it's not that difficult once you understand how the configuration settings are organized and you get the hang of using the IIS Configuration Editor to add or modify these settings.
Disabling Custom User Isolation
In the Add a custom FTP provider to an FTP site that is not used for authentication section of this blog, I added a step to specify Custom as the User Isolation mode. Since this is something of an advanced feature, there is no user interface for enabling custom user isolation; this was a design decision to keep people from breaking their FTP sites. Here's why: if you enable custom user isolation and you don't install a custom Home Directory provider for FTP, all users will be denied access to your FTP site.
That being said, once you have enabled custom user isolation, the option to disable custom user isolation will "magically" appear in the FTP User Isolation feature in the IIS Manager. To see this for yourself, you would first need to follow the steps to custom user isolation in the Add a custom FTP provider to an FTP site that is not used for authentication section of this blog.
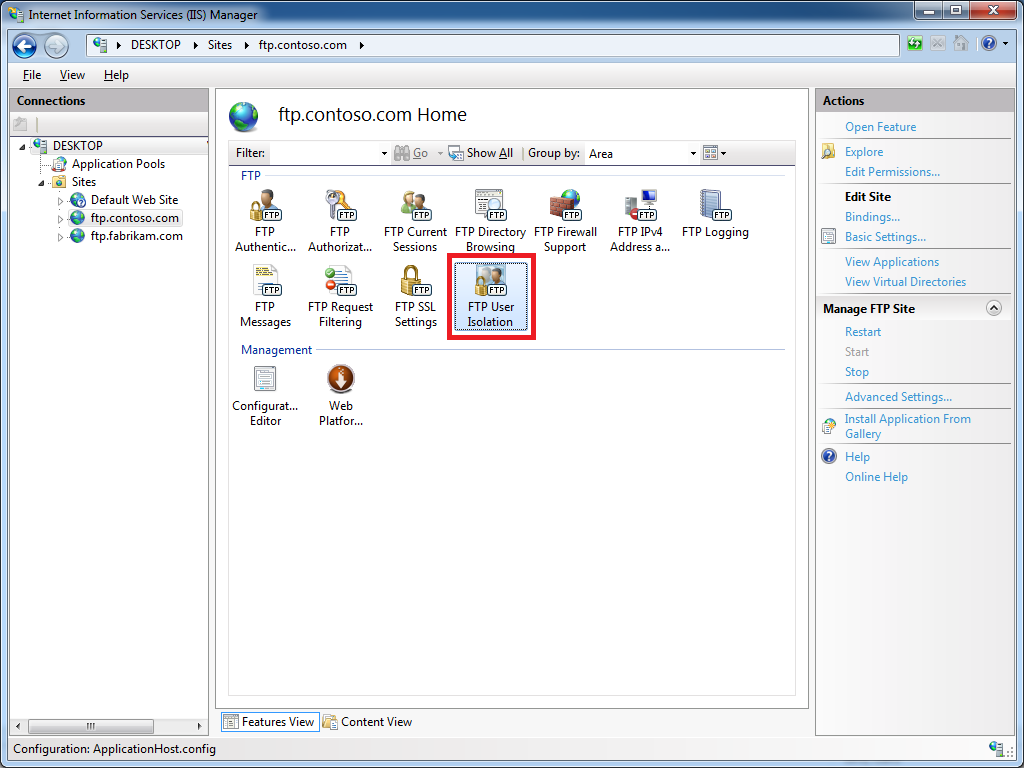
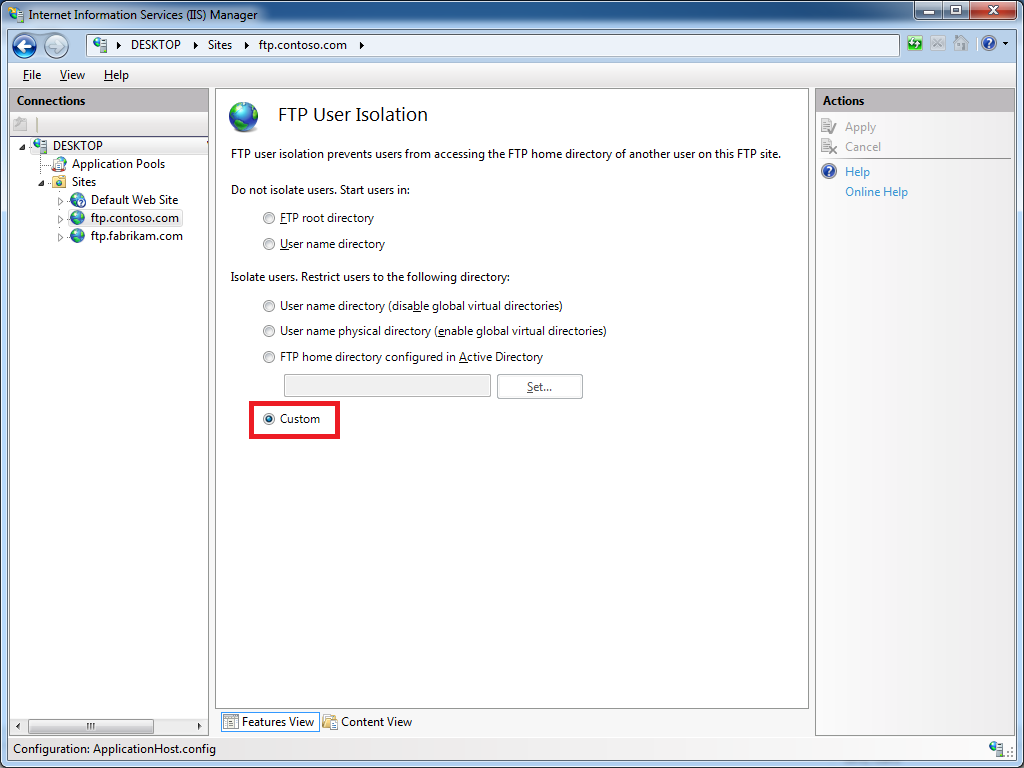
Once you have enabled custom user isolation, highlight your FTP site in the list of Sites pane of IIS Manager, then open the FTP User Isolation feature:
When you open the FTP User Isolation feature, you will see that an option for Custom now appears in the list of user isolation modes:
This option will appear as long as custom user isolation is enabled. If you change the user isolation mode to something other than Custom, this option will continue appear in the list of user isolation modes until you navigate somewhere else in IIS Manager. Once you have changed the user isolation mode to one of the built-in modes and you navigate somewhere else, the Custom option will not show up in the FTP User Isolation feature until you follow the steps to re-enable custom user isolation.
Additional Information
If you want additional information about configuring the settings for FTP providers, you can find detailed reference documentation at the following URLs:
- FTP Custom Features <customFeatures>
http://www.iis.net/configreference/system.applicationhost/sites/site/ftpserver/customfeatures - FTP Custom Authentication <customAuthentication>
http://www.iis.net/configreference/system.applicationhost/sites/site/ftpserver/security/authentication/customauthentication
Each of these articles contain "How-To" steps, detailed information about each of the configuration settings, and code samples for AppCmd.exe, C#/VB.NET, and JavaScript/VBScript.
As always, let me know if you have any questions. ;-]
Note: This blog was originally posted at http://blogs.msdn.com/robert_mcmurray/
Adding Custom FTP Providers with the IIS Configuration Editor - Part 1
31 March 2013 • by Bob • Extensibility, FTP, IIS
I've written a lot of walkthroughs and blog posts about creating custom FTP providers over the past several years, and I usually include instructions for adding these custom providers to IIS. When you create a custom FTP authentication provider, IIS has a user interface for adding that provider to FTP. But if you are adding a custom home directory or logging provider, there is no dedicated user interface for adding those types of FTP providers. In addition, if you create a custom FTP provider that requires settings that are stored in your IIS configuration, there is no user interface to add or manage those settings.
With this in mind, I include instructions in my blogs and walkthroughs that describe how to add those type of providers by using AppCmd.exe from a command line. For example, if you take a look at my How to Use Managed Code (C#) to Create an FTP Authentication and Authorization Provider using an XML Database walkthrough, I include the following instructions:
Adding the Provider
- Determine the assembly information for the extensibility provider:
- In Windows Explorer, open your "C:\Windows\assembly" path, where C: is your operating system drive.
- Locate the FtpXmlAuthorization assembly.
- Right-click the assembly, and then click Properties.
- Copy the Culture value; for example: Neutral.
- Copy the Version number; for example: 1.0.0.0.
- Copy the Public Key Token value; for example: 426f62526f636b73.
- Click Cancel.
- Using the information from the previous steps, add the extensibility provider to the global list of FTP providers and configure the options for the provider:
- At the moment there is no user interface that enables you to add properties for custom authentication or authorization modules, so you will have to use the following command line:
cd %SystemRoot%\System32\Inetsrv

appcmd.exe set config -section:system.ftpServer/providerDefinitions /+"[name='FtpXmlAuthorization',type='FtpXmlAuthorization,FtpXmlAuthorization,version=1.0.0.0,Culture=neutral,PublicKeyToken=426f62526f636b73']" /commit:apphost

appcmd.exe set config -section:system.ftpServer/providerDefinitions /+"activation.[name='FtpXmlAuthorization']" /commit:apphost

appcmd.exe set config -section:system.ftpServer/providerDefinitions /+"activation.[name='FtpXmlAuthorization'].[key='xmlFileName',value='C:\Inetpub\XmlSample\Users.xml']" /commit:apphost - Note: The file path that you specify in the xmlFileName attribute must match the path where you saved the "Users.xml" file on your computer in the earlier in this walkthrough.
- At the moment there is no user interface that enables you to add properties for custom authentication or authorization modules, so you will have to use the following command line:
This example adds a custom FTP provider, and then it adds a custom setting for that provider that is stored in your IIS configuration settings.
That being said, there is actually a way to add custom FTP providers with settings like the ones that I have just described through the IIS interface by using the IIS Configuration Editor. This feature was first available through the IIS Administration Pack for IIS 7.0, and is built-in for IIS 7.5 and IIS 8.0.
Before I continue, if would probably be prudent to take a look at the settings that we are trying to add, because these settings might help you to understand the rest of steps in this blog. Here is an example from my applicationhost.config file for three custom FTP authentication providers; the first two providers are installed with the FTP service, and the third provider is a custom provider that I created with a single provider-specific configuration setting:
<system.ftpServer>
  <providerDefinitions>
    <add name="IisManagerAuth" type="Microsoft.Web.FtpServer.Security.IisManagerAuthenticationProvider, Microsoft.Web.FtpServer, version=7.5.0.0, Culture=neutral, PublicKeyToken=31bf3856ad364e35" />
    <add name="AspNetAuth" type="Microsoft.Web.FtpServer.Security.AspNetFtpMembershipProvider, Microsoft.Web.FtpServer, version=7.5.0.0, Culture=neutral, PublicKeyToken=31bf3856ad364e35" />
    <add name="FtpXmlAuthorization" type="FtpXmlAuthorization, FtpXmlAuthorization, version=1.0.0.0, Culture=neutral, PublicKeyToken=426f62526f636b73" />
    <activation>
      <providerData name="FtpXmlAuthorization">
        <add key="xmlFileName" value="C:\inetpub\FtpUsers\Users.xml" />
      </providerData>
    </activation>
  </providerDefinitions>
</system.ftpServer>
With that in mind, in part 1 of this blog series, I will show you how to use the IIS Configuration Editor to add a custom FTP provider with provider-specific configuration settings.
Step 1 - Open the IIS Manager and click on the Configuration Editor at feature the server level:
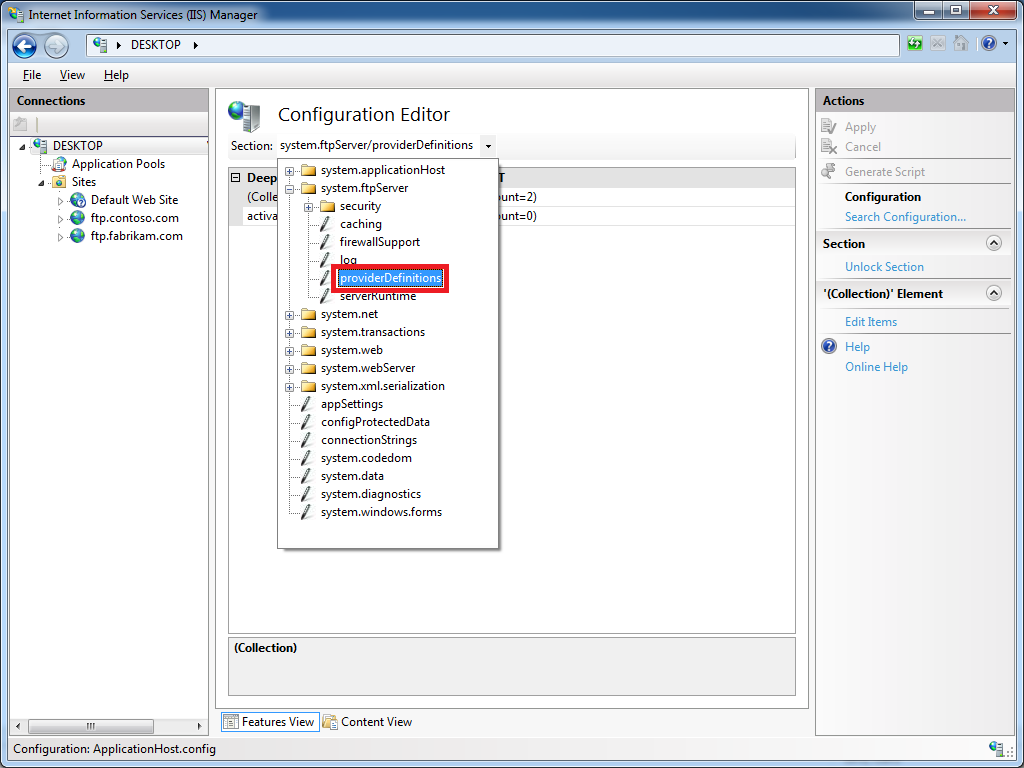
Step 2 - Click the Section drop-down menu, expand the the system.ftpServer collection, and then highlight the providerDefinitions node:
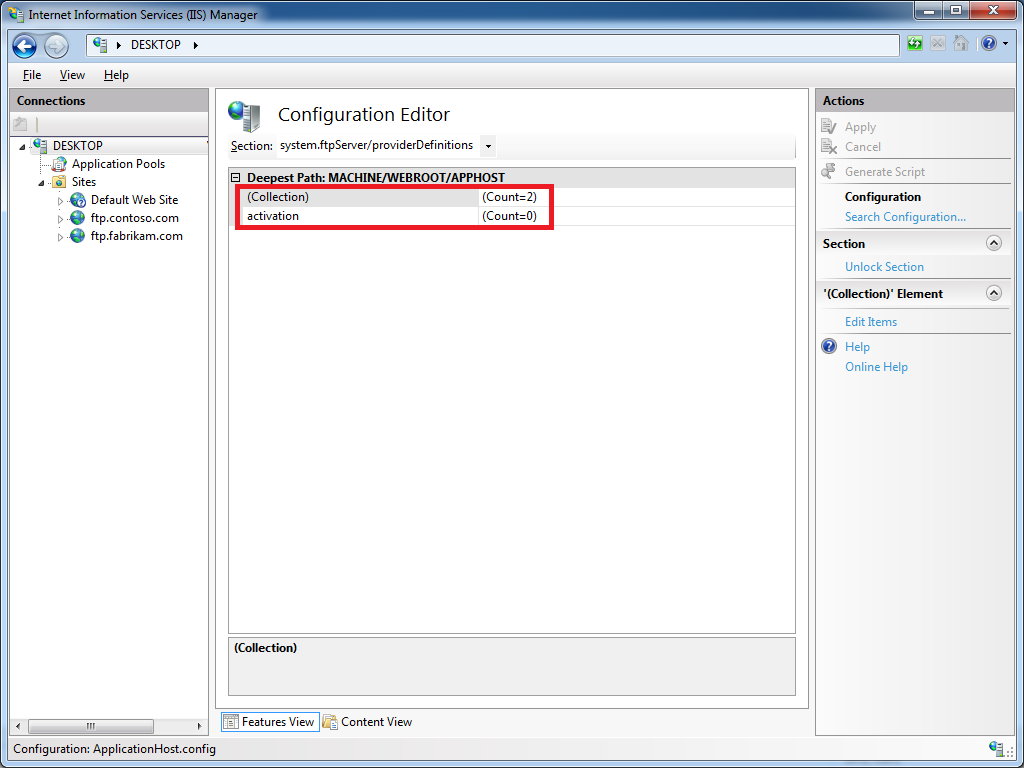
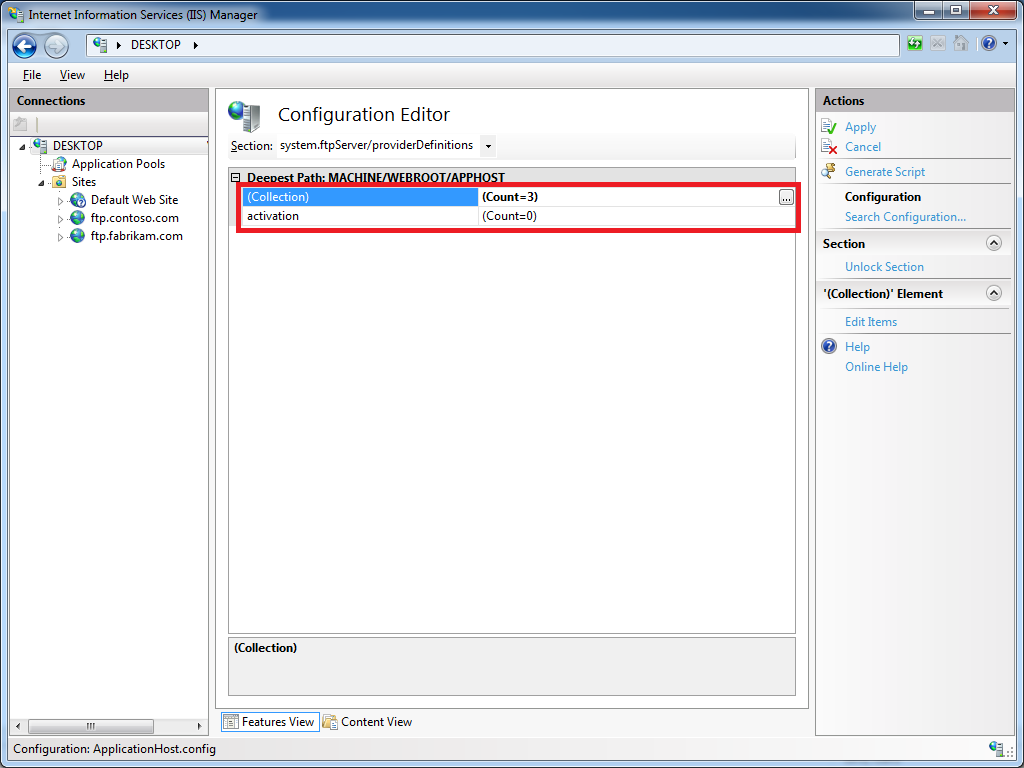
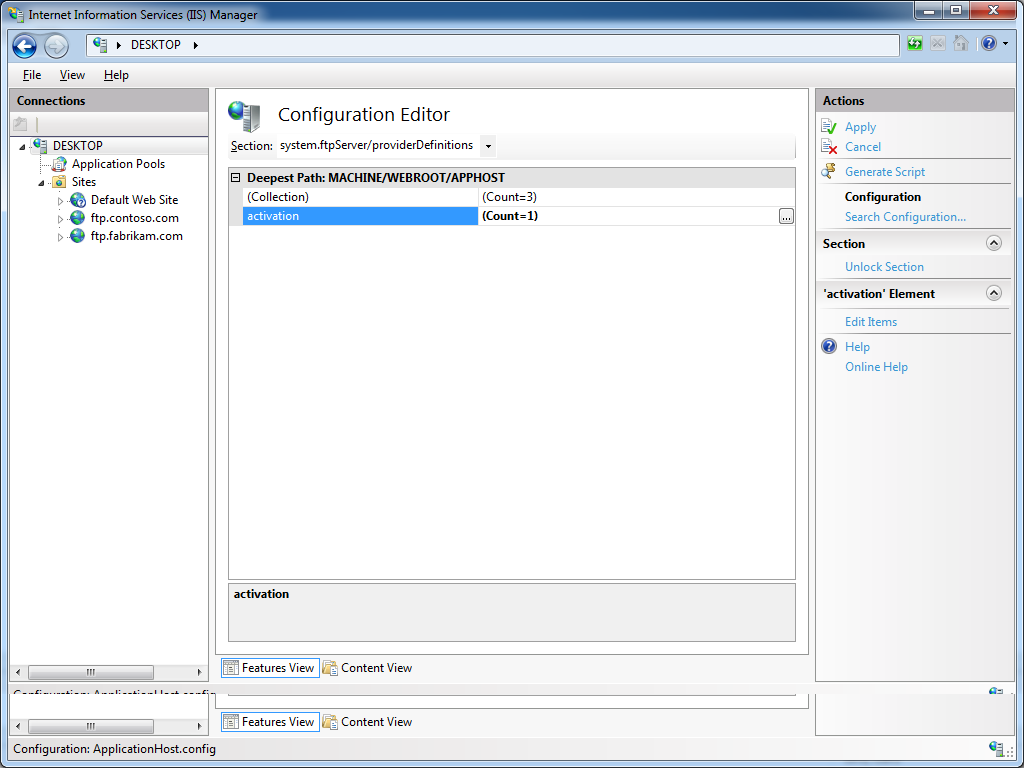
Step 3 - A default installation IIS with the FTP service should show a Count of 2 providers in the Collection row, and no settings in the activation row:
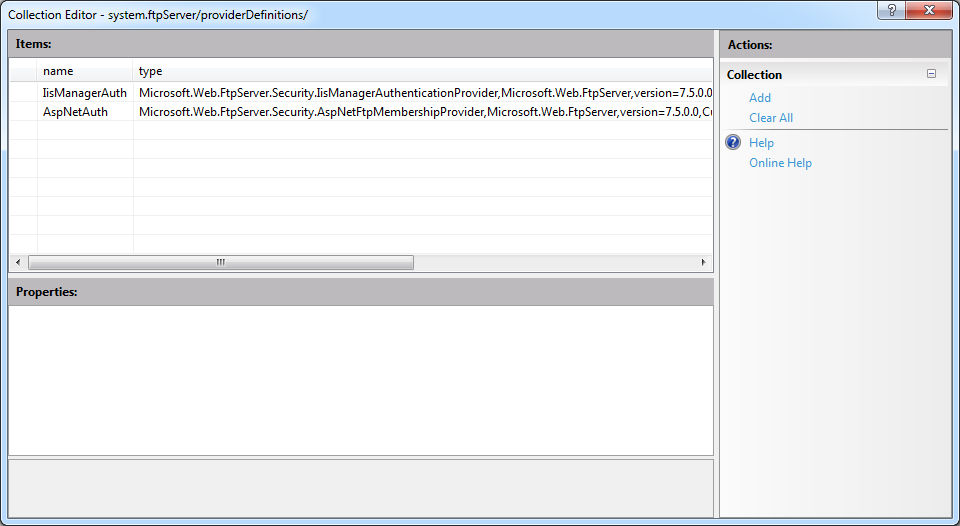
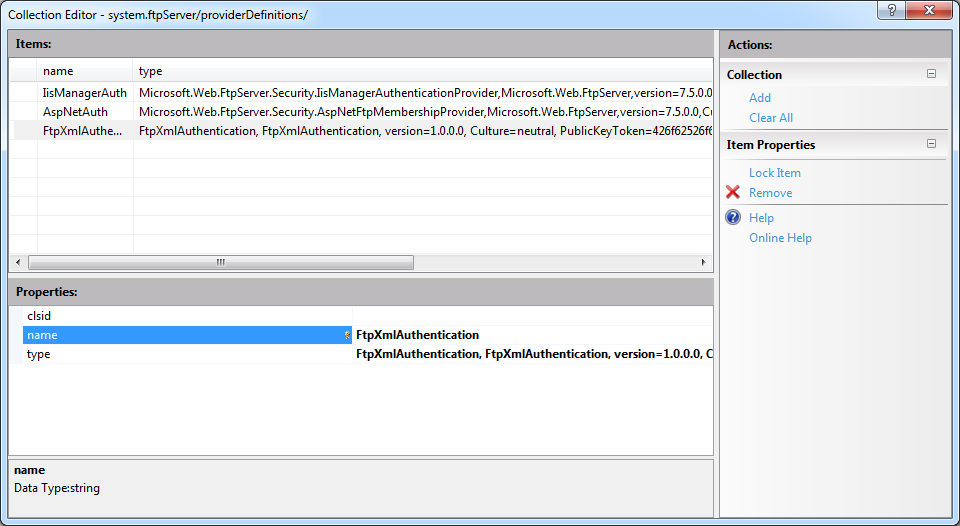
Step 4 - If you click on the Collection row, an ellipsis [...] will appear, and when you click that, IIS will display the Collection Editor dialog for FTP providers. By default you should see just the two built-in providers for the IisManagerAuth and AspNetAuth providers:
Step 5 - When you click Add in the Actions pane, you can enter the registration information for your provider. At a minimum you must provide a name for your provider, but you will need to enter either the clsid for a COM-based provider or the type for a managed-code provider:
Step 6 - When you close the Collection Editor dialog, the Count of providers in the Collection should now reflect the provider that we just added; click Apply in the Actions pane to save the changes:
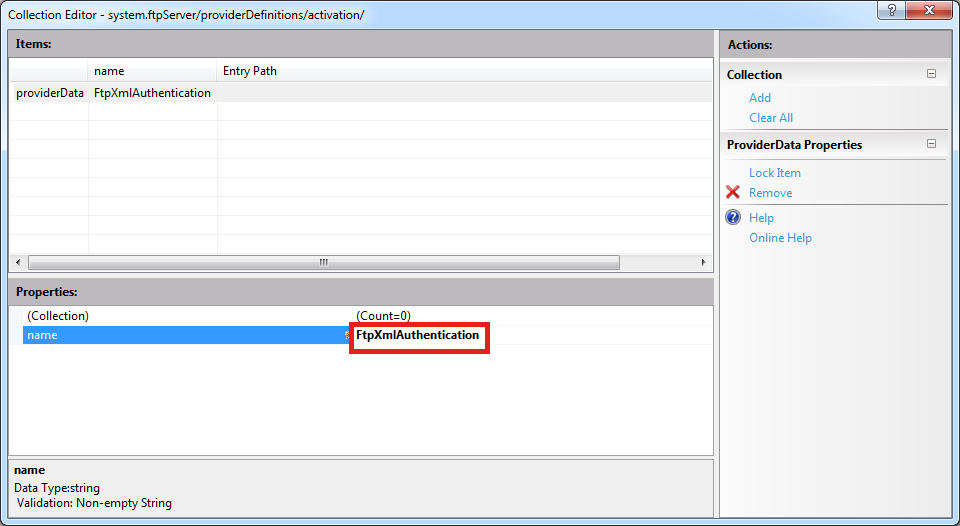
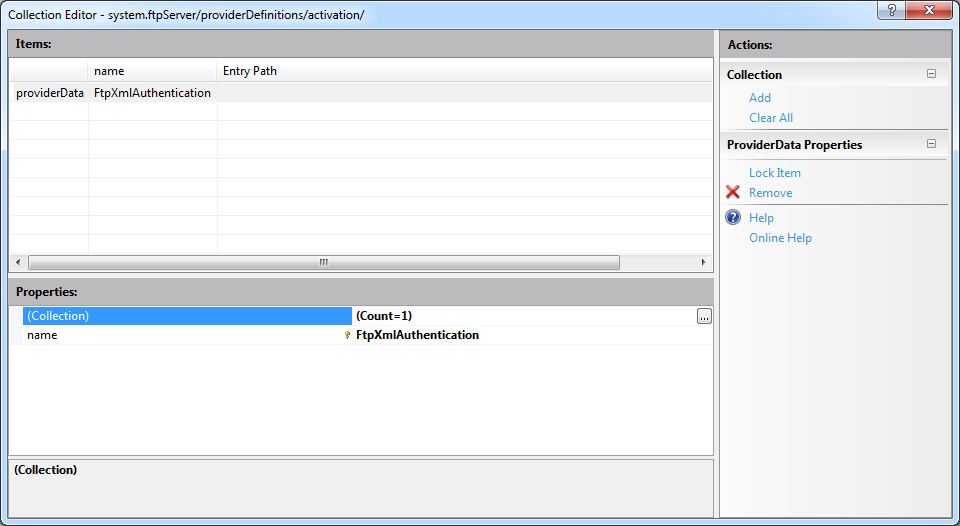
Step 7 - If you click on the activation row, an ellipsis [...] will appear, and when you click that, IIS will display the Collection Editor dialog for provider data; this is where you will enter provider-specific settings. When you click Add in the Actions pane, you must specify the name for your provider's settings, and this name must match the exact name that you provided in Step 5 earlier:
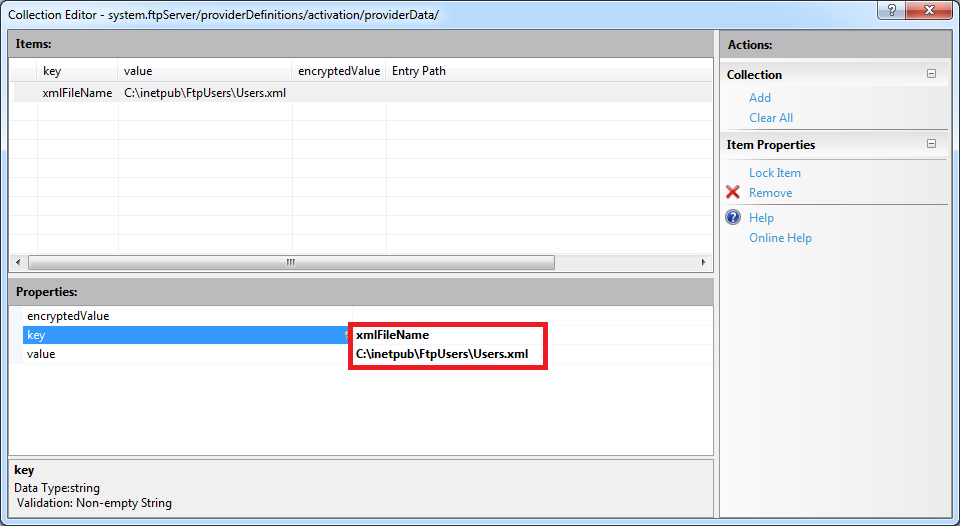
Step 8 - If you click on the Collection row, an ellipsis [...] will appear, and when you click that, IIS will display the Collection Editor dialog for the activation data for an FTP provider. At a minimum you must provide a key for your provider, which will depend on the settings that your provider expects to retrieve from your configuration settings. (For example, in the XML file that I provided earlier, my FtpXmlAuthorization provider expects to retrieve the path to an XML that contains a list of users, roles, and authorization rules.) You also need to enter the either the value or encryptedValue for your provider; although you can specify either setting, should generally specify the value when the settings are not sensitive in nature, and specify the encryptedValue for settings like usernames and passwords:
Step 9 - When you close the Collection Editor dialog for the activation data, the Count of key/value pairs in the Collection should now reflect the value that we just added:
Step 10 - When you close the Collection Editor dialog for the provider data, the Count of provider data settings in the activation row should now reflect the custom settings that we just added; click Apply in the Actions pane to save the changes:
That's all that there is to adding a custom FTP provider with provider-specific settings; I admit that it might seem like a lot of steps until you get the hang of it.
In the next blog for this series, I will show you how to add custom providers to FTP sites by using the IIS Configuration Editor.
Note: This blog was originally posted at http://blogs.msdn.com/robert_mcmurray/
Using Classic ASP and URL Rewrite for Dynamic SEO Functionality
31 December 2012 • by Bob • IIS, URL Rewrite, SEO, Classic ASP
I had another interesting situation present itself recently that I thought would make a good blog: how to use Classic ASP with the IIS URL Rewrite module to dynamically generate Robots.txt and Sitemap.xml files.
Overview
Here's the situation: I host a website for one of my family members, and like everyone else on the Internet, he wanted some better SEO rankings. We discussed a few things that he could do to improve his visibility with search engines, and one of the suggestions that I gave him was to keep his Robots.txt and Sitemap.xml files up-to-date. But there was an additional caveat - he uses two separate DNS names for the same website, and that presents a problem for absolute URLs in either of those files. Before anyone points out that it's usually not a good idea to host multiple DNS names on the same content, there are times when this is acceptable; for example, if you are trying to decide which of several DNS names is the best to use, you might want to bind each name to the same IP address and parse your logs to find out which address is getting the most traffic.
In any event, the syntax for both Robots.txt and Sitemap.xml files is pretty easy, so I wrote a couple of simple Classic ASP Robots.asp and Sitemap.asp pages that output the correct syntax and DNS-specific URLs for each domain name, and I wrote some simple URL Rewrite rules that rewrite inbound requests for Robots.txt and Sitemap.xml files to the ASP pages, while blocking direct access to the Classic ASP pages themselves.
All of that being said, there are a couple of quick things that I would like to mention before I get to the code:
- First of all, I chose Classic ASP for the files because it allows the code to run without having to load any additional framework; I could have used ASP.NET or PHP just as easily, but either of those would require additional overhead that isn't really required.
- Second, the specific website for which I wrote these specific examples consists of all static content that is updated a few times a month, so I wrote the example to parse the physical directory structure for the website's URLs and specified a weekly interval for search engines to revisit the website. All of these options can easily be changed; for example, I reused this code a little while later for a website where all of the content was created dynamically from a database, and I updated the code in the Sitemap.asp file to create the URLs from the dynamically-generated content. (That's really easy to do, but outside the scope of this blog.)
That being said, let's move on to the actual code.
Creating the Required Files
There are three files that you will need to create for this example:
- A Robots.asp file to which URL Rewrite will send requests for Robots.txt
- A Sitemap.asp file to which URL Rewrite will send requests for Sitemap.xml
- A Web.config file that contains the URL Rewrite rules
Step 1 - Creating the Robots.asp File
You need to save the following code sample as Robots.asp in the root of your website; this page will be executed whenever someone requests the Robots.txt file for your website. This example is very simple: it checks for the requested hostname and uses that to dynamically create the absolute URL for the website's Sitemap.xml file.
<%
    Option Explicit
    On Error Resume Next

    Dim strUrlRoot
    Dim strHttpHost
    Dim strUserAgent

    Response.Clear
    Response.Buffer = True
    Response.ContentType = "text/plain"
    Response.CacheControl = "public"

    Response.Write "# Robots.txt" & vbCrLf
    Response.Write "# For more information on this file see:" & vbCrLf
    Response.Write "# http://www.robotstxt.org/" & vbCrLf & vbCrLf

    strHttpHost = LCase(Request.ServerVariables("HTTP_HOST"))
    strUserAgent = LCase(Request.ServerVariables("HTTP_USER_AGENT"))
    strUrlRoot = "http://" & strHttpHost

    Response.Write "# Define the sitemap path" & vbCrLf
    Response.Write "Sitemap: " & strUrlRoot & "/sitemap.xml" & vbCrLf & vbCrLf

    Response.Write "# Make changes for all web spiders" & vbCrLf
    Response.Write "User-agent: *" & vbCrLf
    Response.Write "Allow: /" & vbCrLf
    Response.Write "Disallow: " & vbCrLf
    Response.End
%>
Step 2 - Creating the Sitemap.asp File
The following example file is also pretty simple, and you would save this code as Sitemap.asp in the root of your website. There is a section in the code where it loops through the file system looking for files with the *.html file extension and only creates URLs for those files. If you want other files included in your results, or you want to change the code from static to dynamic content, this is where you would need to update the file accordingly.
<%
    Option Explicit
    On Error Resume Next

    Response.Clear
    Response.Buffer = True
    Response.AddHeader "Connection", "Keep-Alive"
    Response.CacheControl = "public"

    Dim strFolderArray, lngFolderArray
    Dim strUrlRoot, strPhysicalRoot, strFormat
    Dim strUrlRelative, strExt

    Dim objFSO, objFolder, objFile

    strPhysicalRoot = Server.MapPath("/")
    Set objFSO = Server.CreateObject("Scripting.Filesystemobject")

    strUrlRoot = "http://" & Request.ServerVariables("HTTP_HOST")

    ' Check for XML or TXT format.
    If UCase(Trim(Request("format")))="XML" Then
        strFormat = "XML"
        Response.ContentType = "text/xml"
    Else
        strFormat = "TXT"
        Response.ContentType = "text/plain"
    End If

    ' Add the UTF-8 Byte Order Mark.
    Response.Write Chr(CByte("&hEF"))
    Response.Write Chr(CByte("&hBB"))
    Response.Write Chr(CByte("&hBF"))

    If strFormat = "XML" Then
        Response.Write "<?xml version=""1.0"" encoding=""UTF-8""?>" & vbCrLf
        Response.Write "<urlset xmlns=""http://www.sitemaps.org/schemas/sitemap/0.9"">" & vbCrLf
    End if

    ' Always output the root of the website.
    Call WriteUrl(strUrlRoot,Now,"weekly",strFormat)

    ' --------------------------------------------------
    ' This following section contains the logic to parse
    ' the directory tree and return URLs based on the
    ' static *.html files that it locates. This is where
    ' you would change the code for dynamic content.
    ' --------------------------------------------------
    strFolderArray = GetFolderTree(strPhysicalRoot)

    For lngFolderArray = 1 to UBound(strFolderArray)
        strUrlRelative = Replace(Mid(strFolderArray(lngFolderArray),Len(strPhysicalRoot)+1),"\","/")
        Set objFolder = objFSO.GetFolder(Server.MapPath("." & strUrlRelative))
        For Each objFile in objFolder.Files
            strExt = objFSO.GetExtensionName(objFile.Name)
            If StrComp(strExt,"html",vbTextCompare)=0 Then
                If StrComp(Left(objFile.Name,6),"google",vbTextCompare)<>0 Then
                    Call WriteUrl(strUrlRoot & strUrlRelative & "/" & objFile.Name, objFile.DateLastModified, "weekly", strFormat)
                End If
            End If
        Next
    Next

    ' --------------------------------------------------
    ' End of file system loop.
    ' --------------------------------------------------
    If strFormat = "XML" Then
        Response.Write "</urlset>"
    End If

    Response.End

    ' ======================================================================
    '
    ' Outputs a sitemap URL to the client in XML or TXT format.
    '
    ' tmpStrFreq = always|hourly|daily|weekly|monthly|yearly|never
    ' tmpStrFormat = TXT|XML
    '
    ' ======================================================================

    Sub WriteUrl(tmpStrUrl,tmpLastModified,tmpStrFreq,tmpStrFormat)
        On Error Resume Next
        Dim tmpDate : tmpDate = CDate(tmpLastModified)
        ' Check if the request is for XML or TXT and return the appropriate syntax.
        If tmpStrFormat = "XML" Then
            Response.Write " <url>" & vbCrLf
            Response.Write " <loc>" & Server.HtmlEncode(tmpStrUrl) & "</loc>" & vbCrLf
            Response.Write " <lastmod>" & Year(tmpLastModified) & "-" & Right("0" & Month(tmpLastModified),2) & "-" & Right("0" & Day(tmpLastModified),2) & "</lastmod>" & vbCrLf
            Response.Write " <changefreq>" & tmpStrFreq & "</changefreq>" & vbCrLf
            Response.Write " </url>" & vbCrLf
        Else
            Response.Write tmpStrUrl & vbCrLf
        End If
    End Sub

    ' ======================================================================
    '
    ' Returns a string array of folders under a root path
    '
    ' ======================================================================

    Function GetFolderTree(strBaseFolder)
        Dim tmpFolderCount,tmpBaseCount
        Dim tmpFolders()
        Dim tmpFSO,tmpFolder,tmpSubFolder
        ' Define the initial values for the folder counters.
        tmpFolderCount = 1
        tmpBaseCount = 0
        ' Dimension an array to hold the folder names.
        ReDim tmpFolders(1)
        ' Store the root folder in the array.
        tmpFolders(tmpFolderCount) = strBaseFolder
        ' Create file system object.
        Set tmpFSO = Server.CreateObject("Scripting.Filesystemobject")
        ' Loop while we still have folders to process.
        While tmpFolderCount <> tmpBaseCount
            ' Set up a folder object to a base folder.
            Set tmpFolder = tmpFSO.GetFolder(tmpFolders(tmpBaseCount+1))
              ' Loop through the collection of subfolders for the base folder.
            For Each tmpSubFolder In tmpFolder.SubFolders
                ' Increment the folder count.
                tmpFolderCount = tmpFolderCount + 1
                ' Increase the array size
                ReDim Preserve tmpFolders(tmpFolderCount)
                ' Store the folder name in the array.
                tmpFolders(tmpFolderCount) = tmpSubFolder.Path
            Next
            ' Increment the base folder counter.
            tmpBaseCount = tmpBaseCount + 1
        Wend
        GetFolderTree = tmpFolders
    End Function
%>
Note: There are two helper methods in the preceding example that I should call out:
- The GetFolderTree() function returns a string array of all the folders that are located under a root folder; you could remove that function if you were generating all of your URLs dynamically.
- The WriteUrl() function outputs an entry for the sitemap file in either XML or TXT format, depending on the file type that is in use. It also allows you to specify the frequency that the specific URL should be indexed (always, hourly, daily, weekly, monthly, yearly, or never).
Step 3 - Creating the Web.config File
The last step is to add the URL Rewrite rules to the Web.config file in the root of your website. The following example is a complete Web.config file, but you could merge the rules into your existing Web.config file if you have already created one for your website. These rules are pretty simple, they rewrite all inbound requests for Robots.txt to Robots.asp, and they rewrite all requests for Sitemap.xml to Sitemap.asp?format=XML and requests for Sitemap.txt to Sitemap.asp?format=TXT; this allows requests for both the XML-based and text-based sitemaps to work, even though the Robots.txt file contains the path to the XML file. The last part of the URL Rewrite syntax returns HTTP 404 errors if anyone tries to send direct requests for either the Robots.asp or Sitemap.asp files; this isn't absolutely necesary, but I like to mask what I'm doing from prying eyes. (I'm kind of geeky that way.)
<?xml version="1.0" encoding="UTF-8"?>
<configuration>
  <system.webServer>
    <rewrite>
      <rewriteMaps>
        <clear />
        <rewriteMap name="Static URL Rewrites">
          <add key="/robots.txt" value="/robots.asp" />
          <add key="/sitemap.xml" value="/sitemap.asp?format=XML" />
          <add key="/sitemap.txt" value="/sitemap.asp?format=TXT" />
        </rewriteMap>
        <rewriteMap name="Static URL Failures">
          <add key="/robots.asp" value="/" />
          <add key="/sitemap.asp" value="/" />
        </rewriteMap>
      </rewriteMaps>
      <rules>
        <clear />
        <rule name="Static URL Rewrites" patternSyntax="ECMAScript" stopProcessing="true">
          <match url=".*" ignoreCase="true" negate="false" />
          <conditions>
            <add input="{Static URL Rewrites:{REQUEST_URI}}" pattern="(.+)" />
          </conditions>
          <action type="Rewrite" url="{C:1}" appendQueryString="false" redirectType="Temporary" />
        </rule>
        <rule name="Static URL Failures" patternSyntax="ECMAScript" stopProcessing="true">
          <match url=".*" ignoreCase="true" negate="false" />
          <conditions>
            <add input="{Static URL Failures:{REQUEST_URI}}" pattern="(.+)" />
          </conditions>
          <action type="CustomResponse" statusCode="404" subStatusCode="0" />
        </rule>
        <rule name="Prevent rewriting for static files" patternSyntax="Wildcard" stopProcessing="true">
          <match url="*" />
          <conditions>
             <add input="{REQUEST_FILENAME}" matchType="IsFile" />
          </conditions>
          <action type="None" />
        </rule>
      </rules>
    </rewrite>
  </system.webServer>
</configuration>
Summary
That sums it up for this blog; I hope that you get some good ideas from it.
For more information about the syntax in Robots.txt and Sitemap.xml files, see the following URLs:
Note: This blog was originally posted at http://blogs.msdn.com/robert_mcmurray/
The New Look for IIS.NET
05 September 2012 • by Bob • IIS 8, IIS News Item, Windows Server 2012
Following up on today's public release of Microsoft Windows Server 2012 and Internet Information Services 8.0, you'll notice some big changes on the IIS.net website.
Over the past few months, we've been working hard with several partners to roll out a brand-new design for the IIS.net website that resembles more closely the look and feel of our websites for Microsoft Azure, Windows Server 2012, and Visual Studio 2012.
Windows Server 2012 and IIS 8 are now available!
04 September 2012 • by Bob • IIS News Item, Windows Server 2012, IIS 8
Microsoft has just released Windows Server 2012! You can find out more about this release on the Official Windows Server 2012 Launch Website (http://www.windows-server-launch.com).
In tandem with the release of Windows Server 2012, the IIS team is happy to announce the general availability of Internet Information Services 8.0 This new version of IIS offers a wealth of new features and improvements, and here are just a few of the enhancements that you can expect in IIS 8.0: Application Initialization, Dynamic IP Address Restrictions, Centralized SSL Certificate Store, CPU Throttling, FTP Logon Attempt Restrictions, Server Name Indication (SNI) Support, Improved SSL and Configuration Scalability, support for Multicore Scaling on NUMA Hardware, and more! Additional information about IIS 8.0 is available in the "What's New in IIS 8.0 for Windows 8?" web page.
If you'd like to try IIS 8.0 for yourself, you can download the evaluation version and start experimenting today!
Note: This blog was originally posted at http://blogs.msdn.com/robert_mcmurray/
Video: What's New with Internet Information Services (IIS) 8: Performance, Scalability, and Security Features
01 September 2012 • by Bob • FTP, IIS, Windows
The folks in the TechEd group have uploaded the video from my "What's New with Internet Information Services (IIS) 8: Performance, Scalability, and Security Features" presentation to YouTube, so you can view the video online.
You can also download the slides and the WMV/MP4 for my presentation at the following URL:
http://channel9.msdn.com/Events/TechEd/NorthAmerica/2012/WSV332
One quick side note: around 38:55 during the video, I had just asked the audience if anyone had used the IIS Configuration Editor, when a tremendous thunderclap resounded outside - this prompted a great laugh from audience members. After the presentation had ended, a couple people came up and jokingly asked how I had managed to stage that so well.
![]()
