Error 0x80070005 When Calling the FTP FlushLog Method
31 January 2014 • by Bob • FTP, Extensibility
I had an interesting question earlier today which I thought was worth sharing. One of my coworkers was trying to use the code sample from my Programmatically Flushing FTP Logs blog, and he was getting the following error:
Unhandled Exception: System.UnauthorizedAccessException: Access is denied. (Exception from HRESULT: 0x80070005 (E_ACCESSDENIED))
at Microsoft.Web.Administration.Interop.IAppHostMethodInstance.Execute()
at Sample.Main() in c:\Projects\FtpTests\Program.cs:line 25
I knew that the code sample in my blog worked perfectly when I originally wrote it, so I figured that my coworker must be doing something wrong. (And every developer has said "It works on my computer..." at one time or other.) But I decided to give him the benefit of the doubt, so I copied the source code from my blog into a new Visual Studio project and I ran it.
Much to my surprise, I saw the same error that my coworker was seeing if I didn't step the code through with a debugger.
When I stepped through the code in a debugger, I saw the following error message:
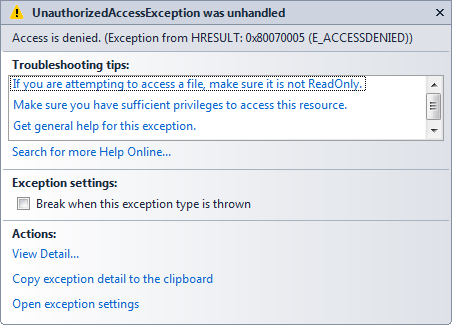
At this point I was thinking, "What the heck? I know this code was working before..." I started to wonder if we had released a breaking change to the FTP service sometime during the past two years, but then it suddenly dawned on me: I hadn't started the FTP service on my computer.
[Duh.]
That was the source of the problem: I usually have the FTP service configured for manual startup on my development computers, but the FTP methods to start and stop FTP sites and flush the FTP logs do not work when the FTP service is not running. Once both of us started the FTP service on each of our systems the problem went away.
I hope this helps. ;-]
Note: This blog was originally posted at http://blogs.msdn.com/robert_mcmurray/
Custom Post-Build Events for Compiling FTP Providers
26 October 2013 • by Bob • Extensibility, FTP, Visual Studio
I've written a lot of walkthroughs and blog posts about creating custom FTP providers over the past several years, and I usually include instructions like the following example for adding a custom post-build event that will automatically register your extensibility provider in the Global Assembly Cache (GAC) on your development computer:
- Click Project, and then click the menu item your project's properties.
- Click the Build Events tab.
- Enter the following in the Post-build event command line dialog box:
net stop ftpsvc
call "%VS100COMNTOOLS%\vsvars32.bat">nul
gacutil.exe /if "$(TargetPath)"
net start ftpsvc
And I usually include instructions like the following example for determining the assembly information for your extensibility provider:
- In Windows Explorer, open your "C:\Windows\assembly" path, where C: is your operating system drive.
- Locate the FtpXmlAuthorization assembly.
- Right-click the assembly, and then click Properties.
- Copy the Culture value; for example: Neutral.
- Copy the Version number; for example: 1.0.0.0.
- Copy the Public Key Token value; for example: 426f62526f636b73.
- Click Cancel.
Over time I have changed the custom post-build event that I use when I am creating custom FTP providers, and my changes make it easier to register custom FTP providers. With that in mind, I thought that my changes would make a good blog subject.
First of all, if you take a look at my How to Use Managed Code (C#) to Create a Simple FTP Authentication Provider walkthrough, you will see that I include instructions like my earlier examples to create a custom post-build event and retrieve the assembly information for your extensibility provider.
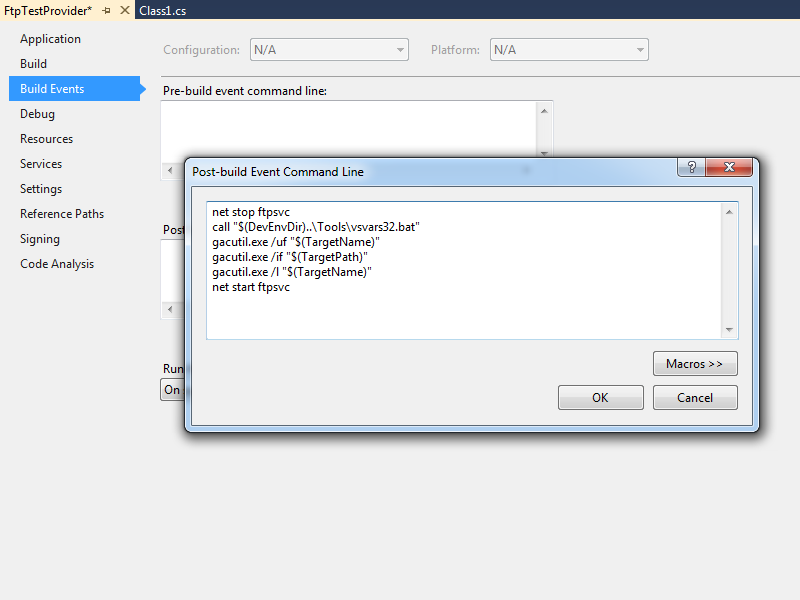
That being said, instead of using the custom post-build event in that walkthrough, I have started using the following custom post-build event:
net stop ftpsvc
call "$(DevEnvDir)..\Tools\vsvars32.bat"
gacutil.exe /uf "$(TargetName)"
gacutil.exe /if "$(TargetPath)"
gacutil.exe /l "$(TargetName)"
net start ftpsvc
This script should resemble the following example when entered into Visual Studio:
This updated script performs the following actions:
- Stops the FTP service (this will allow any copies of your DLL to unload)
- Loads the Visual Studio environment variables (this will add gacutil.exe to the path)
- Calls gacutil.exe to forcibly unregister any previous version of your FTP provider
- Calls gacutil.exe to forcibly register the newly-compiled version of your FTP provider
- Calls gacutil.exe to list the GAC information for your FTP provider (this will be used to register your DLL with IIS)
- Starts the FTP service
Let's say that you created a simple FTP authentication provider which contained code like the following example:
using System;
using System.Text;
using Microsoft.Web.FtpServer;

public class FtpTestProvider :
    BaseProvider,
    IFtpAuthenticationProvider
{
    private string _username = "test";
    private string _password = "password";

    public bool AuthenticateUser(
        string sessionId,
        string siteName,
        string userName,
        string userPassword,
        out string canonicalUserName)
    {
        canonicalUserName = userName;
        if (((userName.Equals(_username,
            StringComparison.OrdinalIgnoreCase)) == true) &&
            userPassword == _password)
        {
            return true;
        }
        else
        {
            return false;
        }
    }
}
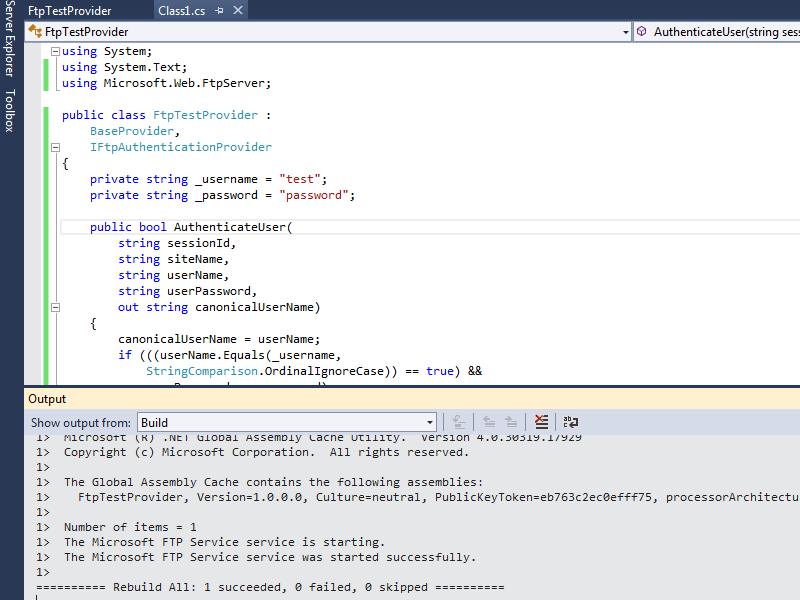
When you compile your provider in Visual Studio, the output window should show the results of the custom post-build event:
When you examine the output information in detail, the highlighted area in the example below should be of particular interest, because it contains the assembly information for your extensibility provider:
------ Rebuild All started: Project: FtpTestProvider, Configuration: Debug Any CPU ------
FtpTestProvider -> c:\users\foobar\documents\visual studio 2012\Projects\FtpTestProvider\bin\Debug\FtpTestProvider.dll
The Microsoft FTP Service service is stopping..
The Microsoft FTP Service service was stopped successfully.

Microsoft (R) .NET Global Assembly Cache Utility. Version 4.0.30319.17929
Copyright (c) Microsoft Corporation. All rights reserved.

Assembly successfully added to the cache
Microsoft (R) .NET Global Assembly Cache Utility. Version 4.0.30319.17929
Copyright (c) Microsoft Corporation. All rights reserved.

The Global Assembly Cache contains the following assemblies:
FtpTestProvider, Version=1.0.0.0, Culture=neutral, PublicKeyToken=eb763c2ec0efff75, processorArchitecture=MSIL

Number of items = 1
The Microsoft FTP Service service is starting.
The Microsoft FTP Service service was started successfully.

========== Rebuild All: 1 succeeded, 0 failed, 0 skipped ==========
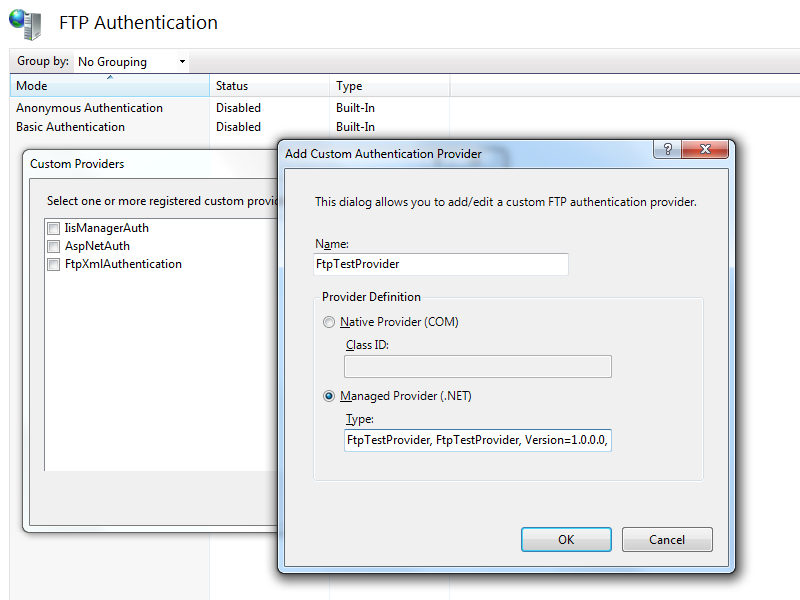
Once you have that information, you simply need to reformat it as "FtpTestProvider, FtpTestProvider, Version=1.0.0.0, Culture=neutral, PublicKeyToken=eb763c2ec0efff75" in order to enter it into the FTP Custom Authentication Providers dialog box in the IIS Manager, or by following the steps in my FTP Walkthroughs or my Adding Custom FTP Providers with the IIS Configuration Editor blogs.
That wraps it up for today's post. As always, let me know if you have any questions. ;-]
Note: This blog was originally posted at http://blogs.msdn.com/robert_mcmurray/
IntelliSense for jQuery in WebMatrix
28 June 2013 • by Bob • Scripting, WebMatrix
I recently had the opportunity to take a day-long class about jQuery from the good folks at Wintellect. The class went great, and I wrote all of my code for the class in WebMatrix. You might recall from my previous blogs that I am a big fan of WebMatrix, but at first there was one thing that was missing from WebMatrix's arsenal of cool features; in order for WebMatrix to really be useful as an editor for jQuery, I really wanted to have IntelliSense support for jQuery. Thankfully, even though IntelliSense support for jQuery is not built-in, adding IntelliSense for jQuery is extremely easy, and I thought that would make a great subject for today's blog.
To start things off, let's take a look at a jQuery sample that is little more than a Hello World sample:
<!DOCTYPE html>
<html lang="en">
    <head>
        <meta charset="utf-8" />
        <title>jQuery Test Page</title>
    </head>
    <body>
        <script src="http://ajax.microsoft.com/ajax/jQuery/jquery-2.0.0.min.js" type="text/javascript"></script>
        <script>
        $(function() {
           $("#bar").text($("#foo").text());
           $("#foo").text("This is some custom text");
        });
        </script>
        <h1 id="foo">This is the first line</h1>
        <h2 id="bar">This is the second line</h2>
    </body>
</html>
This example does very little: it loads the jQuery library from Microsoft's AJAX Content Delivery Network (CDN), and it uses jQuery to replace the text in a couple of HTML tags. (The example isn't really important - getting IntelliSense to work is the topic du jour.) This sample would look like the following illustration if you opened it in WebMatrix 3:
When you are using a JavaScript library for which there is no built-in support, Microsoft's developer tools allow you to add IntelliSense support by adding Reference Directives to your page, and the files that you would use for your reference directives are available at the same Microsoft CDN where you can get the jQuery library:
http://www.asp.net/ajaxlibrary/cdn.ashx
In order to use IntelliSense for jQuery, you need to download the appropriate jquery-n.n.n-vsdoc.js file for the version of jQuery that you are using and store that in your website. For example, if you are using jQuery version 2.0.0, you would add a script reference to the CDN path for http://ajax.aspnetcdn.com/ajax/jQuery/jquery-2.0.0.min.js, and you would download the http://ajax.aspnetcdn.com/ajax/jQuery/jquery-2.0.0-vsdoc.js file for your website.
Like many developers, I usually add a folder named scripts in the root of my website, and this is where I will typically store the jquery-n.n.n-vsdoc.js file that I am using. Once you have added the appropriate jquery-n.n.n-vsdoc.js file to your website, all that you need to do is add the appropriate reference directive to your script, as I demonstrate in the highlighted section of the following code sample:
<!DOCTYPE html>
<html lang="en">
    <head>
        <meta charset="utf-8" />
        <title>jQuery Test Page</title>
    </head>
    <body>
        <script src="http://ajax.microsoft.com/ajax/jQuery/jquery-2.0.0.min.js" type="text/javascript"></script>
        <script>
        /// <reference path="scripts/jquery-2.0.0-vsdoc.js" />
        $(function() {
           $("#bar").text($("#foo").text());
           $("#foo").text("This is some custom text");
        });
        </script>
        <h1 id="foo">This is the first line</h1>
        <h2 id="bar">This is the second line</h2>
    </body>
</html>
Once you have added the reference directive for your jquery-n.n.n-vsdoc.js file, IntelliSense will begin working for jQuery in WebMatrix, as shown in the following illustration:
In Closing...
One last thing that I would like to mention is that is always a good idea to load JavaScript libraries like jQuery from a CDN, and there are lots of CDNs to choose from. There are some additional steps that you can take to ensure that your website works with jQuery even if the CDN is down, but that subject is outside the scope of this blog. ;-]
Note: This blog was originally posted at http://blogs.msdn.com/robert_mcmurray/
Adding Custom FTP Providers with the IIS Configuration Editor - Part 2
02 May 2013 • by Bob • IIS, FTP, Extensibility
In Part 1 of this blog series about adding custom FTP providers with the IIS Configuration Editor, I showed you how to add a custom FTP provider with a custom setting for the provider that is stored in your IIS configuration settings. For my examples, I showed how to do this by using both the AppCmd.exe application from a command line and by using the IIS Configuration Editor. In part 2 of this blog series, I will show you how to use the IIS Configuration Editor to add custom FTP providers to your FTP sites.
As a brief review from Part 1, the following XML excerpt illustrates what the provider's settings should resemble when added to your IIS settings:
<system.ftpServer>
   <providerDefinitions>
     <add name="FtpXmlAuthorization"
       type="FtpXmlAuthorization, FtpXmlAuthorization, version=1.0.0.0, Culture=neutral, PublicKeyToken=426f62526f636b73" />
     <activation>
       <providerData name="FtpXmlAuthorization">
         <add key="xmlFileName"
           value="C:\inetpub\FtpUsers\Users.xml" />
       </providerData>
     </activation>
   </providerDefinitions>
 </system.ftpServer>
The above example shows the settings that are added globally to register an FTP provider. Note that this example only contains the settings for my custom provider; you would normally see the settings for the IisManagerAuth and AspNetAuth providers that ship with the FTP service in the providerDefinitions collection.
To actually use a provider for an FTP site, you would need to add the provider to the settings for the FTP site in your IIS settings. So for part 2 of this blog series, we will focus on how to add a custom provider to an FTP site by using the IIS Configuration Editor.
Having said all of that, the rest of this blog is broken down into the following sections:
- Step 1 - Looking at the configuration settings for custom FTP providers
- Step 2 - Navigate to an FTP Site in the Configuration Editor
- Step 3 - Add custom FTP providers to an FTP site
- Summary and Parting Thoughts
Before continuing, I should reiterate that custom FTP providers fall into two categories: providers that are used for authentication and providers that are used for everything else. This distinction is important, because the settings are stored in different sections of your IIS settings. With that in mind, let's take a look at the settings for an example FTP site.
Step 1 - Looking at the configuration settings for custom FTP providers
The following example shows an FTP site with several custom FTP providers added:
<site name="ftp.contoso.com" id="2">
   <application path="/">
     <virtualDirectory path="/"
       physicalPath="c:\inetpub\www.contoso.com\wwwroot" />
   </application>
   <bindings>
     <binding protocol="ftp"
       bindingInformation="*:21:ftp.contoso.com" />
   </bindings>
   <ftpServer>
     <security>
       <ssl controlChannelPolicy="SslAllow"
         dataChannelPolicy="SslAllow" />
       <authentication>
         <customAuthentication>
           <providers>
             <add name="MyCustomFtpAuthenticationProvider" />
           </providers>
         </customAuthentication>
       </authentication>
     </security>
     <customFeatures>
       <providers>
         <add name="MyCustomFtpHomeDirectoryProvider" />
         <add name="MyCustomFtpLoggingProvider" />
       </providers>
     </customFeatures>
     <userIsolation mode="Custom" />
   </ftpServer>
 </site>
If you look at the above example, you will notice the following providers have been added:
- A custom FTP authentication provider named MyCustomFtpAuthenticationProvider has been added to the ftpServer/security/authentication/customAuthentication/providers collection; this provider will obviously be used by the FTP service to validate usernames and passwords.
- A custom FTP home directory provider named MyCustomFtpHomeDirectoryProvider has been added to the ftpServer/customFeatures/providers collection; this will be used by the FTP service for custom user isolation. Note the mode for the userIsolation element is set to custom.
- A custom FTP logging provider named MyCustomFtpLoggingProvider has been added to the ftpServer/customFeatures/providers collection; this will be used by the FTP service for creating custom log files.
As I mentioned earlier, you will notice that the settings for FTP custom providers are stored in different sections of the ftpServer collection depending on whether they are used for authentication or some other purpose.
Step 2 - Navigate to an FTP Site in the Configuration Editor
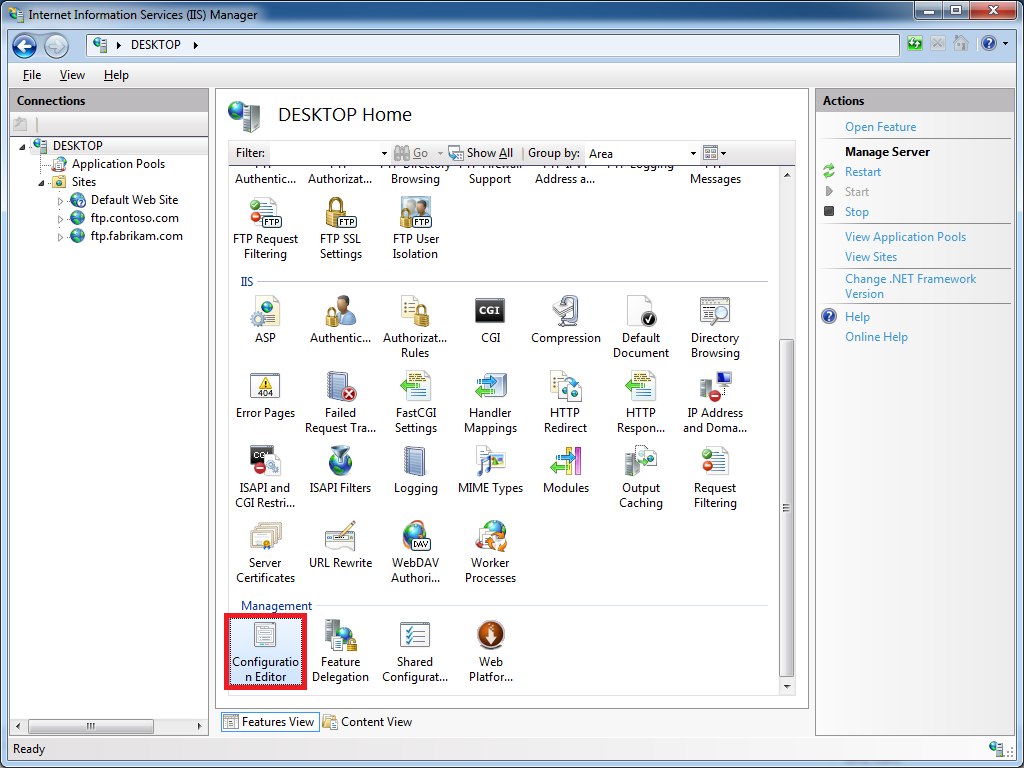
Open the IIS Manager and click on the Configuration Editor at feature the server level:
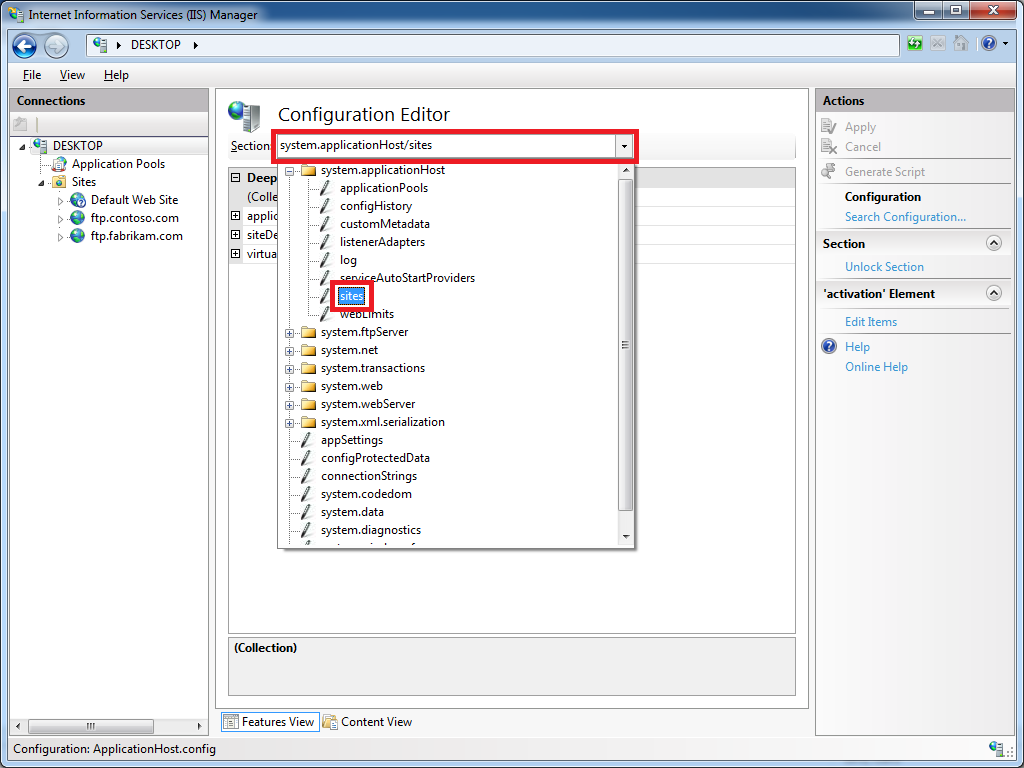
Click the Section drop-down menu, expand the the system.applicationHost collection, and then highlight the sites node:
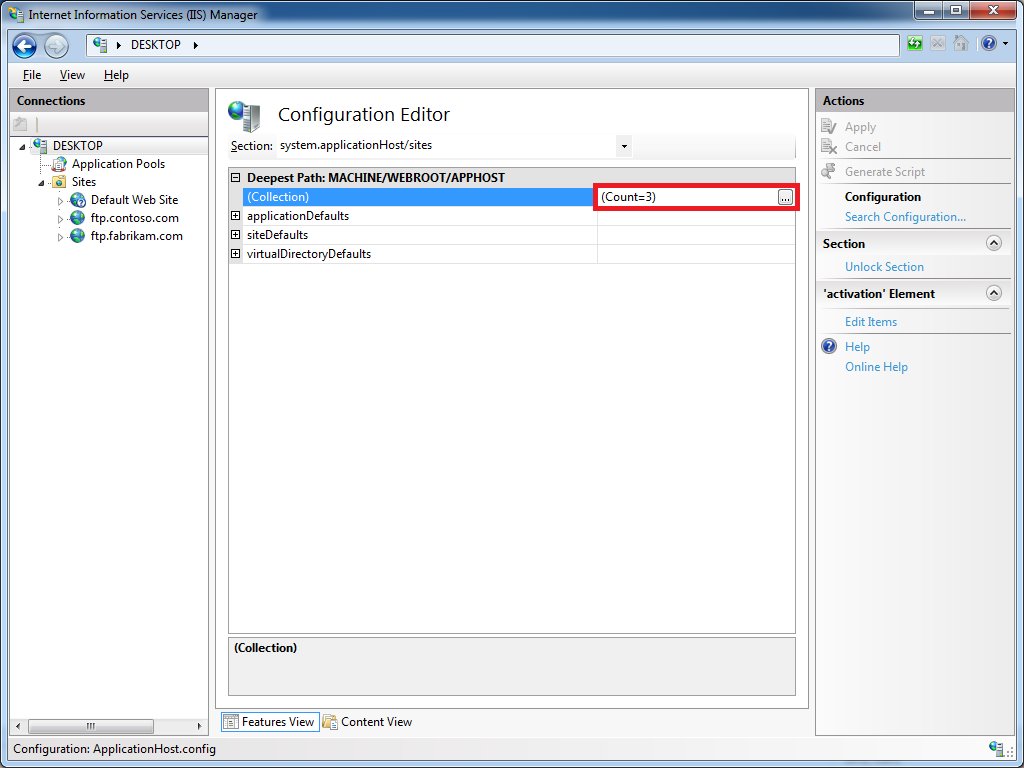
If you click on the Collection row, an ellipsis [...] will appear:
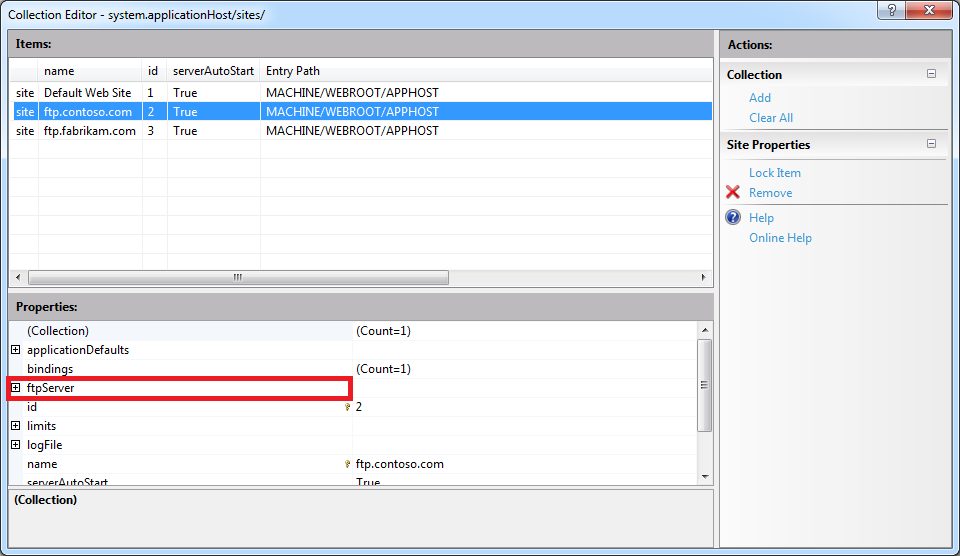
When you click the ellipsis [...], IIS will display the Collection Editor dialog box for your sites; both HTTP and FTP sites will be displayed:
Expand the ftpServer node, which is where all of the site-level settings for an FTP site are kept.
Step 3 - Add custom FTP providers to an FTP site
As I mentioned earlier, custom FTP providers fall into two categories: providers that are used for authentication and everything else. Because of this distinction, the following steps show you how to add a provider to the correct section of your settings depending on the provider's purpose.
Add a custom FTP provider to an FTP site that is not used for authentication
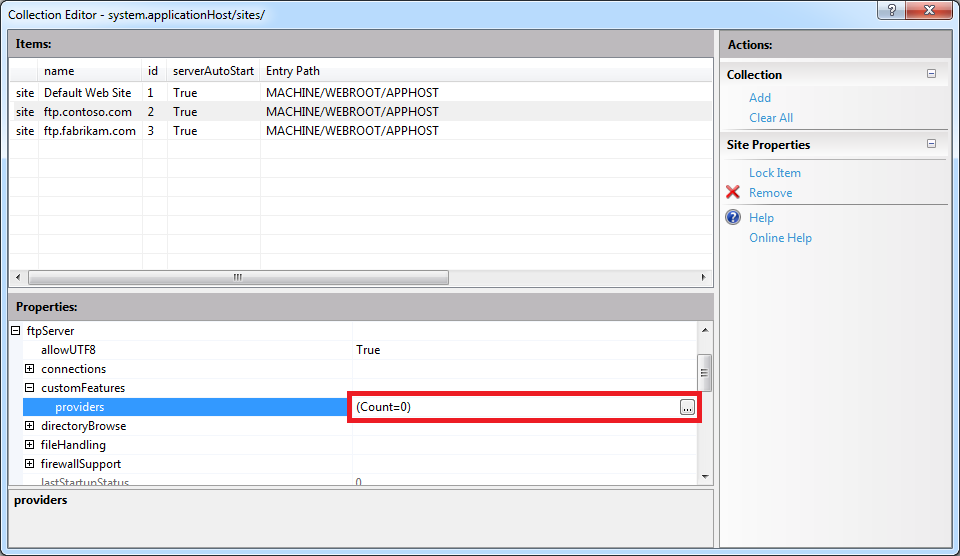
Expand the customFeatures node, which is located under the ftpServer node for an FTP site; this collection defines the custom providers for an FTP site that are not used for authentication, for example: home directory providers, logging providers, etc. When you highlight the providers row, an ellipsis [...] will appear:
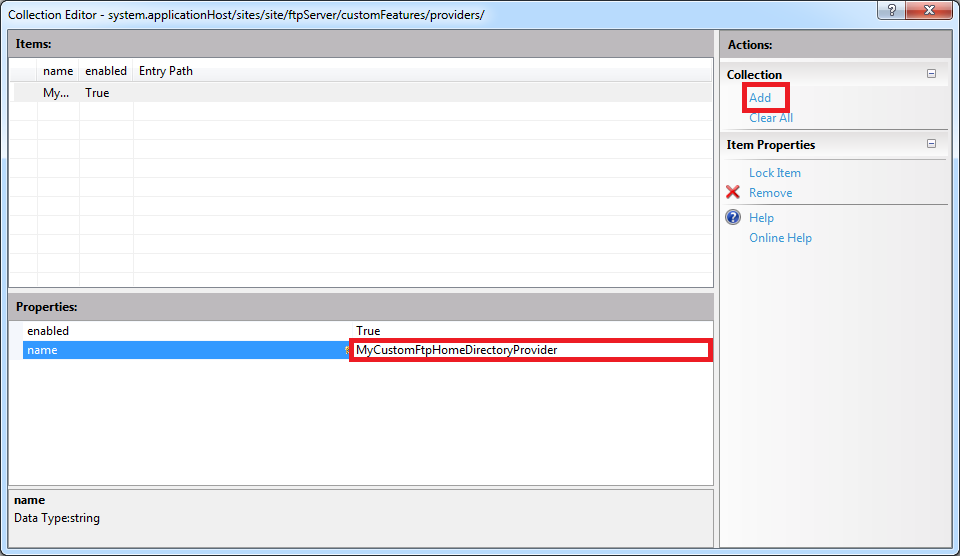
When you click the ellipsis [...], IIS will display the Collection Editor dialog box for your custom features (providers). When you click Add in the Actions pane, you need to enter the name of an FTP provider that you entered by following the instructions in Part 1 of this blog series:
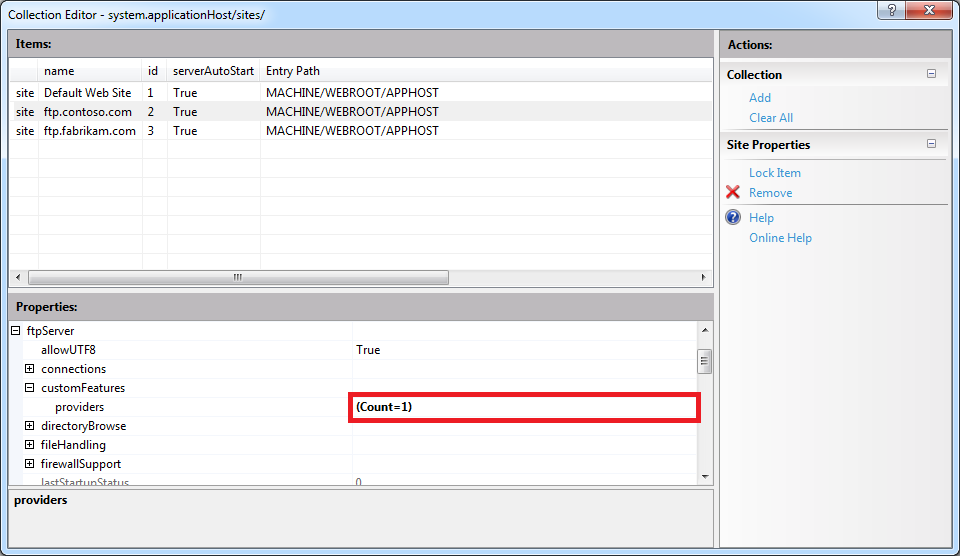
Once you enter the name of your FTP provider in the Collection Editor dialog box for your custom features, you can close that dialog box. The Collection Editor for your sites will reflect the updated provider count for your FTP site:
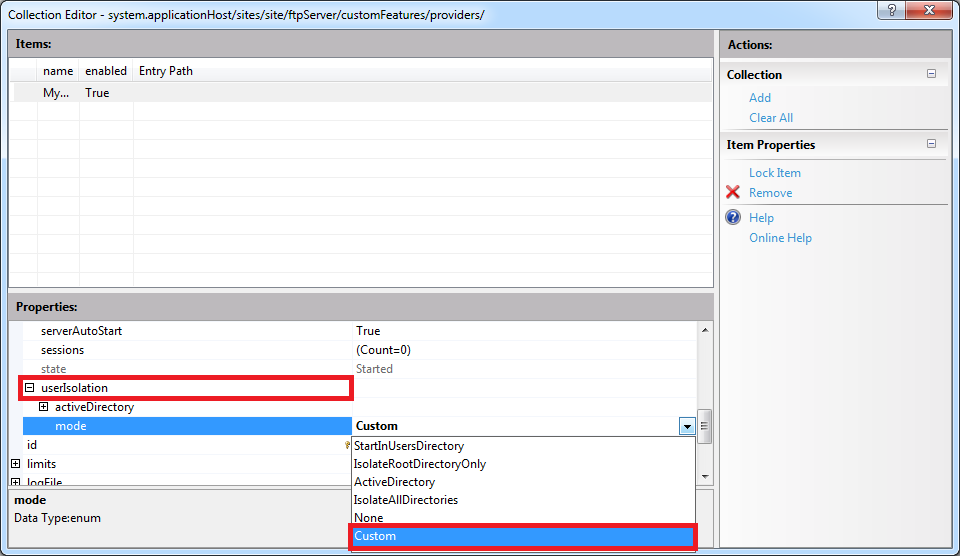
Important Note: If you are adding a custom FTP Home Directory Provider, you have to configure the mode for FTP's User Isolation features. To do so, you need to expand the userIsolation node, which is located under the ftpServer node for an FTP site. Once you have done so, click the mode drop-down menu and choose Custom from the list of choices:
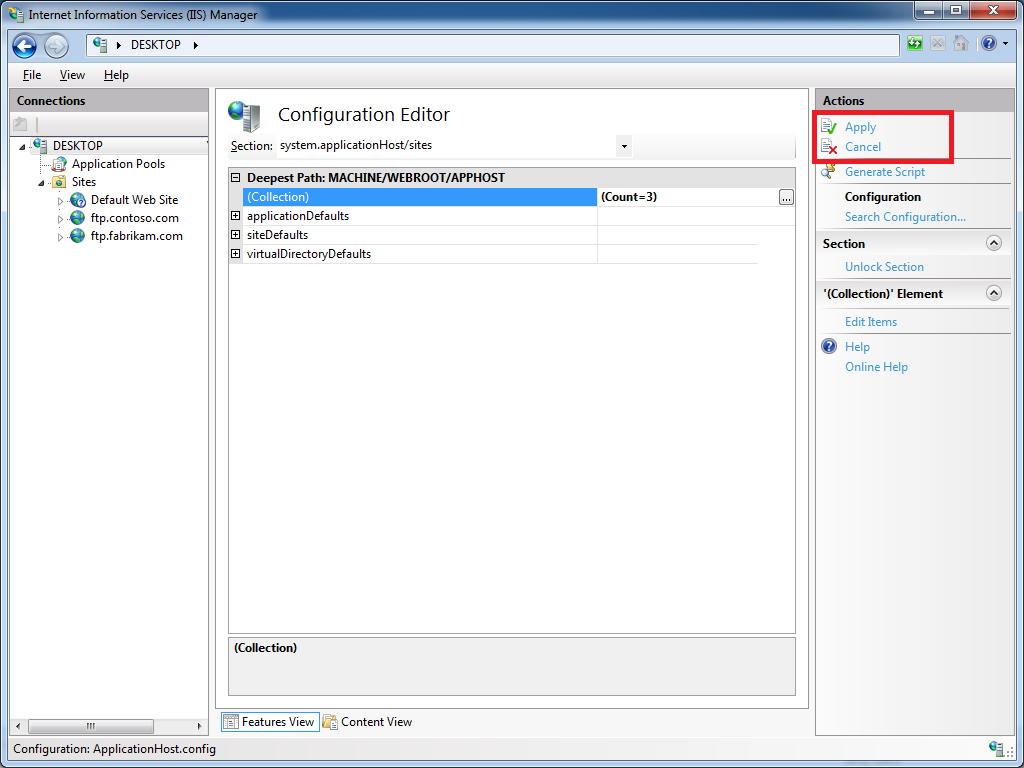
When you close the Collection Editor dialog box for your sites, you need to click Apply in the Actions pane to commit the changes to your IIS settings:
Add a custom FTP authentication provider to an FTP site
First and foremost - there is built-in support for adding custom authentication providers in IIS Manager; to see the steps to do so, see the FTP Custom Authentication <customAuthentication> article on the IIS.NET website. However, if you want to add a custom FTP authentication provider to an FTP site by using the IIS Configuration Editor, you can do so by using the following steps.
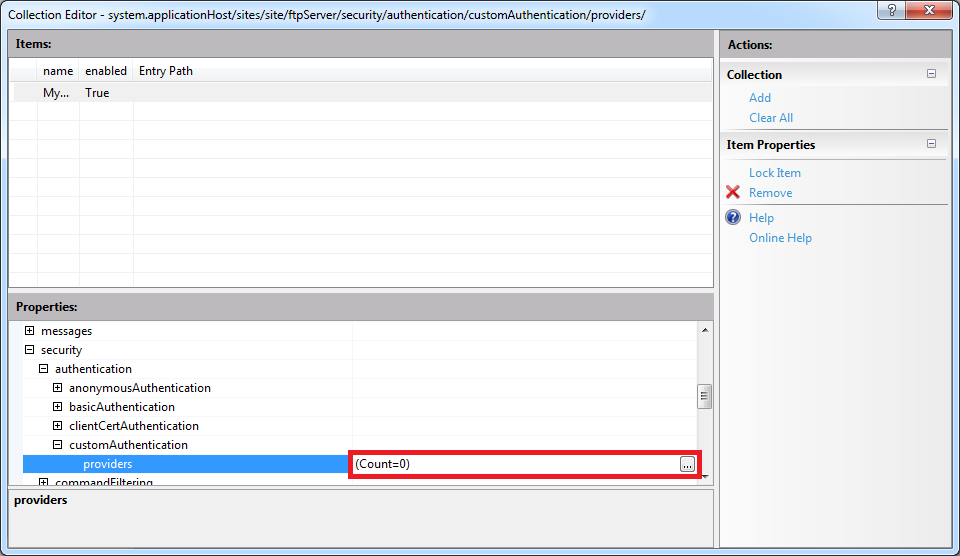
Expand the security node under the ftpServer node for an FTP site, then expand the authentication node, and then expand the customAuthentication node; this collection defines the custom authentication providers for an FTP site. When you highlight the providers row, an ellipsis [...] will appear:
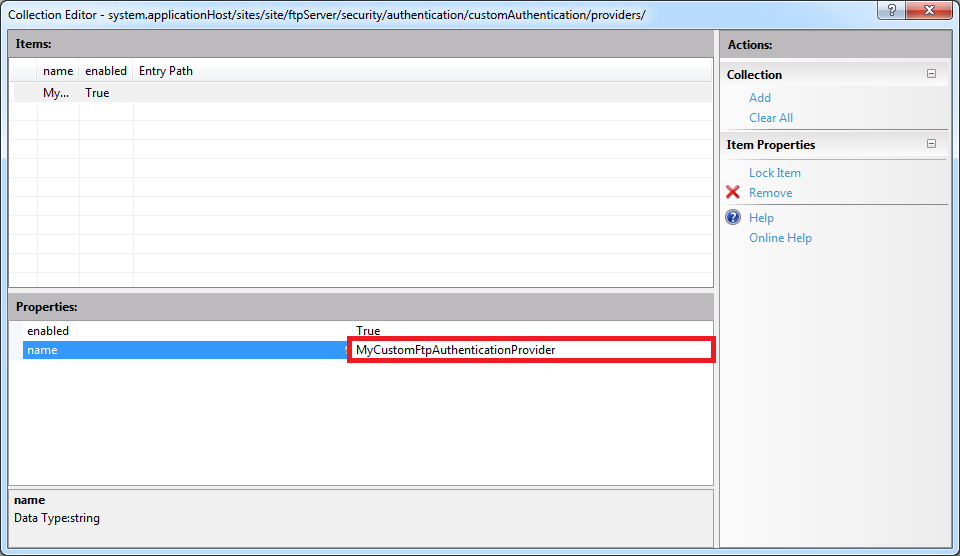
When you click the ellipsis [...], IIS will display the Collection Editor dialog box for your custom authentication providers. When you click Add in the Actions pane, you need to enter the name of an FTP authentication provider that you entered by following the instructions in Part 1 of this blog series:
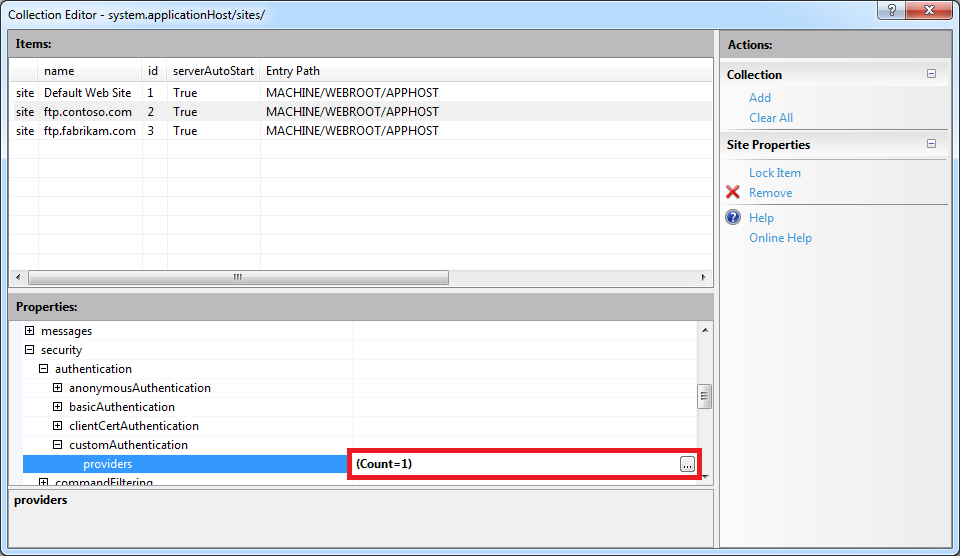
Once you enter the name of your FTP authentication provider in the Collection Editor dialog box for your custom authentication providers, you can close that dialog box. The Collection Editor for your sites will reflect the updated authentication provider count for your FTP site:
When you close the Collection Editor dialog box for your sites, you need to click Apply in the Actions pane to commit the changes to your IIS settings:
Summary and Parting Thoughts
As I mentioned in part 1 of this series, I admit that this might seem like a lot of steps to go through, but it's not that difficult once you understand how the configuration settings are organized and you get the hang of using the IIS Configuration Editor to add or modify these settings.
Disabling Custom User Isolation
In the Add a custom FTP provider to an FTP site that is not used for authentication section of this blog, I added a step to specify Custom as the User Isolation mode. Since this is something of an advanced feature, there is no user interface for enabling custom user isolation; this was a design decision to keep people from breaking their FTP sites. Here's why: if you enable custom user isolation and you don't install a custom Home Directory provider for FTP, all users will be denied access to your FTP site.
That being said, once you have enabled custom user isolation, the option to disable custom user isolation will "magically" appear in the FTP User Isolation feature in the IIS Manager. To see this for yourself, you would first need to follow the steps to custom user isolation in the Add a custom FTP provider to an FTP site that is not used for authentication section of this blog.
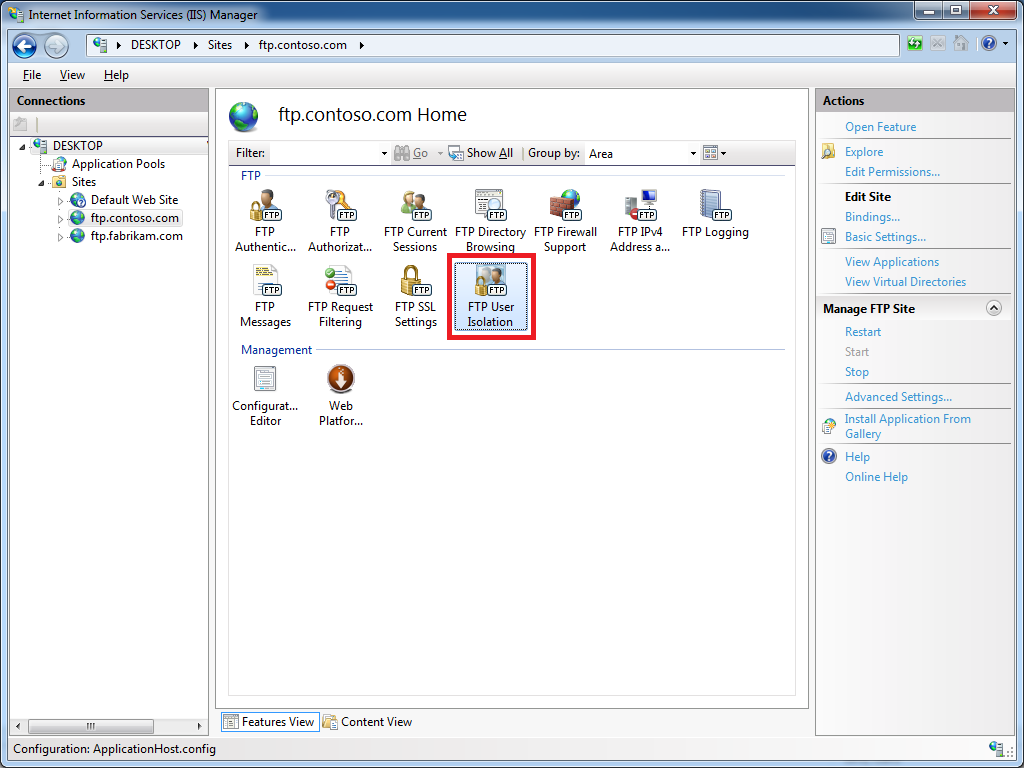
Once you have enabled custom user isolation, highlight your FTP site in the list of Sites pane of IIS Manager, then open the FTP User Isolation feature:
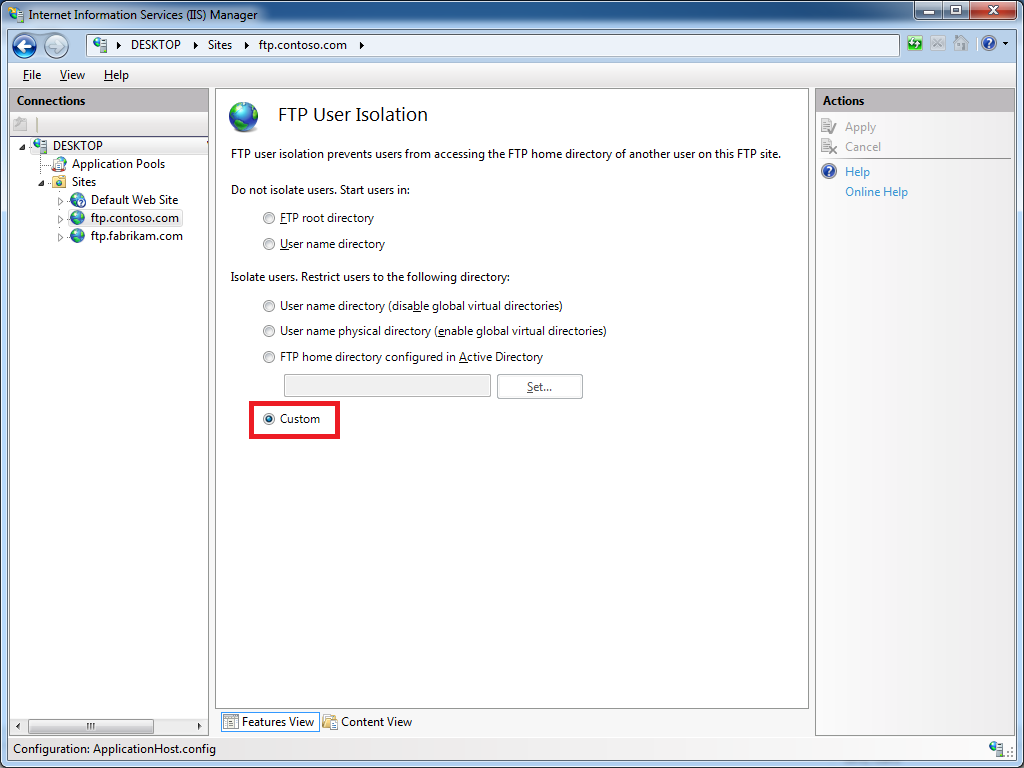
When you open the FTP User Isolation feature, you will see that an option for Custom now appears in the list of user isolation modes:
This option will appear as long as custom user isolation is enabled. If you change the user isolation mode to something other than Custom, this option will continue appear in the list of user isolation modes until you navigate somewhere else in IIS Manager. Once you have changed the user isolation mode to one of the built-in modes and you navigate somewhere else, the Custom option will not show up in the FTP User Isolation feature until you follow the steps to re-enable custom user isolation.
Additional Information
If you want additional information about configuring the settings for FTP providers, you can find detailed reference documentation at the following URLs:
- FTP Custom Features <customFeatures>
http://www.iis.net/configreference/system.applicationhost/sites/site/ftpserver/customfeatures - FTP Custom Authentication <customAuthentication>
http://www.iis.net/configreference/system.applicationhost/sites/site/ftpserver/security/authentication/customauthentication
Each of these articles contain "How-To" steps, detailed information about each of the configuration settings, and code samples for AppCmd.exe, C#/VB.NET, and JavaScript/VBScript.
As always, let me know if you have any questions. ;-]
Note: This blog was originally posted at http://blogs.msdn.com/robert_mcmurray/
IIS 6.0 WebDAV and Compound Document Format Files Revisited with Workarounds
24 April 2013 • by Bob • IIS, WebDAV, IIS 6
A few years ago I wrote the following blog, wherein I described how the WebDAV functionality in IIS 6.0 worked with files that are Compound Document format:
IIS 6.0 WebDAV and Compound Document Format Files
As I explained in that blog post, WebDAV needs somewhere to store "properties" for files that are uploaded to the server, and WebDAV uses the compound document format to accomplish this according to the following implementation logic:
- If the file is already in the compound document file format, IIS simply adds the WebDAV properties to the existing file. This data will not be used by the application that created the file - it will only be used by WebDAV. However, the file size will increase because WebDAV properties are added to the compound document.
- For other files, WebDAV stores a compound document in an NTFS alternate data stream that is attached to the file. You will never see this additional data from any directory listing, and the file size doesn't change because it's in an alternate data stream.
I recently had a customer contact me in order to ask if there was a way to disable this functionality since he didn't want his files modified in order to store the WebDAV properties. Unfortunately there is no built-in option for IIS that will disable this functionality, but there are a few workarounds.
Workaround #1 - Change the File Type
First and foremost - you can change your file type to something other than the compound document format. For example, if you are uploading files that were created in Microsoft Office, if you can upload your files in the newer Office Open XML formats, then you will not run into this problem. By way of explanation, older Microsoft Office files are in compound document format, whereas files that are that are created with Microsoft Office 2010 and later are in a zipped, XML-based file format. These files will have extensions like *.DOCX for Microsoft Word documents, *.XLSX for Microsoft Excel spreadsheets, and *.PPTX for Microsoft PowerPoint presentations.
Workaround #2 - Wrap Compound Document Files in a Separate File Type
If you are using a file that must be in compound document format, like a setup package in Microsoft Installer (*.MSI) format, you can upload the file in a *.ZIP file, or you can wrap the setup package inside a self-extracting executable by using a technology like Microsoft's IExpress Wizard (which ships as a built-in utility with most versions of Windows).
Workaround #3 - Block WebDAV Properties
If you absolutely cannot change your document from compound document format, I have a completely unsupported workaround that I can suggest. Since the problem arises when properties are added to a file, you can find a way to intercept the WebDAV commands that try to set properties. The actual HTTP verb that is used is PROPPATCH, so if you can find a way to keep this command from being used, then you can prevent files from being modified. Unfortunately you cannot simply suppress PROPPATCH commands by using a security tool like Microsoft's UrlScan to block the command, because this will cause many WebDAV clients to fail.
Instead, what I did as a workaround was to write an example ISAPI filter for IIS 6.0 that intercepts incoming PROPPATCH commands and always sends a successful (e.g. "200 OK") response to the WebDAV client, but in reality the filter does nothing with the properties and ends the request processing. This tricks a WebDAV client into thinking that it succeeded, and it prevents your files in compound document format from being modified. However, this also means that no WebDAV properties will ever be stored with your files; but if that's acceptable to you, (and it usually should be), then you can use this workaround.
With that in mind, here's the C++ code for my example ISAPI filter, and please remember that this is a completely unsupported workaround that is intended for use only when you cannot repackage your files to use something other than the compound document format.
#define _WIN32_WINNT 0x0400

#include <windows.h>
#include <httpfilt.h>

#define STRSAFE_LIB
#include <strsafe.h>

#define BUFFER_SIZE 2048

const char xmlpart1[] = "<?xml version=\"1.0\"?>"
  "<a:multistatus xmlns:a=\"DAV:\">"
  "<a:response>"
  "<a:href>";

const char xmlpart2[] = "</a:href>"
  "<a:propstat>"
  "<a:status>HTTP/1.1 200 OK</a:status>"
  "</a:propstat>"
  "</a:response>"
  "</a:multistatus>";

BOOL WINAPI GetFilterVersion(PHTTP_FILTER_VERSION pVer)
{
  HRESULT hr = S_OK;
  // Set the filter's version.
  pVer->dwFilterVersion = HTTP_FILTER_REVISION;
  // Set the filter's description.
  hr = StringCchCopyEx(
    pVer->lpszFilterDesc,256,"PROPPATCH",
    NULL,NULL,STRSAFE_IGNORE_NULLS);
  if (FAILED(hr)) return FALSE;
  // Set the filter's flags.
  pVer->dwFlags = SF_NOTIFY_ORDER_HIGH | SF_NOTIFY_PREPROC_HEADERS;
  return TRUE;
}

DWORD WINAPI HttpFilterProc(
  PHTTP_FILTER_CONTEXT pfc,
  DWORD NotificationType,
  LPVOID pvNotification )
{
  // Verify the correct notification.
  if ( NotificationType == SF_NOTIFY_PREPROC_HEADERS)
  {
    PHTTP_FILTER_PREPROC_HEADERS pHeaders;
    HRESULT hr = S_OK;

    bool fSecure = false;

    char szServerName[BUFFER_SIZE] = "";
    char szSecure[2] = "";
    char szResponseXML[BUFFER_SIZE] = "";
    char szResponseURL[BUFFER_SIZE] = "";
    char szRequestURL[BUFFER_SIZE] = "";
    char szMethod[BUFFER_SIZE] = "";

    DWORD dwBuffSize = 0;

    pHeaders = (PHTTP_FILTER_PREPROC_HEADERS) pvNotification;

    // Get the method of the request
    dwBuffSize = BUFFER_SIZE-1;
    // Exit with an error status if a failure occured.
    if (!pfc->GetServerVariable(
      pfc, "HTTP_METHOD", szMethod, &dwBuffSize))
      return SF_STATUS_REQ_ERROR;

    if (strcmp(szMethod, "PROPPATCH") == 0)
    {
      // Send the HTTP status to the client.
      if (!pfc->ServerSupportFunction(
        pfc, SF_REQ_SEND_RESPONSE_HEADER,"207 Multi-Status", 0, 0))
        return SF_STATUS_REQ_ERROR;

      // Get the URL of the request.
      dwBuffSize = BUFFER_SIZE-1;
      if (!pfc->GetServerVariable(
        pfc, "URL", szRequestURL, &dwBuffSize))
        return SF_STATUS_REQ_ERROR;

      // Determine if request was sent over secure port.
      dwBuffSize = 2;
      if (!pfc->GetServerVariable(
        pfc, "SERVER_PORT_SECURE", szSecure, &dwBuffSize))
        return SF_STATUS_REQ_ERROR;
      fSecure = (szSecure[0] == '1');

      // Get the server name.
      dwBuffSize = BUFFER_SIZE-1;
      if (!pfc->GetServerVariable(
        pfc, "SERVER_NAME", szServerName, &dwBuffSize))
        return SF_STATUS_REQ_ERROR;

      // Set the response URL.
      hr = StringCchPrintf(
        szResponseURL,BUFFER_SIZE-1, "http%s://%s/%s",
        (fSecure ? "s" : ""), szServerName, &szRequestURL[1]);
      // Exit with an error status if a failure occurs.
      if (FAILED(hr)) return SF_STATUS_REQ_ERROR;

      // Set the response body.
      hr = StringCchPrintf(
        szResponseXML,BUFFER_SIZE-1, "%s%s%s",
        xmlpart1, szResponseURL, xmlpart2);
      // Exit with an error status if a failure occurs.
      if (FAILED(hr)) return SF_STATUS_REQ_ERROR;

      // Write the response body to the client.
      dwBuffSize = strlen(szResponseXML);
      if (!pfc->WriteClient(
        pfc, szResponseXML, &dwBuffSize, 0))
        return SF_STATUS_REQ_ERROR;

      // Flag the request as completed.
      return SF_STATUS_REQ_FINISHED;
    }
  }

  return SF_STATUS_REQ_NEXT_NOTIFICATION;
}
I hope this helps. ;-]
Note: This blog was originally posted at http://blogs.msdn.com/robert_mcmurray/
Adding Custom FTP Providers with the IIS Configuration Editor - Part 1
31 March 2013 • by Bob • Extensibility, FTP, IIS
I've written a lot of walkthroughs and blog posts about creating custom FTP providers over the past several years, and I usually include instructions for adding these custom providers to IIS. When you create a custom FTP authentication provider, IIS has a user interface for adding that provider to FTP. But if you are adding a custom home directory or logging provider, there is no dedicated user interface for adding those types of FTP providers. In addition, if you create a custom FTP provider that requires settings that are stored in your IIS configuration, there is no user interface to add or manage those settings.
With this in mind, I include instructions in my blogs and walkthroughs that describe how to add those type of providers by using AppCmd.exe from a command line. For example, if you take a look at my How to Use Managed Code (C#) to Create an FTP Authentication and Authorization Provider using an XML Database walkthrough, I include the following instructions:
Adding the Provider
- Determine the assembly information for the extensibility provider:
- In Windows Explorer, open your "C:\Windows\assembly" path, where C: is your operating system drive.
- Locate the FtpXmlAuthorization assembly.
- Right-click the assembly, and then click Properties.
- Copy the Culture value; for example: Neutral.
- Copy the Version number; for example: 1.0.0.0.
- Copy the Public Key Token value; for example: 426f62526f636b73.
- Click Cancel.
- Using the information from the previous steps, add the extensibility provider to the global list of FTP providers and configure the options for the provider:
- At the moment there is no user interface that enables you to add properties for custom authentication or authorization modules, so you will have to use the following command line:
cd %SystemRoot%\System32\Inetsrv

appcmd.exe set config -section:system.ftpServer/providerDefinitions /+"[name='FtpXmlAuthorization',type='FtpXmlAuthorization,FtpXmlAuthorization,version=1.0.0.0,Culture=neutral,PublicKeyToken=426f62526f636b73']" /commit:apphost

appcmd.exe set config -section:system.ftpServer/providerDefinitions /+"activation.[name='FtpXmlAuthorization']" /commit:apphost

appcmd.exe set config -section:system.ftpServer/providerDefinitions /+"activation.[name='FtpXmlAuthorization'].[key='xmlFileName',value='C:\Inetpub\XmlSample\Users.xml']" /commit:apphost - Note: The file path that you specify in the xmlFileName attribute must match the path where you saved the "Users.xml" file on your computer in the earlier in this walkthrough.
- At the moment there is no user interface that enables you to add properties for custom authentication or authorization modules, so you will have to use the following command line:
This example adds a custom FTP provider, and then it adds a custom setting for that provider that is stored in your IIS configuration settings.
That being said, there is actually a way to add custom FTP providers with settings like the ones that I have just described through the IIS interface by using the IIS Configuration Editor. This feature was first available through the IIS Administration Pack for IIS 7.0, and is built-in for IIS 7.5 and IIS 8.0.
Before I continue, if would probably be prudent to take a look at the settings that we are trying to add, because these settings might help you to understand the rest of steps in this blog. Here is an example from my applicationhost.config file for three custom FTP authentication providers; the first two providers are installed with the FTP service, and the third provider is a custom provider that I created with a single provider-specific configuration setting:
<system.ftpServer>
  <providerDefinitions>
    <add name="IisManagerAuth" type="Microsoft.Web.FtpServer.Security.IisManagerAuthenticationProvider, Microsoft.Web.FtpServer, version=7.5.0.0, Culture=neutral, PublicKeyToken=31bf3856ad364e35" />
    <add name="AspNetAuth" type="Microsoft.Web.FtpServer.Security.AspNetFtpMembershipProvider, Microsoft.Web.FtpServer, version=7.5.0.0, Culture=neutral, PublicKeyToken=31bf3856ad364e35" />
    <add name="FtpXmlAuthorization" type="FtpXmlAuthorization, FtpXmlAuthorization, version=1.0.0.0, Culture=neutral, PublicKeyToken=426f62526f636b73" />
    <activation>
      <providerData name="FtpXmlAuthorization">
        <add key="xmlFileName" value="C:\inetpub\FtpUsers\Users.xml" />
      </providerData>
    </activation>
  </providerDefinitions>
</system.ftpServer>
With that in mind, in part 1 of this blog series, I will show you how to use the IIS Configuration Editor to add a custom FTP provider with provider-specific configuration settings.
Step 1 - Open the IIS Manager and click on the Configuration Editor at feature the server level:
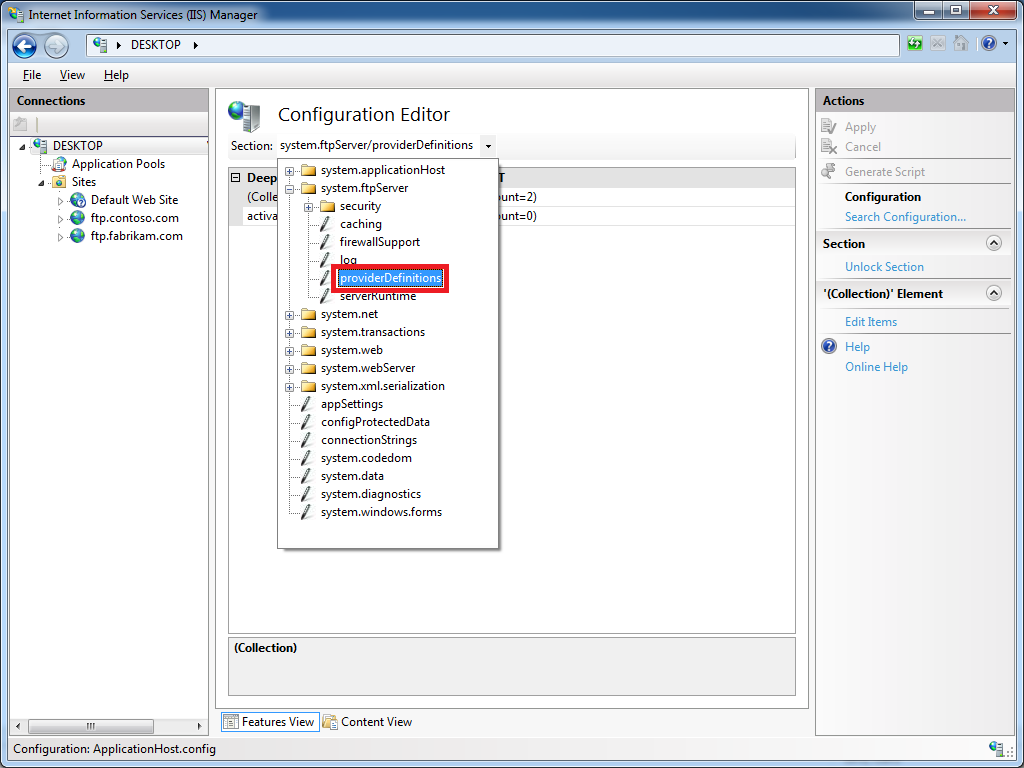
Step 2 - Click the Section drop-down menu, expand the the system.ftpServer collection, and then highlight the providerDefinitions node:
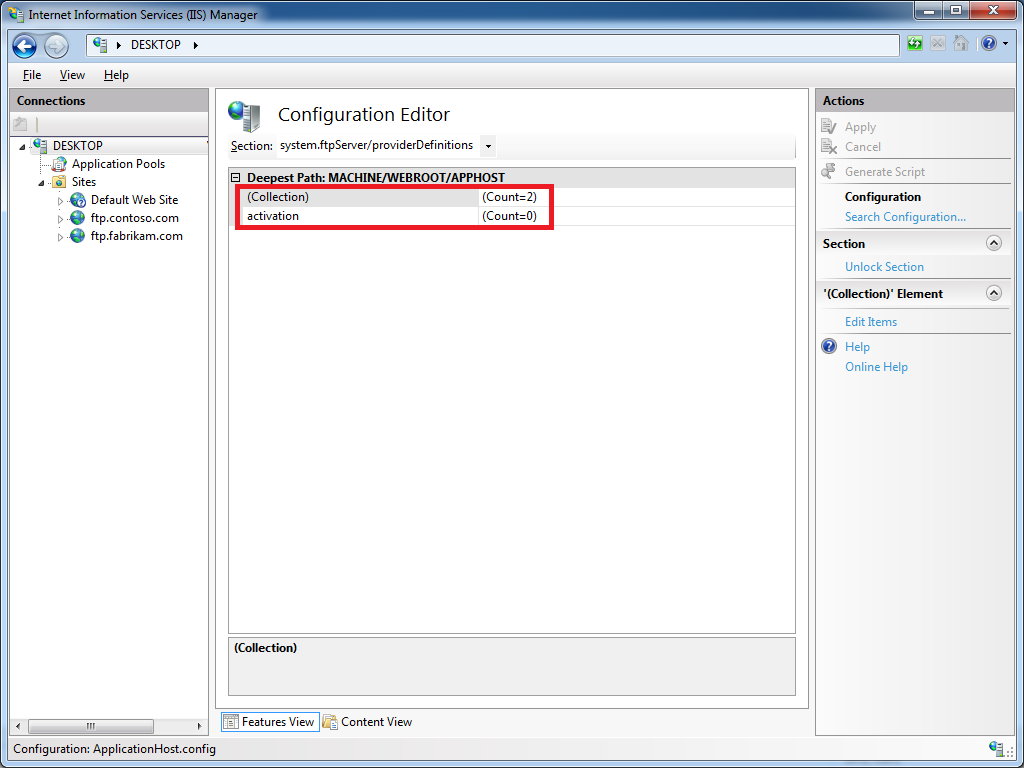
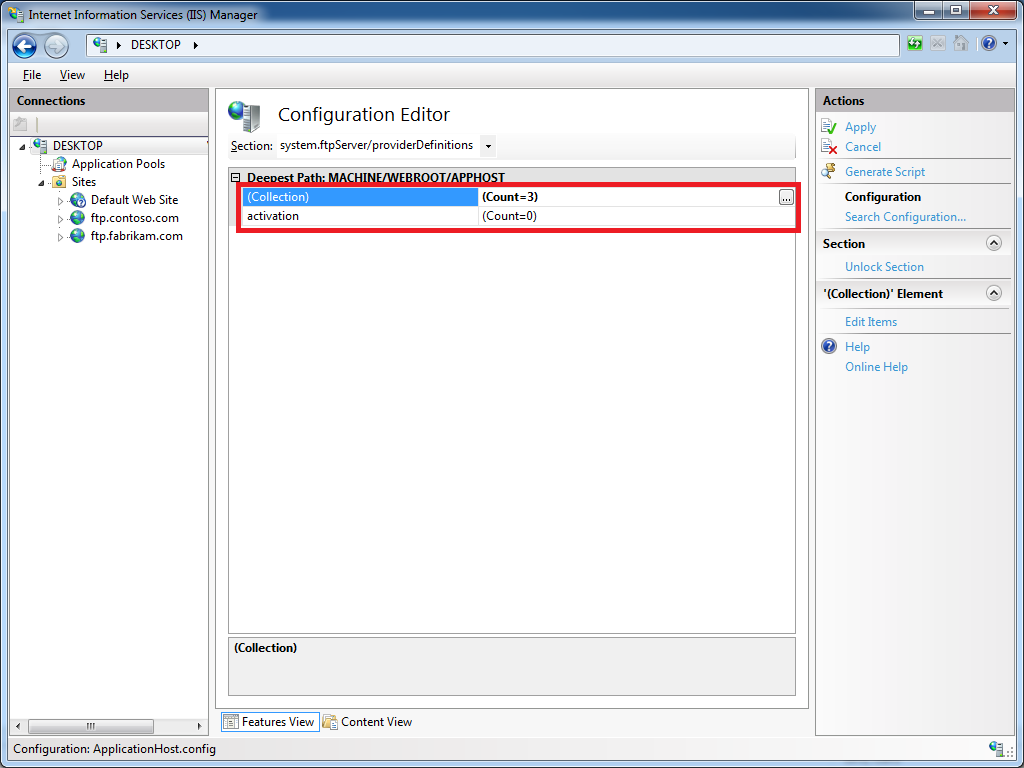
Step 3 - A default installation IIS with the FTP service should show a Count of 2 providers in the Collection row, and no settings in the activation row:
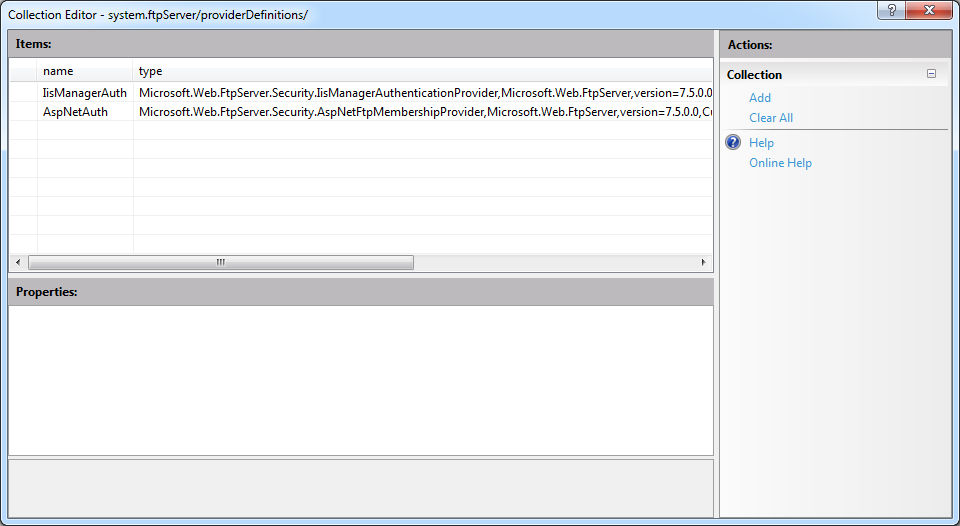
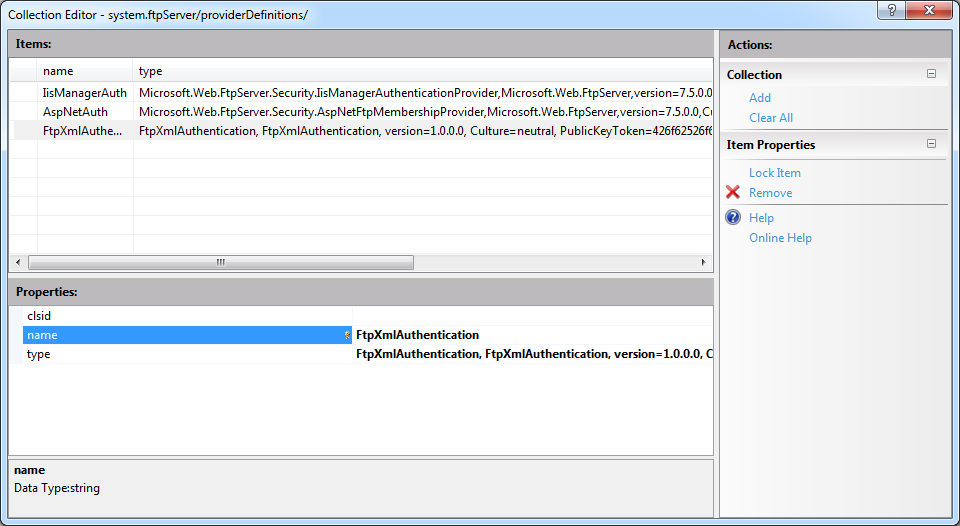
Step 4 - If you click on the Collection row, an ellipsis [...] will appear, and when you click that, IIS will display the Collection Editor dialog for FTP providers. By default you should see just the two built-in providers for the IisManagerAuth and AspNetAuth providers:
Step 5 - When you click Add in the Actions pane, you can enter the registration information for your provider. At a minimum you must provide a name for your provider, but you will need to enter either the clsid for a COM-based provider or the type for a managed-code provider:
Step 6 - When you close the Collection Editor dialog, the Count of providers in the Collection should now reflect the provider that we just added; click Apply in the Actions pane to save the changes:
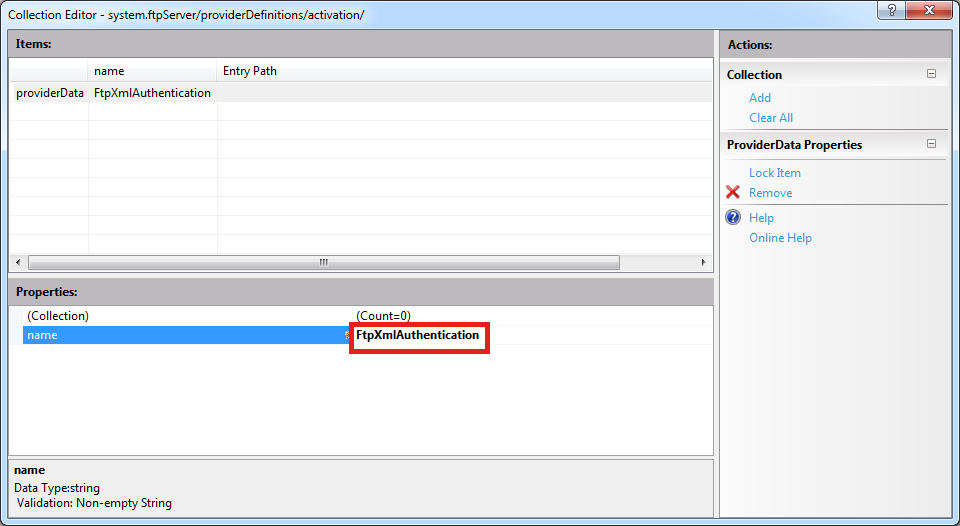
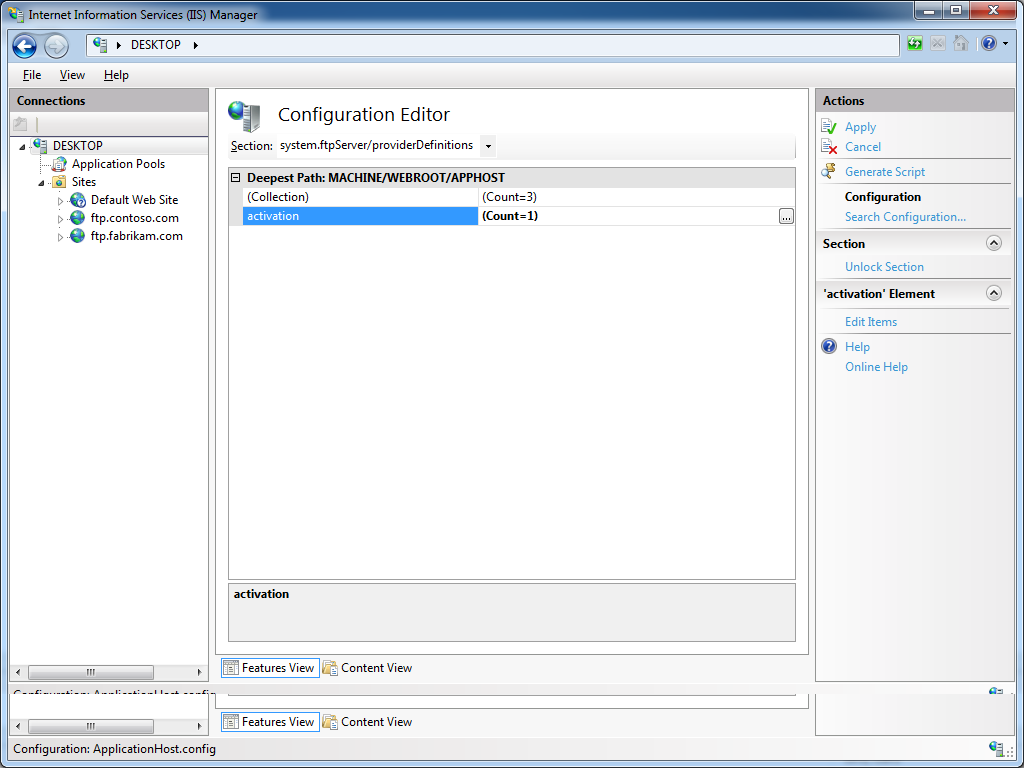
Step 7 - If you click on the activation row, an ellipsis [...] will appear, and when you click that, IIS will display the Collection Editor dialog for provider data; this is where you will enter provider-specific settings. When you click Add in the Actions pane, you must specify the name for your provider's settings, and this name must match the exact name that you provided in Step 5 earlier:
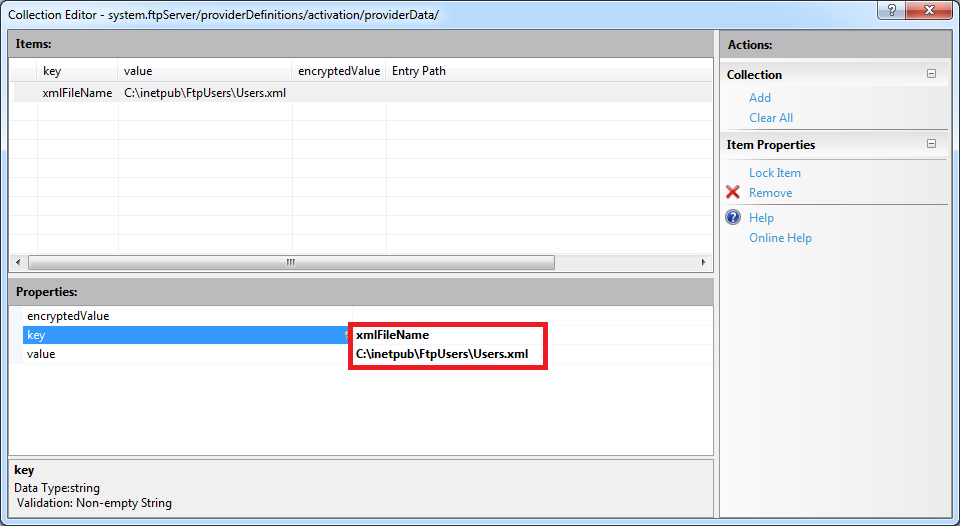
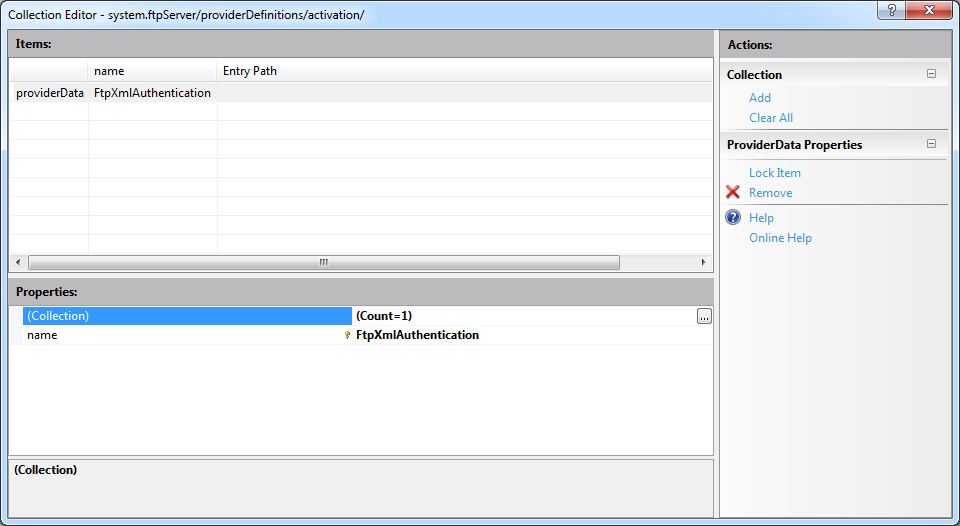
Step 8 - If you click on the Collection row, an ellipsis [...] will appear, and when you click that, IIS will display the Collection Editor dialog for the activation data for an FTP provider. At a minimum you must provide a key for your provider, which will depend on the settings that your provider expects to retrieve from your configuration settings. (For example, in the XML file that I provided earlier, my FtpXmlAuthorization provider expects to retrieve the path to an XML that contains a list of users, roles, and authorization rules.) You also need to enter the either the value or encryptedValue for your provider; although you can specify either setting, should generally specify the value when the settings are not sensitive in nature, and specify the encryptedValue for settings like usernames and passwords:
Step 9 - When you close the Collection Editor dialog for the activation data, the Count of key/value pairs in the Collection should now reflect the value that we just added:
Step 10 - When you close the Collection Editor dialog for the provider data, the Count of provider data settings in the activation row should now reflect the custom settings that we just added; click Apply in the Actions pane to save the changes:
That's all that there is to adding a custom FTP provider with provider-specific settings; I admit that it might seem like a lot of steps until you get the hang of it.
In the next blog for this series, I will show you how to add custom providers to FTP sites by using the IIS Configuration Editor.
Note: This blog was originally posted at http://blogs.msdn.com/robert_mcmurray/
Restarting the FTP Service Orphans a DLLHOST.EXE Process
31 January 2013 • by Bob • Scripting, FTP, Extensibility
I was recently creating a new authentication provider using FTP extensibility, and I ran into a weird behavior that I had seen before. With that in mind, I thought my situation would make a great blog subject because someone else may run into it.
Here are the details of the situation: let's say that you are developing a new FTP provider for IIS, and your code changes never seem to take effect. Your provider appears to be working, it's just that any new functionality is not reflected in your provider's behavior. You restart the FTP service as a troubleshooting step, but that does not appear to make any difference.
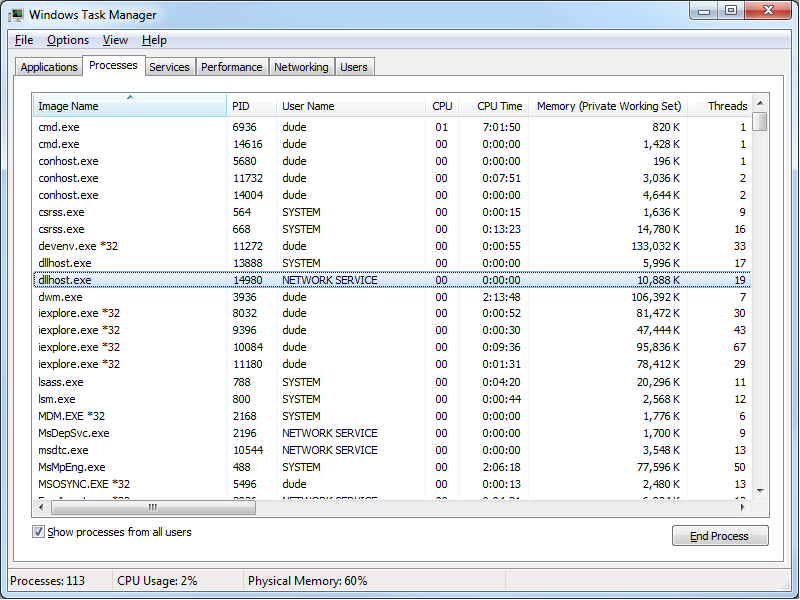
I'll bypass mentioning any other troubleshooting tasks and cut to the chase - if you read my Changing the Identity of the FTP 7 Extensibility Process blog post a year ago, you will recall that I mentioned that all custom FTP extensibility providers are executed through COM+ in a DLLHOST.exe process. When you restart the FTP service, that should clean up the DLLHOST.EXE process that is being used for FTP extensibility. However, if you are developing custom FTP providers and the DLLHOST.EXE process is not terminated by the FTP service, you may find yourself in a situation where you have a DLLHOST.EXE process in memory that contains an older copy of your provider, which will not be removed from memory until the DLLHOST.EXE process for FTP extensibility has been forcibly terminated.
If you have read some of my earlier blog posts or walkthroughs on IIS.NET, you may have noticed that I generally like to use a few pre-build and post-build commands in my FTP projects; usually I add these commands in order to to automatically register/unregister my FTP providers in the Global Assembly Cache (GAC).
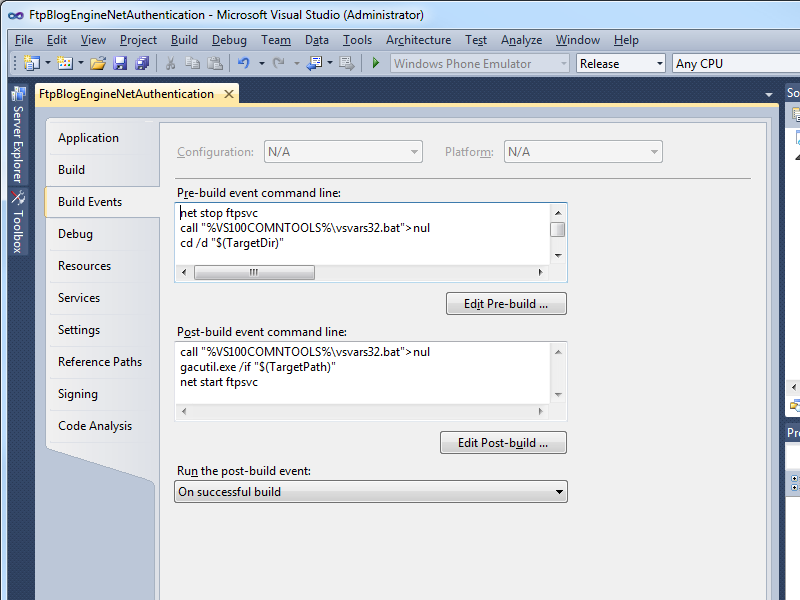
With a little modification and some command-line wizardry, you can automate the termination of any orphaned DLLHOST.EXE processes that are being used for FTP extensibility. With that in mind, here are some example pre-build/post-build commands that will unregister/reregister your provider in the GAC, restart the FTP service, and terminate any orphaned FTP extensibility DLLHOST.EXE processes.
Note: The following syntax was written using Visual Studio 2010; you would need to change "%VS100COMNTOOLS%" to "%VS90COMNTOOLS%" for Visual Studio 2008 or "%VS110COMNTOOLS%" for Visual Studio 2012.
Pre-build Commands:
net stop ftpsvc
call "%VS100COMNTOOLS%\vsvars32.bat">nul
cd /d "$(TargetDir)"
gacutil.exe /uf "$(TargetName)"
for /f "usebackq tokens=1,2* delims=," %%a in (`tasklist /fi "MODULES eq Microsoft.Web.FtpServer.*" /fi "IMAGENAME eq DLLHOST.EXE" /fo csv ^| find /i "dllhost.exe"`) do taskkill /f /pid %%b
Post-build Commands:
call "%VS100COMNTOOLS%\vsvars32.bat">nul
gacutil.exe /if "$(TargetPath)"
net start ftpsvc
The syntax is a little tricky for the FOR statement, so be carefully when typing or copying/pasting that into your projects. For example, you need to make sure that all of the code from the FOR statement through the TASKKILL command are on the same line in your project's properties.
When you compile your provider, Visual Studio should display something like the following:
------ Rebuild All started: Project: FtpBlogEngineNetAuthentication, Configuration: Release Any CPU ------
The Microsoft FTP Service service is stopping.
The Microsoft FTP Service service was stopped successfully.
Microsoft (R) .NET Global Assembly Cache Utility. Version 4.0.30319.1
Copyright (c) Microsoft Corporation. All rights reserved.
Assembly: FtpBlogEngineNetAuthentication, Version=1.0.0.0, Culture=neutral, PublicKeyToken=426f62526f636b73, processorArchitecture=MSIL
Uninstalled: FtpBlogEngineNetAuthentication, Version=1.0.0.0, Culture=neutral, PublicKeyToken=426f62526f636b73, processorArchitecture=MSIL
Number of assemblies uninstalled = 1
Number of failures = 0
SUCCESS: The process with PID 12656 has been terminated.
FtpBlogEngineNetAuthentication -> C:\Users\dude\Documents\Visual Studio 2010\Projects\FtpBlogEngineNetAuthentication\FtpBlogEngineNetAuthentication\bin\Release\FtpBlogEngineNetAuthentication.dll
Microsoft (R) .NET Global Assembly Cache Utility. Version 4.0.30319.1
Copyright (c) Microsoft Corporation. All rights reserved.
Assembly successfully added to the cache
The Microsoft FTP Service service is starting.
The Microsoft FTP Service service was started successfully.
========== Rebuild All: 1 succeeded, 0 failed, 0 skipped ==========
If you analyze the output from the build process, you will see that the commands in my earlier samples stopped the FTP service, removed the existing assembly from the GAC, terminated any orphaned DLLHOST.EXE processes, registered the newly-built DLL in the GAC, and then restarted the FTP service.
By utilizing these pre-build/post-build commands, I have been able to work around situations where a DLLHOST.EXE process is being orphaned and caching old assemblies in memory.
Note: This blog was originally posted at http://blogs.msdn.com/robert_mcmurray/
Troubleshooting Custom FTP Providers with ETW
28 August 2012 • by Bob • FTP, Extensibility
I recently received a question from a customer about troubleshooting custom FTP providers, and I recommended using the FTP service's Event Tracing for Windows (ETW) features in order to help troubleshoot the problem. I've helped a lot of customers use this little-known feature of the FTP service, so I thought that it would make a great subject for a quick blog.
By way of explanation, the FTP service in IIS 7.5 and IIS 8.0 allows developers to write their own custom functionality, and over the past several years I have written several walkthroughs and blogs that illustrate how you can create your own custom FTP providers:
- Custom Authentication Providers:
- How to Use Managed Code (C#) to Create a Simple FTP Authentication Provider
- How to Use Native Code (C++) to Create a Simple FTP Authentication Provider
- How to Use Managed Code (C#) to Create an FTP Authentication Provider using an XML Database
- How to Use Managed Code (C#) to Create an FTP Authentication and Authorization Provider using an XML Database
- How to Use Managed Code (C#) to Create an FTP Authentication Provider with Dynamic IP Restrictions
- FTP and LDAP - Part 1: How to Use Managed Code (C#) to Create an FTP Authentication Provider that uses an LDAP Server
- How to Create an Authentication Provider for FTP 7.5 using BlogEngine.NET's XML Membership Files
- Custom Home Directory Providers:
- How to Use Managed Code (C#) to Create a Simple FTP Home Directory Provider
- How to Use Managed Code (Visual Basic) to Create a Simple FTP Home Directory Provider
- How to Use Native Code (C++) to Create a Simple FTP Home Directory Provider
- How to use Managed Code (C#) to create an FTP Home Directory Provider that is based on the Remote Client IP Address
- How to Use Managed Code (C#) to Create an FTP Home Directory Provider for the Days of the Week
- Custom Logging Providers:
- Custom Functionality Providers:
That being said, sometimes things go wrong, and when that happens, I use some FTP ETW troubleshooting tricks that I'd like to share.
Setting up FTP ETW Tracing
Several years ago I wrote a blog about FTP and ETW Tracing, where I described how to turn on the FTP service's ETW tracing through a batch file, and then it used Log Parser to render the output in a datagrid for analysis. In the interests of completeness, here is the batch file again:
| @echo off rem====================================================================== echo Verifying that LogParser.exe is in the path... LogParser -h >nul 2>nul if errorlevel 1 ( echo. echo Error: echo. echo LogParser.exe is was not found. It is required for parsing traces. echo. echo Recommended actions: echo. echo - If LogParser is installed then fix the PATH echo variable to include the LogParser directory echo. echo - If LogParser is not installed, then install echo it from the following location: echo. echo http://www.microsoft.com/downloads/details.aspx?FamilyID=890cd06b-abf8-4c25-91b2-f8d975cf8c07 echo. goto :EOF ) else ( echo Done. echo. ) rem====================================================================== echo Starting the ETW session for full FTP tracing... logman start "ftp" -p "IIS: Ftp Server" 255 5 -ets echo. echo Now reproduce your problem. echo. echo After you have reproduced your issue, hit any key to close the FTP echo tracing session. Your trace events will be displayed automatically. echo. pause>nul rem====================================================================== echo. echo Closing the ETW session for full FTP tracing... logman stop "ftp" -ets rem====================================================================== echo. echo Parsing the results - this may take a long time depending on the size of the trace... LogParser "select EventTypeName, UserData from ftp.etl" -e 2 -o:DATAGRID -compactModeSep " | " -rtp 20 |
When you save and run this batch file, it will display something like the following:
C:\FTP_ETW.cmd Verifying that LogParser.exe is in the path... Done. Starting the ETW session for full FTP tracing... The command completed successfully. Now reproduce your problem. After you have reproduced your issue, hit any key to close the FTP tracing session. Your trace events will be displayed automatically. |
When you see this displayed, you will need to reproduce your problem, and FTP's ETW tracing will record the troubleshooting information.
Once you have reproduced your problem, hit a key to end the ETW session, and you will see the following message displayed:
Closing the ETW session for full FTP tracing... The command completed successfully. Parsing the results - this may take a long time depending on the size of the trace... |
The batch file will eventually call Log Parser to parse the ETW events, and a dialog like the following will be displayed:
Troubleshooting Custom FTP Providers with ETW Tracing
Now that you know how to set up FTP's ETW tracing, let's examine what you should be looking for in the tracing information.In all of the examples in this blog, I am using the XML-based authentication provider that is documented in the How to Use Managed Code (C#) to Create an FTP Authentication Provider using an XML Database walkthrough.
The following illustration highlights several lines that show the FTP service starting its authentication process, loading my custom authentication provider, and ending the authentication process after I have successfully logged in:
This example shows what everything looks like when it works as expected, so now let's look at what happens when something goes wrong.
If I use the same provider, but I enter my username or password incorrectly, I will see the following lines in the trace:
This example informs you that the provider was loaded successfully, but the logon failed. The error code that is returned is 0x8007052E - this hexadecimal 32-bit value can be split into 16-bit values:
- 8007 - This code informs you that this is a Win32 error.
- 052E - This code coverts to 1326 in decimal, and if you enter "NET HELPMSG 1326" from a command-prompt, that will tell you that the error was "
Logon failure: unknown user name or bad password."
If I continue to use the same provider as earlier, and I delete the XML file that my provider uses, then I will receive the following error:
Once again, this example informs you that the provider was loaded successfully, but an error occurred. In this specific case you see the actual details that the XML file exists, and that is an error that is returned by a throw() statement in the provider. The error code that is returned is 0x80070057 - and once again this hexadecimal 32-bit value can be split into 16-bit values:
- 8007 - This code informs you that this is a Win32 error.
- 0057 - This code coverts to 87 in decimal, and if you enter "NET HELPMSG 87" from a command-prompt, that will tell you that the error was "
The parameter is incorrect."
If I replace the missing XML file for the provider, but I remove all of the permissions to the file, I get the following error:
As in the previous examples, this informs you that the provider was loaded successfully, but an error occurred. You can't look up the 0x80131500 error code by using "NET HELPMSG" from a command-prompt, but that doesn't matter since the error description informs you of the problem - access to the path where the file is located was denied.
If I enter a bad provider name, I get the following error:
Unlike the previous examples, this informs you that the provider was not loaded successfully. The description for this error informs you that it could not load the provider, and it gives you the assembly information. In addition to the error description, the error code that is returned by the FTP service is 0x80070002 - and once again this hexadecimal 32-bit value can be split into 16-bit values:
- 8007 - This code informs you that this is a Win32 error.
- 0002 - This code is obviously 2 in decimal, so if you enter "NET HELPMSG 2" from a command-prompt, that will tell you that the error was "
The system cannot find the file specified."
So now let's look at a common perplexing problem:
This example shows the same 0x8007052E error code that we looked at in a previous example, but you'll notice that any reference to the provider is conspicuously absent from the trace - this means that the FTP service made no attempt to load the custom authentication provider. In this specific case, even though I had correctly registered my custom FTP authentication provider on the system, I had not added or enabled the custom authentication provider for my FTP site.
Summary
In this blog I showed you how to troubleshoot several different errors with FTP custom authentication providers by using FTP's ETW features.
As a parting thought, I should point out that the most-common error that I run into when creating my own providers is the last example. Believe it or not, I nearly always miss a step when I am creating a new provider and I forget to add a setting here or there which will cause the FTP service to completely ignore my provider. A perfect example is when I am writing custom home directory providers - I always remember to add the provider to the global list of FTP providers, and I usually remember to add the provider to the list of custom features for my FTP site, but I forget to configure my FTP site to use custom user isolation and my provider is ignored. (Darn, darn, darn...)
;-]
Note: This blog was originally posted at http://blogs.msdn.com/robert_mcmurray/
WebDAV Website Importer for WebMatrix
21 July 2012 • by Bob • WebDAV, WebMatrix
The other day I was talking with one of my coworkers, Yishai Galatzer, about Microsoft's WebMatrix. By way of introduction, Yishai is one of our senior developers on the WebMatrix project; I'm not sure if you've used WebMatrix, but it's a pretty handy website editor. Here's a few generic screen shots:
 |
| WebMatrix 2 Splash Screen |
 |
| WebMatrix 2 Quick Start Screen |
 |
| Editing QDIG in WebMatrix 2 |
In any event, I was explaining how easy it is to work with WebDAV, and I mentioned that I had written some some blogs about working with WebDAV websites programmatically. (See my Sending WebDAV Requests in .NET Revisited blog for an example.) Since WebMatrix 2 has some pretty cool extensibility, Yishai challenged me to write a WebDAV extension for WebMatrix. His idea was just too good for me to pass up, so I stayed up late that night and I wrote a simple WebDAV Website Import extension for WebMatrix 2.
With that in mind, there are a few things that I need to explain in this blog:
- What this extension actually does.
- How to install this extension.
- How to use this extension.
What the WebDAV Website Importer Extension Actually Does
The WebDAV Website Importer extension does just what its name implies - it allows you to import a website into WebMatrix over WebDAV. This allows you to download your website to your local computer, where you can make changes to your source files and test them on your local system with IIS Express.
It should be noted that this extension is only designed to create a new local website by downloading a copy of your website's files in order to create a local copy of your website - it is not designed to be a website publishing feature like WebMatrix's built-in FTP and Web Deploy features. (I would like to write a full-featured website import/export/sync extension, but that's another project for another day.)
How to Install the WebDAV Website Importer Extension
To install this extension, you first need to install WebMatrix. You can find details about installing WebMatrix at the following URL:
Once you have WebMatrix installed, click the Extensions menu on the ribbon, and then click Gallery.
When the Extensions Gallery appears, you will see the WebDAV Website Importer in the list of extensions.
When you click Install, the WebDAV Website Importer details page will be displayed.
When you click Install, the End User License Agreement for the WebDAV Website Importer will be displayed.
When you click I Accept, WebMatrix will download and install the extension.
How to Use the WebDAV Website Importer Extension
Once you have downloaded and installed the WebDAV Website Importer extension, it will show up whenever you are creating a new website in WebMatrix.
When you click Import Site from WebDAV, WebMatrix will prompt you for the credentials to your WebDAV website.
Once you enter your credentials and click OK, the extension will import the content from your WebDAV website and save it in a new local website folder.
Summary
So - there you have it; this is a pretty simple extension, but it opens up some WebDAV possibilities for WebMatrix. As I mentioned earlier, this extension is import-only - perhaps I'll write a full-featured import/export/sync extension in the future, but for now - this was a cool test for combining WebMatrix extensibility and WebDAV.
Note: This blog was originally posted at http://blogs.msdn.com/robert_mcmurray/
Error: Class Not Registered (0x80040154) when Querying FTP Runtime State
29 June 2012 • by Bob • FTP, IIS
I had a great question from a customer earlier today, and I thought that it was worth blogging about. The problem that he was running into was that he was seeing the following error when he was trying to query the runtime state for the FTP service in an application that he was writing:
Class not registered (Exception from HRESULT: 0x80040154 (REGDB_E_CLASSNOTREG))
He was using Visual Basic, and his code looked okay to me, so for the moment I was stumped.
I'm more of a C# guy, and I remembered that I had written the following blog many years ago:
Viewing current FTP7 sessions using C#
I copied the code from that blog into a new Visual Studio project, and I got the same error that he was seeing when I ran my code - this had me a little more confused. Have you ever said to yourself, "Darn - I know that worked the other day...?" ;-]
I knew that there is more than one way to access the runtime state, so I rewrote my sample application using two different approaches:
Method #1:
AppHostAdminManager objAdminManager = new AppHostAdminManager();
IAppHostElement objSitesElement =
  objAdminManager.GetAdminSection("system.applicationHost/sites",
  "MACHINE/WEBROOT/APPHOST");
uint intSiteCount = objSitesElement.Collection.Count;
for (int intSite = 0; intSite < intSiteCount; ++intSite)
{
    IAppHostElement objFtpSite = objSitesElement.Collection[intSite];
    Console.WriteLine("Name: " + objFtpSite.Properties["name"].StringValue);
    IAppHostElement objFtpSiteElement = objFtpSite.ChildElements["ftpServer"];
    IAppHostPropertyCollection objProperties = objFtpSiteElement.Properties;
    try
    {
        IAppHostProperty objState = objProperties["state"];
        string ftpState = objState.StringValue;
        Console.WriteLine("State: " + ftpState);
    }
    catch (System.Exception ex)
    {
        Console.WriteLine("\r\nError: {0}", ex.Message);
    }
}
Method #2:
ServerManager manager = new ServerManager();
foreach (Site site in manager.Sites)
{
    Console.WriteLine("Name: " + site.Name);
    ConfigurationElement ftpServer = site.GetChildElement("ftpServer");
    try
    {
        foreach (ConfigurationAttribute attrib in ftpServer.Attributes)
        {
            Console.WriteLine(attrib.Name + ": " + attrib.Value);
        }
    }
    catch (System.Exception ex)
    {
        Console.WriteLine("\r\nError: {0}", ex.Message);
    }
}
Both of these methods returned the same COM error, so this was getting weird for me. Hmm...
The FTP runtime state is exposed through a COM interface, and that is implemented in a DLL that is named "ftpconfigext.dll". That file should be registered when you install IIS, and I re-registered it on my system just for good measure, but that didn't resolve the issue.
I had a brief conversation with one of my coworkers, Eok Kim, about the error that I was seeing. He also suggested re-registering the DLL, but something else that he said about searching the registry for the InprocServer32 entry made me wonder if the whole problem was related to the bitness of my application.
To make a long story short - that was the whole problem.
Both the customer and I were creating 32-bit .NET applications, and the COM interface for the FTP runtime state is implemented in a 64-bit-only DLL. Once we both changed our projects to compile for 64-bit platforms, we were both able to get the code to run. (Coincidentally, all I had was a 32-bit system when I wrote my original blog, so I probably would have run into this sooner if I had owned a 64-bit system way back then. ;-])
Note: This blog was originally posted at http://blogs.msdn.com/robert_mcmurray/
