Minor Surgery on a Ricoh Theta V
14 June 2022 • by Bob • Photography, DIY
I just ran into a weird issue with a somewhat easy resolution that I thought I'd share:
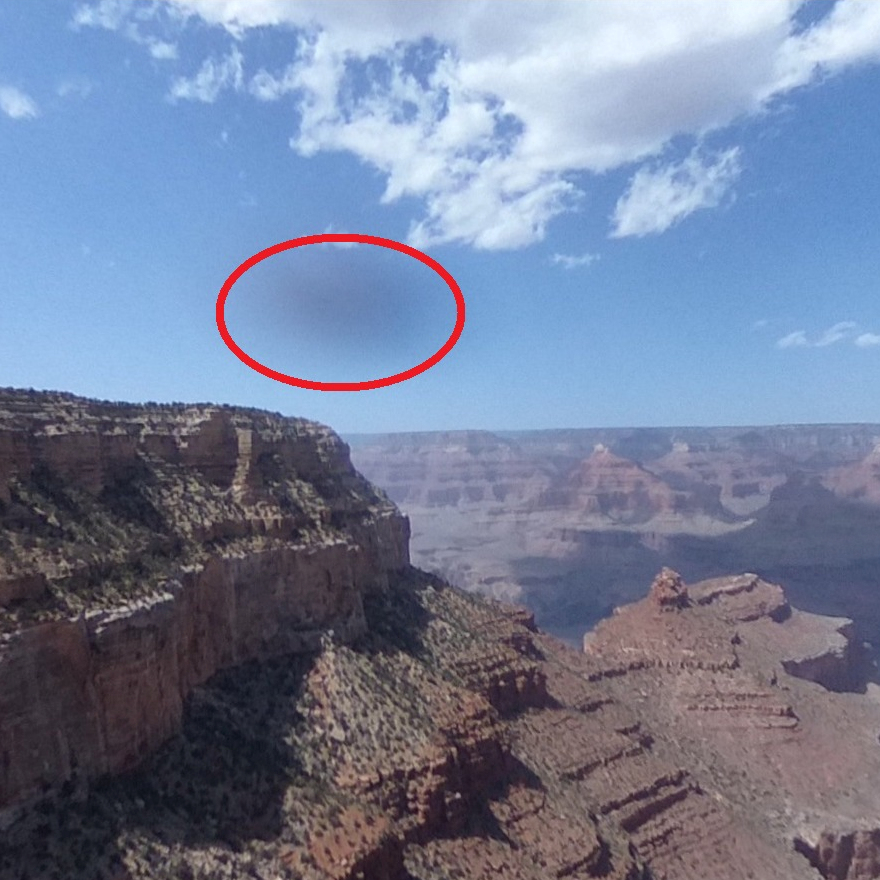
One of my "fun" cameras is a Ricoh Theta V 360 camera, which is what I used to create several 360-degree images that I took at the Grand Canyon recently. However, when I looked at my images from that trip, there was a light shadow in each of the final images.

Upon inspecting the camera, there was a tiny scratch on the surface of the lens. I'm not sure how that happened, but any images in the future would have had similar shadows. A quick scan of eBay yielded a replacement lens for around $40, and the following video provided the instructions for swapping the new lens for the old.
Since the video has all the images you need to see, I didn't bother to take any photos, but I thought that I'd share a few notes about the steps involved:
- Remove the base from the camera; probably best with a hobby blade that you can easily slide underneath.
- Remove the four screws from the bottom; you need a fine point philips screwdriver for this.
- Open the case; I used a guitar pick to open the case, but you should make sure to use something non-metallic so that you don't damage anything inside the camera.
- Remove the lens; once again, you need to use something that won't damage the camera.
That's about it. Long story short, after 20 minutes of relatively easy labor, my camera is back up and working.
FYI: If you'd like to see the full 360-degree Grand Canyon image, you can click here.
Aerial View of Shipwreck Beach on Lanai
09 November 2021 • by Bob • Photography
I recently brought a drone with me to the island of Lanai, and I used some of the footage to create the following aerial 360-degree image of YOGN 42 off the shore of Shipwreck Beach. The black discoloration at the top of the image was caused by the drone's propellers, which were fighting hard to keep the drone in position amidst winds that were far too strong for it. As a result, I didn't get more than a few minutes of video before I decided to call it quits, otherwise I would have risked losing the drone.
If you click the image, you'll see the
The drone has GPS for keeping the drone out of areas where I shouldn't be flying, and to return home if the drone loses signal. To guide the drone, I had it linked to my phone, so I was watching the video on my phone's screen while holding the remote. In that sense, it was almost like playing a video game using a controller.
Unfortunately, I have no video from above the wreck. I was close enough to overfly the ship, but a warning popped up on my phone's screen telling me that it was far too windy (which it was) and I should land immediately. Then a second warning popped up saying that the extreme winds meant that GPS might not be reliable, so the drone might not be able to return home if I lost signal. Having seen both of those warnings in rapid succession, I turned the drone around and headed it back to where I was on the beach, lest I lose the drone and have it join the dozens of other wrecks along Shipwreck Beach.
Coloring Historical Photographs - February 13th, 2021, Edition
13 February 2021 • by Bob • Photography, History
A year ago I made one of my first attempts a colorizing a photo, and the results were not very good. The photo in question was a boyhood photo of my father-in-law, Terry Wetmore, and the final outcome of my colorization efforts was so bad that I'd rather not share it publicly.
However, I've colorized a few dozen photos since then, and I've picked up a few skills along the way. With that in mind, I thought that I would take another pass at his photo to see if I could do a better job the second time around, and here are the results.
This image is certainly better than last year's attempt, but I still have lots of room for improvement. I think I'll try again after another year or so to see what the results are like.
Coloring Historical Photographs - January 16th Edition
16 January 2021 • by Bob • Photography, History
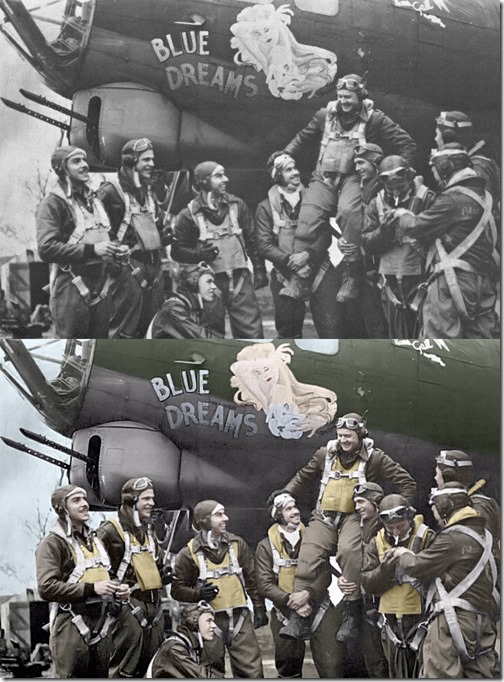
I found another interesting photo in an aviation forum that looked like a good candidate for colorizing, in this case it was the crew of the "Blue Dreams" B-17, which looks like they're celebrating after a successful mission.
As I have done in the past, I tried to discover any information that I could about this photo or the aircraft. The best that I could do was to find a page that mentioned the ball turret gunner having completed 25 missions in this aircraft. In World War II, that usually meant the crew would rotate stateside, and for his sake I hope that happened.
That being said, I found another web page that mentioned the aircraft as having completed 29 missions before it crashed. The pilot noticed that the aircraft was leaking fuel after takeoff, and he set the aircraft down without lowering the landing gear. The aircraft was a total loss, but the crew was able to escape without harm. Still - that was a sad fate for a beautiful aircraft.
Coloring Historical Photographs - December 22nd Edition
22 December 2020 • by Bob • Photography, History
A friend of mine posted a link to an article titled Deconstructing the Reconciliation Narrative of the Civil War, which was a fascinating article that presented an interesting look at a difficult time in the United States' troubled past: the period of Reconciliation that followed the post-Civil War Reconstruction. If you're into history as I am, it might be worth your time to read.
That being said, the article contained a wonderful photograph of General George H. Thomas that I thought would make a great candidate for colorization. With that in mind, here are the before and after views of that photo.
One interesting item of note about the final image: as I have always done in the past, I had edited all of the imperfections from the original photo; the scratches, discolorations, tears, etc. However, the fully-restored image of General Thomas over a flat background looked so unnatural that I decided to overlay my "finished" image over the original to add back a few imperfections. In the end, I think this looked photo looked far better with a few problems in it.
Coloring Historical Photographs - June 11th Edition
11 June 2020 • by Bob • Photography, History
Following up on the B-17 image that I posted yesterday, here's a quick animation that illustrates how I added successive layers of color to create the finished image.
FYI - a few layers were combined to make the animation a little shorter, and the images in the video are not necessarily in the order that I colored them. I created a series of images based on the layers that I had created, but I did so after I had finished the image.
Coloring Historical Photographs - June 10th Edition
10 June 2020 • by Bob • Photography, History
I found another interesting photo in an aviation forum that looked like a good candidate for colorizing, in this case it was the crew of the "Hell's Angel's" B-17 adding the numbers for their latest bombing mission. (Which looks to be just shy of 40 missions.)
You can read more about this B-17 at: https://bit.ly/3hvp4Mg.
By the way, for those who've never seen it before, Jimmy Stewart helped create an Air Force Training/Recruitment film in 1942, wherein he describes the duties and responsibilities of a B-17 crew. (Although if you know your B-17 history, you can tell that the video is of a very early version of the aircraft, and not the version that saw most of the combat during the war. Can anyone else point out the most-important differences?)
PS - Despite having created this film, during the war Jimmy Stewart flew B-24s.
![]()
Coloring Historical Photographs - June 3rd Edition
04 June 2020 • by Bob • Photography, History
I found another interesting photo in an aviation forum that looked like a good candidate for colorizing, and here's the "Before and After" views. I can't imagine how cold it was in these WWII airplanes, but the scarf, gloves, leather boots and fleece lining that the pilot is wearing would seem to suggest that it was pretty cold. It's because of sacrifices from guys like this that we still have England.
After a bit of research, it appears that was a photo of Adolph Gysbert Malan, and you can read more about him here: Sailor Malan: a Battle of Britain Pilot.
Coloring Historical Photographs - May 29th Edition
29 May 2020 • by Bob • Photography, History
I found another image on an aviation forum, that I thought might be fun to colorize. To be honest, I did it rather quickly, so there are less layers than I had been using for some of the other images that I had done.
Some time later, I discovered that this was an image from LIFE magazine of Major Wallace Frank, which was dated September, 1948. (That was kind of a surprise; I would have thought that it was from a decade later.)
Even though I found this image on an aviation forum, while I was researching the image to see who was in it, I found it's information at: https://bit.ly/2zC1aOb.
Coloring Historical Photographs - May 16th Edition
16 May 2020 • by Bob • Photography, History
I found another interesting photo in an aviation forum, and I thought that I'd take a quick pass at colorizing it. It's a WWII Navy pilot standing on the wing of a Grumman Hellcat F6F, and despite some trying - I couldn't find out who he is.
The colorization isn't perfect, of course, but I think it adds a bit of depth to the story. There is something obvious that I got wrong, though: the undercarriage of the Hellcat should have been colored gray.
Of course, I could go back and fix that now, but... meh. Not today.


