Command-Line Utility to Create BlogEngine.NET Password Hashes
31 January 2015 • by Bob • BlogEngine.NET
I ran into an interesting predicament the other day, and I thought that both the situation and my solution were worth sharing. Here's the scenario: I host websites for several family members and friends, and one of my family member's uses BlogEngine.NET for her blog. (As you may have seen in my previous blogs, I'm a big fan of BlogEngine.NET.) In any event, she forgot her password, so I logged into the admin section of her website, only to discover that there was no way for me to reset her password – I could only reset my password. Since it's my webserver, I have access to the physical files, so I decided to write a simple utility that can create the requisite SHA256/BASE64 password hashes that BlogEngine.NET uses, and then I can manually update the Users.xml file with new password hashes as I create them.
With that in mind, here is the code for the command-line utility:
using System;
using System.Collections.Generic;
using System.Linq;
using System.Security.Cryptography;
using System.Text;
using System.Threading.Tasks;

namespace BlogEnginePasswordHash
{
  class Program
  {
    static void Main(string[] args)
    {
      // Verify that a single argument was passed to the application...
      if (args.Length != 1)
      {
        // ...if not, reply with generic help message.
        Console.WriteLine("\nUSAGE: BlogEnginePasswordHash <password>\n");
      }
      // ...otherwise...
      else
      {
        // Retrieve a sequence of bytes for the password argument.
        var passwordBytes = Encoding.UTF8.GetBytes(args[0]);
        // Retrieve a SHA256 object.
        using (HashAlgorithm sha256 = new SHA256Managed())
        {
          // Hash the password.
          sha256.TransformFinalBlock(passwordBytes, 0, passwordBytes.Length);
          // Convert the hashed password to a Base64 string.
          string passwordHash = Convert.ToBase64String(sha256.Hash);
          // Display the password and it's hash.
          Console.WriteLine("\nPassword: {0}\nHash: {1}\n", args[0], passwordHash);
        }
      }
    }
  }
}
That code snippet should be pretty self-explanatory; the application takes a single argument, which is the password to hash. Once you enter a password and hit enter, the password and it's respective hash will be displayed.
Here are a few examples:
C:\>BlogEnginePasswordHash.exe "This is my password"

Password: This is my password
Hash: 6tV+IGzvN4gaQ0vmCWNHSQ0UQ0WgW4+ThJuhpXR6Z3c=

C:\>BlogEnginePasswordHash.exe Password1

Password: Password1
Hash: GVE/3J2k+3KkoF62aRdUjTyQ/5TVQZ4fI2PuqJ3+4d0=

C:\>BlogEnginePasswordHash.exe Password2

Password: Password2
Hash: G+AiJ1Cq84iauVtdWTuhLk/xBGR0cC1rR3n0tScwWyM=

C:\>
Once you have created password hashes, you can paste those into the Users.xml file for your website:
<Users>
  <User>
    <UserName>Alice</UserName>
    <Password>GVE/3J2k+3KkoF62aRdUjTyQ/5TVQZ4fI2PuqJ3+4d0=</Password>
    <Email>alice@fabrikam.com</Email>
    <LastLoginTime>2015-01-31 01:52:00</LastLoginTime>
  </User>
  <User>
    <UserName>Bob</UserName>
    <Password>G+AiJ1Cq84iauVtdWTuhLk/xBGR0cC1rR3n0tScwWyM=</Password>
    <Email>bob@fabrikam.com</Email>
    <LastLoginTime>2015-01-31 01:53:00</LastLoginTime>
  </User>
</Users>
That's all there is to do. Pretty simple stuff.
Note: This blog was originally posted at http://blogs.msdn.com/robert_mcmurray/
Adding Custom FTP Providers with the IIS Configuration Editor - Part 2
02 May 2013 • by Bob • IIS, FTP, Extensibility
In Part 1 of this blog series about adding custom FTP providers with the IIS Configuration Editor, I showed you how to add a custom FTP provider with a custom setting for the provider that is stored in your IIS configuration settings. For my examples, I showed how to do this by using both the AppCmd.exe application from a command line and by using the IIS Configuration Editor. In part 2 of this blog series, I will show you how to use the IIS Configuration Editor to add custom FTP providers to your FTP sites.
As a brief review from Part 1, the following XML excerpt illustrates what the provider's settings should resemble when added to your IIS settings:
<system.ftpServer>
   <providerDefinitions>
     <add name="FtpXmlAuthorization"
       type="FtpXmlAuthorization, FtpXmlAuthorization, version=1.0.0.0, Culture=neutral, PublicKeyToken=426f62526f636b73" />
     <activation>
       <providerData name="FtpXmlAuthorization">
         <add key="xmlFileName"
           value="C:\inetpub\FtpUsers\Users.xml" />
       </providerData>
     </activation>
   </providerDefinitions>
 </system.ftpServer>
The above example shows the settings that are added globally to register an FTP provider. Note that this example only contains the settings for my custom provider; you would normally see the settings for the IisManagerAuth and AspNetAuth providers that ship with the FTP service in the providerDefinitions collection.
To actually use a provider for an FTP site, you would need to add the provider to the settings for the FTP site in your IIS settings. So for part 2 of this blog series, we will focus on how to add a custom provider to an FTP site by using the IIS Configuration Editor.
Having said all of that, the rest of this blog is broken down into the following sections:
- Step 1 - Looking at the configuration settings for custom FTP providers
- Step 2 - Navigate to an FTP Site in the Configuration Editor
- Step 3 - Add custom FTP providers to an FTP site
- Summary and Parting Thoughts
Before continuing, I should reiterate that custom FTP providers fall into two categories: providers that are used for authentication and providers that are used for everything else. This distinction is important, because the settings are stored in different sections of your IIS settings. With that in mind, let's take a look at the settings for an example FTP site.
Step 1 - Looking at the configuration settings for custom FTP providers
The following example shows an FTP site with several custom FTP providers added:
<site name="ftp.contoso.com" id="2">
   <application path="/">
     <virtualDirectory path="/"
       physicalPath="c:\inetpub\www.contoso.com\wwwroot" />
   </application>
   <bindings>
     <binding protocol="ftp"
       bindingInformation="*:21:ftp.contoso.com" />
   </bindings>
   <ftpServer>
     <security>
       <ssl controlChannelPolicy="SslAllow"
         dataChannelPolicy="SslAllow" />
       <authentication>
         <customAuthentication>
           <providers>
             <add name="MyCustomFtpAuthenticationProvider" />
           </providers>
         </customAuthentication>
       </authentication>
     </security>
     <customFeatures>
       <providers>
         <add name="MyCustomFtpHomeDirectoryProvider" />
         <add name="MyCustomFtpLoggingProvider" />
       </providers>
     </customFeatures>
     <userIsolation mode="Custom" />
   </ftpServer>
 </site>
If you look at the above example, you will notice the following providers have been added:
- A custom FTP authentication provider named MyCustomFtpAuthenticationProvider has been added to the ftpServer/security/authentication/customAuthentication/providers collection; this provider will obviously be used by the FTP service to validate usernames and passwords.
- A custom FTP home directory provider named MyCustomFtpHomeDirectoryProvider has been added to the ftpServer/customFeatures/providers collection; this will be used by the FTP service for custom user isolation. Note the mode for the userIsolation element is set to custom.
- A custom FTP logging provider named MyCustomFtpLoggingProvider has been added to the ftpServer/customFeatures/providers collection; this will be used by the FTP service for creating custom log files.
As I mentioned earlier, you will notice that the settings for FTP custom providers are stored in different sections of the ftpServer collection depending on whether they are used for authentication or some other purpose.
Step 2 - Navigate to an FTP Site in the Configuration Editor
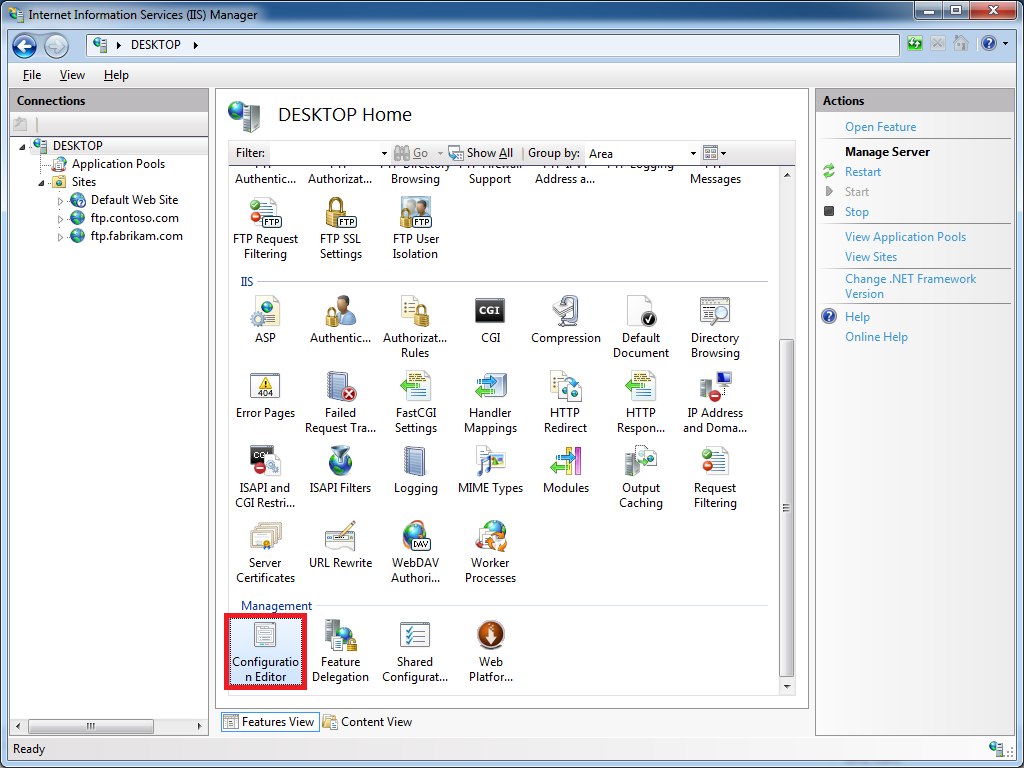
Open the IIS Manager and click on the Configuration Editor at feature the server level:
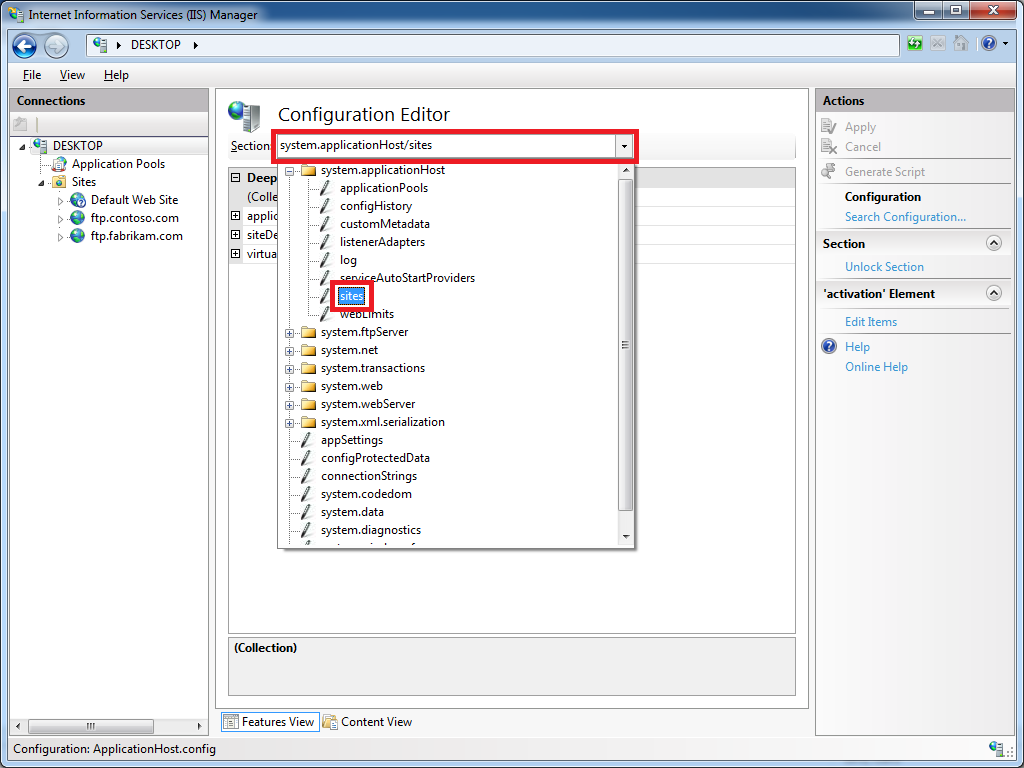
Click the Section drop-down menu, expand the the system.applicationHost collection, and then highlight the sites node:
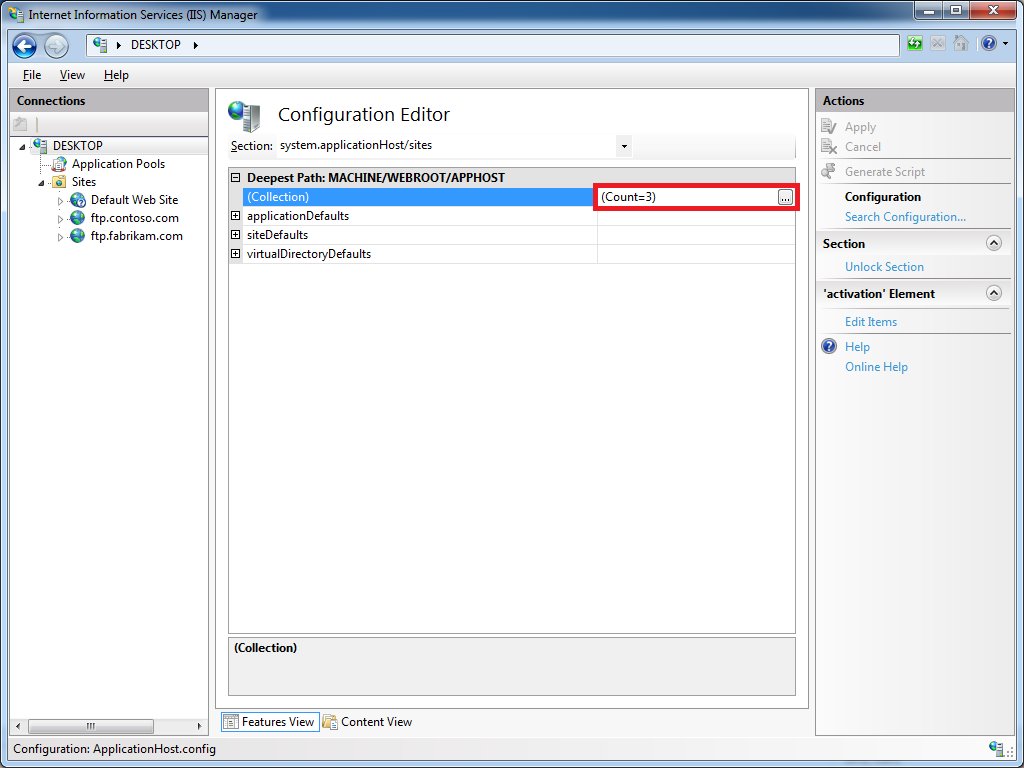
If you click on the Collection row, an ellipsis [...] will appear:
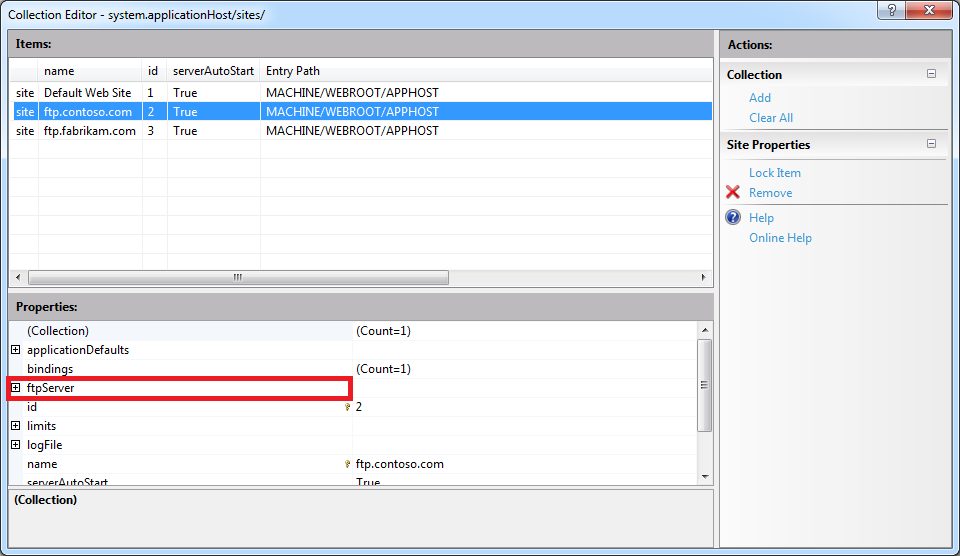
When you click the ellipsis [...], IIS will display the Collection Editor dialog box for your sites; both HTTP and FTP sites will be displayed:
Expand the ftpServer node, which is where all of the site-level settings for an FTP site are kept.
Step 3 - Add custom FTP providers to an FTP site
As I mentioned earlier, custom FTP providers fall into two categories: providers that are used for authentication and everything else. Because of this distinction, the following steps show you how to add a provider to the correct section of your settings depending on the provider's purpose.
Add a custom FTP provider to an FTP site that is not used for authentication
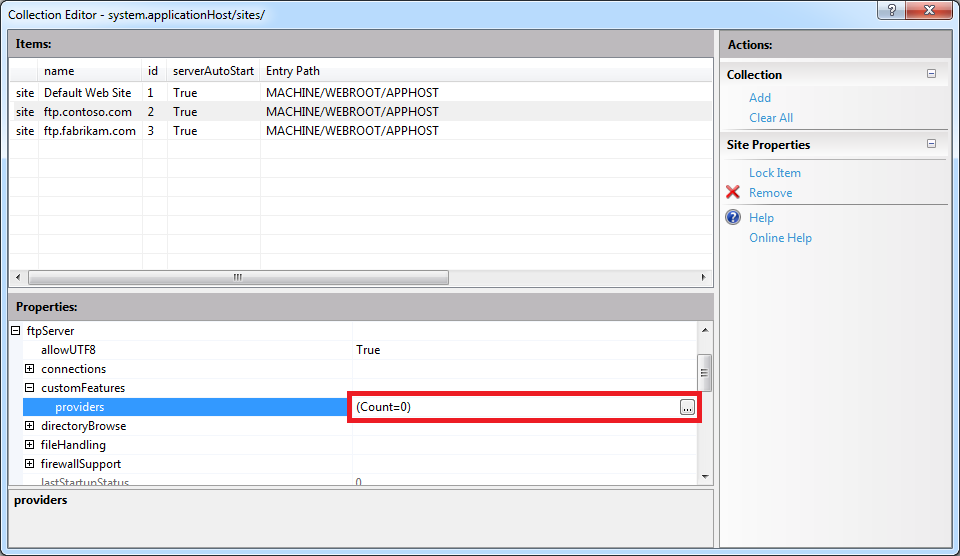
Expand the customFeatures node, which is located under the ftpServer node for an FTP site; this collection defines the custom providers for an FTP site that are not used for authentication, for example: home directory providers, logging providers, etc. When you highlight the providers row, an ellipsis [...] will appear:
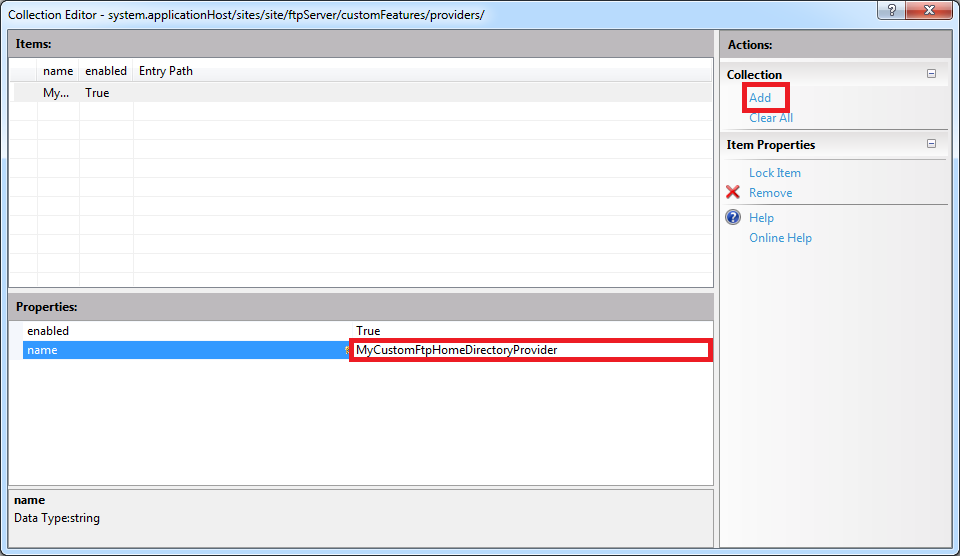
When you click the ellipsis [...], IIS will display the Collection Editor dialog box for your custom features (providers). When you click Add in the Actions pane, you need to enter the name of an FTP provider that you entered by following the instructions in Part 1 of this blog series:
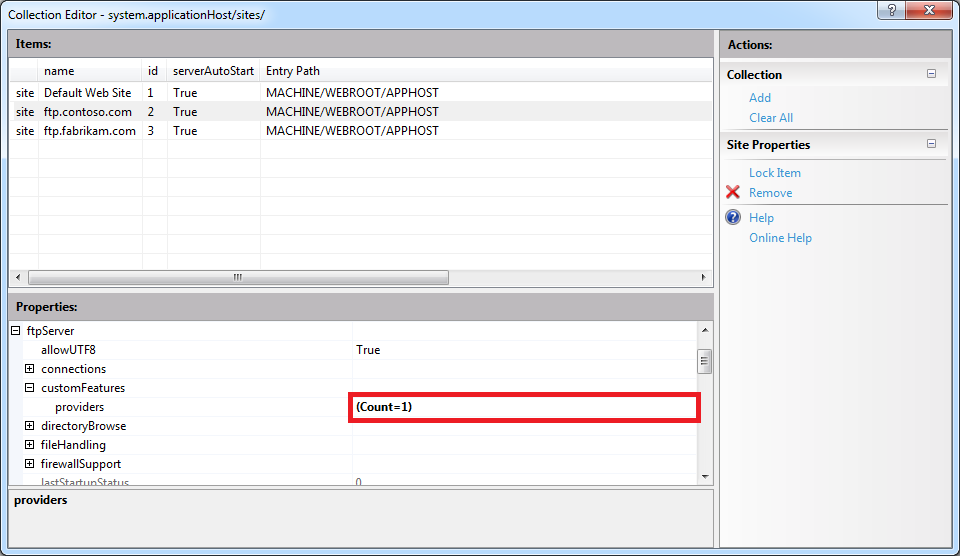
Once you enter the name of your FTP provider in the Collection Editor dialog box for your custom features, you can close that dialog box. The Collection Editor for your sites will reflect the updated provider count for your FTP site:
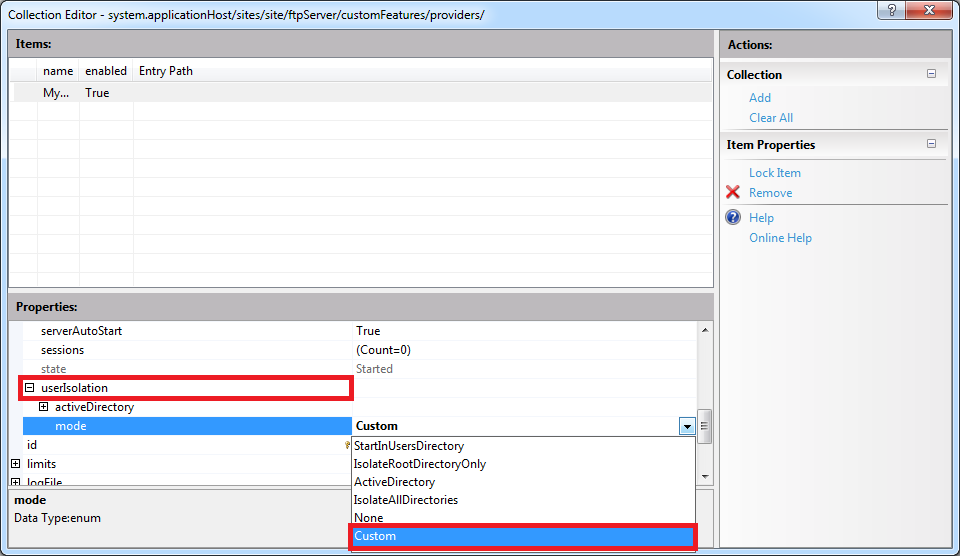
Important Note: If you are adding a custom FTP Home Directory Provider, you have to configure the mode for FTP's User Isolation features. To do so, you need to expand the userIsolation node, which is located under the ftpServer node for an FTP site. Once you have done so, click the mode drop-down menu and choose Custom from the list of choices:
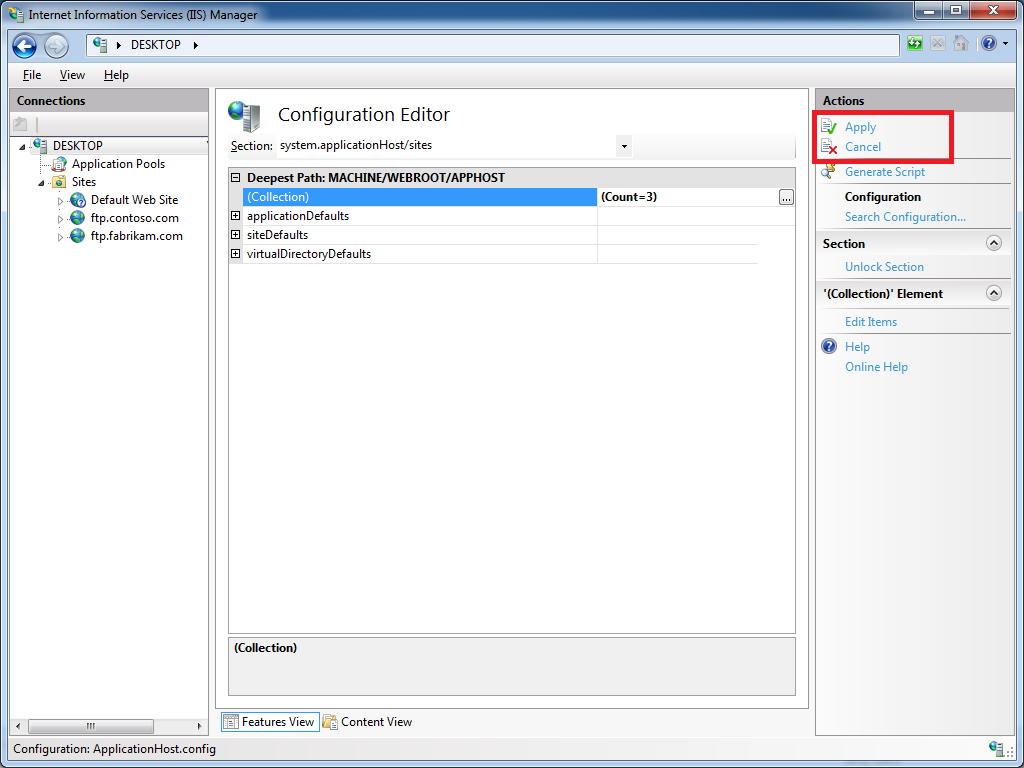
When you close the Collection Editor dialog box for your sites, you need to click Apply in the Actions pane to commit the changes to your IIS settings:
Add a custom FTP authentication provider to an FTP site
First and foremost - there is built-in support for adding custom authentication providers in IIS Manager; to see the steps to do so, see the FTP Custom Authentication <customAuthentication> article on the IIS.NET website. However, if you want to add a custom FTP authentication provider to an FTP site by using the IIS Configuration Editor, you can do so by using the following steps.
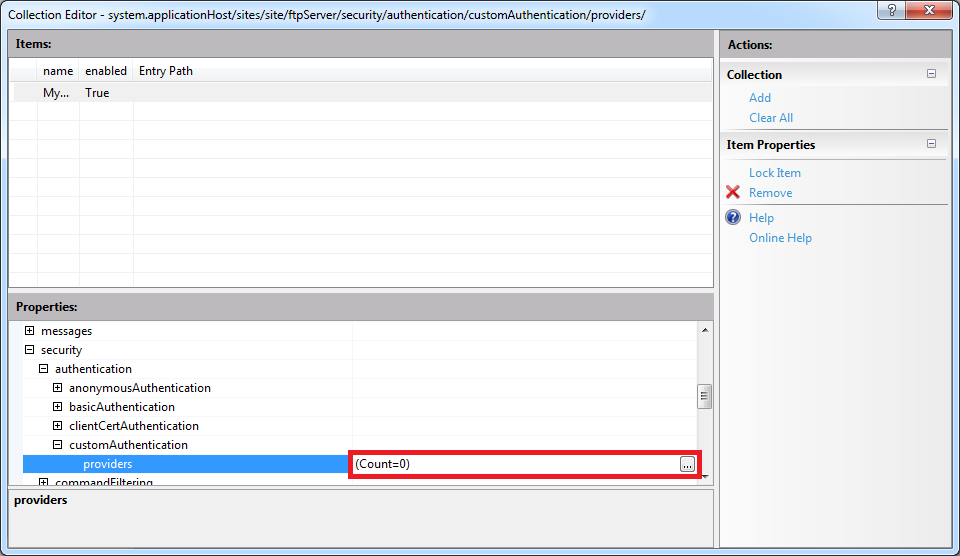
Expand the security node under the ftpServer node for an FTP site, then expand the authentication node, and then expand the customAuthentication node; this collection defines the custom authentication providers for an FTP site. When you highlight the providers row, an ellipsis [...] will appear:
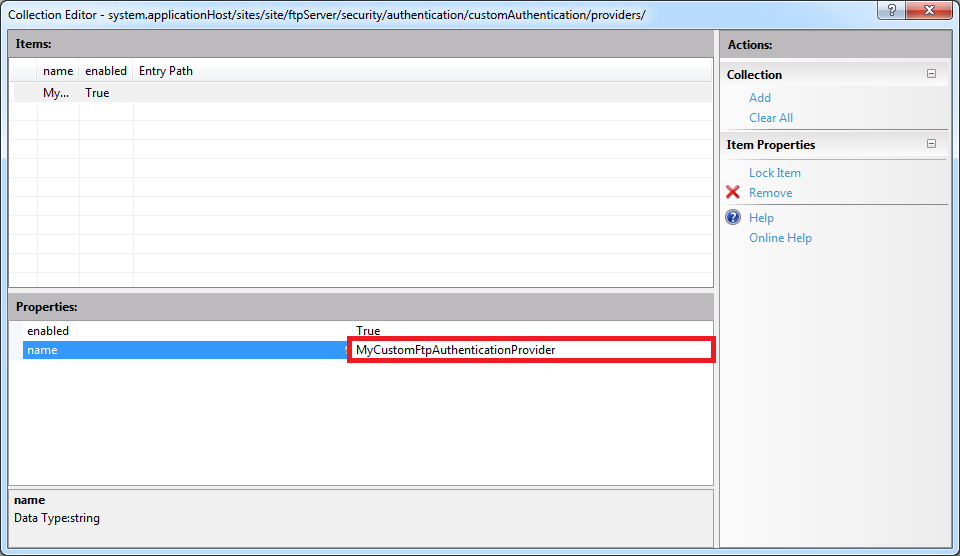
When you click the ellipsis [...], IIS will display the Collection Editor dialog box for your custom authentication providers. When you click Add in the Actions pane, you need to enter the name of an FTP authentication provider that you entered by following the instructions in Part 1 of this blog series:
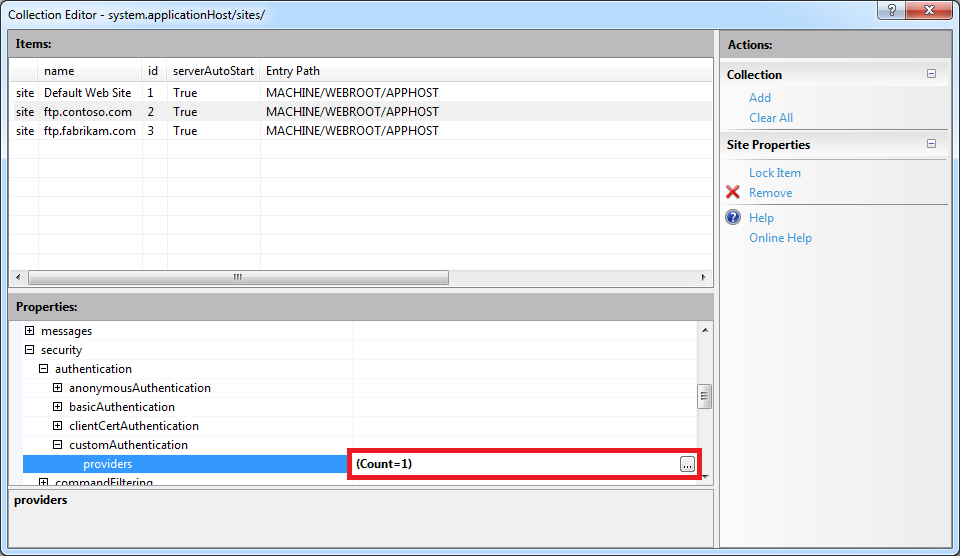
Once you enter the name of your FTP authentication provider in the Collection Editor dialog box for your custom authentication providers, you can close that dialog box. The Collection Editor for your sites will reflect the updated authentication provider count for your FTP site:
When you close the Collection Editor dialog box for your sites, you need to click Apply in the Actions pane to commit the changes to your IIS settings:
Summary and Parting Thoughts
As I mentioned in part 1 of this series, I admit that this might seem like a lot of steps to go through, but it's not that difficult once you understand how the configuration settings are organized and you get the hang of using the IIS Configuration Editor to add or modify these settings.
Disabling Custom User Isolation
In the Add a custom FTP provider to an FTP site that is not used for authentication section of this blog, I added a step to specify Custom as the User Isolation mode. Since this is something of an advanced feature, there is no user interface for enabling custom user isolation; this was a design decision to keep people from breaking their FTP sites. Here's why: if you enable custom user isolation and you don't install a custom Home Directory provider for FTP, all users will be denied access to your FTP site.
That being said, once you have enabled custom user isolation, the option to disable custom user isolation will "magically" appear in the FTP User Isolation feature in the IIS Manager. To see this for yourself, you would first need to follow the steps to custom user isolation in the Add a custom FTP provider to an FTP site that is not used for authentication section of this blog.
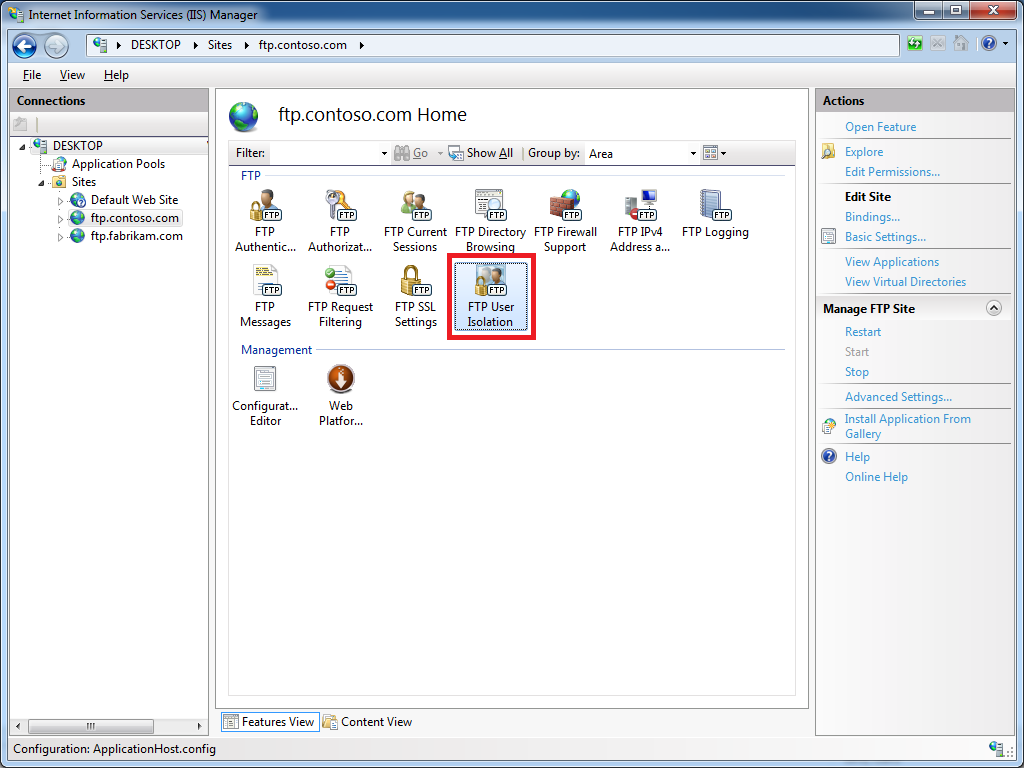
Once you have enabled custom user isolation, highlight your FTP site in the list of Sites pane of IIS Manager, then open the FTP User Isolation feature:
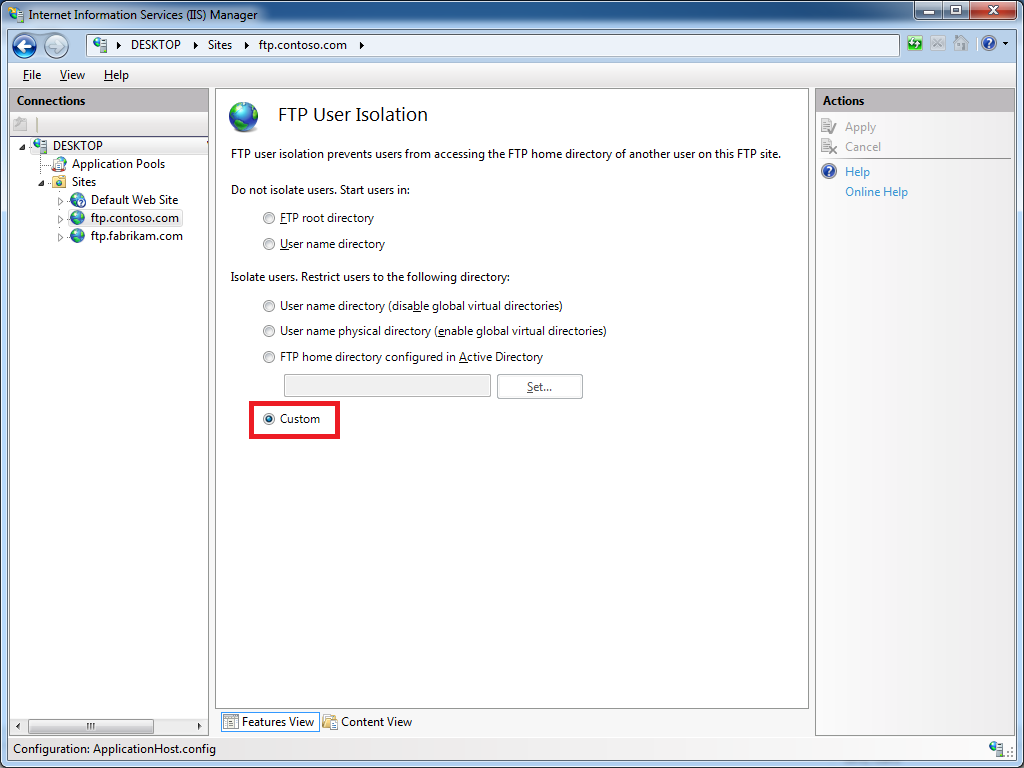
When you open the FTP User Isolation feature, you will see that an option for Custom now appears in the list of user isolation modes:
This option will appear as long as custom user isolation is enabled. If you change the user isolation mode to something other than Custom, this option will continue appear in the list of user isolation modes until you navigate somewhere else in IIS Manager. Once you have changed the user isolation mode to one of the built-in modes and you navigate somewhere else, the Custom option will not show up in the FTP User Isolation feature until you follow the steps to re-enable custom user isolation.
Additional Information
If you want additional information about configuring the settings for FTP providers, you can find detailed reference documentation at the following URLs:
- FTP Custom Features <customFeatures>
http://www.iis.net/configreference/system.applicationhost/sites/site/ftpserver/customfeatures - FTP Custom Authentication <customAuthentication>
http://www.iis.net/configreference/system.applicationhost/sites/site/ftpserver/security/authentication/customauthentication
Each of these articles contain "How-To" steps, detailed information about each of the configuration settings, and code samples for AppCmd.exe, C#/VB.NET, and JavaScript/VBScript.
As always, let me know if you have any questions. ;-]
Note: This blog was originally posted at http://blogs.msdn.com/robert_mcmurray/
Adding Custom FTP Providers with the IIS Configuration Editor - Part 1
31 March 2013 • by Bob • Extensibility, FTP, IIS
I've written a lot of walkthroughs and blog posts about creating custom FTP providers over the past several years, and I usually include instructions for adding these custom providers to IIS. When you create a custom FTP authentication provider, IIS has a user interface for adding that provider to FTP. But if you are adding a custom home directory or logging provider, there is no dedicated user interface for adding those types of FTP providers. In addition, if you create a custom FTP provider that requires settings that are stored in your IIS configuration, there is no user interface to add or manage those settings.
With this in mind, I include instructions in my blogs and walkthroughs that describe how to add those type of providers by using AppCmd.exe from a command line. For example, if you take a look at my How to Use Managed Code (C#) to Create an FTP Authentication and Authorization Provider using an XML Database walkthrough, I include the following instructions:
Adding the Provider
- Determine the assembly information for the extensibility provider:
- In Windows Explorer, open your "C:\Windows\assembly" path, where C: is your operating system drive.
- Locate the FtpXmlAuthorization assembly.
- Right-click the assembly, and then click Properties.
- Copy the Culture value; for example: Neutral.
- Copy the Version number; for example: 1.0.0.0.
- Copy the Public Key Token value; for example: 426f62526f636b73.
- Click Cancel.
- Using the information from the previous steps, add the extensibility provider to the global list of FTP providers and configure the options for the provider:
- At the moment there is no user interface that enables you to add properties for custom authentication or authorization modules, so you will have to use the following command line:
cd %SystemRoot%\System32\Inetsrv

appcmd.exe set config -section:system.ftpServer/providerDefinitions /+"[name='FtpXmlAuthorization',type='FtpXmlAuthorization,FtpXmlAuthorization,version=1.0.0.0,Culture=neutral,PublicKeyToken=426f62526f636b73']" /commit:apphost

appcmd.exe set config -section:system.ftpServer/providerDefinitions /+"activation.[name='FtpXmlAuthorization']" /commit:apphost

appcmd.exe set config -section:system.ftpServer/providerDefinitions /+"activation.[name='FtpXmlAuthorization'].[key='xmlFileName',value='C:\Inetpub\XmlSample\Users.xml']" /commit:apphost - Note: The file path that you specify in the xmlFileName attribute must match the path where you saved the "Users.xml" file on your computer in the earlier in this walkthrough.
- At the moment there is no user interface that enables you to add properties for custom authentication or authorization modules, so you will have to use the following command line:
This example adds a custom FTP provider, and then it adds a custom setting for that provider that is stored in your IIS configuration settings.
That being said, there is actually a way to add custom FTP providers with settings like the ones that I have just described through the IIS interface by using the IIS Configuration Editor. This feature was first available through the IIS Administration Pack for IIS 7.0, and is built-in for IIS 7.5 and IIS 8.0.
Before I continue, if would probably be prudent to take a look at the settings that we are trying to add, because these settings might help you to understand the rest of steps in this blog. Here is an example from my applicationhost.config file for three custom FTP authentication providers; the first two providers are installed with the FTP service, and the third provider is a custom provider that I created with a single provider-specific configuration setting:
<system.ftpServer>
  <providerDefinitions>
    <add name="IisManagerAuth" type="Microsoft.Web.FtpServer.Security.IisManagerAuthenticationProvider, Microsoft.Web.FtpServer, version=7.5.0.0, Culture=neutral, PublicKeyToken=31bf3856ad364e35" />
    <add name="AspNetAuth" type="Microsoft.Web.FtpServer.Security.AspNetFtpMembershipProvider, Microsoft.Web.FtpServer, version=7.5.0.0, Culture=neutral, PublicKeyToken=31bf3856ad364e35" />
    <add name="FtpXmlAuthorization" type="FtpXmlAuthorization, FtpXmlAuthorization, version=1.0.0.0, Culture=neutral, PublicKeyToken=426f62526f636b73" />
    <activation>
      <providerData name="FtpXmlAuthorization">
        <add key="xmlFileName" value="C:\inetpub\FtpUsers\Users.xml" />
      </providerData>
    </activation>
  </providerDefinitions>
</system.ftpServer>
With that in mind, in part 1 of this blog series, I will show you how to use the IIS Configuration Editor to add a custom FTP provider with provider-specific configuration settings.
Step 1 - Open the IIS Manager and click on the Configuration Editor at feature the server level:
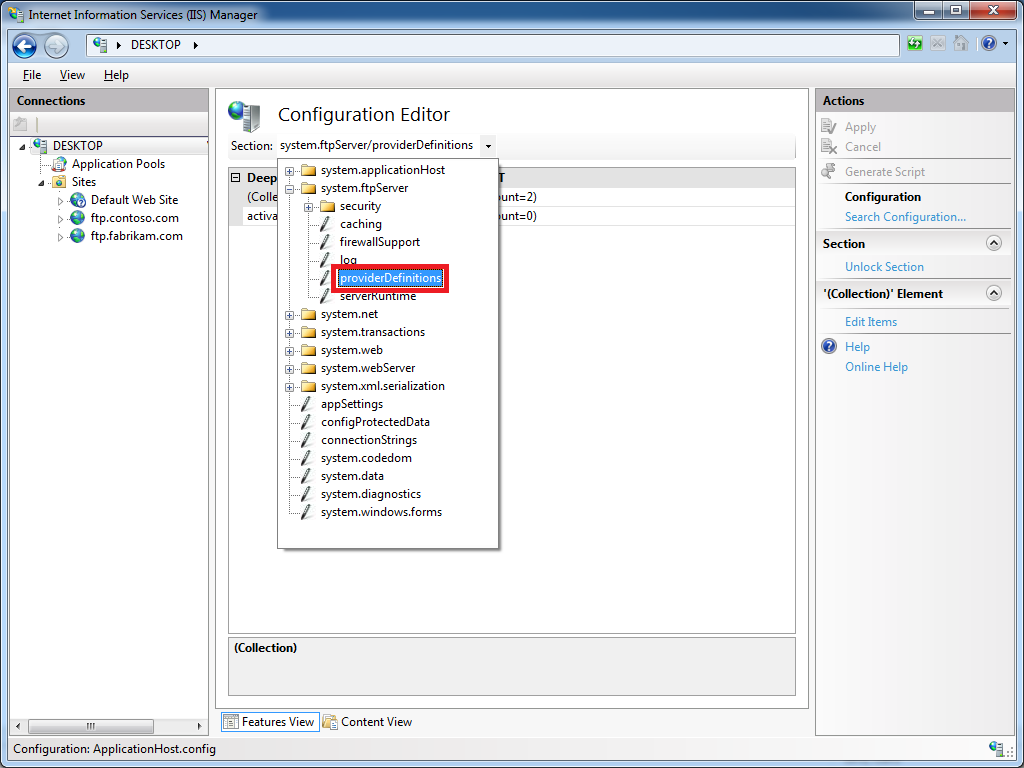
Step 2 - Click the Section drop-down menu, expand the the system.ftpServer collection, and then highlight the providerDefinitions node:
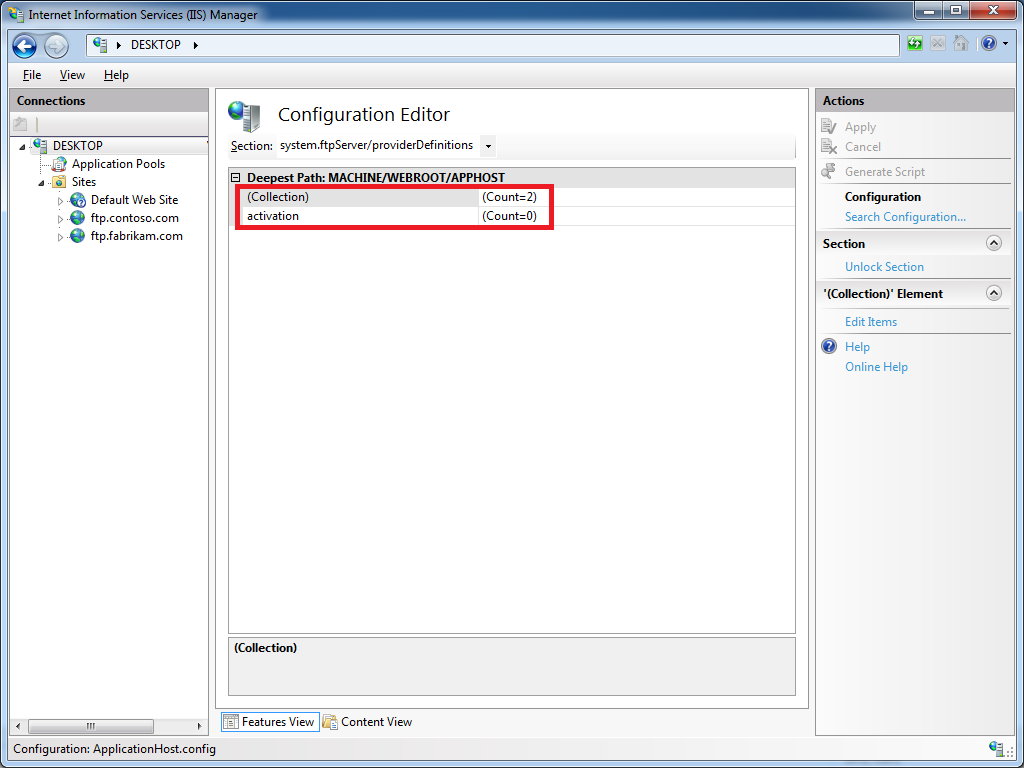
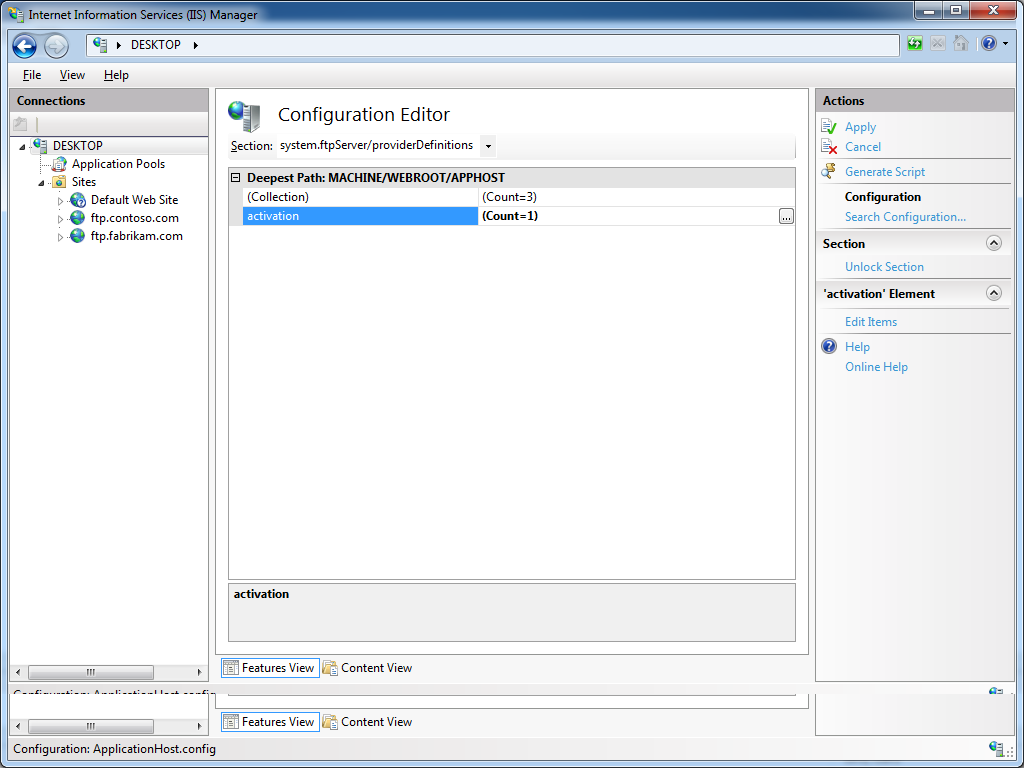
Step 3 - A default installation IIS with the FTP service should show a Count of 2 providers in the Collection row, and no settings in the activation row:
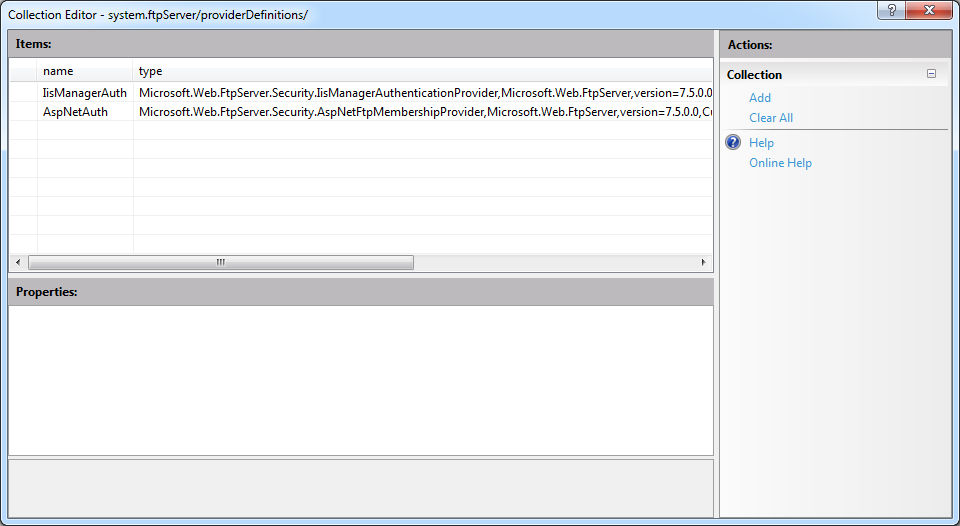
Step 4 - If you click on the Collection row, an ellipsis [...] will appear, and when you click that, IIS will display the Collection Editor dialog for FTP providers. By default you should see just the two built-in providers for the IisManagerAuth and AspNetAuth providers:
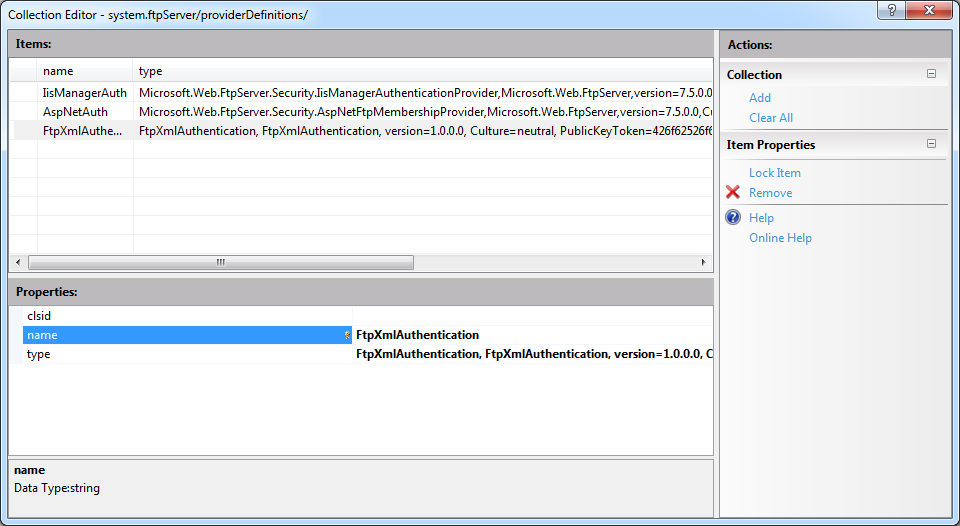
Step 5 - When you click Add in the Actions pane, you can enter the registration information for your provider. At a minimum you must provide a name for your provider, but you will need to enter either the clsid for a COM-based provider or the type for a managed-code provider:
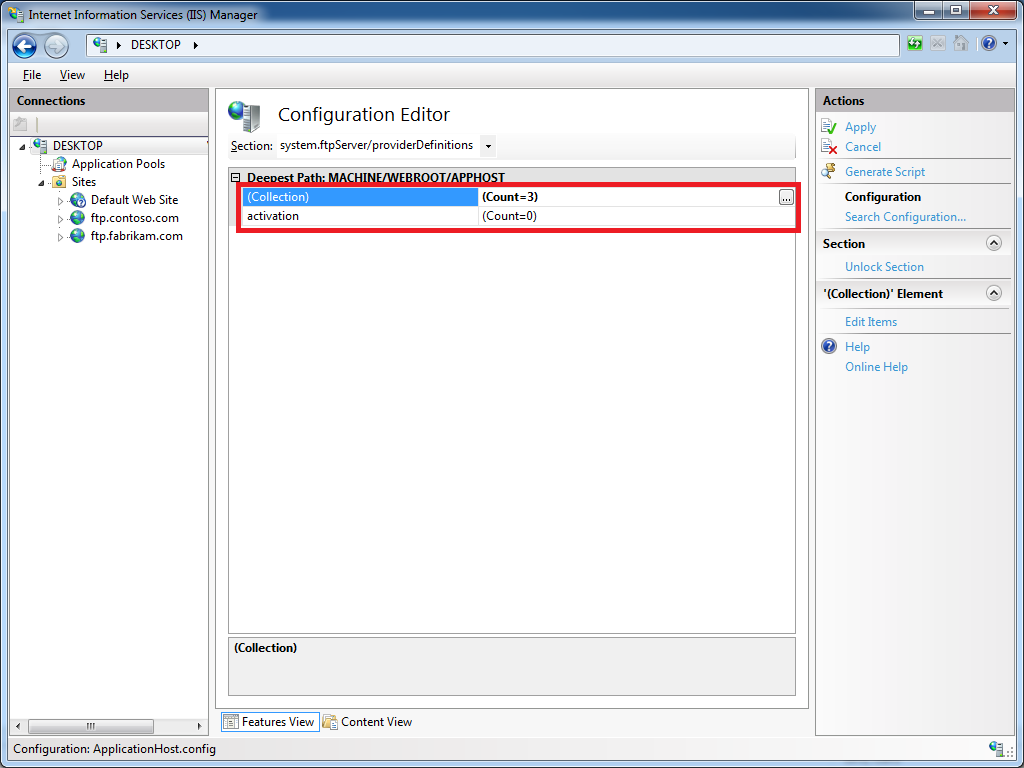
Step 6 - When you close the Collection Editor dialog, the Count of providers in the Collection should now reflect the provider that we just added; click Apply in the Actions pane to save the changes:
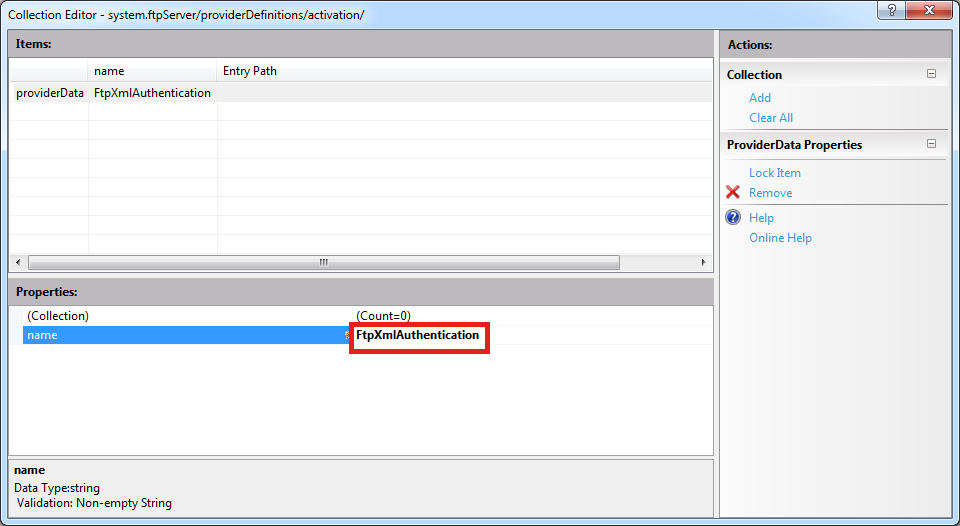
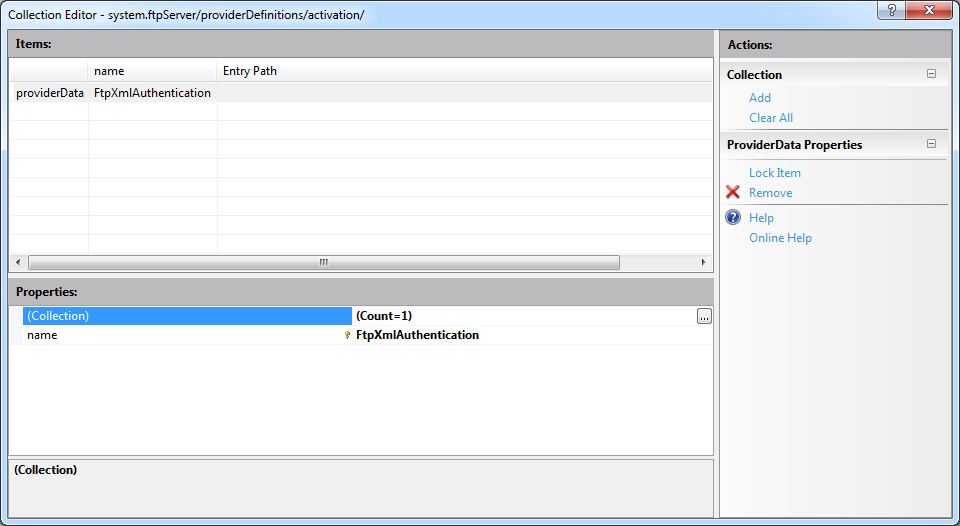
Step 7 - If you click on the activation row, an ellipsis [...] will appear, and when you click that, IIS will display the Collection Editor dialog for provider data; this is where you will enter provider-specific settings. When you click Add in the Actions pane, you must specify the name for your provider's settings, and this name must match the exact name that you provided in Step 5 earlier:
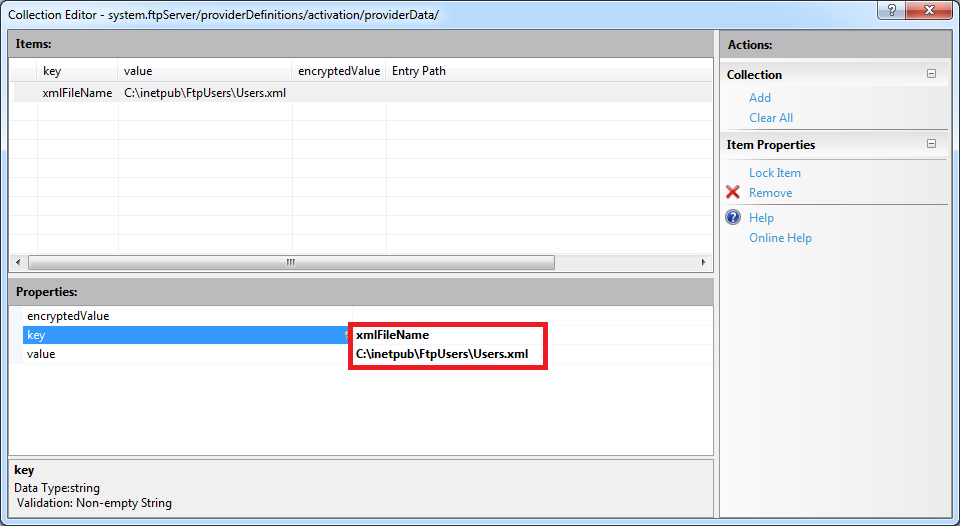
Step 8 - If you click on the Collection row, an ellipsis [...] will appear, and when you click that, IIS will display the Collection Editor dialog for the activation data for an FTP provider. At a minimum you must provide a key for your provider, which will depend on the settings that your provider expects to retrieve from your configuration settings. (For example, in the XML file that I provided earlier, my FtpXmlAuthorization provider expects to retrieve the path to an XML that contains a list of users, roles, and authorization rules.) You also need to enter the either the value or encryptedValue for your provider; although you can specify either setting, should generally specify the value when the settings are not sensitive in nature, and specify the encryptedValue for settings like usernames and passwords:
Step 9 - When you close the Collection Editor dialog for the activation data, the Count of key/value pairs in the Collection should now reflect the value that we just added:
Step 10 - When you close the Collection Editor dialog for the provider data, the Count of provider data settings in the activation row should now reflect the custom settings that we just added; click Apply in the Actions pane to save the changes:
That's all that there is to adding a custom FTP provider with provider-specific settings; I admit that it might seem like a lot of steps until you get the hang of it.
In the next blog for this series, I will show you how to add custom providers to FTP sites by using the IIS Configuration Editor.
Note: This blog was originally posted at http://blogs.msdn.com/robert_mcmurray/
Advanced Log Parser Part 7 - Creating a Generic Input Format Plug-In
28 February 2013 • by Bob • LogParser, Scripting, XML
In Part 6 of this series, I showed how to create a very basic COM-based input format provider for Log Parser. I wrote that blog post as a follow-up to an earlier blog post where I had written a more complex COM-based input format provider for Log Parser that worked with FTP RSCA events. My original blog post had resulted in several requests for me to write some easier examples about how to get started writing COM-based input format providers for Log Parser, and those appeals led me to write my last blog post:
Advanced Log Parser Part 6 - Creating a Simple Custom Input Format Plug-In
The example in that blog post simply returns static data, which was the easiest example that I could demonstrate.
For this follow-up blog post, I will illustrate how to create a simple COM-based input format plug-in for Log Parser that you can use as a generic provider for consuming data in text-based log files. Please bear in mind that this is just an example to help developers get started writing their own COM-based input format providers; you might be able to accomplish some of what I will demonstrate in this blog post by using the built-in Log Parser functionality. That being said, this still seems like the best example to help developers get started because consuming data in text-based log files was the most-often-requested example that I received.
In Review: Creating COM-based plug-ins for Log Parser
In my earlier blog posts, I mentioned that a COM plug-in has to support several public methods. You can look at those blog posts when you get the chance, but it is a worthwhile endeavor for me to copy the following information from those blog posts since it is essential to understanding how the code sample in this blog post is supposed to work.
| Method Name | Description |
|---|---|
| OpenInput | Opens your data source and sets up any initial environment settings. |
| GetFieldCount | Returns the number of fields that your plug-in will provide. |
| GetFieldName | Returns the name of a specified field. |
| GetFieldType | Returns the datatype of a specified field. |
| GetValue | Returns the value of a specified field. |
| ReadRecord | Reads the next record from your data source. |
| CloseInput | Closes your data source and cleans up any environment settings. |
Once you have created and registered a COM-based input format plug-in, you call it from Log Parser by using something like the following syntax:
logparser.exe "SELECT * FROM FOO" -i:COM -iProgID:BAR
In the preceding example, FOO is a data source that makes sense to your plug-in, and BAR is the COM class name for your plug-in.
Creating a Generic COM plug-in for Log Parser
As I have done in my previous two blog posts about creating COM-based input format plug-ins, I'm going to demonstrate how to create a COM component by using a scriptlet since no compilation is required. This generic plug-in will parse any text-based log files where records are delimited by CRLF sequences and fields/columns are delimited by a separator that is defined as a constant in the code sample.
To create the sample COM plug-in, copy the following code into a text file, and save that file as "Generic.LogParser.Scriptlet.sct" to your computer. (Note: The *.SCT file extension tells Windows that this is a scriptlet file.)
<SCRIPTLET>
  <registration
    Description="Simple Log Parser Scriptlet"
    Progid="Generic.LogParser.Scriptlet"
    Classid="{4e616d65-6f6e-6d65-6973-526f62657274}"
    Version="1.00"
    Remotable="False" />
  <comment>
  EXAMPLE: logparser "SELECT * FROM 'C:\foo\bar.log'" -i:COM -iProgID:Generic.LogParser.Scriptlet
  </comment>
  <implements id="Automation" type="Automation">
    <method name="OpenInput">
      <parameter name="strFileName"/>
    </method>
    <method name="GetFieldCount" />
    <method name="GetFieldName">
      <parameter name="intFieldIndex"/>
    </method>
    <method name="GetFieldType">
      <parameter name="intFieldIndex"/>
    </method>
    <method name="ReadRecord" />
    <method name="GetValue">
      <parameter name="intFieldIndex"/>
    </method>
    <method name="CloseInput">
      <parameter name="blnAbort"/>
    </method>
  </implements>
  <SCRIPT LANGUAGE="VBScript">

Option Explicit

' Define the column separator in the log file.
Const strSeparator = "|"

' Define whether the first row contains column names.
Const blnHeaderRow = True

' Define the field type constants.
Const TYPE_INTEGER   = 1
Const TYPE_REAL      = 2
Const TYPE_STRING    = 3
Const TYPE_TIMESTAMP = 4
Const TYPE_NULL      = 5

' Declare variables.
Dim objFSO, objFile, blnFileOpen
Dim arrFieldNames, arrFieldTypes
Dim arrCurrentRecord

' Indicate that no file has been opened.
blnFileOpen = False

' --------------------------------------------------------------------------------
' Open the input session.
' --------------------------------------------------------------------------------

Public Function OpenInput(strFileName)
    Dim tmpCount
    ' Test for a file name.
    If Len(strFileName)=0 Then
        ' Return a status that the parameter is incorrect.
        OpenInput = 87
        blnFileOpen = False
    Else
        ' Test for single-quotes.
        If Left(strFileName,1)="'" And Right(strFileName,1)="'" Then
            ' Strip the single-quotes from the file name.
            strFileName = Mid(strFileName,2,Len(strFileName)-2)
        End If
        ' Open the file system object.
        Set objFSO = CreateObject("Scripting.Filesystemobject")
        ' Verify that the specified file exists.
        If objFSO.FileExists(strFileName) Then
            ' Open the specified file.
            Set objFile = objFSO.OpenTextFile(strFileName,1,False)
            ' Set a flag to indicate that the specified file is open.
            blnFileOpen = true
            ' Retrieve an initial record.
            Call ReadRecord()
            ' Redimension the array of field names.
            ReDim arrFieldNames(UBound(arrCurrentRecord))
            ' Loop through the record fields.
            For tmpCount = 0 To (UBound(arrFieldNames))
                ' Test for a header row.
                If blnHeaderRow = True Then
                    arrFieldNames(tmpCount) = arrCurrentRecord(tmpCount)
                Else
                    arrFieldNames(tmpCount) = "Field" & (tmpCount+1)
                End If
            Next
            ' Test for a header row.
            If blnHeaderRow = True Then
                ' Retrieve a second record.
                Call ReadRecord()
            End If
            ' Redimension the array of field types.
            ReDim arrFieldTypes(UBound(arrCurrentRecord))
            ' Loop through the record fields.
            For tmpCount = 0 To (UBound(arrFieldTypes))
                ' Test if the current field contains a date.
                If IsDate(arrCurrentRecord(tmpCount)) Then
                    ' Specify the field type as a timestamp.
                    arrFieldTypes(tmpCount) = TYPE_TIMESTAMP
                ' Test if the current field contains a number.
                ElseIf IsNumeric(arrCurrentRecord(tmpCount)) Then
                    ' Test if the current field contains a decimal.
                    If InStr(arrCurrentRecord(tmpCount),".") Then
                        ' Specify the field type as a real number.
                        arrFieldTypes(tmpCount) = TYPE_REAL
                    Else
                        ' Specify the field type as an integer.
                        arrFieldTypes(tmpCount) = TYPE_INTEGER
                    End If
                ' Test if the current field is null.
                ElseIf IsNull(arrCurrentRecord(tmpCount)) Then
                    ' Specify the field type as NULL.
                    arrFieldTypes(tmpCount) = TYPE_NULL
                ' Test if the current field is empty.
                ElseIf IsEmpty(arrCurrentRecord(tmpCount)) Then
                    ' Specify the field type as NULL.
                    arrFieldTypes(tmpCount) = TYPE_NULL
                ' Otherwise, assume it's a string.
                Else
                    ' Specify the field type as a string.
                    arrFieldTypes(tmpCount) = TYPE_STRING
                End If
            Next
            ' Temporarily close the log file.
            objFile.Close
            ' Re-open the specified file.
            Set objFile = objFSO.OpenTextFile(strFileName,1,False)
            ' Test for a header row.
            If blnHeaderRow = True Then
                ' Skip the first row.
                objFile.SkipLine
            End If
            ' Return success status.
            OpenInput = 0
        Else
            ' Return a file not found status.
            OpenInput = 2
        End If
    End If
End Function

' --------------------------------------------------------------------------------
' Close the input session.
' --------------------------------------------------------------------------------

Public Function CloseInput(blnAbort)
    ' Free the objects.
    Set objFile = Nothing
    Set objFSO = Nothing
    ' Set a flag to indicate that the specified file is closed.
    blnFileOpen = False
End Function

' --------------------------------------------------------------------------------
' Return the count of fields.
' --------------------------------------------------------------------------------

Public Function GetFieldCount()
    ' Specify the default value.
    GetFieldCount = 0
    ' Test if a file is open.
    If (blnFileOpen = True) Then
        ' Test for the number of field names.
        If UBound(arrFieldNames) > 0 Then
            ' Return the count of fields.
            GetFieldCount = UBound(arrFieldNames) + 1
        End If
    End If
End Function

' --------------------------------------------------------------------------------
' Return the specified field's name.
' --------------------------------------------------------------------------------

Public Function GetFieldName(intFieldIndex)
    ' Specify the default value.
    GetFieldName = Null
    ' Test if a file is open.
    If (blnFileOpen = True) Then
        ' Test if the index is valid.
        If intFieldIndex<=UBound(arrFieldNames) Then
            ' Return the specified field name.
            GetFieldName = arrFieldNames(intFieldIndex)
        End If
    End If
End Function

' --------------------------------------------------------------------------------
' Return the specified field's type.
' --------------------------------------------------------------------------------

Public Function GetFieldType(intFieldIndex)
    ' Specify the default value.
    GetFieldType = Null
    ' Test if a file is open.
    If (blnFileOpen = True) Then
        ' Test if the index is valid.
        If intFieldIndex<=UBound(arrFieldTypes) Then
            ' Return the specified field type.
            GetFieldType = arrFieldTypes(intFieldIndex)
        End If
    End If
End Function

' --------------------------------------------------------------------------------
' Return the specified field's value.
' --------------------------------------------------------------------------------

Public Function GetValue(intFieldIndex)
    ' Specify the default value.
    GetValue = Null
    ' Test if a file is open.
    If (blnFileOpen = True) Then
        ' Test if the index is valid.
        If intFieldIndex<=UBound(arrCurrentRecord) Then
            ' Return the specified field value based on the field type.
            Select Case arrFieldTypes(intFieldIndex)
                Case TYPE_INTEGER:
                    GetValue = CInt(arrCurrentRecord(intFieldIndex))
                Case TYPE_REAL:
                    GetValue = CDbl(arrCurrentRecord(intFieldIndex))
                Case TYPE_STRING:
                    GetValue = CStr(arrCurrentRecord(intFieldIndex))
                Case TYPE_TIMESTAMP:
                    GetValue = CDate(arrCurrentRecord(intFieldIndex))
                Case Else
                    GetValue = Null
            End Select
        End If
    End If
End Function

' --------------------------------------------------------------------------------
' Read the next record, and return true or false if there is more data.
' --------------------------------------------------------------------------------

Public Function ReadRecord()
    ' Specify the default value.
    ReadRecord = False
    ' Test if a file is open.
    If (blnFileOpen = True) Then
        ' Test if there is more data.
        If objFile.AtEndOfStream Then
            ' Flag the log file as having no more data.
            ReadRecord = False
        Else
            ' Read the current record.
            arrCurrentRecord = Split(objFile.ReadLine,strSeparator)
            ' Flag the log file as having more data to process.
            ReadRecord = True
        End If
    End If
End Function

  </SCRIPT>

</SCRIPTLET>
After you have saved the scriptlet code to your computer, you register it by using the following syntax:
regsvr32 Generic.LogParser.Scriptlet.sct
At the very minimum, you can now use the COM plug-in with Log Parser by using syntax like the following:
logparser "SELECT * FROM 'C:\Foo\Bar.log'" -i:COM -iProgID:Generic.LogParser.Scriptlet
Next, let's analyze what this sample does.
Examining the Generic Scriptlet in Detail
Here are the different parts of the scriptlet and what they do:
- The <registration> section of the scriptlet sets up the COM registration information; you'll notice the COM component class name and GUID, as well as version information and a general description. (Note that you should generate your own GUID for each scriptlet that you create.)
- The <implements> section declares the public methods that the COM plug-in has to support.
- The <script>section contains the actual implementation:
- The first part of the script section declares the global variables that will be used:
- The strSeparator constant defines the delimiter that is used to separate the data between fields/columns in a text-based log file.
- The blnHeaderRow constant defines whether the first row in a text-based log file contains the names of the fields/columns:
- If set to True, the plug-in will use the data in the first line of the log file to name the fields/columns.
- If set to False, the plug-in will define generic field/column names like "Field1", "Field2", etc.
- The second part of the script contains the required methods:
- The OpenInput() method performs several tasks:
- Locates and opens the log file that you specify in your SQL statement, or returns an error if the log file cannot be found.
- Determines the number, names, and data types of fields/columns in the log file.
- The CloseInput() method cleans up the session by closing the log file and destroying objects.
- The GetFieldCount() method returns the number of fields/columns in the log file.
- The GetFieldName() method returns the name of a field/column in the log file.
- The GetFieldType() method returns the data type of a field/column in the log file. As a reminder, Log Parser supports the following five data types for COM plug-ins: TYPE_INTEGER, TYPE_REAL, TYPE_STRING, TYPE_TIMESTAMP, and TYPE_NULL.
- The GetValue() method returns the data value of a field/column in the log file.
- The ReadRecord() method moves to the next line in the log file. This method returns True if there is additional data to read, or False when the end of data is reached.
- The OpenInput() method performs several tasks:
- The first part of the script section declares the global variables that will be used:
Next, let's look at how to use the sample.
Using the Generic Scriptlet with Log Parser
As a sample log file for this blog, I'm going to use the data in the Sample XML File (books.xml) from MSDN. By running a quick Log Parser query that I will show later, I was able to export data from the XML file into text file named "books.log" that represents an example of a simple log file format that I have had to work with in the past:
id|publish_date|author|title|price
bk101|2000-10-01|Gambardella, Matthew|XML Developer's Guide|44.950000
bk102|2000-12-16|Ralls, Kim|Midnight Rain|5.950000
bk103|2000-11-17|Corets, Eva|Maeve Ascendant|5.950000
bk104|2001-03-10|Corets, Eva|Oberon's Legacy|5.950000
bk105|2001-09-10|Corets, Eva|The Sundered Grail|5.950000
bk106|2000-09-02|Randall, Cynthia|Lover Birds|4.950000
bk107|2000-11-02|Thurman, Paula|Splish Splash|4.950000
bk108|2000-12-06|Knorr, Stefan|Creepy Crawlies|4.950000
bk109|2000-11-02|Kress, Peter|Paradox Lost|6.950000
bk110|2000-12-09|O'Brien, Tim|Microsoft .NET: The Programming Bible|36.950000
bk111|2000-12-01|O'Brien, Tim|MSXML3: A Comprehensive Guide|36.950000
bk112|2001-04-16|Galos, Mike|Visual Studio 7: A Comprehensive Guide|49.950000
In this example, the data is pretty easy to understand - the first row contains the list of field/column names, and the fields/columns are separated by the pipe ("|") character throughout the log file. That being said, you could easily change my sample code to use a different delimiter that your custom log files use.
With that in mind, let's look at some Log Parser examples.
Example #1: Retrieving Data from a Custom Log
The first thing that you should try is to simply retrieve data from your custom plug-in, and the following query should serve as an example:
logparser "SELECT * FROM 'C:\sample\books.log'" -i:COM -iProgID:Generic.LogParser.Scriptlet
The above query will return results like the following:
| id | publish_date | author | title | price | ||||||||||
|---|---|---|---|---|---|---|---|---|---|---|---|---|---|---|
| ----- | ------------------ | -------------------- | ------------------------------------- | --------- | ||||||||||
| bk101 | 10/1/2000 0:00:00 | Gambardella, Matthew | XML Developer's Guide | 44.950000 | ||||||||||
| bk102 | 12/16/2000 0:00:00 | Ralls, Kim | Midnight Rain | 5.950000 | ||||||||||
| bk103 | 11/17/2000 0:00:00 | Corets, Eva | Maeve Ascendant | 5.950000 | ||||||||||
| bk104 | 3/10/2001 0:00:00 | Corets, Eva | Oberon's Legacy | 5.950000 | ||||||||||
| bk105 | 9/10/2001 0:00:00 | Corets, Eva | The Sundered Grail | 5.950000 | ||||||||||
| bk106 | 9/2/2000 0:00:00 | Randall, Cynthia | Lover Birds | 4.950000 | ||||||||||
| bk107 | 11/2/2000 0:00:00 | Thurman, Paula | Splish Splash | 4.950000 | ||||||||||
| bk108 | 12/6/2000 0:00:00 | Knorr, Stefan | Creepy Crawlies | 4.950000 | ||||||||||
| bk109 | 11/2/2000 0:00:00 | Kress, Peter | Paradox Lost | 6.950000 | ||||||||||
| bk110 | 12/9/2000 0:00:00 | O'Brien, Tim | Microsoft .NET: The Programming Bible | 36.950000 | ||||||||||
| bk111 | 12/1/2000 0:00:00 | O'Brien, Tim | MSXML3: A Comprehensive Guide | 36.950000 | ||||||||||
| bk112 | 4/16/2001 0:00:00 | Galos, Mike | Visual Studio 7: A Comprehensive Guide | 49.950000 | ||||||||||
|
||||||||||||||
While the above example works a good proof-of-concept for functionality, it's not overly useful, so let's look at additional examples.
Example #2: Reformatting Log File Data
Once you have established that you can retrieve data from your custom plug-in, you can start taking advantage of Log Parser's features to process your log file data. In this example, I will use several of the built-in functions to reformat the data:
logparser "SELECT id AS ID, TO_DATE(publish_date) AS Date, author AS Author, SUBSTR(title,0,20) AS Title, STRCAT(TO_STRING(TO_INT(FLOOR(price))),SUBSTR(TO_STRING(price),INDEX_OF(TO_STRING(price),'.'),3)) AS Price FROM 'C:\sample\books.log'" -i:COM -iProgID:Generic.LogParser.Scriptlet
The above query will return results like the following:
| ID | Date | Author | Title | Price | ||||||||||
|---|---|---|---|---|---|---|---|---|---|---|---|---|---|---|
| ----- | ---------- | -------------------- | -------------------- | ----- | ||||||||||
| bk101 | 10/1/2000 | Gambardella, Matthew | XML Developer's Guid | 44.95 | ||||||||||
| bk102 | 12/16/2000 | Ralls, Kim | Midnight Rain | 5.95 | ||||||||||
| bk103 | 11/17/2000 | Corets, Eva | Maeve Ascendant | 5.95 | ||||||||||
| bk104 | 3/10/2001 | Corets, Eva | Oberon's Legacy | 5.95 | ||||||||||
| bk105 | 9/10/2001 | Corets, Eva | The Sundered Grail | 5.95 | ||||||||||
| bk106 | 9/2/2000 | Randall, Cynthia | Lover Birds | 4.95 | ||||||||||
| bk107 | 11/2/2000 | Thurman, Paula | Splish Splash | 4.95 | ||||||||||
| bk108 | 12/6/2000 | Knorr, Stefan | Creepy Crawlies | 4.95 | ||||||||||
| bk109 | 11/2/2000 | Kress, Peter | Paradox Lost | 6.95 | ||||||||||
| bk110 | 12/9/2000 | O'Brien, Tim | Microsoft .NET: The | 36.95 | ||||||||||
| bk111 | 12/1/2000 | O'Brien, Tim | MSXML3: A Comprehens | 36.95 | ||||||||||
| bk112 | 4/16/2001 | Galos, Mike | Visual Studio 7: A C | 49.95 | ||||||||||
|
||||||||||||||
This example reformats the dates and prices a little nicer, and it truncates the book titles at 20 characters so they fit a little better on some screens.
Example #3: Processing Log File Data
In addition to simply reformatting your data, you can use Log Parser to group, sort, count, total, etc., your data. The following example illustrates how to use Log Parser to count the number of books by author in the log file:
logparser "SELECT author AS Author, COUNT(Title) AS Books FROM 'C:\sample\books.log' GROUP BY Author ORDER BY Author" -i:COM -iProgID:Generic.LogParser.Scriptlet
The above query will return results like the following:
| Author | Books | ||||||||||
|---|---|---|---|---|---|---|---|---|---|---|---|
| -------------------- | ----- | ||||||||||
| Corets, Eva | 3 | ||||||||||
| Galos, Mike | 1 | ||||||||||
| Gambardella, Matthew | 1 | ||||||||||
| Knorr, Stefan | 1 | ||||||||||
| Kress, Peter | 1 | ||||||||||
| O'Brien, Tim | 2 | ||||||||||
| Ralls, Kim | 1 | ||||||||||
| Randall, Cynthia | 1 | ||||||||||
| Thurman, Paula | 1 | ||||||||||
|
|||||||||||
The results are pretty straight-forward: Log Parser parses the data and presents you with a list of alphabetized authors and the total number of books that were written by each author.
Example #4: Creating Charts
You can also use data from your custom log file to create charts through Log Parser. If I modify the above example, all that I need to do is add a few parameters to create a chart:
logparser "SELECT author AS Author, COUNT(Title) AS Books INTO Authors.gif FROM 'C:\sample\books.log' GROUP BY Author ORDER BY Author" -i:COM -iProgID:Generic.LogParser.Scriptlet -fileType:GIF -groupSize:800x600 -chartType:Pie -categories:OFF -values:ON -legend:ON
The above query will create a chart like the following:
I admit that it's not a very pretty-looking chart - you can look at the other posts in my Log Parser series for some examples about making Log Parser charts more interesting.
Summary
In this blog post and my last post, I have illustrated a few examples that should help developers get started writing their own custom input format plug-ins for Log Parser. As I mentioned in each of the blog posts where I have used scriptlets for the COM objects, I would typically use C# or C++ to create a COM component, but using a scriptlet is much easier for demos because it doesn't require installing Visual Studio and compiling a DLL.
There is one last thing that I would like to mention before I finish this blog; I mentioned earlier that I had used Log Parser to reformat the sample Books.xml file into a generic log file that I could use for the examples in this blog. Since Log Parser supports XML as an input format and it allows you to customize your output, I wrote the following simple Log Parser query to reformat the XML data into a format that I had often seen used for text-based log files:
logparser.exe "SELECT id,publish_date,author,title,price INTO books.log FROM books.xml" -i:xml -o:tsv -headers:ON -oSeparator:"|"
Actually, this ability to change data formats is one of the hidden gems of Log Parser; I have often used Log Parser to change the data from one type of log file to another - usually so that a different program can access the data. For example, if you were given the log file with a pipe ("|") delimiter like I used as an example, you could easily use Log Parser to convert that data into the CSV format so you could open it in Excel:
logparser.exe "SELECT id,publish_date,author,title,price INTO books.csv FROM books.log" -i:tsv -o:csv -headers:ON -iSeparator:"|" -oDQuotes:on
I hope these past few blog posts help you to get started writing your own custom input format plug-ins for Log Parser.
That's all for now. ;-)
Note: This blog was originally posted at http://blogs.msdn.com/robert_mcmurray/
Creating "Pretty" XML using XSL and VBScript
06 July 2012 • by Bob • Scripting, XML
I was working with an application recently that stored all of its settings in a large XML file, however, when I opened the XML in Windows Notepad, all I saw was a large blob of tags and text - there was no structured formatting to the XML, and that made it very difficult to change some of settings by hand. (Okay - I realize that some of you are probably thinking to yourselves, maybe I wasn't supposed to be editing those settings by hand - but that's just the way I do things around here... if I can't customize every setting to my heart's content, then it's just not worth using.)
In any event, I'll give you an example of what I mean by using the example XML database that's provided on MSDN at the following URL:
http://msdn.microsoft.com/en-us/library/windows/desktop/ms762271.aspx
Note - the entire XML file would be too long to repost here, so I'll just include an unstructured except from that file that resembles what my other XML looked like when I opened the file in Windows Notepad:
<?xml version="1.0"?><catalog><book id="bk101"><author>Gambardella, Matthew</author><title>XML Developer's Guide</title><genre>Computer</genre><price>44.95</price><publish_date>2000-10-01</publish_date><description>An in-depth look at creating applications with XML.</description></book><book id="bk102"><author>Ralls, Kim</author><title>Midnight Rain</title><genre>Fantasy</genre><price>5.95</price><publish_date>2000-12-16</publish_date><description>A former architect battles corporate zombies, an evil sorceress, and her own childhood to become queen of the world.</description></book><book id="bk103"><author>Corets, Eva</author><title>Maeve Ascendant</title><genre>Fantasy</genre><price>5.95</price><publish_date>2000-11-17</publish_date><description>After the collapse of a nanotechnology society in England, the young survivors lay the foundation for a new society.</description></book></catalog>
This is obviously difficult to read, and even more so when you are dealing with hundreds or thousands of lines of XML code. What would be considerably easier to read and edit would be something more like the following example:
<?xml version="1.0"?>
<catalog>
<book id="bk101">
<author>Gambardella, Matthew</author>
<title>XML Developer's Guide</title>
<genre>Computer</genre>
<price>44.95</price>
<publish_date>2000-10-01</publish_date>
<description>An in-depth look at creating applications with XML.</description>
</book>
<book id="bk102">
<author>Ralls, Kim</author>
<title>Midnight Rain</title>
<genre>Fantasy</genre>
<price>5.95</price>
<publish_date>2000-12-16</publish_date>
<description>A former architect battles corporate zombies, an evil sorceress, and her own childhood to become queen of the world.</description>
</book>
<book id="bk103">
<author>Corets, Eva</author>
<title>Maeve Ascendant</title>
<genre>Fantasy</genre>
<price>5.95</price>
<publish_date>2000-11-17</publish_date>
<description>After the collapse of a nanotechnology society in England, the young survivors lay the foundation for a new society.</description>
</book>
</catalog>
I had written a "Pretty XML" script sometime around ten years ago that read an XML file, collapsed all of the whitespace between tags, and then inserted CRLF sequences and TAB characters in order to reformat the file. This script worked great for many years, but I decided that it would be more advantageous to use XSL to transform the XML. (e.g. "Why continue to do things the hard way when you really don't need to?");-]
With that in mind, I rewrote my old script as the following example:
' ****************************************
' MAKE PRETTY XML
' ****************************************

Option Explicit

Const strInputFile = "InputFile.xml"
Const strOutputFile = "OutputFile.xml"

' ****************************************

Dim objInputFile, objOutputFile, strXML
Dim objFSO : Set objFSO = WScript.CreateObject("Scripting.FileSystemObject")
Dim objXML : Set objXML = WScript.CreateObject("Msxml2.DOMDocument")
Dim objXSL : Set objXSL = WScript.CreateObject("Msxml2.DOMDocument")

' ****************************************
' Put whitespace between tags. (Required for XSL transformation.)
' ****************************************

Set objInputFile = objFSO.OpenTextFile(strInputFile,1,False,-2)
Set objOutputFile = objFSO.CreateTextFile(strOutputFile,True,False)
strXML = objInputFile.ReadAll
strXML = Replace(strXML,"><",">" & vbCrLf & "<")
objOutputFile.Write strXML
objInputFile.Close
objOutputFile.Close

' ****************************************
' Create an XSL stylesheet for transformation.
' ****************************************

Dim strStylesheet : strStylesheet = _
    "<xsl:stylesheet version=""1.0"" xmlns:xsl=""http://www.w3.org/1999/XSL/Transform"">" & _
    "<xsl:output method=""xml"" indent=""yes""/>" & _
    "<xsl:template match=""/"">" & _
    "<xsl:copy-of select="".""/>" & _
    "</xsl:template>" & _
    "</xsl:stylesheet>"

' ****************************************
' Transform the XML.
' ****************************************

objXSL.loadXML strStylesheet
objXML.load strOutputFile
objXML.transformNode objXSL
objXML.save strOutputFile

WScript.Quit
This script is really straightforward in what it does:
- Creates two MSXML DOM Document objects:
- One for XML
- One for XSL
- Creates two file objects:
- One for the input/source XML file
- One for the output/destination XML
- Reads all of the source XML from the input file.
- Inserts whitespace between all of the XML tags in the source XML; this is required or the XSL transformation will not work properly.
- Saves the resulting XML into the output XML file.
- Dynamically creates a simple XSL file that will be used for transformation in one of the MSXML DOM Document objects.
- Loads the output XML file from earlier into the other MSXML DOM Document object.
- Transforms the source XML into well-formatted ("pretty") XML.
- Replaces the XML in the output file with the transformed XML.
That's all that there is to it.
Note: For more information about the XSL stylesheet that I used, see http://www.w3.org/TR/xslt.
Note: This blog was originally posted at http://blogs.msdn.com/robert_mcmurray/
Creating XML Reports for FSRM Quota Usage
25 October 2007 • by Bob • Scripting
I had a great question in follow up to the "Secure, Simplified Web Publishing using Microsoft Internet Information Services 7.0" webcast that I delivered the other day, "How you can you programmatically access the quota usage information from the File Server Resource Manager (FSRM)?"
First of all, there is a native API for writing code to access FSRM data detailed at the following URL:
http://msdn2.microsoft.com/en-us/library/bb625489.aspx
That's a bit of overkill if you're just looking to script something.
There is a WMI interface as well, but it’s only for FSRM events.
So that leaves you with a pair of command-line tools that you can script in order to list your quota usage information:
- storrept.exe - Used to manage storage reports
- dirquota.exe - Used to manage quota usage
Right out of the box the first command-line tool, storrept.exe, can generate a detailed XML report using a user-definable scope. To see this in action, take the following example syntax and modify the scope parameter to your desired paths:
storrept.exe reports generate /Report:QuotaUsage /Format:XML /Scope:"C:\"
You can also specify multiple paths in your scope using a pipe-delimited format like:
/Scope:"C:\Inetpub|D:\Inetpub"
When the command has finished, it will tell you the path to your report like the following example:
Storage reports generated successfully in "C:\StorageReports\Interactive".
The XML-based information in the report can then be consumed with whatever method you usually use to parse XML. It should be noted that storrept.exe also supports the following formats: CSV, DHTML, HTML, and TXT.
This XML might be okay for most applications, but for some reason I wanted to customize the information that I received, so I experimented with the second command-line tool, dirquota.exe, to get the result that I was looking for.
First of all, using dirquota.exe quota list returns information in the following format:
Quotas on machine SERVER: Quota Path: C:\inetpub\ftproot Source Template: 100 MB Limit (Matches template) Quota Status: Enabled Limit: 100.00 MB (Hard) Used: 1.00 KB (0%) Available: 100.00 MB Peak Usage: 1.00 KB (10/25/2007 2:15 PM) Thresholds: Warning ( 85%): E-mail Warning ( 95%): E-mail, Event Log Limit (100%): E-mail, Event Log
This information is formatted nicely and is therefore easily parsed, so I wrote the following batch file called "dirquota.cmd" to start things off:
@echo off echo Processing the report... dirquota.exe quota list > dirquota.txt cscript.exe //nologo dirquota.vbs
Next, I wrote the following vbscript application called "dirquota.vbs" to parse the output into some easily-usable XML code:
Option Explicit

Dim objFSO, objFile1, objFile2
Dim strLine, strArray(2)
Dim blnQuota,blnThreshold

' create objects
Set objFSO = WScript.CreateObject("Scripting.FileSystemObject")
Set objFile1 = objFSO.OpenTextFile("dirquota.txt")
Set objFile2 = objFSO.CreateTextFile("dirquota.xml")

' start the XML output file
objFile2.WriteLine "<?xml version=""1.0""?>"
objFile2.WriteLine "<Quotas>"

' set the runtime statuses to off
blnQuota = False
blnThreshold = False

' loop through the text file
Do While Not objFile1.AtEndOfStream

  ' get a line from the file
  strLine = objFile1.ReadLine

  ' only process lines with a colon character
  If InStr(strLine,":") Then
    ' split the string manually at the colon character
    strArray(1) = Trim(Left(strLine,InStr(strLine,":")-1))
    strArray(2) = Trim(Mid(strLine,InStr(strLine,":")+1))

    ' filter on strings with parentheses
    strLine = strArray(1)
    If InStr(strLine,"(") Then
      strLine = Trim(Left(strLine,InStr(strLine,"(")-1)) & "*"
    End If

    ' process the inidivdual entries
    Select Case UCase(strLine)

      ' a quota path signifies a new record
      Case UCase("Quota Path")

        ' close any open threshold collections
        If blnThreshold = True Then
          objFile2.WriteLine "</Thresholds>"
        End If

        ' close an open quota element
        If blnQuota= True Then
          objFile2.WriteLine "</Quota>"
        End If

        ' signify a new quota element
        objFile2.WriteLine "<Quota>"

        ' output the relelvant information
        objFile2.WriteLine FormatElement(strArray(1),strArray(2))

        ' set the runtime statuses
        blnQuota= True
        blnThreshold = False

      ' these bits of informaiton are parts of a quota
      Case UCase("Source Template"), UCase("Quota Status"), _
          UCase("Limit"), UCase("Used"), _
          UCase("Available"), UCase("Peak Usage")

        ' close any open threshold collections
        If blnThreshold = True Then
          objFile2.WriteLine "</Thresholds>"
        End If

        ' set the runtime status
        blnThreshold = False

        ' output the relelvant information
        objFile2.WriteLine FormatElement(strArray(1),strArray(2))

      ' these bits of informaiton are thresholds
      Case UCase("Warning*"), UCase("Limit*")

        ' open a threshold collection if not already open
        If blnThreshold = False Then
          objFile2.WriteLine "<Thresholds>"
        End If

        ' output the relelvant information
        objFile2.WriteLine FormatElement( _
          Left(strLine,Len(strLine)-1), _
          Replace(Mid(strArray(1), _
          Len(strLine))," ","") & " " & strArray(2))

        ' set the runtime status
        blnThreshold = True

    End Select
  End If
Loop

' close any open threshold collections
If blnThreshold = True Then
  objFile2.WriteLine "</Thresholds>"
End If

' close an open quota element
If blnQuota= True Then
  objFile2.WriteLine "</Quota>"
End If

' end the XML output file
objFile2.WriteLine "</Quotas>"

objFile1.Close
objFile2.Close
Set objFSO = Nothing

' format data into an XML element
Function FormatElement(tmpName,tmpValue)
  FormatElement = "<" & Replace(tmpName," ","") & _
  ">" & tmpValue & "</" & Replace(tmpName,Chr(32),"") & ">"
End Function
When the batch file and vbscript are run, they will create a file named "dirquota.xml" which will resemble the following example XML:
<?xml version="1.0"?>
<Quotas>
  <Quota>
    <QuotaPath>C:\inetpub\ftproot</QuotaPath>
    <SourceTemplate>100 MB Limit (Matches template)</SourceTemplate>
    <QuotaStatus>Enabled</QuotaStatus>
    <Limit>100.00 MB (Hard)</Limit>
    <Used>1.00 KB (0%)</Used>
    <Available>100.00 MB</Available>
    <PeakUsage>1.00 KB (10/25/2007 2:15 PM)</PeakUsage>
    <Thresholds>
      <Warning>(85%) E-mail</Warning>
      <Warning>(95%) E-mail, Event Log</Warning>
      <Limit>(100%) E-mail, Event Log</Limit>
    </Thresholds>
  </Quota>
</Quotas>
I found the above XML much easier to use than the XML that came from the storrept.exe report, but I'm probably comparing apples to oranges. In any event, I hope this helps someone with questions about FSRM reporting.
Have fun!
Note: This blog was originally posted at http://blogs.msdn.com/robert_mcmurray/
