Command-Line Utility to Create BlogEngine.NET Password Hashes
31 January 2015 • by Bob • BlogEngine.NET
I ran into an interesting predicament the other day, and I thought that both the situation and my solution were worth sharing. Here's the scenario: I host websites for several family members and friends, and one of my family member's uses BlogEngine.NET for her blog. (As you may have seen in my previous blogs, I'm a big fan of BlogEngine.NET.) In any event, she forgot her password, so I logged into the admin section of her website, only to discover that there was no way for me to reset her password – I could only reset my password. Since it's my webserver, I have access to the physical files, so I decided to write a simple utility that can create the requisite SHA256/BASE64 password hashes that BlogEngine.NET uses, and then I can manually update the Users.xml file with new password hashes as I create them.
With that in mind, here is the code for the command-line utility:
using System;
using System.Collections.Generic;
using System.Linq;
using System.Security.Cryptography;
using System.Text;
using System.Threading.Tasks;

namespace BlogEnginePasswordHash
{
  class Program
  {
    static void Main(string[] args)
    {
      // Verify that a single argument was passed to the application...
      if (args.Length != 1)
      {
        // ...if not, reply with generic help message.
        Console.WriteLine("\nUSAGE: BlogEnginePasswordHash <password>\n");
      }
      // ...otherwise...
      else
      {
        // Retrieve a sequence of bytes for the password argument.
        var passwordBytes = Encoding.UTF8.GetBytes(args[0]);
        // Retrieve a SHA256 object.
        using (HashAlgorithm sha256 = new SHA256Managed())
        {
          // Hash the password.
          sha256.TransformFinalBlock(passwordBytes, 0, passwordBytes.Length);
          // Convert the hashed password to a Base64 string.
          string passwordHash = Convert.ToBase64String(sha256.Hash);
          // Display the password and it's hash.
          Console.WriteLine("\nPassword: {0}\nHash: {1}\n", args[0], passwordHash);
        }
      }
    }
  }
}
That code snippet should be pretty self-explanatory; the application takes a single argument, which is the password to hash. Once you enter a password and hit enter, the password and it's respective hash will be displayed.
Here are a few examples:
C:\>BlogEnginePasswordHash.exe "This is my password"

Password: This is my password
Hash: 6tV+IGzvN4gaQ0vmCWNHSQ0UQ0WgW4+ThJuhpXR6Z3c=

C:\>BlogEnginePasswordHash.exe Password1

Password: Password1
Hash: GVE/3J2k+3KkoF62aRdUjTyQ/5TVQZ4fI2PuqJ3+4d0=

C:\>BlogEnginePasswordHash.exe Password2

Password: Password2
Hash: G+AiJ1Cq84iauVtdWTuhLk/xBGR0cC1rR3n0tScwWyM=

C:\>
Once you have created password hashes, you can paste those into the Users.xml file for your website:
<Users>
  <User>
    <UserName>Alice</UserName>
    <Password>GVE/3J2k+3KkoF62aRdUjTyQ/5TVQZ4fI2PuqJ3+4d0=</Password>
    <Email>alice@fabrikam.com</Email>
    <LastLoginTime>2015-01-31 01:52:00</LastLoginTime>
  </User>
  <User>
    <UserName>Bob</UserName>
    <Password>G+AiJ1Cq84iauVtdWTuhLk/xBGR0cC1rR3n0tScwWyM=</Password>
    <Email>bob@fabrikam.com</Email>
    <LastLoginTime>2015-01-31 01:53:00</LastLoginTime>
  </User>
</Users>
That's all there is to do. Pretty simple stuff.
Note: This blog was originally posted at http://blogs.msdn.com/robert_mcmurray/
Using the WebDAV Redirector with OneDrive Part 2 - Two-Step Verification
30 September 2014 • by Bob • WebDAV, OneDrive, SkyDrive
This blog is Part 2 of a series about mapping a drive letter to your OneDrive account. In Part 1 of this series, I showed you how to map a drive letter to your OneDrive account when you are using standard security, and in this blog I will show you how to map a drive letter to your OneDrive account after you have enabled two-step verification for your account security. The process is largely similar, with the notable exception that you need to generate an application password which you will use when you are mapping the drive letter with the WebDAV Redirector.
A quick note about two-step verification: enabling this security feature adds an additional requirement so that you will need to use a secondary method to verify your identity when you are logging in. (For example, you can use a phone app, text message, or second email account.) However, you cannot use a secondary login method when you are using the WebDAV Redirector, so you will need to create an application password. (Note: More information about two-step verification for your Microsoft is available in the Two-step verification: FAQ.)
Step 1 - Log Into Your OneDrive Account
The first thing that you need to do is to browse to 
Your Customer ID is the value that is specified after the "cid=" in the URL; for example: "https://onedrive.live.com/?cid=426f62526f636b73". You will need this value when you map a drive letter.
Step 3 - Generate an Application Password
To map a WebDAV drive to your OneDrive account after you have enabled two-step account verification, you will need to generate an application password which you will use when you enter your credentials. (Note: More information about two-step verification can be found in the App passwords and two-step verification article.)
To generate an application password, you first need to log into your Microsoft account settings at 
Once you have logged in, click on Security & password and then Create a new app password:
When the app password page is displayed, copy the password for later:
Step 4 - Map the Drive Letter
Your next step is to map the drive letter, and there are a few ways to do this. I have documented several methods in my Using the WebDAV Redirector article on the IIS.net website, but I will show a few ways in this blog.
Method #1 - Using the Windows User Interface and Wizards
On most of my systems I have the Network and This PC or My Computer icons on my desktop, which makes it easy to simply right-click one of those icons and select Map network drive:
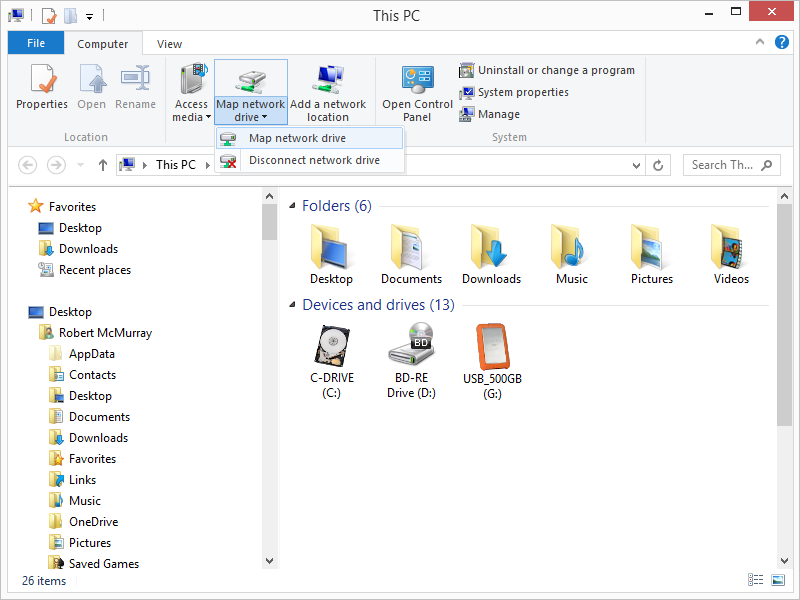
An alternate method on Windows 8 is to open This PC and Map network drive will be listed as an icon on the Windows Explorer ribbon:
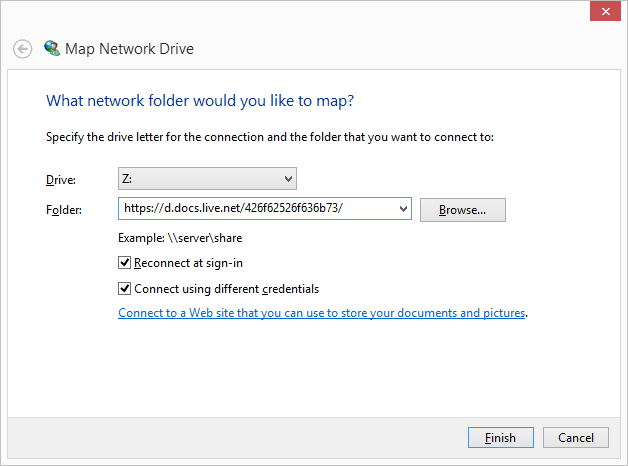
Once the Map Network Drive Wizard appears, enter "https://d.docs.live.net/" followed by your Customer ID from Step 2. For example: "https://d.docs.live.net/426f62526f636b73/"
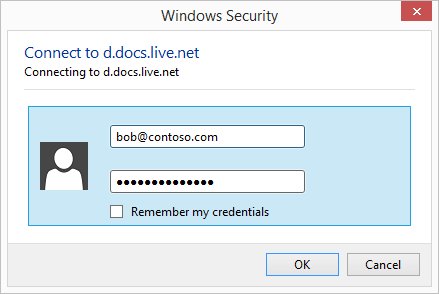
When the Windows Security dialog box appears, enter your email address that you used to log into your OneDrive account in Step 1 and the application password that you created in Step 3.
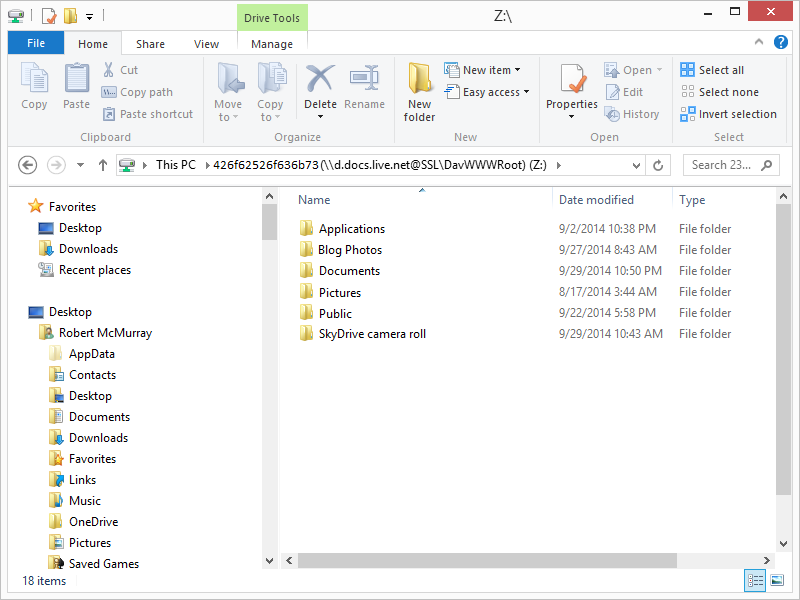
Once the mapping has been completed, you will be able to view your OneDrive files in Windows Explorer via the mapped drive:
Method #2 - Using the Windows Command Line
You can also map a WebDAV drive letter to your OneDrive account from a command line. The general syntax is listed below:
|
For example:
C:\>net use * https://d.docs.live.net/426f62526f636b73/ /user:"bob@contoso.com" "426f62526f636b73" C:\>dir Volume in drive Z has no label. Volume Serial Number is 0000-0000 Directory of Z:\ 09/02/2014 10:38 PM <DIR> Applications 09/27/2014 08:43 AM <DIR> Blog Photos 09/29/2014 10:50 PM <DIR> Documents 08/17/2014 03:44 AM <DIR> Pictures 09/22/2014 05:58 PM <DIR> Public 09/29/2014 10:43 AM <DIR> SkyDrive camera roll C:\> |
That wraps it up for Part 2 of this blog series - I hope this helps!
Note: This blog was originally posted at http://blogs.msdn.com/robert_mcmurray/
Using the WebDAV Redirector with OneDrive Part 1 - Standard Security
30 September 2014 • by Bob • WebDAV, OneDrive, SkyDrive
If you have read some of my previous blog posts and IIS.NET articles about WebDAV, you will see that I often use the WebDAV Redirector that is built-in to Windows in order to connect to various WebDAV websites. This allows me to access my files via a mapped drive letter, which also enables me to use WebDAV with applications that do not have native WebDAV support. (Like Visual Studio.) I'm also a big fan of OneDrive, but sometimes I'm on a legacy system where I don't have OneDrive installed. With that in mind, I thought that I would put together a quick blog series to show you how to map a drive letter to your OneDrive files.
In Part 1 of this series, I will show you how to map a drive letter to your OneDrive account by using standard security. In Part 2 of this series, I will show you how to map a drive letter to your OneDrive account after you have enabled two-step verification for your account security.
Step 1 - Log Into Your OneDrive Account
The first thing that you need to do is to browse to 
Your Customer ID is the value that is specified after the "cid=" in the URL; for example: "https://onedrive.live.com/?cid=426f62526f636b73". You will need this value when you map a drive letter.
Step 3 - Map the Drive Letter
Your next step is to map the drive letter, and there are a few ways to do this. I have documented several methods in my Using the WebDAV Redirector article on the IIS.net website, but I will show a few ways in this blog.
Method #1 - Using the Windows User Interface and Wizards
On most of my systems I have the Network and This PC or My Computer icons on my desktop, which makes it easy to simply right-click one of those icons and select Map network drive:
An alternate method on Windows 8 is to open This PC and Map network drive will be listed as an icon on the Windows Explorer ribbon:
Once the Map Network Drive Wizard appears, enter "https://d.docs.live.net/" followed by your Customer ID from Step 2. For example: "https://d.docs.live.net/426f62526f636b73/"
When the Windows Security dialog box appears, enter the email address and password that you used to log into your OneDrive account in Step 1.
Once the mapping has been completed, you will be able to view your OneDrive files in Windows Explorer via the mapped drive:
Method #2 - Using the Windows Command Line
You can also map a WebDAV drive letter to your OneDrive account from a command line. The general syntax is listed below:
|
For example:
C:\>net use * https://d.docs.live.net/426f62526f636b73/ /user:"bob@contoso.com" "P@ssw0rd" C:\>dir Volume in drive Z has no label. Volume Serial Number is 0000-0000 Directory of Z:\ 09/02/2014 10:38 PM <DIR> Applications 09/27/2014 08:43 AM <DIR> Blog Photos 09/29/2014 10:50 PM <DIR> Documents 08/17/2014 03:44 AM <DIR> Pictures 09/22/2014 05:58 PM <DIR> Public 09/29/2014 10:43 AM <DIR> SkyDrive camera roll C:\> |
That wraps it up for Part 1 of this blog series. In Part 2, I will show how to map a WebDAV drive to your OneDrive account after you have enabled two-step verification for your account security.
Note: This blog was originally posted at http://blogs.msdn.com/robert_mcmurray/
Video: What's New with Internet Information Services (IIS) 8: Performance, Scalability, and Security Features
01 September 2012 • by Bob • FTP, IIS, Windows
The folks in the TechEd group have uploaded the video from my "What's New with Internet Information Services (IIS) 8: Performance, Scalability, and Security Features" presentation to YouTube, so you can view the video online.
You can also download the slides and the WMV/MP4 for my presentation at the following URL:
http://channel9.msdn.com/Events/TechEd/NorthAmerica/2012/WSV332
One quick side note: around 38:55 during the video, I had just asked the audience if anyone had used the IIS Configuration Editor, when a tremendous thunderclap resounded outside - this prompted a great laugh from audience members. After the presentation had ended, a couple people came up and jokingly asked how I had managed to stage that so well.
![]()


